
MV Wireless Configuration Guide
Overview
MV cameras include a wireless chip that enables them to operate as wireless clients. When combined with the Meraki MV low-voltage power injector they offer a cost-effective alternative to avoid expensive re-cabling. Refer to installation guide for more information.
Only the second and third generation MV cameras (excluding the MV53X) support wireless configuration.
MV2 cameras can have wireless profiles pushed to them during the wireless onboarding process. For detailed instructions on wireless onboarding for MV2 devices, please refer to the MV2 Wireless Onboarding guide.
Configure wireless settings in the Meraki dashboard, connect the cameras to the LAN to download the configuration, and mount the cameras with power within access point range. MV wireless functionality works with any wireless access point. This guide explains how to configure wireless profiles for the MV.
Wireless configurations are designed to serve as the camera's primary uplink connection, not as a backup for the LAN. They are not intended to act as a failover for MV connectivity.
MV wireless configuration is intended as the camera’s primary uplink method after pre-staging. MV cameras do not fail over from Ethernet to Wi-Fi if the wired LAN connection fails. SSID failover applies only after the camera is operating wirelessly; the camera can move from the Primary SSID to the Secondary SSID, and then to the optional Backup SSID.
Perform the following steps to create wireless profiles for Meraki MV cameras.
- From the Meraki Dashboard, navigate to Cameras > Configure > Camera Profiles.
- Select Wireless Profiles from the options.
- All SSID profiles created for the Dashboard network will be listed, along with options to create new profiles. You can DUPLICATE, EDIT, or DELETE existing profiles.

WPA3-PSK is supported only on the MV13, MV23, MV33, MV63, MV73, and MV93 series. Ensure the camera is running MV 6.2.2 or later.
- Select Add Wireless Profile. Configure the new profile by choosing the security protocol and filling out the required credentials.
- The only supported WPA-Enterprise EAP type is TTLS. Certificate-based authentication is not supported. The Outer Identity is automatically set to the camera's wireless MAC address. The camera's wireless MAC address is offset by +1 from its base Ethernet MAC address.
- The following characters are not supported: \ , " and non-printable ASCII characters.

- Click Save to store the new wireless profile. The profile will be available for all Meraki MV cameras within the Dashboard network.
Under the Wireless section of a specific camera, wireless profiles can be added and edited as well.
WPA3 Support
The MV13, MV23, MV33, MV63, MV73, and MV93 series will support WPA-3 Personal Standard with MV 6.2.2+ firmware.
Applying Wireless Profiles
Ensure the camera remains connected for 30 minutes after applying the wireless profile during pre-staging for wireless deployment.
Perform the following steps to apply wireless profiles to Meraki MV cameras.
Start by using a wired connection to download the configuration.
- From the Meraki Dashboard, navigate to Cameras > Monitor > Cameras.
- Select one or more cameras from the list page via its checkbox.
- Select Assign > Wireless profile.
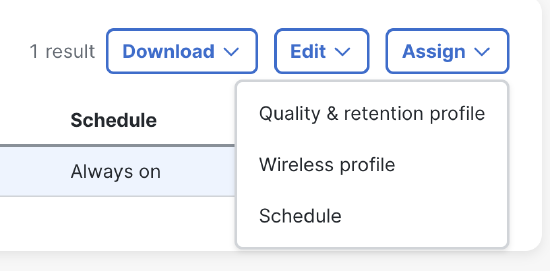
- From the wireless profile window, select a Primary and Secondary SSID. A third Backup SSID is optional.
You must select two SSID profiles. Applying a primary profile is not allowed. Multiple SSID profiles enable failover scenarios. The Meraki MV prioritizes the primary SSID and will automatically failover to the secondary and then the backup SSID.
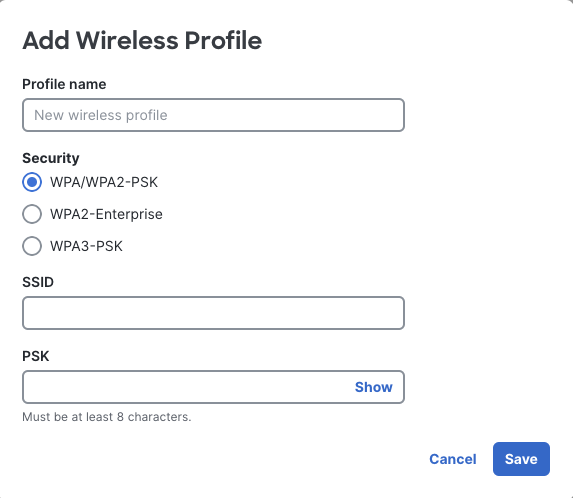_image.png?revision=3)
- After selecting the two SSID profiles, click Next. Confirm that all cameras have the correct SSID profiles, then click Assign.

- After saving the changes, the selected cameras will automatically update their configuration. Keep the cameras connected for approximately 30 minutes.
- Next, mount the cameras with power and ensure they are within the range of the access points providing the wireless profiles.
- Refer to the next section to check the wireless configuration status using the dashboard.

In the Wireless section of a specific camera, you can adjust wireless settings on a per-device basis.
Check Wireless Configuration Status on Dashboard
You can monitor the wireless configuration status of your cameras in two locations: the list page and under the Network page of each camera.
On the list page
In the list page under Cameras > Monitor > Cameras, you can add the following six columns to display the wireless connectivity status.


The Wireless Enabled column indicate whether wireless is enabled or disabled. The Configured SSIDs column lists the primary, secondary, and optional backup SSIDs. If wireless is enabled, the SSID column displays the connected SSID. The Signal Strength and WPA State columns indicate the wireless connectivity status.
On the camera’s Network page
In the Network tab of each camera under the Wireless section, you can view details such as the camera's LAN IP, public IP, gateway, DNS, SSID, and signal strength.

Remove Wireless Profile from a camera
Perform the following steps to remove a wireless profile from a specific camera.
- From the Meraki dashboard, navigate to Cameras > Monitor > Cameras.
- Select a camera from the list page.
- Select Settings > Wireless.
- Select Remove Profiles.
