
MV Desk Occupancy (Deprecated)
Desk Occupancy is no longer supported. For an alternative solution to understand area occupancy, please visit MV Presence Sensing.
Overview
Meraki Desk and Room Occupancy provides our users with greater visibility into physical space and advanced insights of their facilities. Room Occupancy detects the number of people in the room which can be used to keep track of the utilization grade of the premises. For Desk Occupancy the algorithm maps detected people to detected desks to determine occupancy state for each individual desk.
Desk and room occupancy is available on MV32 fisheye cameras. An MV Sense license is required to configure and send the MQTT output of the Desk Occupancy model.
Get Most Out of the Office Space – in Real-Time and Long Term
Key Insights
-
Which desks are currently available?
-
Which meeting rooms are available?
-
Are meeting rooms too crowded or not used enough?
-
How well is the office space utilized?
-
How can the utilization be improved?
Data Provided
-
Occupancy is reported every minute
-
Available through MQTT
-
Desk occupancy: For each desk defined on floor plan the occupancy can be mapped
-
Meeting room occupancy: For each room occupancy will be detected
How It Works
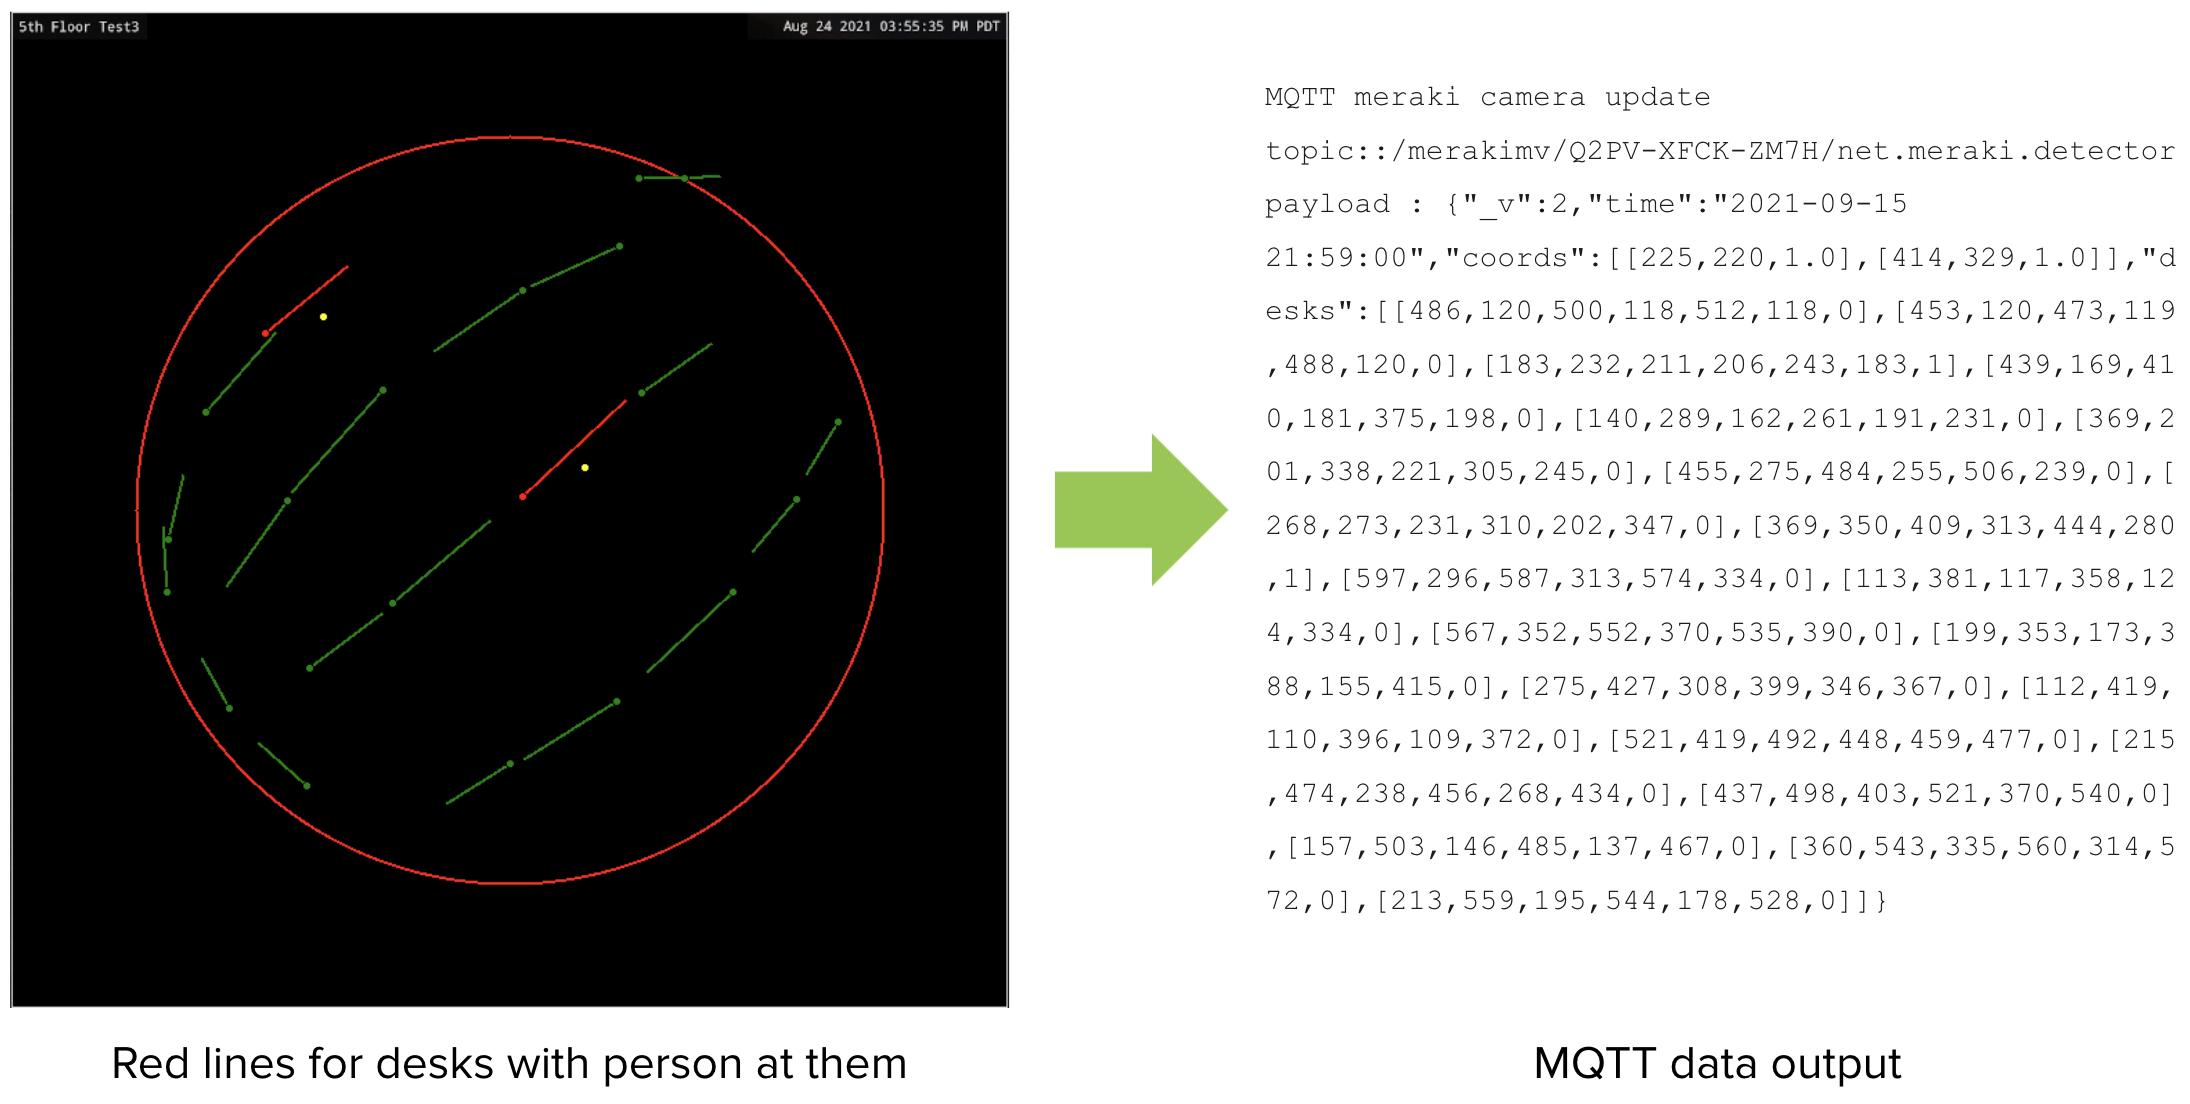
The Desk and Room Occupancy is collected from configured cameras several times a minute and sends aggregated occupancy metrics out via MQTT. These occupancy metrics can be used to show current occupancy on a floor plan, and historical occupancy in diagrams.
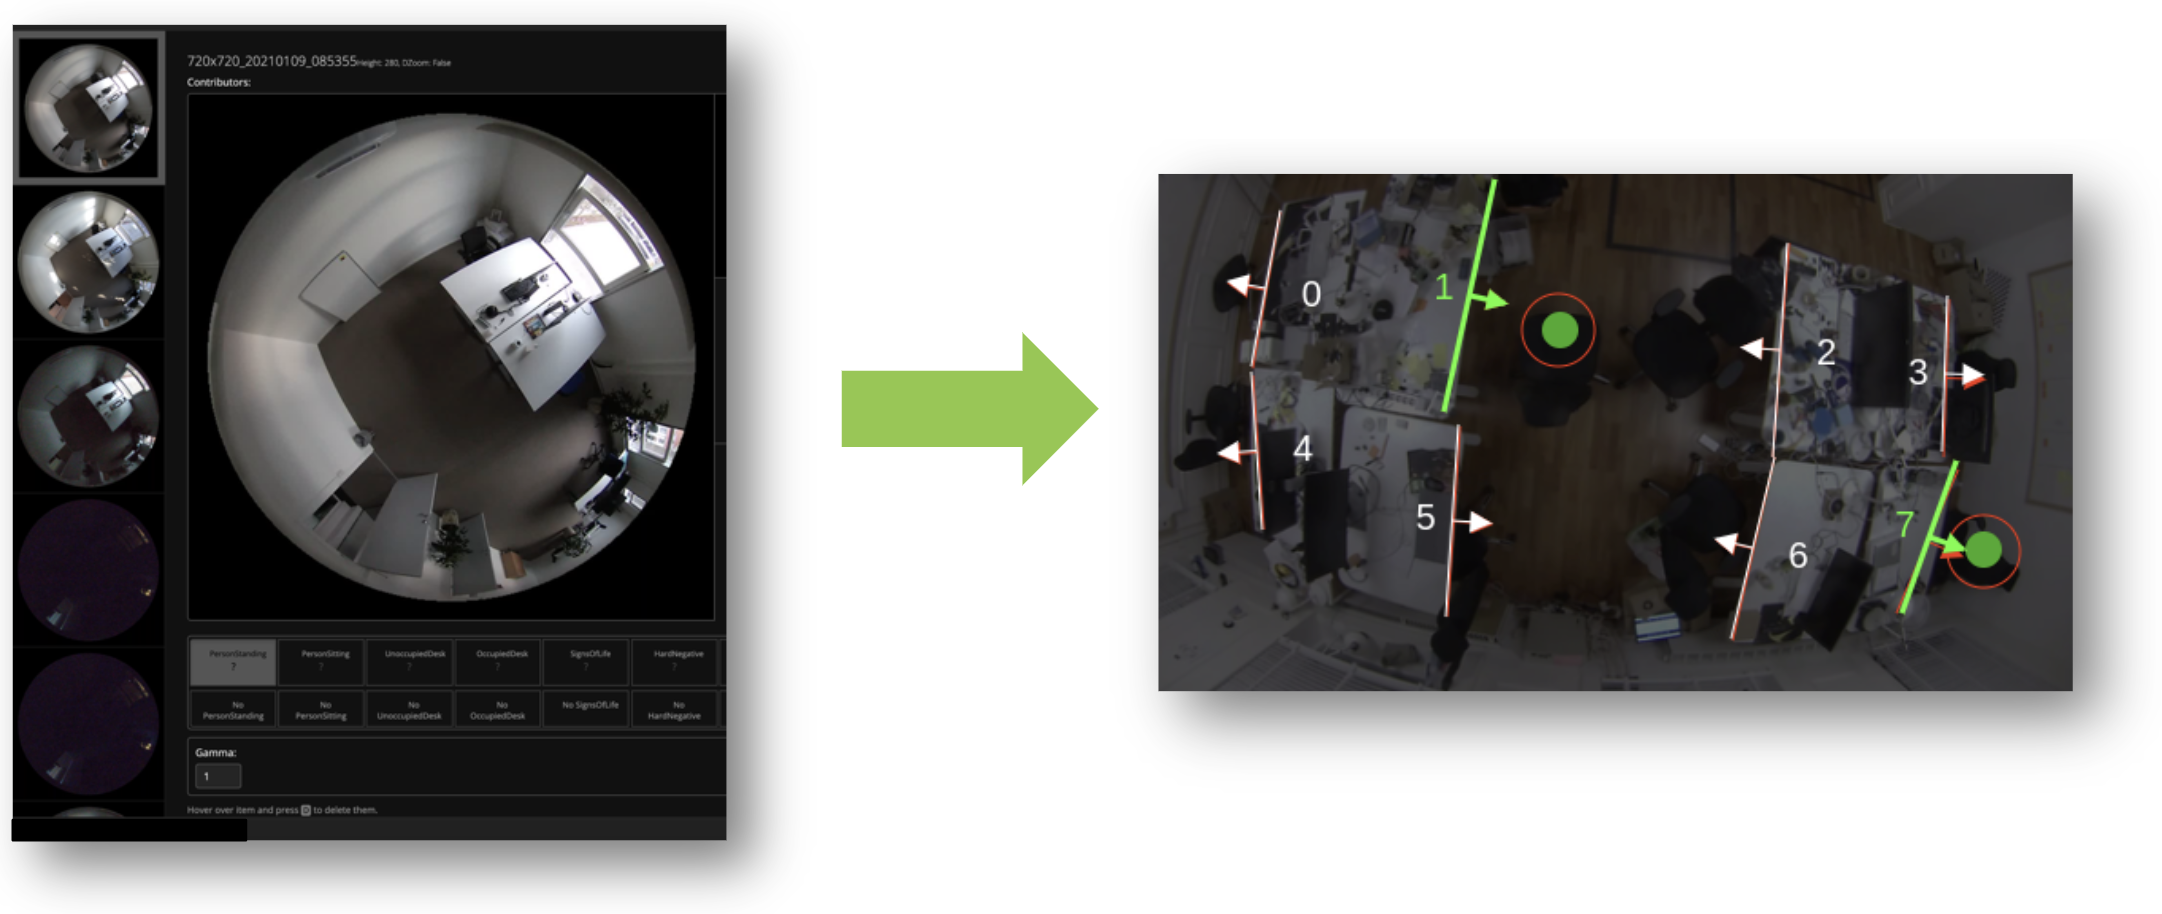
The solution uses a machine learning with a neural network model that is trained to detect desks and people. From the cameras field of view the algorithm is able to identify desks and if there is a person sitting at the desk. Fully anonymously, the camera provides coordinates of the detected objects over MQTT. There is a standard algorithm that will give occupancy data, but for the best performance it is recommended to allow site specific data collection for a limited period of time, to train the algorithm on the actual installation environment.
Configuring Desk Occupancy in the Meraki Dashboard
On a MV32 camera, the Desk Occupancy model can be enabled in the MV Sense settings:
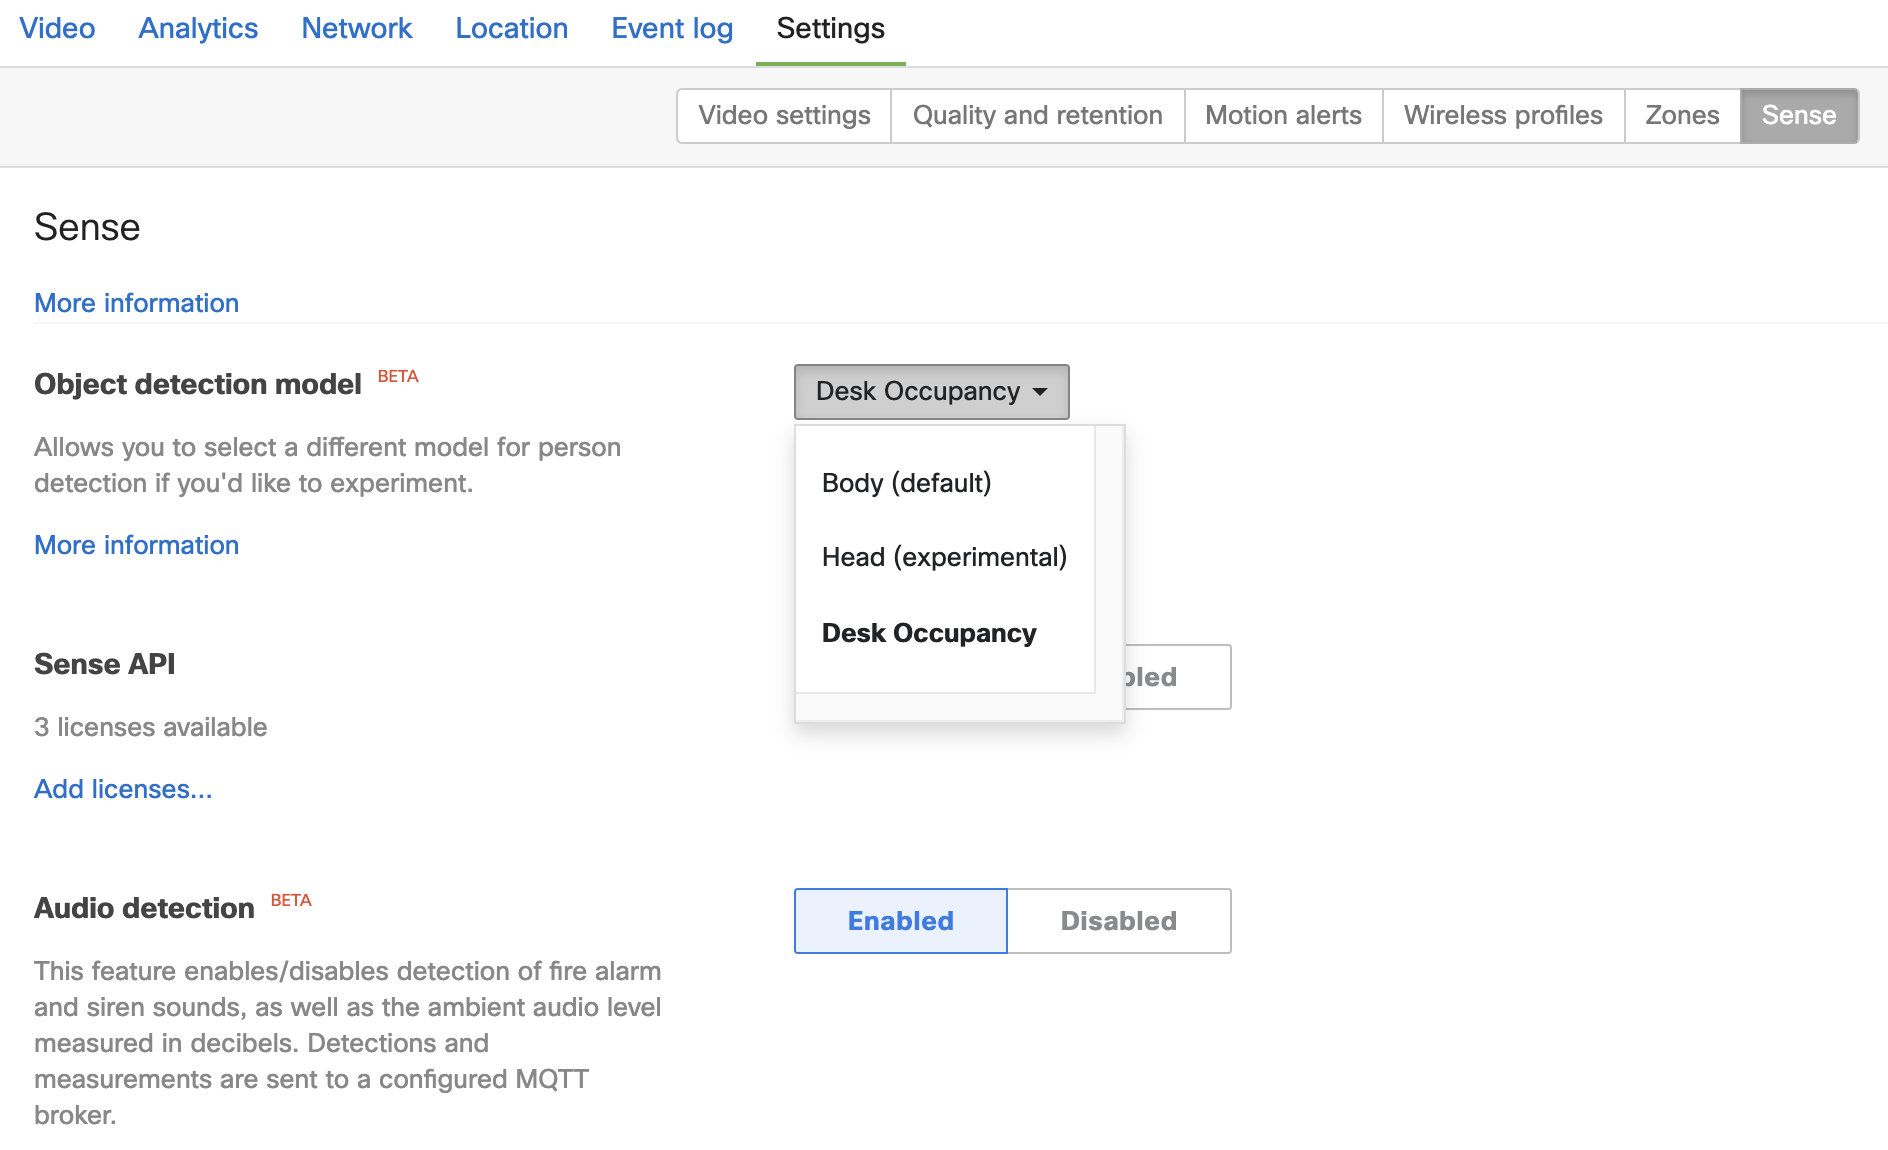
Select 'Desk Occupancy' from the Object detection model dropdown, enable the Sense API, and configure the appropriate MQTT Broker configuration to send occupancy data to.
Note: an MV Sense license is required to enable and configure MV Sense API capabilities. Each Organization has ten free MV Sense licenses by default.
Planning
For desk and room occupancy, most of the office area needs to be covered by cameras mounted in the ceiling. To calculate the number of cameras needed, it is important to understand the environment and adjust camera positions to find the best way to cover all desks (and meeting rooms). Make sure to have read through the information below before you start planning.
Information Needed
Before you begin detailed planning of desk occupancy monitoring, consider the following questions:
-
How will occupancy data be used for this location?
-
Will the desks always remain in the same positions, or should the office be covered to enable re-arrangements
Checklist
To prepare appropriately for a Desk Occupancy deployment, ensure the following items are gathered:
|
What |
Why |
|
Floor plans |
It is important to have an up-to-date floor plan, preferably showing desk positions for easier planning. |
|
Mount heights |
The mount height is required to properly calculate coverage and can be different from the ceiling height in cases with a very high ceiling or lots of obstructing elements in the ceiling. In these cases the cameras might have to be mounted on mounting sticks for better view. |
|
Office layout |
For the planning to be as accurate as possible the full layout of the space is important. Furniture or building elements like tall shelves, half walls or low hanging lamp armatures can severely affect the camera view. Photos or videos of the office area will help the planning. A site survey highlighting all possible issues is ideal to get accurate planning. |
|
Areas of interest |
Before planning and installation be sure to consider if the entire office should be covered to allow future re-arrangements of furniture or if only the current desk areas should be covered. What about coffee areas? Lounge areas? |
|
Combined information gives more |
The Desk and Room Occupancy can be combined with humidity trackers, security cameras and much more to get an even broader overview of the office area. |
Camera Coverage
Camera coverage for top down facing mounting varies only with mount height. While the fisheye lens in MV32 has close to 180 degrees view, the objects at the rim of the view will be small and distorted to a point where the neural network can no longer detect them.
In open office areas with many desks, there needs to be several cameras to cover the area. A small overlap is needed to ensure that desks between two cameras will be well detected.
For installation, a camera can be assumed to have a coverage at floor level as seen in the table below. Note that these values are approximates and may be higher or smaller depending on the required accuracy and precision:
|
Mount height |
Coverage radius |
Area Coverage |
|
2.6 m / 8.5 ft |
2.7 m / 9.0 ft |
23 m² / 255 sq ft |
|
2.8 m / 9.2 ft |
3.2 m / 10.8 ft |
34 m² / 367 sq ft |
|
3.0 m / 9.8 ft |
3.8 m / 12.6 ft |
46 m² / 500 sq ft |
|
3.2 m /10.4 ft |
4.4 m / 14.4 ft |
60 m² / 653 sq ft |
|
3.4 m / 11.1 ft |
4.9 m / 16.2 ft |
76 m² / 826 sq ft |
Get Started with Desk Occupancy
The first step is to plan and position the cameras to cover the office area. To show individual desks occupancy status, the physical camera positions then have to be mapped onto a digital floor plan. Once the physical installation is complete, it is recommended to allow for image collection from the cameras in order to fine tune the machine learning model to the specific site and location.
This tool can be used for the planning: mvplanning.meraki.com
Here is a user guide for the Planning tool: Planning Tool Userguide
When planning is done it can be downloaded and shared with the team that will install the cameras on site, to show all mounting positions.
The data output from the cameras can be configured to be presented in a user interface in collaboration with Meraki Eco-system partners.
If you are interested in learning more about Desk Occupancy for your location, please contact us at desk-occupancy-meraki@cisco.com.