
Automatic NAT Traversal for Auto VPN Tunneling between Cisco Meraki Peers
Automatic NAT traversal is the default method used to establish a secure IPsec tunnel between Cisco Meraki VPN peers. This method relies on the Cloud to broker connections between remote peers automatically. It is the preferred method because it works well even when peers are located on different private networks protected by a firewall and NAT.
The connection types below use Automatic NAT traversal. It is not an option when peering an MX or Z-series device to a 3rd-party IPsec peer.
- Teleworker VPN (MR to VM concentrator) - Configured under VM concentrator > Configure > VM settings (VM Concentrator) and monitored with VM concentrator > Monitor > VM status > Tools > SSID status (VM Concentrator)
- Teleworker VPN or L3 roaming (MR to MX) - Configured under Security & SD-WAN > Configure > Wireless concentrator (MX) and monitored on the Test connectivity button under Wireless > Configure > Access control > Addressing and traffic (MR)
- Site-to-site VPN (MX/Z to MX/Z) - Configured under Security & SD-WAN > Configure > Site-to-site VPN and monitored under Security & SD-WAN > Monitor > VPN status

How does Automatic NAT Traversal Work?
Automatic NAT traversal works by leveraging the Cloud to broker connections between remote peers. The peer connection process is handled in two phases, the registration phase and the connection phase. A technique called "UDP hole punching" is used to establish the peer-to-peer connection.
During the registration phase, peers contact the VPN registry located in the Cloud. Each peer registers their public IP address and UDP port for incoming and outgoing IPsec traffic with the Cloud. They also download the public IP addresses and UDP ports of other registered remote peers.
In the connection phase, peers use information obtained during registration to establish an IPsec tunnel with each other directly. If a peer is located behind a firewall and NAT, the local peer attempts to punch a hole in the firewall by sending outbound packets to a remote peer. These outbound packets create a session on the local firewall which allow the remote peer to send packets inbound successfully.
Note: IPsec tunnels between peers never traverse the Cloud. The VPN registry simply acts as a broker allowing peers to exchange connection-specific information. The actual IPsec tunnel is always peer-to-peer.
UDP is the transport for IPsec connections. Peers contact the VPN Registry on UDP port 9350-9381. Each peer will dynamically choose a UDP source port between 32768-61000. During registration this dynamically chosen UDP port is distributed to remote peers and used by the local peer for incoming and outgoing IPsec traffic. Essentially a local peers source port will be a remote peers destination port and vice versa. Figures 1 through 3 below provide a visual representation of how Automatic NAT traversal uses "UDP hole punching" to allow both peers to establish an IPsec tunnel through a firewall and NAT.
Note: Services that direct traffic to the HA pair should be configured with the virtual IP address of the HA pair, not the individual WAN IP addresses of the primary and spare MXs.
Figure 1. Registration Phase: Peers register with the Cloud.
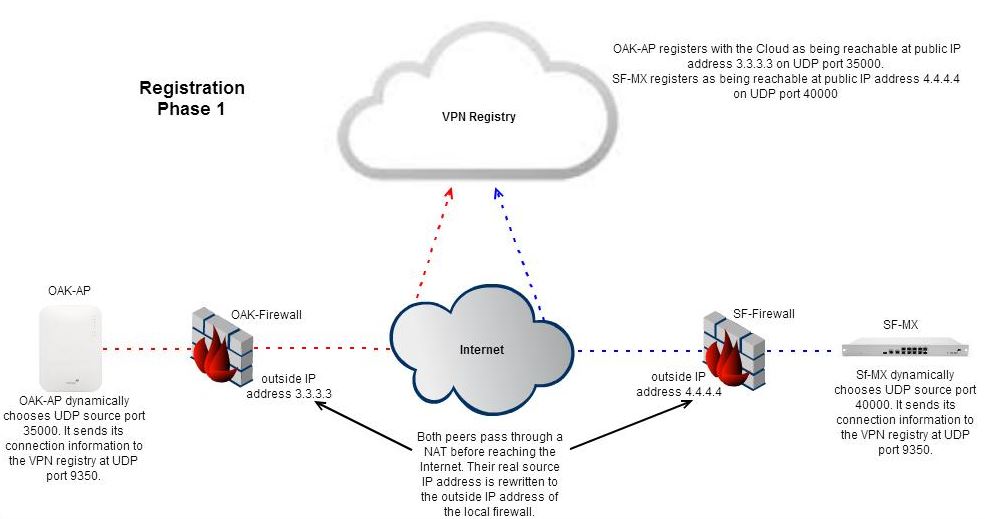
Figure 2. The Cloud brokers the connection between peers.

Figure 3. Connection phase: Peers use UDP hole punching to establish an IPsec tunnel.


Automatic NAT Traversal Requirements
The UDP ports below are used by Automatic NAT traversal. When peers are directly connected to the Internet with a public IP address and not protected by a transparent firewall or when peers are behind a firewall and NAT that allow all outbound traffic and does not perform load balancing, no further configuration is necessary on upstream security systems. In this case the tunnel should be established and all peers will show up as connected in Dashboard. However in the case that your Cisco Meraki peer resides behind a restrictive firewall the following connection types are required.
To contact the VPN registry:
- Source UDP port range 32768-61000
- Destination UDP port range 9350-9381
For IPsec tunneling:
- Source UDP port range 32768-61000
- Destination UDP port range 32768-61000
Related article: Troubleshooting Automatic NAT traversal