
Configuring DHCP Relay
Dynamic Host Configuration Protocol (DHCP) allows a client device to automatically obtain the information for services and configuration necessary to operate on a given network. To initiate this protocol, the client first sends out a broadcast packet called a DHCP Discover, contextualized below:

DHCP Discovers are restricted to a broadcast domain and cannot be routed. However, it is unnecessary to have a DHCP server for each subnet. DHCP relay agents (aka. iphelper) can be used to send these DHCP Discover packets to an appropriate DHCP server in a different broadcast domain using unicast.
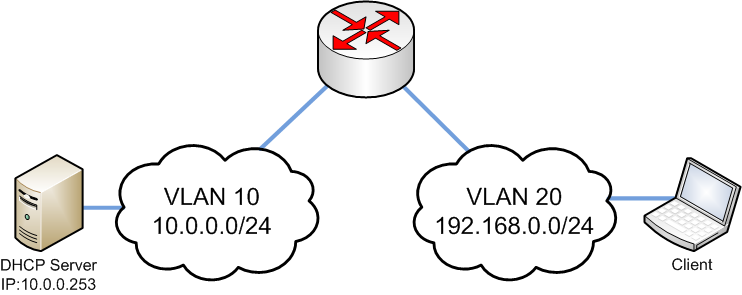
In the following example, there are two VLANs behind a Layer 3 networking device which limits the broadcast domain. Because the client resides on VLAN 20 and is configured for a 192.168.0.0/24 address space, its DHCP discover packets cannot traverse the routing hop to the DHCP server on VLAN 10, which is configured for a 10.0.0.0/24 address space:
However, the DHCP Discover from the client can reach the DHCP server if the routing device is configured to act as a DHCP relay between VLAN 10 and VLAN 20 in the above example.
The Cisco Meraki MX security appliance supports the ability to configure DHCP relay on a per-subnet basis. For example, an MX in this example network should have the following configuration:

Note: The MX must have VLANs enabled in order to relay DHCP to another server.
Note: The DHCP server configured must be in a subnet configured on the MX, including directly-connected VLANs, static routes, and subnets participating in Auto VPN. DHCP servers sitting behind a non-Meraki VPN peer are not supported.
Note: If multiple relay servers are configured, the MX will forward DHCP requests to them all simultaneously.
Note: If DHCP relay is being configured over Auto VPN, and a default route is being specified with an exit hub or a full-tunnel hub, the hub must still advertise an explicit route to the DHCP server in question.
To enable DHCP relay:
- Navigate to Security & SD-WAN > Configure > DHCP
- Locate the subnet in the list that should have DHCP relay enabled.
- For Client addressing, change the drop-down menu to Relay DHCP to another server.
- In the DHCP server IP box that appears, enter the IP address of the DHCP server that should serve this subnet.
- At the bottom of the page, click Save Changes
Note: The MX will use the LAN IP of the subnet from which the DHCP Discover packet is seen as the source IP when sending DHCP relay requests to a DHCP server across Auto VPN or a static route. If the DHCP relay server is across Auto VPN, VPN participation must be enabled for the VLAN configured with DHCP relay, otherwise seen DHCP discover packets in said VLAN will be dropped; as the VLAN is not permitted through Auto VPN.
See Configuring DHCP services on the MX Security Appliance, Using Packet Capture to Troubleshoot Client-side DHCP Issues, and Configuring DHCP Services on the MX and MS for more information about DHCP.