
vMX and Azure Route Server
Click 日本語 for Japanese
Solution Overview
This document encompasses a detailed step by step guide on deploying the Azure Route Server (Currently in Preview) and Cisco Meraki vMXs hosted in the Azure cloud. BGP is utilized to provide resiliency, symmetry and load sharing across vMXs in the Azure cloud.
Why Azure Route Server
Traditionally, for customers to achieve high availability for Network Virtual Appliances (NVAs) in Azure, an Azure function was utilized to probe the virtual machine connectivity. Based on whether or not a response was seen on the primary VM, the function would rewrite the User Defined Routes in the Azure routing table. This solution technically works, although creates it's own challenges with scalability, manageability and delay.
Additionally, when adding new sites or even new subnets to existing sites you no longer need to manually update the User Defined Routes in the Azure routing table. Because we are now utilizing BGP to exchange reachability while offering redundancy, symmetry (via AS Path manipulation) and loadsharing across multiple NVAs.
Solution Architecture

In the above diagram, the branch MX connects to a pair of vMXs deployed in the same VNET across different Availability Zones for redundancy. EBGP has been configured across the vMXs to the route server virtualRouterIps that will be discussed further later. IBGP is formed on top of Auto VPN directly from the Branch to the respective vMXs in the Azure cloud. AS Path manipulation is used to ensure symmetry for the route to Azure and the route back from Azure, this is done in accordance with the concentrator priority that is configured at the branch MX site to site vpn settings.
Deployment Steps
Deploy Cisco Meraki Network Virtual Appliances (vMXs) from Azure Marketplace
The steps for deploying virtual MXs from the Azure marketplace are out of scope for this document. For more information on deploying virtual MXs from the Azure marketplace please reference the following link: https://documentation.meraki.com/MX/MX_Installation_Guides/vMX_Setup_Guide_for_Microsoft_Azure
Sign in to your Azure account and select the appropriate subscription
From a browser, navigate to the Azure portal and sign in with your Azure account.
Create a resource group and a vNET (optional)
For the Azure Route Server, a VNET is need in order to host the service. Use the follow command to create a resource group and virtual network. (Use these if you do not already have a virtual network)
Below snippets were taken directly from Azure documentation: https://docs.microsoft.com/en-us/azure/route-server/quickstart-configure-route-server-cli
az group create -n "RouteServerRG" -l "westus"
az network vnet create -g "RouteServerRG" -n "myVirtualNetwork" --address-prefix "10.0.0.0/16"
Next we must create a subnet inside the VNET to host the route server and obtain the subnet ID. Below are the commands to create the subnet followed by the command to obtain the subnet ID.
az network vnet subnet create -g "RouteServerRG" --vnet-name "myVirtualNetwork" --name "RouteServerSubnet" --address-prefix "10.0.0.0/24"
az network vnet subnet show -n "RouteServerSubnet" --vnet-name "myVirtualNetwork" -g "RouteServerRG" --query id -o tsv
Deploy Azure Route Server
-
Sign in to Azure portal, search and select Route Server.
-
Select + Create to create a new route server

3. On the Create a Router Server page, enter the required information:
- Subscription Select the Azure subscription you want to use to deploy the Route Server.
- Resource group Select a resource group to create the Route Server in. If you don't have an existing resource group, you can create a new one.
- Name Enter a name for the Route Server.
- Region Select the region the Route Server will be created in. Select the same region as the virtual network you created previously to see the virtual network in the drop-down.
- Virtual Network Select the virtual network in which the Route Server will be created. You can create a new virtual network or use an existing virtual network. If you're using an existing virtual network, make sure the existing virtual network has enough space for a minimum of a /27 subnet to accommodate the Route Server subnet requirement. If you don't see your virtual network from the dropdown, make sure you've selected the correct Resource Group or region.
- Subnet Once you've created or select a virtual network, the subnet field will appear. This subnet is dedicated to Route Server only. Select Manage subnet configuration and create the Azure Route Server subnet. Select + Subnet and create a subnet using the following guidelines.
- The subnet must be named RouteServerSubnet
- The subnet must be a minimum of /27 or larger.
-
Public IP address Create a new or select an existing Standard public IP resource to assign to the Route Server. To ensure connectivity to the backend service that manages the Route Server configuration, a public IP address is required.
4. Select Review + create, review the summary, and then select Create.
Configure BGP Peering on the Azure Route Server
The below steps have to be performed for both the vMX devices in the two different availability zones as shown in the configuration below.
1. Go to the Route Server deployed in the previous step and select Peers under Settings in the left navigation panel. Select + Add to add a new peer.
2. Select Peers under Settings in the left navigation panel. Then select + Add to add the vMX as a peer.
3. Enter the ASN for your vMX and it's IP address.


Configure BGP on the Cisco Meraki vMX
The next step is for us to enable Auto VPN (set the vMX to be an Auto VPN Hub on the site to site VPN page) and configure the BGP settings on the Azure vMXs. To do so, we need the RouteServer's Peer IPs and ASN. Go to the Routeserver from the Azure portal and obtain the information from the Overview section
Noting in the above you will want to grab the 'Asn' and 'Peer IPs' for the Meraki BGP config.
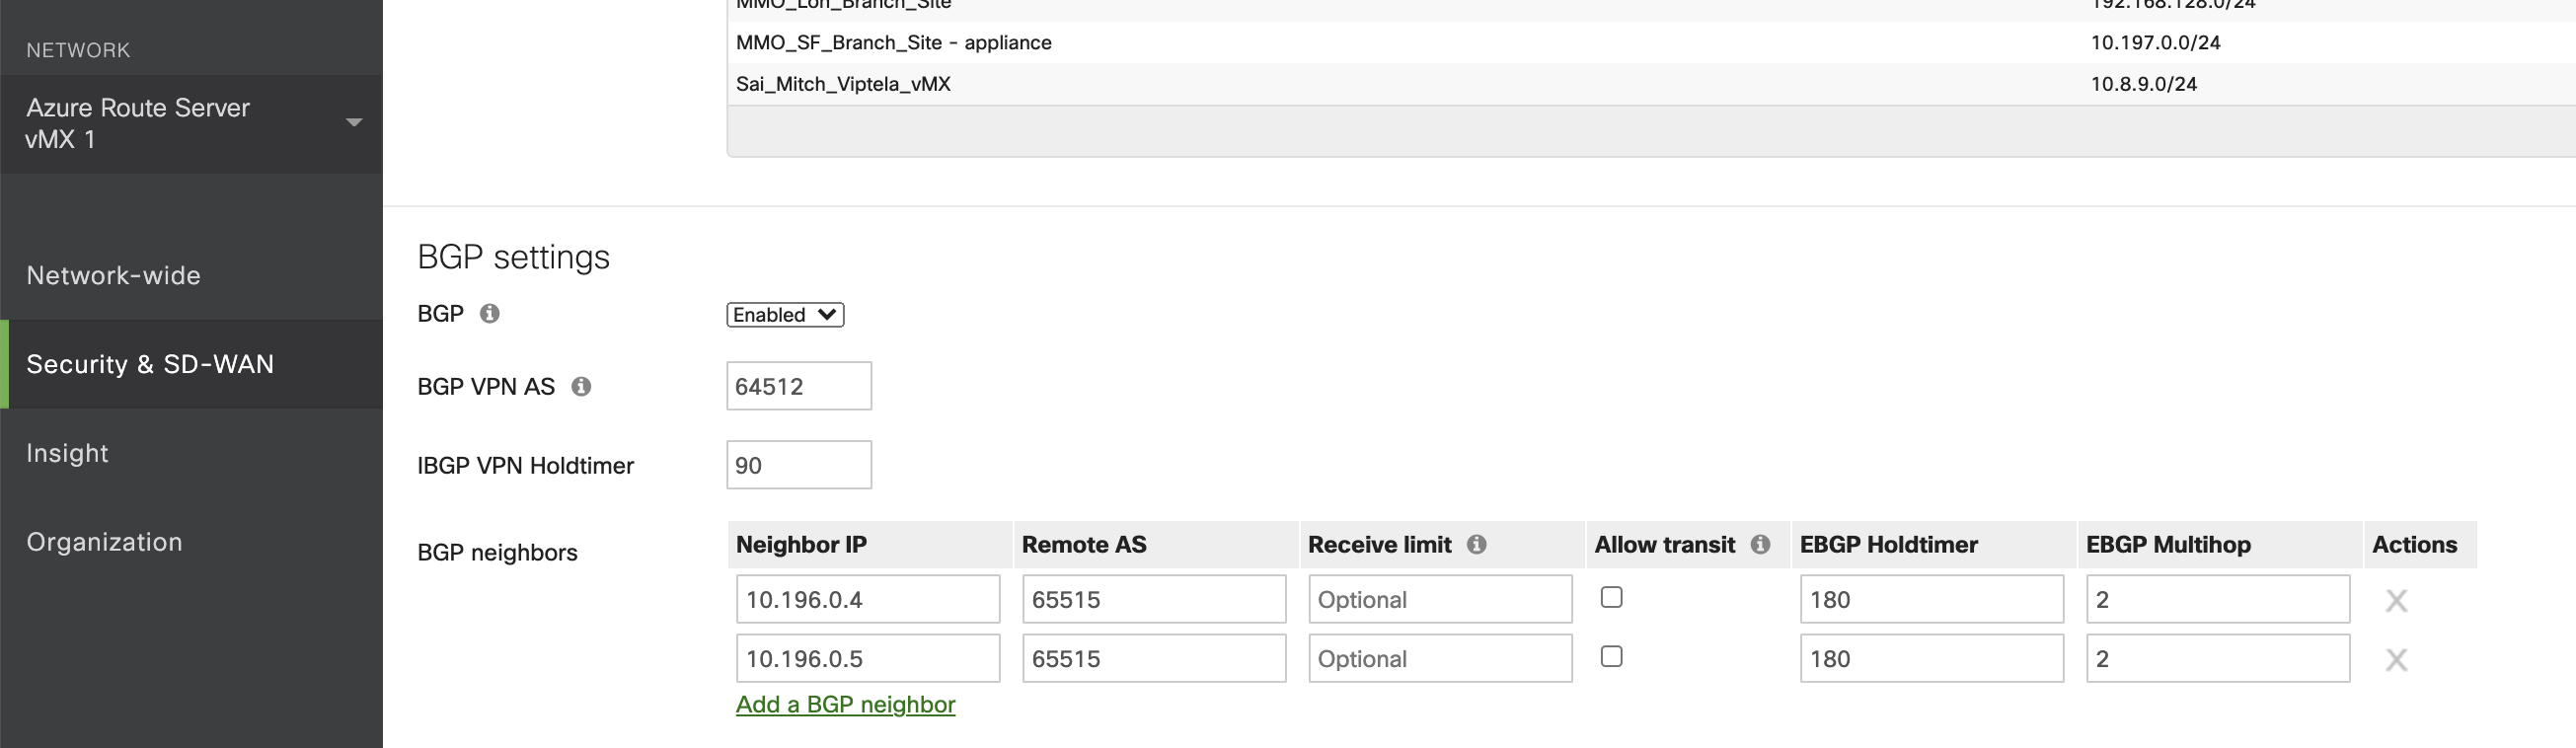
Once these values have been obtained, you will navigate to your virtual appliance in the Meraki Dashboard and navigate to the site to site vpn page, enable Auto VPN by selecting Hub and then scrolling down to the BGP settings.
Select the dropdown to enable BGP and configure your local ASN (The Meraki Auto VPN Autonomous System) and then configure two EBGP peers with the values that you were able to obtain from above. Below is a screenshot of what the BGP config should look like for both your vMXs:
In addition to configuring the BGP settings you will need to add the EBGP peer IPs as local networks on the top of the site to site VPN page. This tells the vMXs that the peer IPs are always reachable through its local Network Interface (NIC) instead of over another VPN tunnel. (This is a requirement for Meraki when Multihop is in play). Below is a screenshot of the local networks on the Azure vMX headends:

Dual Azure vMX to Secure Connect
The diagram at the beginning of the document depicts dual vMX connectivity to MX branch. This same design is applicable to vMXs connecting to Secure cloud such as Secure Connect. This is common design where private resources and applications are hosted in Azure cloud.
Connecting two Azure vMX devices to Secure Connect require few addition configuration steps to ensure stability in the network.
- Once vMX is connected to cloud fabric, it establishes AutoVPN tunnel. The default route is injected and will be propagated to eBGP Route Server. This will cause vMX SD-WAN interface to get default route pointing to the AutoVPN tunnel, instead to Internet. With this AutoVPN tunnel and BGP will start flapping. It is required for SD-WAN interface to always point its default route to Internet. This ensures stable connectivity to Meraki Dashboard and AutoVPN tunnel headend. Configure User Defined Route with Route Table and attach it to any vMX SD-WAN interface.

- Default Route Server BGP Hold-down timer is 180 seconds. Hold-down timer can be configured as lower value on Cisco Meraki NVA (vMX) and will be negotiated with Azure Route Server. Lowering hold-down timer greatly decreases failover time.
- Azure Route Server advertise routes with its own IP address. If Route Server is not in the same subnet as vMX LAN interface, this will cause workloads to be inaccessible. Configure static route to reach route Server IP address via LAN subnet Virtual Gateway.

Advertising identical subnets in to Secure Connect is not supported.
Troubleshooting
When BGP peering between the Cisco Meraki NVA and the route server is flapping, it is typically due to the hold timer settings on the Meraki dashboard. By default, the Keep-alive timer on Azure Route Server is set to 60 seconds and the Hold-down timer is 180 seconds. (as seen in referenced BGP config)
The session between the NVA and the Azure route server must be an EBGP session. This is due to the fact that the Meraki branches and the vMX in Azure have an IBGP relationship. So in order for the branch to receive the Azure subnets the vMX must be configured in a different ASN than the Azure route server.
The Cisco Meraki Events Log is a powerful tool for troubleshooting any BGP issues. For flapping BGP sessions the Meraki event log will display when BGP sessions establish and log the BGP Notification messages that were sent and received. This is useful for troubleshooting flapping routes/sessions. Below is a screenshot that shows some sample BGP logs in the Meraki Dashboard:

The Notification messages displayed above show the RFC error and sub error codes for why a session was brought down. Below is a link to the RFC: https://tools.ietf.org/html/rfc4486
Additionally, these BGP logs can be pulled from the Meraki API for integrating with third party monitoring systems: https://developer.cisco.com/meraki/api-v1/#!get-network-events
For troubleshooting vMX specific issues not related to dynamic routing please refer to the troubleshooting section in the Azure vMX Deployment Guide linked below: https://documentation.meraki.com/MX/MX_Installation_Guides/vMX_Setup_Guide_for_Microsoft_Azure#Troubleshooting
Azure BGP Route Limit
The Azure BGP learned route limit is 1000 routes per peer. This limit is documented by Microsoft in the link below: https://learn.microsoft.com/en-us/azure/route-server/route-server-faq#limitations