
vMX Setup Guide for Microsoft Azure
As of June 26th 2026, new instance types have been enabled in the Azure Marketplace offering for Cisco Meraki vMX. This was due to Microsoft’s announcement to retire the Fs_v2 instance type in Fall of 2028, which directly affected the current recommended instance type for vMX on Azure (F4s_v2).
Microsoft Instance Deprecation Announcement Link: https://azure.microsoft.com/en-us/updates?id=500682
vMX-S should now be deployed on D2_v5 instances, and vMX-M/L should be deployed on D4_v5. It is recommended that users switch over to these new instances as soon as possible to avoid any issues with the coming deprecation.
Please see the FAQ Document for more information on the deprecation.
A 4 Core vCPU instance type is required for IDS/IPS (SNORT) functionality on vMX-M The following Azure instance types will not be able to run the feature:
- D2_v2
- D2_v3
If you are currently using these instance types but also require IDS/IPS (SNORT) functionality, we recommend changing your vMX-M to the F4s_v2 instance type instead.
Overview
This document provides a walkthrough for setting up a virtual MX appliance (vMX) in the Azure Marketplace. After completing the steps outlined in this document, you will have a virtual MX appliance running in the Azure Cloud that serves as an Auto VPN termination point for your physical MX devices.
Note: Some Azure regions require Azure support to enable the ability to deploy the Standard F4s_v2 VM(Virtual Machine) instance type required by the Meraki vMX. The process for requesting access to these regions is documented by Microsoft in the Azure region access request process. Meraki vMX is only supported on instance types mentioned in this KB, other instance types are not supported.
Key Concepts
Before deploying a vMX, it is important to understand several key concepts.
Concentrator Mode
All MXs can be configured in either NAT or VPN concentrator mode. Considerations are relevant and important for both modes. If needed, refer to the article on concentrator modes for more detailed information.
One-Armed Concentrator
In this mode, the MX is configured with a single Ethernet connection to the upstream network. All traffic will be sent and received on this interface.
NAT Mode/Secure Cloud Gateway
In this mode, any traffic coming over to LAN port of the vMX will be NATed to the vMX's WAN IP as it egresses the vMX, while also maintaining its ability to act as a hub for Site-to-Site and Client VPN.
As of MX 19.1, vMX will also support all other NAT Mode and Security features that you would find on a physical MX, enabling the vMX to act as a Secure Gateway for your cloud-hosted resources. Refer to vMX NAT Mode Use Cases and FAQ for more information.
Change in Default Behaviour
All new vMX's deployed post October 31, 2022 will be deployed in Routed/NAT Mode Concentrator by default, existing vMX deployments will not be affected. To use the vMX in passthrough mode, change the deployment settings to Passthrough or VPN Concentrator mode from the Security & SD-WAN > Configure > Addressing & VLANs page.
VPN Topology
There are several options available for the structure of the VPN deployment.
Split Tunnel
In this configuration, branches will only send traffic across the VPN if it is destined for a specific subnet that is being advertised by another MX in the same dashboard organization. The remaining traffic will be checked against other available routes, such as static LAN and third-party VPN routes, and if not matched will be NATed and sent out the branch MX unencrypted.
If users behind remote sites participating in AutoVPN want to reach certain subnets (split tunnel) on the public/private cloud environment, then the vMX will have to be set to passthrough mode. This is so that users can advertise those specific subnets, by configuring them under Security & SD-WAN > Configure > Site-to-Site VPN page of the vMX.
Full Tunnel
In full-tunnel mode, all traffic that the branch or remote office does not have another route to is sent to a VPN hub.
vMXs in NAT mode will not advertise subnets that are available on the public/private cloud, so spoke MXs will have to send all their traffic (full tunnel) to the vMX, which will then NAT the traffic and send it across its WAN interface into the public/private cloud environment.
Azure Cloud Terminology
This document will make reference to several key Azure-specific terms and concepts.
Azure Virtual Network
A virtual network is where a block of associated IP addresses, DNS settings, security policies, and route tables can be configured and managed.
Azure Resource Manager (ARM) and Azure Classic
Azure has different types of virtual network environments, which represent two different methods of deploying and managing Azure virtual environments. The vMX uses managed applications, which is a Microsoft platform, and is not compatible with Azure 'classic' deployments.
Resource group
A resource group is a container within Microsoft Azure's infrastructure where resources such as virtual machines are stored.
Azure-Managed Applications
Managed applications within Azure serve as the network used to manage and support the Cisco Meraki vMX.
Additional Information
During the setup of your vMX instance, or over the course of working within Azure, you may encounter additional terminology which is not defined in this document. To find out more about these terms, and for additional details on the terms listed above, refer to the Microsoft Azure glossary.
vMX is a managed application, and does not support external monitoring applications such as Azure's guest agent which will report an "Agent not ready" status.
Meraki Dashboard Configuration
Begin by creating a new Security Appliance network in your organization. This guide details the process for creating a new network in the Meraki dashboard.
1. Adding license(s) to the Meraki dashboard
The Meraki Dashboard will require a vMX license to be added before you are able to continue. If you do not have access to a vMX license, contact your Meraki reseller or sales representative.
Create a "Security appliance" network type:

Once you have created the "Security appliance" network and added the appropriate license, you will be able to deploy a new vMX to your network by clicking on the 'Add vMX' button:

Before generating the token, verify the firmware is running MX 15.37+, otherwise the upgrade will not occur.
2. Generate the authentication token
After you add the new vMX to your network, navigate to Security & SD-WAN > Monitor > Appliance status and select “Generate authentication token” to generate the token for the Azure "Meraki Authentication Token" data field.

3. Copy the newly generated token and save it.
The newly generated token will be used in the Basics -> Instance details section when creating a new Azure-managed application.
The authentication token must be entered into the Azure instance within one hour of generating it, otherwise a new token must be generated.
Azure Setup
This section describes the configuration of necessary Azure requirements and adding a vMX instance to your Azure virtual network. For more details on setting up an Azure virtual network and other components, refer to Microsoft Azure Documentation.
Before You Begin
You must have the following before you begin:
-
An Azure virtual network (vNET, also known as a VPC - Virtual Private Cloud) where you will deploy the vMX. This vNET and its corresponding resource group can be the same one as the resources you plan to access across the Meraki VPN or a different one. Refer to this Azure document for creating these resources.
-
An "SD-WAN" subnet is required inside the vNET where the vMX will be deployed which is separate from the subnet(s) where the resources you plan to access through the VPN are hosted. Ex. If your apps and resources are located in the "production" subnet, you will deploy a second subnet in the same vNET called "SD-WAN" in which the vMX will be deployed. DO NOT deploy the vMX inside the production subnet alongside the other resources as this can result in a routing loop and packet loss within the Azure environment.
AZURE Documentation States the Following:
Deploy a virtual appliance into a different subnet than the resources that route through the virtual appliance are deployed in. Deploying the virtual appliance to the same subnet, then applying a route table to the subnet that routes traffic through the virtual appliance, can result in routing loops, where traffic never leaves the subnet.
https://docs.microsoft.com/en-us/azure/virtual-network/virtual-networks-udr-overview#user-defined
This section walks you through configuring the necessary requirements within Microsoft Azure, and adding a vMX instance to your resource group. For more details on setting up a resource group and other components, refer to Azure's documentation.
Accessing the Offer
Access to the vMX offer. A screenshot of the Marketplace list of Cisco Meraki vMX in Azure is included below:

The same vMX offer is also available via Cloud Solution Providers (CSP) program on Azure.
Deployment Steps
For NAT mode deployments, refer to vMX NAT Mode Use Cases and FAQ.
From the Marketplace listing, click on "Create."
After creating, you will be prompted to configure basic settings for the managed app.

Project Details
-
Subscription: Select the Subscription for Billing
-
Resource group: Create a new resource group with any name or select an existing resource group
Instance Details
-
VM name: Enter a name for your Cisco Meraki vMX VM.
-
Meraki authentication token: Paste the token previously generated on the Meraki dashboard
-
Region: Select the region where the vMX will be deployed.
-
Password: A password required for Azure deployment. This is required for the managed app on Azure as a mandatory input variable, the vMX firmware doesn't use this password and is ignored. A default value (e.g., MerakivMX1234!@) can be used.
- Zone: Select the appropriate Availability Zone (AZ) for the region selected above
Note: Basic SKU public IP addresses in Azure will be deprecated on 30 September 2025. After this date, it will be necessary to set up a security policy to forward traffic in the standard SKU instead. For more information, please refer to this note from Azure: Upgrade to Standard SKU public IP addresses in Azure
All vMX deployed after December 2024 will automatically use the Standard SKU, so no action will need to be taken. If your vMX was deployed before that date, you will need to re-deploy the vMX on Azure to switch over to the Standard SKU. No changes need to be made to the vMX on the Meraki Dashboard.
Not all regions on Azure support Availability Zones (AZ). Select “NONE” for zones that don’t support AZs. If a zone is selected for a region that does not support AZs, the deployment will fail.

Failure details:

Managed Application Details
-
Application name: Choose a name for your Cisco vMX managed application
-
Managed resource group: Name for the managed resource group, which will hold all the resources that are required by the vMX managed application
After completing the basic settings configuration, go to the next step, “Deployment Details.”
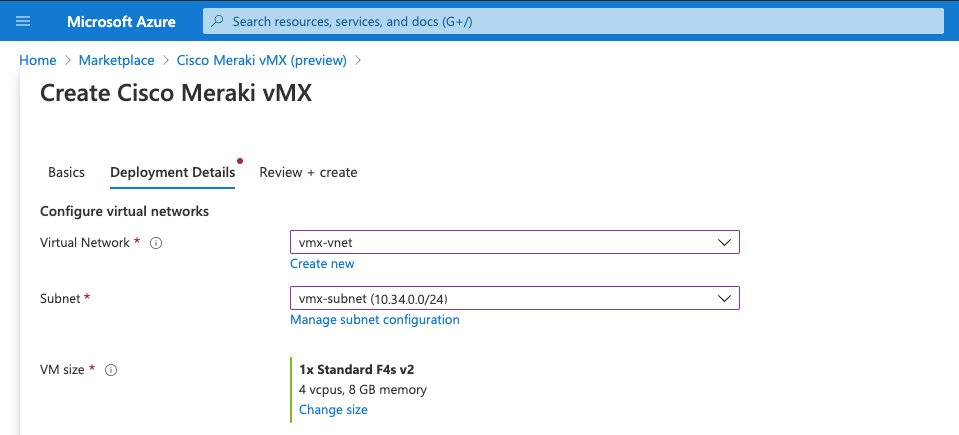
Deployment Details
-
Configure virtual networks
-
Virtual network: Choose an existing virtual network from the list.
-
Subnet: Choose the SD-WAN subnet mentioned above in which the vMX will be deployed; if needed, refer to the article for more information about subnets in Azure. The subnet chosen here must be different from the subnet where resources you plan to access and route through the vMX are deployed.
-
-
VM size: Choose the VM size based on the vMX SKU you want to deploy using vMX comparison datasheet . For best performance, the new instance type of "D2_v5" should be used to deploy vMX-S. vMX-M/L should be deployed on "D4_v5".
NOTE: As of 06/29/2026, the F4s_v2 is no longer the recommended version to run vMX. This is due to Microsoft's announced deprecation of this instance type, and the ongoing capacity issues in some regions. See FAQ: Azure Retirement of vMX Instance Type for more information on this.
Cisco Meraki recommends moving to the new D2_v5 for vMX-S or D4_v5 for vMX-M/L as soon as possible.

Next, review the deployment details and licensing information and select "Create."

After you click on "Create," the deployment will begin.

It may be several minutes before the deployment completes and the instance launches. 
Once the vMX is online, a route table needs to be created including the Auto VPN subnets so that the Azure resources know how to access the Meraki subnets over Auto VPN.
Additional Azure Route Table Configuration
To create a route table, click on "New" and then "Route Table."

Next, define the “Basics” for the new route table resource.

Route Table Basics
-
Subscription: Select the Subcsription for Billing
-
Resource group: Choose an existing or a new resource group where your instances are present or will be deployed
-
Instance Details
-
Region: Select the region where the route table will be deployed
-
Name: Enter a name for the route table instance
-
Propagate gateway routes: Default is "Yes;" select "no" to prevent the propagation of on-premises routes to the network interfaces in associated subnets
-
Once the Route Table has been created, add the VPN routes pointing to the vMX as the next hop, including the client VPN subnet where applicable:

Ignore the IP forwarding warning; it has already been enabled in the managed application template by default.
Finally, associate the Route Table with the subnet where the resources are deployed (NOT the SD-WAN subnet where the vMX is deployed). Click on "Subnets" and then "Associate". Choose the virtual network and then choose the production subnet(s) where your applications are deployed and click "OK."
Associating the vMX SD-WAN Subnet with the resource subnet's route table causes packet loss.

Once the subnet has been associated, enable site-to-site VPN on dashboard.
On the site-to-site VPN page, add each subnet in your resource group that should be accessible to remote Auto VPN peers to the list of "Local Network(s)." For more information on configuring Auto VPN, refer to the site-to-site VPN settings documentation.
Troubleshooting
The most common problem when deploying a vMX is getting it provisioned and online in the Meraki dashboard in the first place.
Refresh Permissions Error
If you are attempting to make changes to the vMX on the Azure Dashboard but are receiving permissions errors, you are likely running an outdated version of the vMX managed application in Azure. The vMX Managed App permissions were updated to allow for increased control in October of 2020. If your vMX was deployed before that date, follow these steps to update permissions
- Check the Date Created on the Azure vMX.

- If the creation date is before October 2020, delete the Managed Application from Azure and re-deploy the vMX Managed Application.
.png?revision=1)
Unable to reach Meraki Dashboard
If the vMX is unable to reach the dashboard on TCP port 7734, refer to this document on the correct ports/IPs that need to be opened for Meraki dashboard communication.
No "Add vMX" Button
When navigating to Security & SD-WAN > Monitor > Appliance Status, if there is no "Add vMX" button, ensure the following two conditions are met:
- You have available vMX licenses in your license pool.
- You have created a "Security appliance" network type.
(Re)deployment failure
A few common fixes for (re)deployment failures could be:
- updating the VNET DNS settings
- removing any special characters in the name of the vMX
Unable to Delete the Resource Group after Deployment
If the managed application (vMX) was successfully deployed to the Meraki Dashboard, then the managed application must be Deleted on the Meraki Dashboard in order for the resource group to be deleted on Azure. Refer to https://learn.microsoft.com/en-us/az...tions/overview for more information.
If the managed application (vMX) failed to deploy to the Meraki Dashboard and the Azure activity log is showing errors similar to the one below, then a support ticket will need to be logged with Microsoft to check for any hidden resources and/or delete the entire tenant.
Azure activity log: Failed to delete managed application 'instance_name'. Error: Deletion of resource group 'resource_group_name' failed as resources with identifiers 'identifier_name' could not be deleted. The provisioning state of the resource group will be rolled back. The tracking id is 'tracking_id'. Check your audit logs for more details.
Packet loss is seen when accessing resources through the vMX
Ensure that:
- Resources are not deployed in the same subnet as the vMX. Resources must be deployed in different subnets, with a route table applied to resource subnets allowing routing back to spoke sites. vMX also supports eBGP for route distribution with Azure Route Servers.
- The vMX SD-WAN subnet is not associated to a VNET Route Table. The vMX subnet will not require a route table to operate correctly, and associating a route table is known to cause general packet loss.
For more information from Azure: https://docs.microsoft.com/en-us/azure/virtual-network/virtual-networks-udr-overview#user-defined
This may also present as low SMB/CIFS(Server Message Block & Common Internet File System) throughput, as these protocols are extremely sensitive to loss.
AutoVPN Cannot Establish with Peers after Standard SKU Public IP Deployment
Due to Microsoft's retirement of Basic SKU Public IP addresses, vMX devices in Azure may need to be redeployed, or new deployments will use a Standard SKU Public IP address. For a detailed comparison between Basic and Standard SKUs, refer to the following Microsoft Azure article:
https://learn.microsoft.com/en-us/azure/virtual-network/ip-services/public-ip-basic-upgrade-guidance
After deploying with a Standard SKU Public IP, you may find that some AutoVPN tunnels have trouble establishing. This is often due to differences in NAT behavior and source port rewrites by intermediary devices or due to an NSG denying traffic. The Standard SKU Public IP uses a "secure by default" model that is closed to inbound traffic, as described in the Azure documentation above.
To resolve this, you may need to configure a Network Security Group (NSG) attached to the vMX or its subnet to permit inbound and outbound UDP traffic on ports 32768-61000, which is required for AutoVPN tunnel establishment. You can read more about how AutoVPN uses UDP hole-punching to establish tunnels here.
Inbound Services (Client VPN, Port Forwarding) Cannot Connect after Standard SKU Public IP Deployment
As with the issue described above, an Azure Network Security Group (NSG) may need to be applied to the vMX or its subnet to allow the relevant inbound services, depending on your vMX configuration. Below is a quick reference for common services and required ports:
IPsec Client VPN: UDP 500, 4500
Cisco Secure Client: Default TCP 443 (or the port configured under Security & SD-WAN > Client VPN > Cisco Secure Client port)
For any Port Forwarding, 1:Many NAT, or 1:1 NAT configurations, ensure the necessary inbound ports are allowed in the NSG as they are configured for vMXs operating in NAT Mode.
Please note that Meraki Support does not troubleshoot Azure Cloud-specific firewall rules and deployments.