
vMX and Azure vWAN
Overview
This document encompasses a detailed step by step guide on deploying the Azure Virtual WAN and Cisco Meraki vMXs hosted in the Azure cloud. BGP with vWAN Hub is utilized to provide resiliency, symmetry and load sharing across vMXs in the Azure cloud.
Solution Architecture
High Level diagram listed below
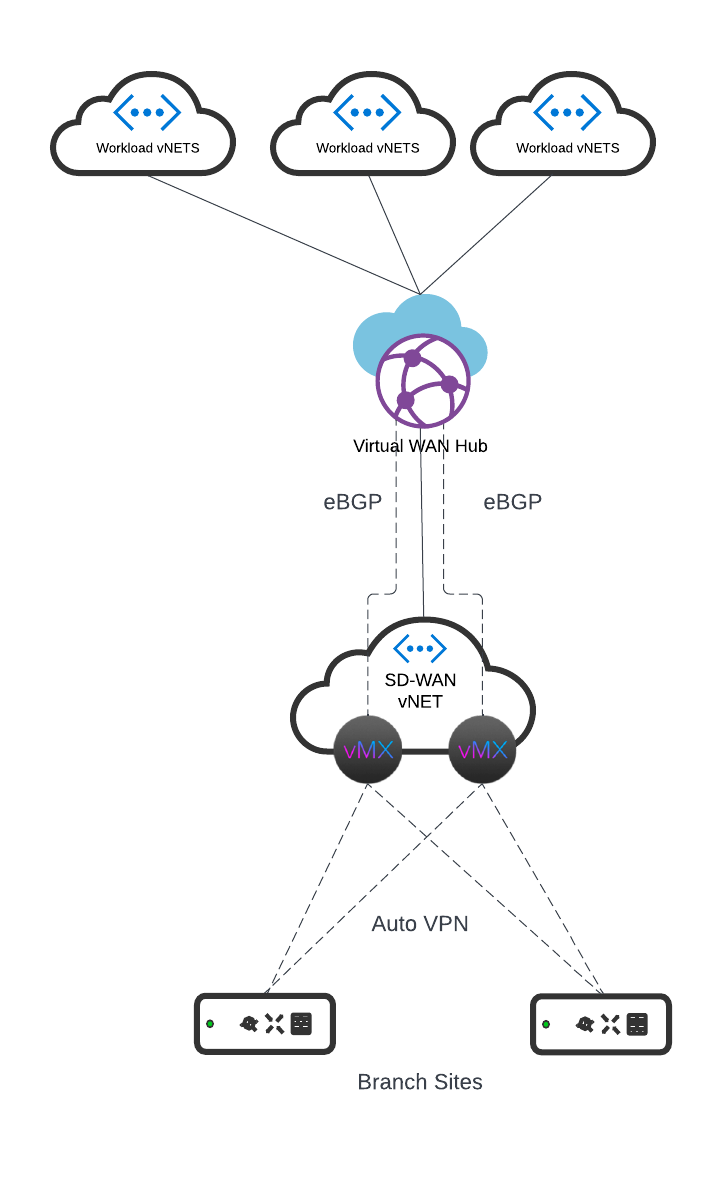
In the above diagram, the branch MX connects to a pair of vMXs deployed in the same VNET across different Availability Zones for redundancy. EBGP has been configured across the vMXs to the vWAN Hub. iBGP is formed on top of Auto VPN directly from the Branch to the respective vMXs in the Azure cloud. AS Path manipulation is used to ensure symmetry for the route to Azure and the route back from Azure, this is done in accordance with the concentrator priority that is configured at the branch MX site to site vpn settings.
Deployment Steps
Step 1) Deploy vMXs from the Azure market place
Deploy two vMXs in the same region across different zones. The steps for deploying virtual MXs from the Azure marketplace are out of scope for this document. For more information on deploying virtual MXs on Azure please refer to the following link: https://documentation.meraki.com/MX/MX_Installation_Guides/vMX_Setup_Guide_for_Microsoft_Azure
These vMX instances would be configured as BGP peers for the vWAN hub.
As part of the post-deployment, please keep a note of the following, they would be used in the subsequent steps:
Name: The name of the vMX instance, example: vmx-acme-vwan
Virtual Network: The network used to deploy the vMX, example: vmx-network
IP Address: The private IP address of the vMX instance, example: 192.168.4.3
Step 2) Create a virtual WAN
-
Login to the Azure portal, in the Search resources bar, type Virtual WAN in the search box and select Enter.
-
Select Virtual WANs from the results. On the Virtual WANs page, select + Create to open the Create WAN page.
-
On the Create WAN page, on the Basics tab, fill in the fields.
-
After you finish filling out the fields, at the bottom of the page, select Review +Create.
-
Once validation passes, click Create to create the virtual WAN.

- Subscription: Select the subscription that you want to use.
- Resource group: Create new or use existing.
- Resource group location: Choose a resource location from the dropdown. A WAN is a global resource and doesn't live in a particular region. However, you must select a region in order to manage and locate the WAN resource that you create.
- Name: Type the Name that you want to call your virtual WAN.
- Type: Basic or Standard. Select Standard.
Step 3) Create a Hub
-
Locate the virtual WAN that you created. On the virtual WAN page, under the Connectivity section, select Hubs.
-
On the Hubs page, select +New Hub to open the Create virtual hub page.
-
On the Create virtual hub page Basics tab, complete the following fields:
- Region: It's the region in which you want to create your virtual hub, this should match to the region in which the vMXs were deployed in.
- Name: The name by which you want the virtual hub to be known.
- Hub private address space: The minimum address space is /24 to create a hub. (should be a separate address space then the one defined when deploying the vMXs)

Step 4) Connect the vMX VNet to the hub
-
Go to your Virtual WAN.
-
In the left pane, under Connectivity, select Virtual network connections.
- On the Virtual network connections page, click +Add connection, to connect the vMXs virtual network to vWAN Hub

- On the Add connection page, configure the required settings.

- Connection name: Name your connection.
- Hubs: Select the hub you want to associate with this connection.
- Subscription: Verify the subscription.
- Resource group: The resource group that contains the VNet for the vMXs.
- Virtual network: Select the virtual network used for the vMX deployment.
- Propagate to none: Leave the default value of No. Connections dynamically propagate routes to a route table. Setting this to true, implies no routes will be propagated from this connection
- Propagate to Route Tables: Select the route tables to dynamically propagate and share the auto-vpn routes with.
- Associate Route Table: You can select the route table that you want to associate, by default you should associate the Default route table.
- Static routes: Leave static routes blank, as we would be using BGP to exchange the routes.
-
Once you've completed the settings you want to configure, select Create to create the connection.
Step 5) Configure BGP on vWAN
-
Open the Azure preview portal using https://aka.ms/azurecortexv2. The BGP peering with Virtual WAN hub feature is currently in managed preview and the configuration pages are not available in the regular Azure portal.
-
On the portal page for your virtual WAN, in the Connectivity section, select Hubs to view the list of hubs. Click a hub to configure a BGP peer.
-
On the Virtual Hub page, under the Routing section, select BGP Peers and click + Add to add a BGP peer.
-
On the Add BGP Peer page, complete all the fields and click Add

- Name – Resource name to identify a specific BGP peer.
- ASN – The ASN for the BGP peer. This would be your Meraki org's ASN.
- IPv4 address – The private IP address of the vMX.
- Virtual Network connection – Choose the connection identifier that corresponds to the Virtual network that hosts the vMXs.
Repeat the above steps for both the vMXs.
Step 6) Configure BGP peering on the vMX
The next step is for us to enable Auto VPN and configure the BGP settings on the Azure vMXs. Before we can configure the BGP settings on the Meraki dashboard we need to obtain the BGP peer settings for the vWAN.
- From the Azure portal select the Virtual WAN that was deployed.
- Select the appropriate vWAN Hub by clicking on it
- From the Overview section, obtain the Virtual Hub Router ASN and Virtual Hub Router Address

4. Once these values have been obtained, you will navigate to your virtual appliance(s) in the Meraki Dashboard and navigate to the site to site vpn page, enable Auto VPN and then navigating to Security & SD_WAN > Configure > Routing to configure BGP.
Enable BGP and configure your local ASN (The Meraki Auto VPN Autonomous System, make sure this matches the peer ASN used in Step 5 and then configure two EBGP peers with the values that you were able to obtain from above. This step needs to be done for both the vMXs. The screenshot below illustrates a BGP configuration for both vMXs. The hold timer is set to the default value of 180 seconds but can be adjusted to a lower value to enable faster failover (minimum of 3 seconds as per RFC 4271).

For eBGP multi-hop, this option is configured per neighbor. This value can be adjusted to peer the concentrator with something multiple hops away in the data center or cloud. If multihop is used AND the eBGP peer is also advertising the IP route that the MX is using to connect to the eBGP peer, 10.15.0.0/24 in the above example. Then this route MUST be added to the list of 'Local Networks' in the 'VPN settings', as shown below:

Step 7) Adding workload vNETs
1. Go to the vWAN deployed in the previous steps
2. Select virtual network connections from the left pane and add a new connection for the workload vNETs

Validation
BGP Session Establishment
Post-deployment, the first thing to check would be to make sure that the BGP session is established between the vMXs and the Azure vWAN Hub. This can be done on the Meraki side by checking the event log for the vMX network to make sure the BGP session has been established.

Route Tables
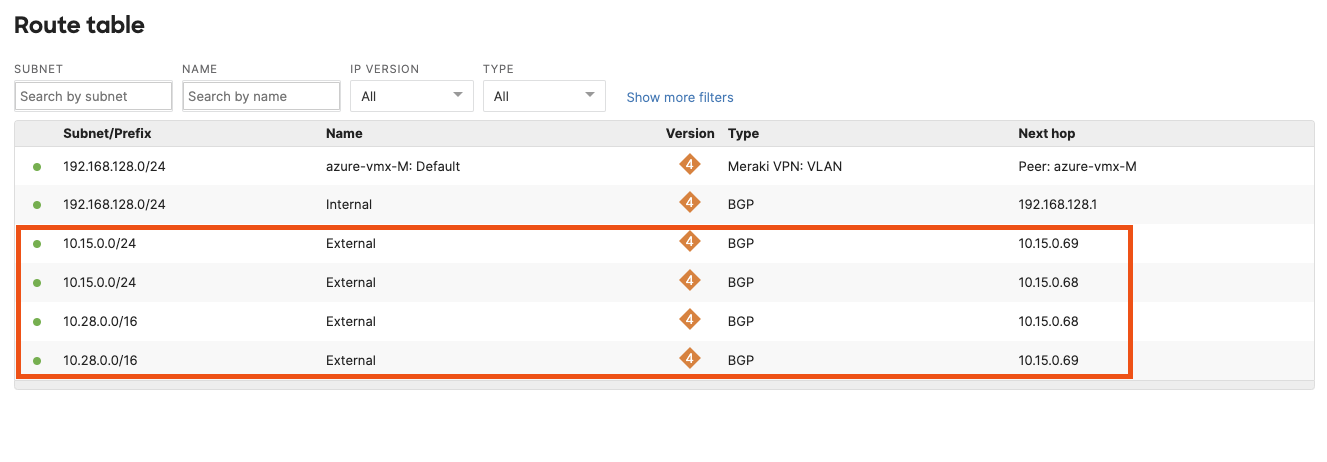
To further verify that BGP session has been established and route exchange is happening as expected look at the vMXs route table. For the vMX network, navigate to Security & SD-WAN > Route Table (click on view new version in the upper right if not already on the new version of the route table).
Similarly, on the Azure console you should be able to see the auto-vpn branch routes learnt by the vWAN Hub with the next-hop as the vMX. To check the vWAN Hub effective routes navigate to Virtual WAN > Virtual WAN Hub > Route tables and Effective Routes. Select the Effective Routes tab and choose the Default Route Table.

You should see the auto-vpn prefixes listed there with the Next Hop Type as HubBGPConnection and the Next Hop as the vMX instance name.
BGP Route Limit
According to Microsoft's documentation, the Azure vWAN has a BGP learned route limit of 4,000 routes per peer, with an overall total limit of 10,000 routes.
References
https://documentation.meraki.com/MX/Networks_and_Routing/BGP
https://docs.microsoft.com/en-us/azure/virtual-wan/scenario-bgp-peering-hub
https://docs.microsoft.com/en-us/azure/virtual-wan/create-bgp-peering-hub-portal#prerequisites
https://documentation.meraki.com/MX/MX_Installation_Guides/vMX_Setup_Guide_for_Microsoft_Azure