Uninstalling Systems Manager and Removing Managed Devices
Click 日本語 for Japanese
Uninstalling Systems Manager from the Client Device
In order for a device to be fully disassociated with a Systems Manager network, the SM agent needs to be removed from the client itself. The following sections detail how to uninstall this application for each major platform.
Please note if a device is removed from the device details page of SM without performing the correct uninstall processes first, all management access for that device is removed, and the device will lose its original enrollment.
This means any profiles, settings, and apps will remain on the device and the dashboard will not be able to remove them. If the device cannot uninstall MDM locally, to remove the settings the device will need to be fully reset using its manufacturer's instructions. Once it has been wiped it can be re-enrolled and can be managed like any new enrollment.
Windows
These instructions may differ based on the version of Windows used. For the most accurate instructions on removing a program, please refer to Microsoft Support.
If a Windows 10 management profile is installed, it can be removed from Windows Settings > Accounts > Work Access.
To uninstall the Systems Manager agent, use the Windows installer available under Systems Manager > Manage > Add Devices in Dashboard. If the installer is not available, the following steps may suffice:
- On the device, navigate to Control Panel > Programs and Features.
- Find the Meraki Systems Manager Agent in the list of programs, right-click and select Uninstall to remove from your system.
If you're unable to remove the agent through the programs list, the commands below can be used to remove the Systems Manager agent software.
Windows Systems Manager agent < 3.1.x removal via command line
Run the following commands via command prompt with administrator privilege. Note, the following commands involve registry edits which contain risk.
sc stop MerakiPCCAgent
sc stop MerakiVNCService

sc delete MerakiPCCAgent
sc delete MerakiVNCService
rd /s /q "C:\Program Files (x86)\Meraki\"
reg delete HKEY_LOCAL_MACHINE\SOFTWARE\Wow6432Node\Meraki /f
Windows Systems Manager agent > 3.1.x removal via command line
Using command prompt, the following command can be run with elevated administrator privilege. If successful, a "ReturnValue" of "0" will be displayed.
wmic product where name="Meraki Systems Manager Agent" call uninstall
Using PowerShell, the following set of commands can be used with administrator privilege. If successful, a "ReturnValue" of "0" will be displayed.
$app = Get-WmiObject -Class Win32_Product -Filter "Name = 'Meraki Systems Manager Agent'"
$app.Uninstall()
$app = Get-WmiObject -Class Win32_Product -Filter "Name = 'Cisco Meraki Endpoint Agent'"
$app.Uninstall()
If a return value other than "0" is displayed the uninstallation attempt failed. ReturnValue of 1603, for instance may be returned if the prompt is not running with elevated Administrator privileges.
macOS
If VPP apps are in use, remove VPP licenses from devices before removing the device from the network.
- To delete the agent: on the Mac, download our uninstaller from Dashboard by navigating to Systems Manager > Manage > Add Device > macOS. Extract this download and run the application to remove Systems Manager from the device.
- To delete the profile: on the Mac, open System Settings > Privacy & Security > Profiles, select the Meraki Management profile and use the subtract button to remove. Older MacOS systems ( < MacOS 13) will need to navigate to System Preferences > Profiles, which will only be shown if at least one configuration profile is installed on the device.
- The profile can also be removed via the dashboard by navigating to Systems Manager > Device, selecting the device(s) that the management profile should be removed from, select the Mobile Security option, then select Unenroll device to trigger an MDM command be sent to the device to remove the enrollment profile. The profile will be removed the next time the device checks in.
If the device has been enrolled via ADE the configuration may prevent management profile removal. To remove management or re-enroll an MacOS device, update the ADE settings in Dashboard to the desired configuration, then factory reset the device. To remove a device from management long term or permanently, release it from ADE via Dashboard or the Apple School Manager / Apple Business Manager portal.
If you no longer have physical access to the device and need to remove the agent, remote commands similar to the following may be used. Please note you are deleting files and executing commands at your risk.
rm -f /Library/LaunchDaemons/com.meraki.agentd.plist
rm -rf /Library/Application\ Support/Meraki
launchctl unload /Library/LaunchDaemons/com.meraki.agentd.plist
Android
Uninstallation steps for Android devices vary slightly by model and OS version, as well as the original enrollment method.
- If the device was enrolled into device owner mode, it can only be unenrolled by factory resetting the device. Note that there is a restriction in Systems Manager > Manage > Settings > More Android that can prevent factory reset on the device. If this restriction is applied, the device can only have the profile completely removed if the device is factory reset through android recovery mode.
- If the device was enrolled with a work profile, first launch the Systems Manager app and remove the work profile from the 'configuration' tab. This will remove the work container and all associated work profile settings and apps.
For KNOX and work profile enrollments, continue with the following steps:
- Navigate on the device to Settings > Security > Device Administrators.
- Select Meraki Systems Manager, then select Deactivate to remove administrative privileges from Systems Manager.
- Navigate to Settings > Applications > Manage Applications or Settings > Apps. If the app is currently running, stop the process first.
- Select Systems Manager, then Uninstall to remove the app from the device.
iOS/iPadOS
If VPP apps are in use, remove VPP licenses from devices before removing the device from the network.
Non ADE enrolled devices
For devices that were enrolled via manual profile installation, the profile can be removed via the UI on the device, or via SM if the device is actively checking in.
UI removal of enrollment profile
-
On the device, navigate to Settings > General > Device Management.
- Select Meraki Management, and select Remove to delete the management profile and any managed configuration profiles installed via SM.
MDM removal of enrollment profile
- On dashboard, navigate to Systems Manager > Device.
- Select the device(s) that the management profile should be removed from.
- Select the command option, then unenroll device to trigger an MDM command be sent to the device to remove the enrollment profile.
ADE enrolled devices (Apple business manager / Apple school manager)
If the device has been enrolled via ADE the configuration may prevent management profile removal. To ensure all management is removed on an iOS/iPadOS device:
- Navigate to Systems Manager > ADE
- Select the device(s) that should be released from management.
- Select the Remove Settings button to remove the profile settings from the device (ADE status should now show 'Empty').
For the new version of the dashboard: Select the Edit button, then under the ADE settings dropdown select "-" to remove the profile settings from the device. - Systems Manager > Monitor > Devices -
- Find the device by serial
- Use the Unenroll command at the top of the page to remove all managed settings, profiles, and managed apps (including licensed VPP apps).
- After the Unenroll command is processed, check the device details to ensure no apps or profiles are still listed,
- It is now safe to remove the device
- Systems Manager > Monitor > Devices page via Edit > Remove from this network.
- Select the Remove Device button to remove the device(s) from the dashboard device list (the device will remain enrolled in Apple Business Manager / Apple School Manager).
- Factory reset the device.
- Once reset, the device will not prompt for remote management.
Once a device is removed from the Systems Manager > Monitor > Devices page, Systems Manager can no longer manage it. To ensure a smooth transition, please make sure to remove any profile settings and managed apps from the device before taking it off the network.
For iOS/iPadOS devices, the restrictions setting "Allow Erase All Content and Settings" should be enabled if you want to initiate a factory reset from the device itself (Settings > General > Transfer or Reset iPhone > Erase All Content and Settings). If the setting is disabled, the device can still be erased using the Apple Configurator by selecting Actions > Advanced > Erase All Content and Settings.
Apple ASM and ABM provide the ability for MDM Servers to release devices from ADE. This setting is shown as "Allow this MDM Server to release devices" on the ADE server side:

Removing the device from ABM/ASM is possible in the new version of the ADE page by using the "Disown device" button.
Any devices that followed the "Manual Enrollment - Add device(s) to Automated Device Enrollment (ADE)" process and that have not completed the 30-day provisional period will be permanently removed from both the dashboard device list as well as the ADE list.
Migrating to a different MDM solution or Apple Profile enrollment
- In Systems Manager > Manage > ADE, select a device, Device Settings should be selected and removed.
- In Systems Manager > Monitor > Devices, select the device and select Erase device (this will push a factory reset to the device).
- Go back to Systems Manager > Manage > ADE and Remove Device from ADE but do not hit Sync during this process.
- Go to Apple Business Manager and remove the device from Apple Business Manager being sure to not allow Dashboard to Sync.
- This will then allow the device to be removed and re-enrolled with another MDM solution.
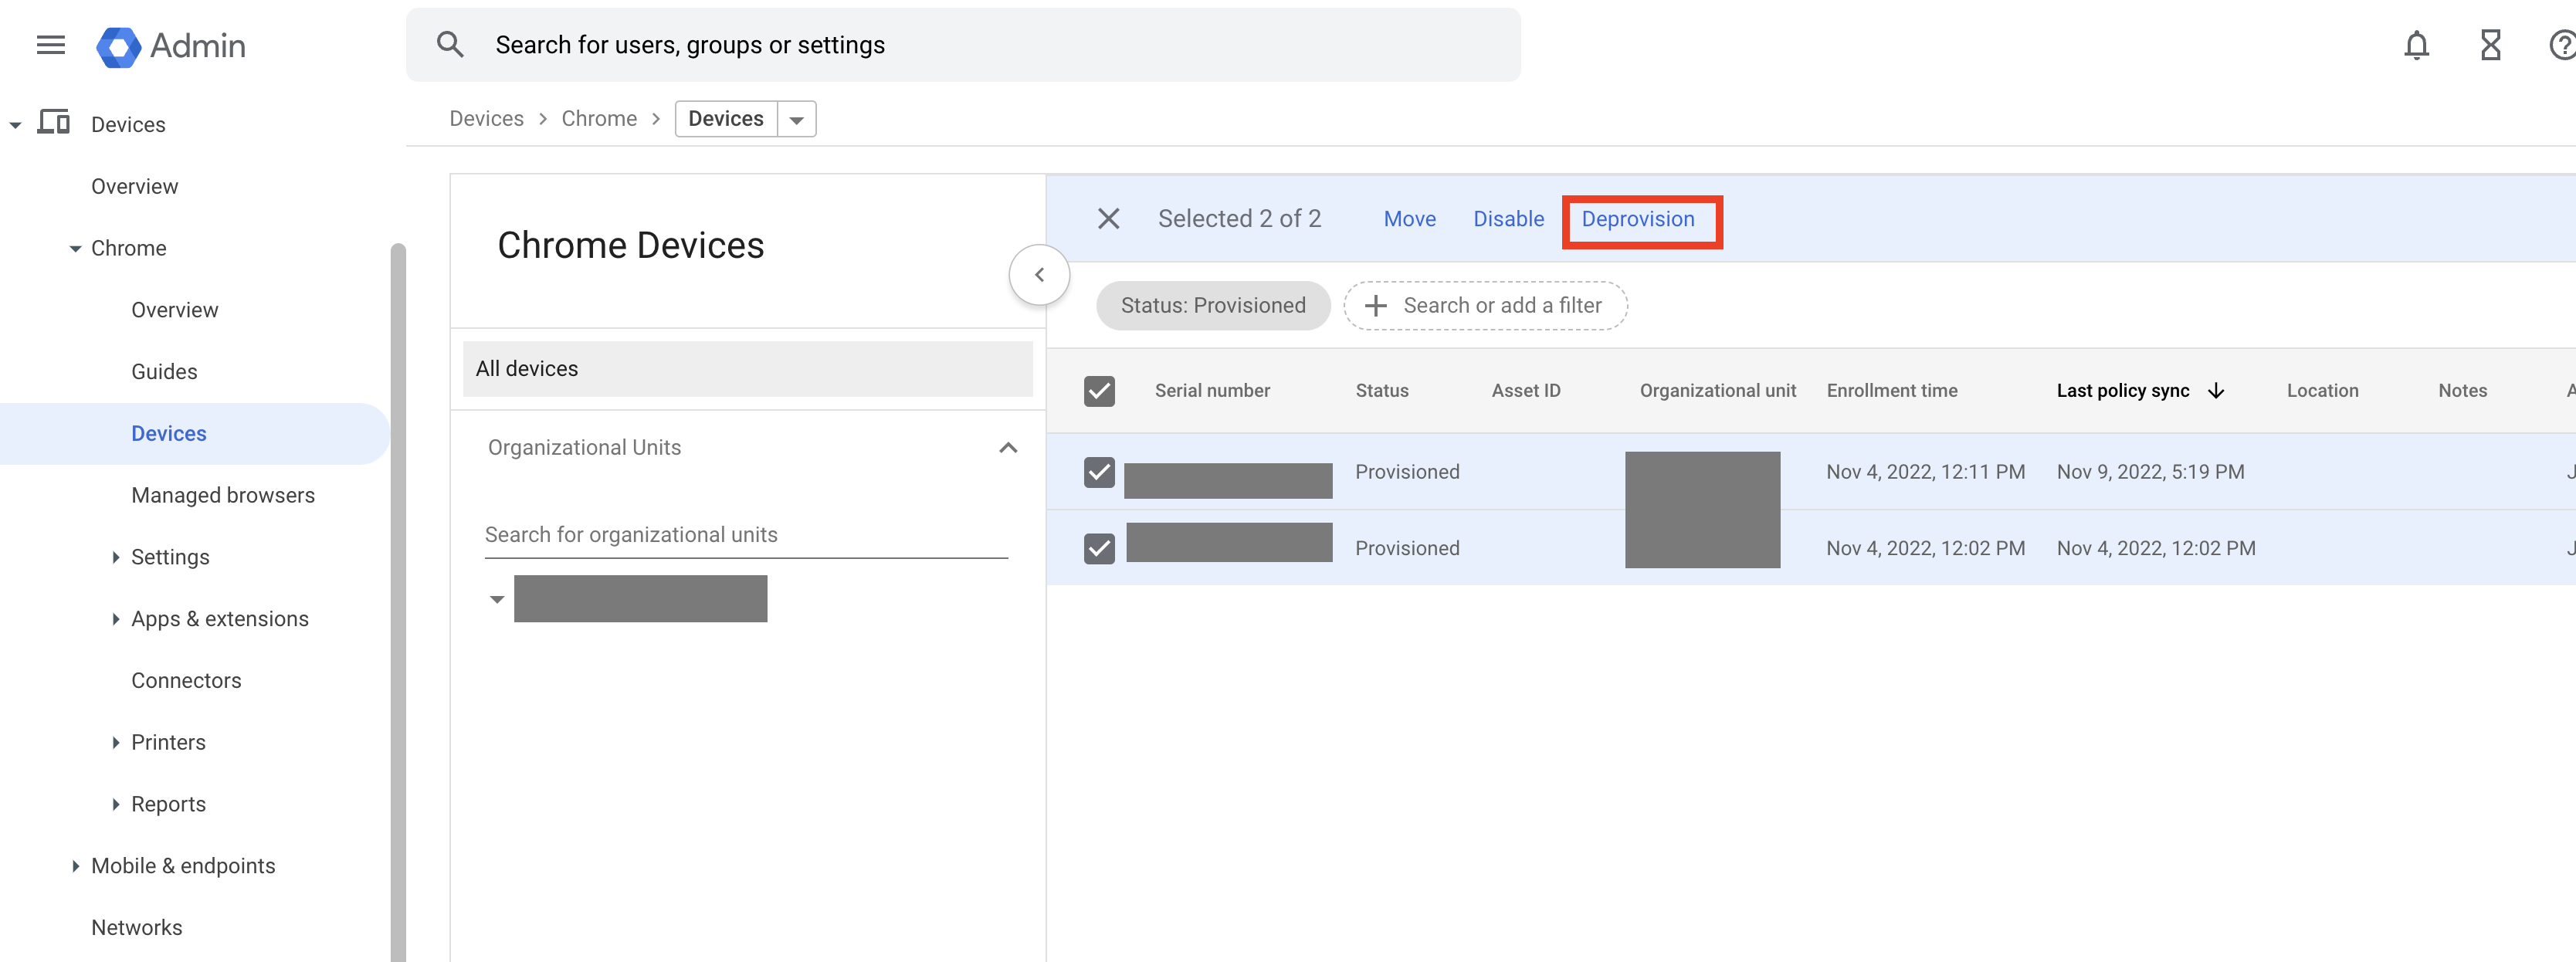
Deprovisioning ChromeOS Devices
- In the Google admin console navigate to Devices > Chrome > Devices.
- Select the box next to the ChromeOS device.
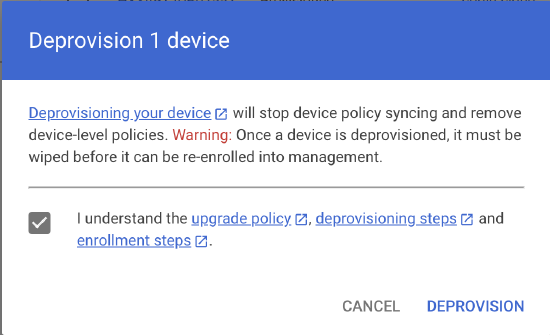
- Click Deprovision

Note: Once a ChromeOS device is deprovisioned, it must be wiped before it can be re-enrolled again. Refer to Google's Wipe ChromeOS device data documentation for additional info.
Removing a Device from a Systems Manager Network
- Log in to Dashboard, and select the appropriate SM network.
- Navigate to Systems manager > Monitor > Devices
- Mark the checkbox for each device to remove.
- At the top of the Client list, select Edit > Remove from this Network.

Impact of Device Removal
Solely removing a device from the Systems Manager Dashboard network will not have any immediate impact on the device, except prevent further MDM management until the device is re-enrolled. Any apps or profiles that are already pushed to a device will remain active on the device.
To completely remove a device, be sure to follow the previous steps in this article to remove associated settings and apps from the device. You may also want to use selective wipe on a device if it will be allocated for a different purpose and existing managed profiles/apps should be removed.


