
Cisco Secure Connect - Defining Private Resources & Apps
Overview
A private resource is an application that is hosted within a private datacenter or private cloud. Cisco Secure Connect enables organizations to provide secure connectivity to private applications via client-based ZTNA, clientless (browser-based) ZTNA and Remote Access VPN. The first step is to define your applications in Cisco Secure Connect.
Configuration Steps
-
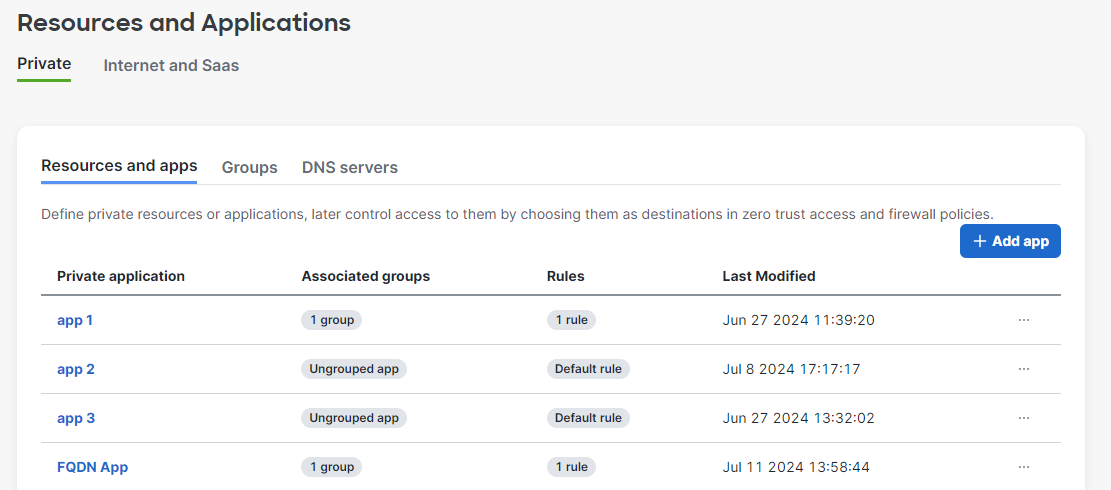
From the Secure Connect menu, navigate to Identities & Connections -> Resources & Applications.

-
Navigate to Private -> Resources and Applications tab and look to the upper right-hand corner, and choose + Add app
-
Give your application a good descriptive Name and Description
-
Complete the connection details to inform Secure Connect what traffic aligns to this private application.
-
Select the desired Access Methods
-
Assign the private app to a Resource Group if desired
Connection Settings
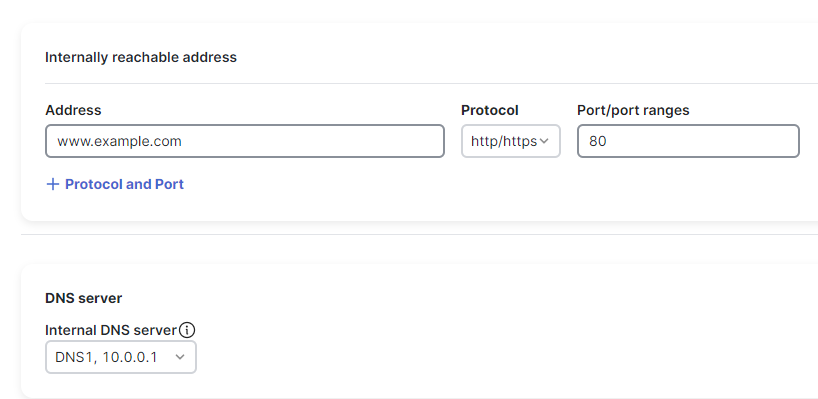
On the Add Resource & Application create page, the connection details are configured by adding the connection information as an IP, CIDR, FQDN or wildcard FQDN with associate protocol and port(s).

Supported Connections
- Protocol HTTP/HTTPS must be selected to support Browser-based access.
- Wildcard FQDNs are supported with the following format. *.cisco.com
- ICMP is not supported for ZTNA but is supported for VPN Access
- All TCP and UDP ports are supported.
- Ports/Port ranges are accepted in single port and/or range format. Both are supported together, for example: 80-81, 443
- Multiple protocols are supported with + Protocol and Port
- Additional network addresses and associated ports and protocols are supported with + Add network address
- VPN & Network Access does not support Fully Qualified Domain Name (FQDN)
DNS & FQDN Apps
FQDN-based applications are supported for both client-based and clientless ZTNA but not for Network and VPN access. DNS resolution must occur for FQDN based apps to work. For FQDNs that are internet-resolvable, no DNS server is required. If your DNS entry for your application is only resolvable internally, an internal DNS server must be specified.
An internal DNS server is required for apps with FQDNs that cannot be resolvable by public DNS resolvers.
Internal DNS servers are configured at Secure Connect -> Identity & Connections -> Private -> DNS servers

Internal DNS server Config on App
Wildcard FQDNs
There are several important factors regarding the configuration and use of wildcard FQDNs for private application access.
- ZTNA access requests will match to the most specific configured private app resource before policy evaluation and will continue to use that resource for connectivity, as well.
- Policy evaluation will then occur for the access request of the most specific matched resource, which may not be the resource configured with the wildcard FQDN if another resource is configured with a more specific address.
- For example, if Resource A is configured as "test.cisco.com" and Resource B is configured as "*.cisco.com", an access request to "test.cisco.com" would match to the more specific Resource A. After this, policy evaluation will only occur for the matched Resource A, not the wildcard FQDN Resource B.
- In general, configurations for resources with a more specific FQDN should assume no less-specific resources exist, as they will not be matched.
Access Methods
Access methods are how users will connect to your private application. After defining the connection details of your private application. Enable the required access methods by sliding the button to the right. If an access method is grayed out, check that you have met the requirements for the access method.

Zero Trust Network Access (ZTNA)
Zero Trust Network Access, or ZTNA, is an evolution of traditional VPN-based remote access. ZTNA offers secure app connectivity on a per-application basis vs. traditional VPN that relies on network extension. Cisco Secure Connect offers two type of ZTNA connectivity; clientless (browser-based) and client-based. Policy for ZTNA is configured on the Zero Trust Access policy page found under Secure Connect -> Policies -> Zero Trust Access.
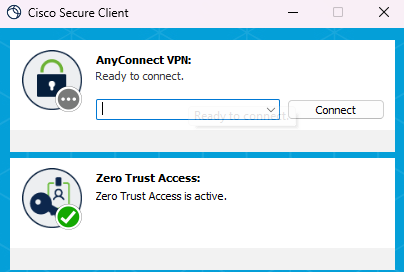
Client-based (ZTNA)
Client-based ZTNA relies on Cisco Secure Client and the ZTA (Zero Trust Access) module. Endpoints enrolled in ZTNA and can securely access private applications that are ZTNA enabled. For details on how to enroll Cisco Secure Client in ZTNA
Clientless (Browser-based) ZTNA
Clientless (Browser-based) ZTNA provides secure private access to web-based applications to any device on the internet with a browser. Protocol HTTP/HTTPS is required for browser-based access.
-
SNI (Server Name Indication) field (optional) - this is the SNI field the proxy should use while connecting to the private application
-
SNI is sometimes used by things like a load balancer or the web server itself to know how to route the connection. If you are unsure of this setting its best to leave blank and test the app first.
-
-
Certificate Check - Enable/Disable Proxy should validate the application certificate or not while connecting to the application.
-
Enabling validation of the certificate will ensure that a valid certificate is present and no one is monitoring the secure communication.
-
-
External URL - this is the URL you can use to access the application. Provide this to your end-users that need access to the private app

Validate Application Certificate - For HTTPS app, enabling this toggle tells the proxy to validate the certificate presented by the application web server (with public Root CAs). With validation enabled, if the certificate validation fails the connection will fail. Private CA certificate validation is not supported at this time.
Network and VPN access
Network and VPN access allows users to access the private app via RA-VPN (Remote Access VPN) and sites connected to Secure Connect.

Related pages
Rules for Network and VPN access are handled via the Cloud firewall in Meraki. Access cloud firewall at Secure Connect -> Policies -> Cloud Firewall. When adding a rule, select Private application and network rule.

Resource Groups
At the bottom of the page you can optional add the application to a Resource Group.

Application Details
The application details pane can be viewed by clicking on the app name from the Resources & Applications page. Applications can be edited by using the three dots menu and clicking edit or from the edit application button on the application details pane.
Application Details Pane

Three dots menu - Edit Application

API Endpoint
The Secure Connect Private Application API endpoint incorporates CRUD (Create, Read, Update, Delete) operations, serving as a versatile interface for managing private applications within a given organization.
With these operations, users have the ability to programmatically create new private applications, retrieve details of existing applications, modify properties of specific applications, and remove applications as needed.
This capability ensures efficient management and control of the private applications lifecycle in a Meraki environment.
- For additional information on the Private Application API endpoint, see Secure Connect Private Application API Reference
- For a sample Python code (Import private applications from a CSV file), see Meraki Secure Connect Private Applications Import Script
-
This is an early access API endpoint.
-
To opt-in for early access APIs, navigate to Organization > Early Access -> Early API Access.

- Keep in mind that this API endpoint might be subject to changes.
Next Steps
For additional information on network-based access policy rules for RAVPN and Branch users, see Cloud Firewall Private App and Network rules.
For additional information on ZTA access policy rules for external users, see Configure Zero Trust Access Policy.