
How to Set Up SP-Initiated SAML Single Sign-On
Click 日本語 for Japanese
Overview
This article explains how to configure SP-Initiated SAML SSO authentication for your Meraki Dashboard organization.
Meraki offers two main SAML login types: IdP-Initiated SAML and SP-Initiated SAML. The login method that works best for your organization depends on the user experience your admins prefer and the IdP standards of your business. Both login types can be used simultaneously and are not mutually exclusive. Both require some baseline actions to enable and configure SAML login as a general service. Refer to Configuring SAML Single Sign-on for Dashboard for those configurations and setting up
SP-Initiated SAML requires additional configuration on top of the general SAML login service. Once configured, your users start the login flow directly from the Dashboard, the Meraki mobile app, or the Meraki Vision portal. Meraki uses a sub-domain based implementation for SP-initiated SAML. You configure a unique subdomain for your Dashboard organization and provide that subdomain during the login flow initiated by Dashboard.
Prerequisites
Confirm the following before you begin:
- An existing SAML configuration for your Dashboard organization.
- A supported domain. SP-Initiated SAML supports only these domains:
- meraki.com
- meraki.cn
- meraki.ca
- Awareness of unsupported domains. The following are not yet supported for SP-Initiated SAML flows:
- meraki.in
- gov-meraki.com
- Your IdP's SSO Login URL.
Account requirements:
- To convert an existing non-SAML Meraki admin account to a SAML account, delete the Meraki admin account from Dashboard, then re-introduce it as a SAML account through the SAML platform you use.
- The username attribute cannot match an existing Dashboard administrator or Meraki Authentication user's email address configured on any Dashboard organization.
Refer to creating SAML roles for more information on SAML roles.
Step-by-step instructions
There are three main steps to configure SP-initiated SAML:
-
Define a unique subdomain for your organization.
-
Provide your IdP's SSO Login URL.
-
Select an IdP for SP-initiated SAML.
Define a unique subdomain for your organization
The Meraki SP SAML implementation requires a Meraki-wide unique subdomain. Each organization on which you want to enable SP SAML requires its own unique subdomain.
If your SAML account currently has access to multiple organizations at login, you do not need to enable SP SAML on each of them to keep access to all of them. Provide the subdomain for the organization that has SP SAML configured during login.
To configure the subdomain:
-
Go to Organization > Settings > Authentication > SSO Subdomain.
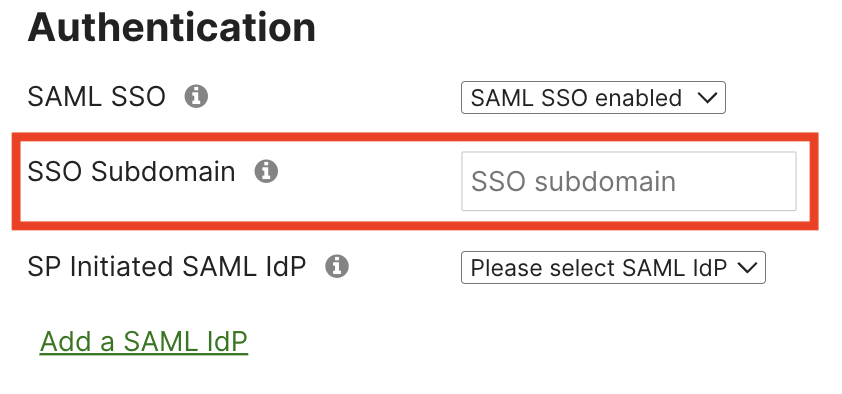
-
Enter your unique subdomain with the rest of the SAML settings.
A dynamic issuer / entity ID is used for each Meraki Dashboard organization that has the SP SAML feature enabled. For example, if the configured subdomain is example, configure these unique issuer / entity IDs with the IdP:
Refer to the Microsoft Entra documentation for configuration advice on the Entra admin center side.

Provide your IdP's SSO Login URL
This flow starts from Dashboard, so Dashboard needs to know where to forward users to authenticate on the IdP. This is the SSO Login URL, provided by your IdP. It is required for SP-initiated SAML to function properly.
Configure the login URL as part of your IdP configuration.
You may need to configure a new generic SAML application with your IdP. Existing Meraki SSO applications with various IdPs may not support the SP-initiated flow until they are updated.

Select an IdP for SP-initiated SAML
Meraki currently supports a single IdP for SP-initiated SAML.
-
In the SP SAML IdP section, choose the IdP you want to use. IdPs appear as their SHA1 fingerprints, from the configured IdPs.
-
Select Save to save your configuration changes.
SP SAML is now configured.

Log in via SP-initiated SAML for web
The SP-Initiated SAML flow requires you to manually browse to the URL of the Dashboard SP SAML login page, or use the custom Login URL defined by your IdP. Bookmark this URL for easy access.
-
Browse to either of the following URLs:
- https://account.meraki.com/login/dashboard_login?sso=true
- <organization subdomain>.sso.meraki.com (for example, if the SSO subdomain you configured was example, navigate to example.sso.meraki.com)
-
Provide the SAML subdomain registered to the organization you want to log in to, then select Next.

-
On the confirmation screen, review your organization name, then select Login with SSO.

-
Authenticate with your IdP. After successful authentication, you are redirected to the Dashboard and logged in.
Notes for specific portals:
- Meraki Vision: If using the MV-specific portal, the URL is https://vision.meraki.com.
- Meraki for Government: If using the FedRAMP-certified Dashboard, the URL is https://account.gov-meraki.com/login/dashboard_login?sso=true.
Log in via SP-initiated SAML for mobile
If you are already logged in to the Meraki mobile app, log out and disable biometric authentication first.
- Go to Settings > Account.
- Tap Edit.
- Toggle off biometric authentication.
- Select Save.
- Select Log Out.

After you log out, or open the app for the first time:
- Select Log in With SSO.

- Enter the unique SSO subdomain you configured for the organization.

- Continue to log in via your configured identity provider.
The app redirects you back, now signed in as a SAML user.
Verification
Confirm a successful configuration with these outcomes:
-
On the web flow, after authenticating with your IdP, you are redirected to the Dashboard and logged in.
-
On the mobile flow, after authenticating with your configured identity provider, the app redirects you back, signed in as a SAML user.
Troubleshooting
Known Issues
| Issue Type | Issue Description |
|---|---|
| Login Screen Text Bug | The text may be incorrect on the SP SAML login page. It should read "Your Meraki dashboard organization's subdomain", NOT "organization name". |
| Login Screen UI Bug | Some browsers render the "Sign into Organization" screen incorrectly with minor graphical glitches |
| Invalid SSO Mobile App Error | 'Invalid SSO URL' error may be presented if the mobile app version is < 4.25.1 |
| Biometric Feature Availability | Biometric authentication is not supported for SAML SSO users |