
Wi-Fi Personal Network (WPN)
Click 日本語 for Japanese
Learn more with these free online training courses on the Meraki Learning Hub:
Overview
Large enterprise environments where users share the same Wi-Fi network to connect their devices present unique challenges. For example, users might find it difficult to discover their own devices among the magnitude of other devices on the same network when using discovery protocols like AirPlay. In addition, malicious actors can exploit these protocols after gaining access to the shared and sometimes insecure wireless networks in university dorms, hotels, senior homes, etc.
The Wi-Fi Personal Network (WPN) feature solves these challenges by segmenting the wireless network on a per-user basis and providing a home-like user experience. In addition, WPN provides a contained environment to each user where discovery protocols like AirPlay allow users to discover only their own devices connected to an SSID shared by other devices.
Even better, WPN allows for segmenting discovery protocols and unicast traffic on a single VLAN, thus eliminating the burden of configuring different VLANs per floor, room, or location and simplifying network management.
WPN allows users to have their own Wi-Fi private network to connect and discover their own devices while being connected to the same shared SSID on the same VLAN.
Supported Models and Firmware
The following access points support the WPN:
|
MR Family |
MR Models |
Minimum Firmware |
| Wi-Fi 7 | CW9171I, CW9172I/H, CW9174I/E, CW9176I/D1, CW9178I, CW9179F | MR 31.1.2 or newer |
| Wi-Fi 6E | MR57, CW9166/64/62I-MR, CW9166D1-MR, CW9163E-MR |
MR 29.4.1 or newer |
|
Wi-Fi 6 |
MR45, MR55, MR28, MR36, MR36H, MR44, MR46, MR46E. MR56, MR76, MR86, MR78 |
|
|
Wi-Fi 5 Wave 2 (802.11ac Wave 2) |
MR20, MR30H, MR33, MR42, MR42E, MR52, MR53, MR53E, MR70, MR74, MR84 |
Supported Authentication Types
WPN can be enabled with the following authentication types:
| Authentication Type | Minimum Firmware | Scalability Limits |
| iPSK without RADIUS | MR 29.4.1 | 5,000 iPSKs per SSID |
| Enterprise with my RADIUS | MR 30.6 * | No limits. RADIUS server-dependent |
| MAC-based access control (no encryption) | MR 30.6 * | No limits. RADIUS server-dependent |
| iPSK with RADIUS | MR 30.6 * |
No limits. RADIUS server-dependent |
Note: WPN Support for RADIUS-based authentication types was added in MR 30.1, however, MR 30.6 has important bug fixes for this feature, therefore, we recommend using MR 30.6.
Design Considerations
-
Wireless devices connected to a WPN-enabled SSID cannot communicate with wired devices on the same VLAN (L2 domain) except for the default gateway.
-
Wireless devices connected to a WPN-enabled SSID can communicate with wired devices on a different VLAN through L3 routing.
-
Wireless devices connected to a WPN-enabled SSID can communicate with wireless devices connected to a different SSID (Non-WPN) if both SSIDs share the same VLAN. If wireless client separation between WPN and Non-WPN SSIDs is desired;
-
WPN-enabled SSIDs should be assigned to their own unique VLAN with no multicast routing or Bonjour forwarding servicing the VLAN to limit discovery.
-
Configure Layer 3 firewall rules as required to allow/block L3 traffic under Wireless > Firewall & Traffic shaping.
-
-
Meraki AP assigned (NAT mode) is not supported on an SSID with WPN enabled.
-
External DHCP server assigned (Bridged) mode must be used instead. The Tunneled mode is not supported.
-
-
WPN segmentation does not work for clients connected to mesh/repeater APs.
Specifically Allowed Traffic
The following traffic types are exempt from WPN isolation:
-
DHCP and DHCPv6
-
DNS
-
ARP
-
NDP and IPv6 NDP
-
IGMP
-
MLD
Blocking the above traffic types essential for basic network connectivity could lead to significant issues. For instance, devices may face difficulties obtaining IP addresses or making DNS queries, especially in scenarios where the DHCP or DNS server is in the same subnet but doesn't share the same L2 address as the gateway.
Configuration
Note: This configuration assumes you want to use Identity PSK without RADIUS with WPN. See WPN Support for RADIUS-based Authentication Types for configuration with other supported authentication types.
To configure iPSK without RADIUS to work with WPN, please follow these steps:
-
Navigate to Network-wide > Configure > Group policies and create at least one group. You can learn more about creating and applying group policies in this guide.
-
Navigate to Wireless > Configure > Access control.
-
Select the desired SSID from the dropdown menu at the top of the page.
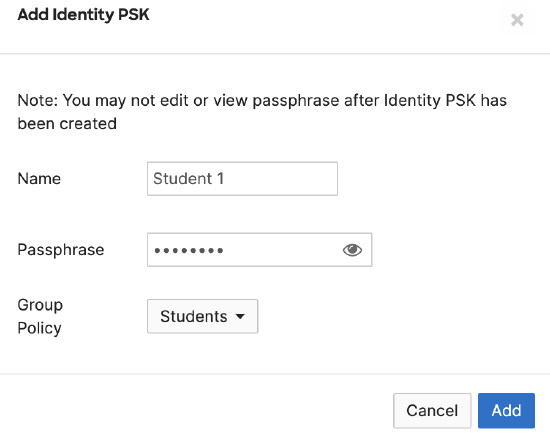
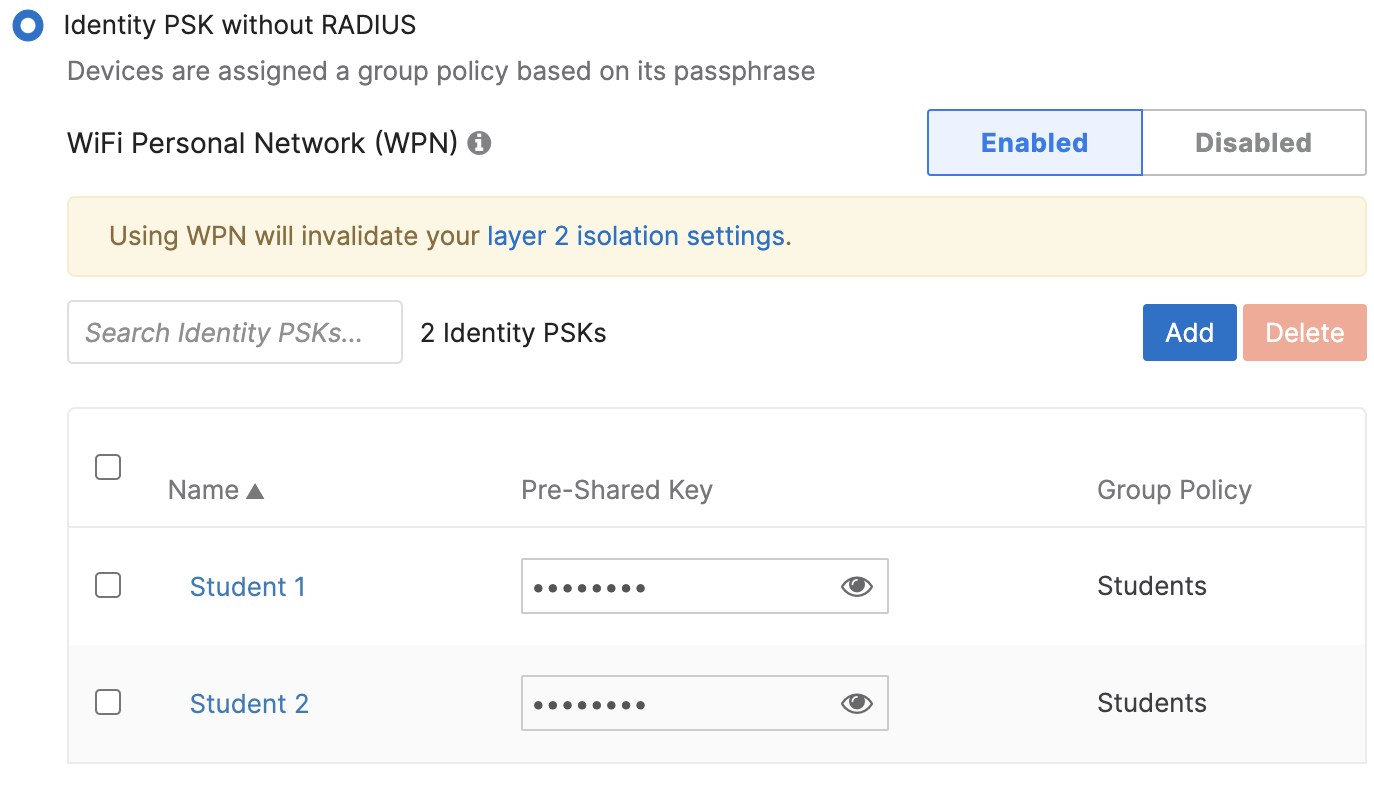
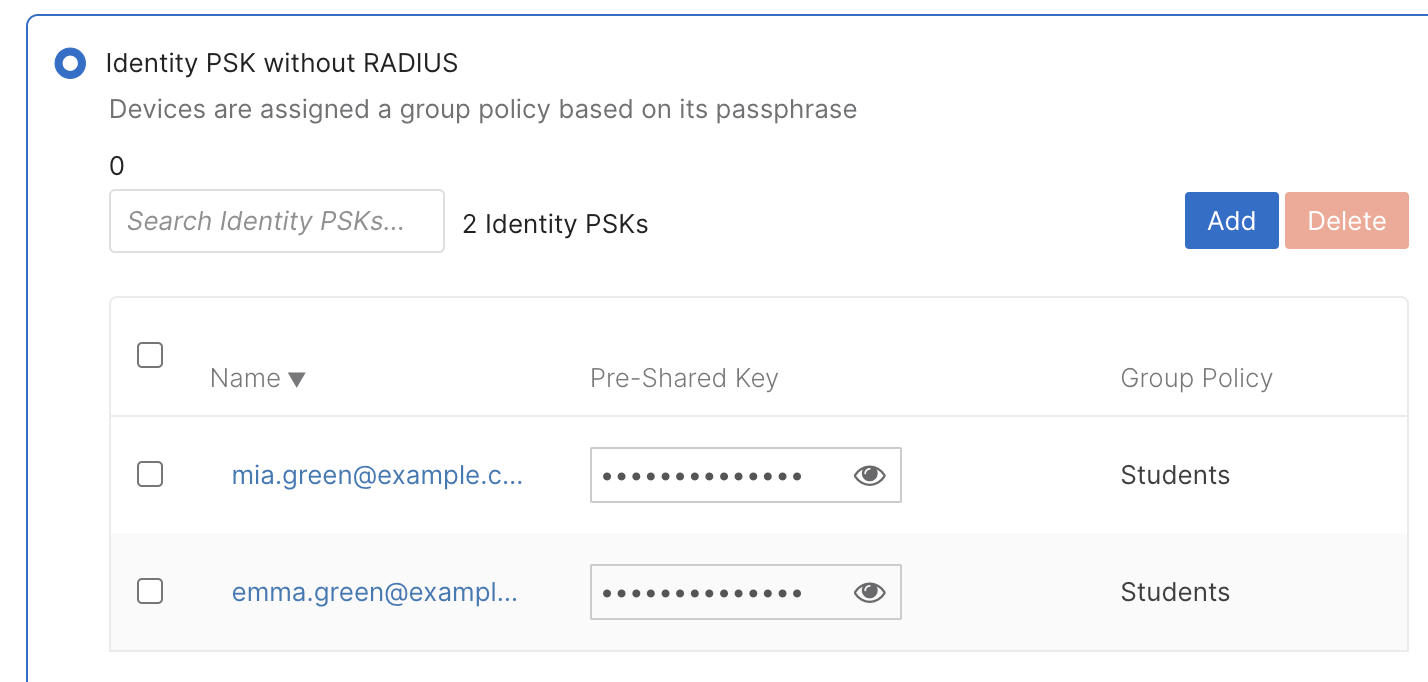
4. Select Identity PSK without RADIUS under Security and click on Add an Identity PSK.
5. Configure a name and passphrase; select a group policy.
6. Use the Add button to configure other iPSK groups as needed.
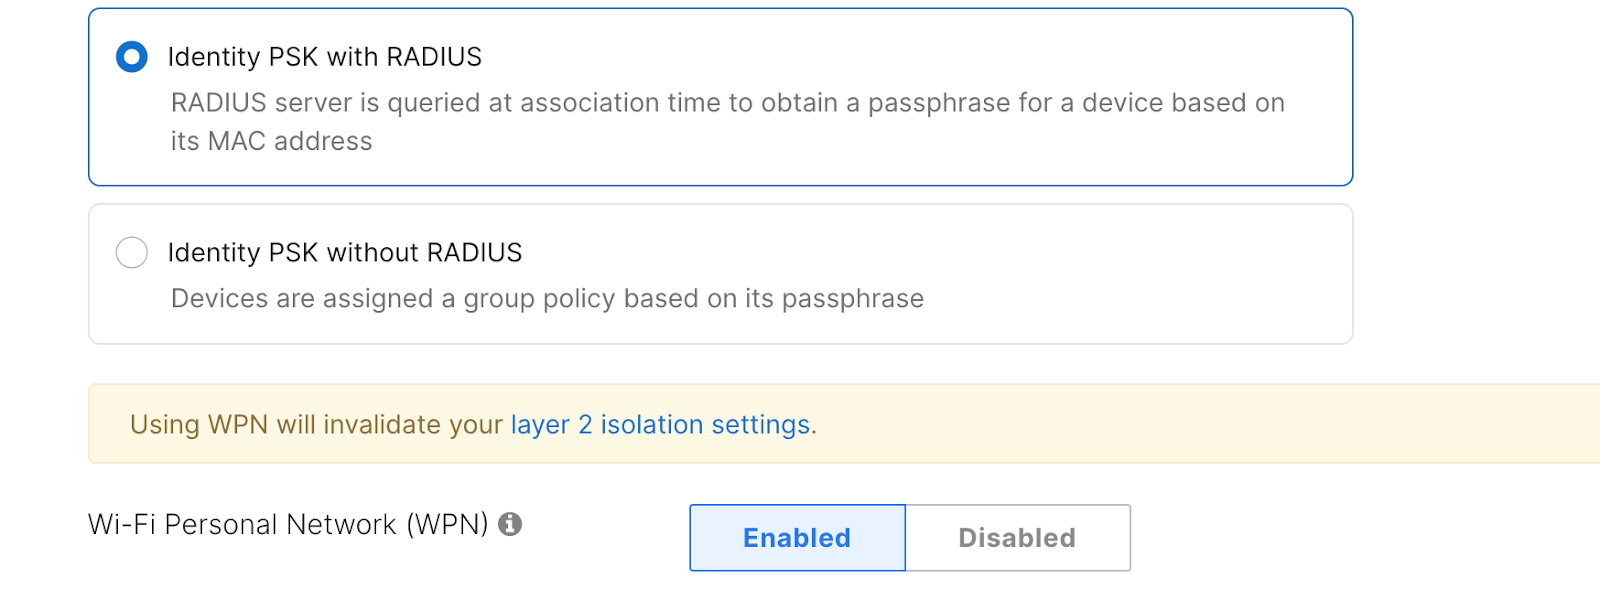
7. Set Wi-Fi Personal Network (WPN) to Enabled
Note: The Wi-Fi Personal Network (WPN) option is only displayed when at least one iPSK group is configured.
8. Save changes on the bottom of the page.
Monitoring
iPSK names used by client devices can be monitored via Meraki dashboard and APIs. This feature is not specific for WPN and works for iPSK without RADIUS. Please see IPSK Authentication without RADIUS for more information.
User Onboarding
For large-scale deployments, user onboarding is typically done using a self-service portal. We recommend using the Cisco exclusive partner Splash Access, allowing users to authenticate using an Identity Provider and create unique PSKs synced back to the Meraki dashboard via APIs.
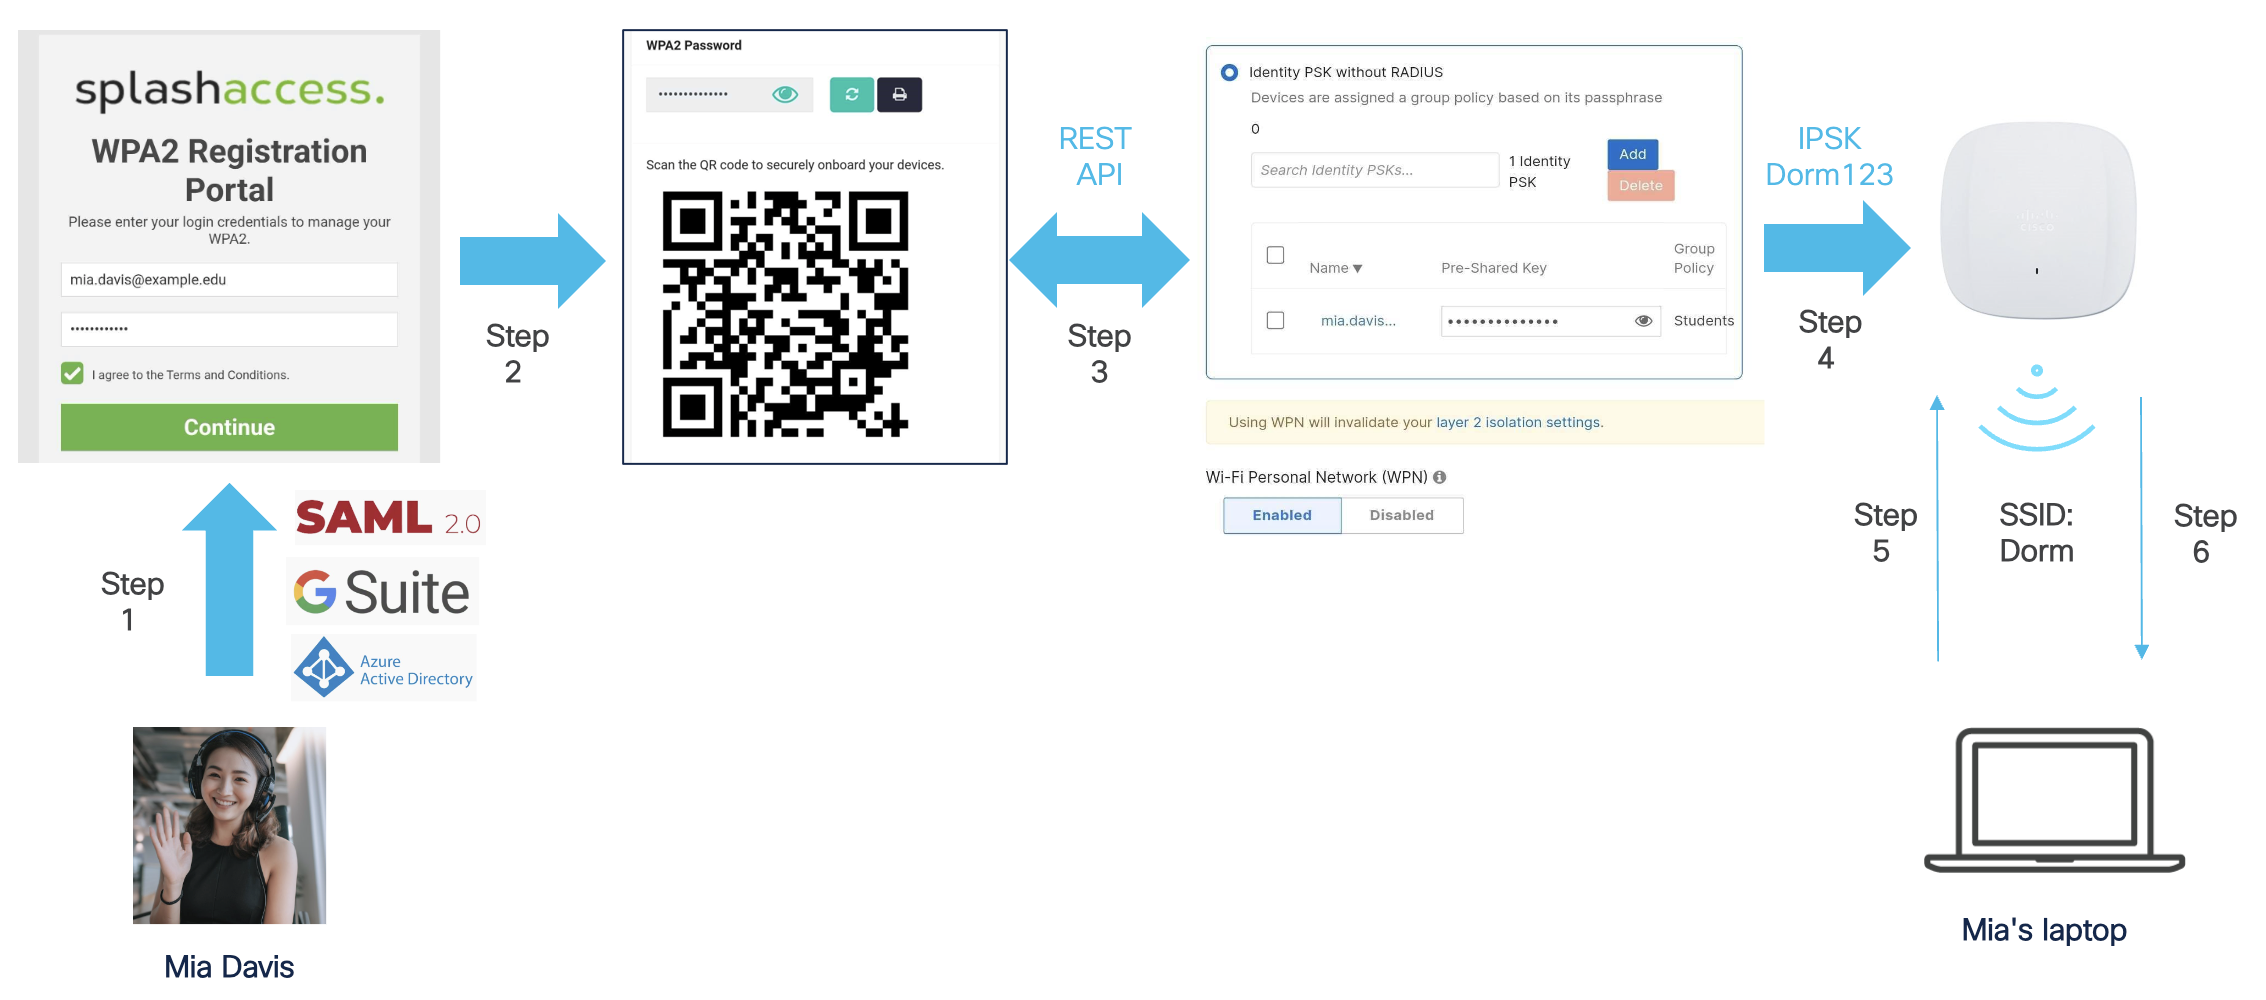
Here is an example of a user onboarding workflow for a large university:
Step 1. A student named Mia logs into the Splash Access self-service portal using her university credentials. Note: Splash Access has native integrations with major identity providers (e.g., Azure AD, GSuite).
Step 2. Mia generates her pre-shared key. A QR code is generated that can be used to onboard Mia's devices. The pre-shared key can also be viewed, updated, or printed.
Step 3. The pre-shared key is pushed from the Splash Access cloud to the Meraki dashboard and assigned to a group policy based on settings in the Splash Access admin portal.
Step 4. The pre-shared key is pushed to the Meraki AP(s) in the network.
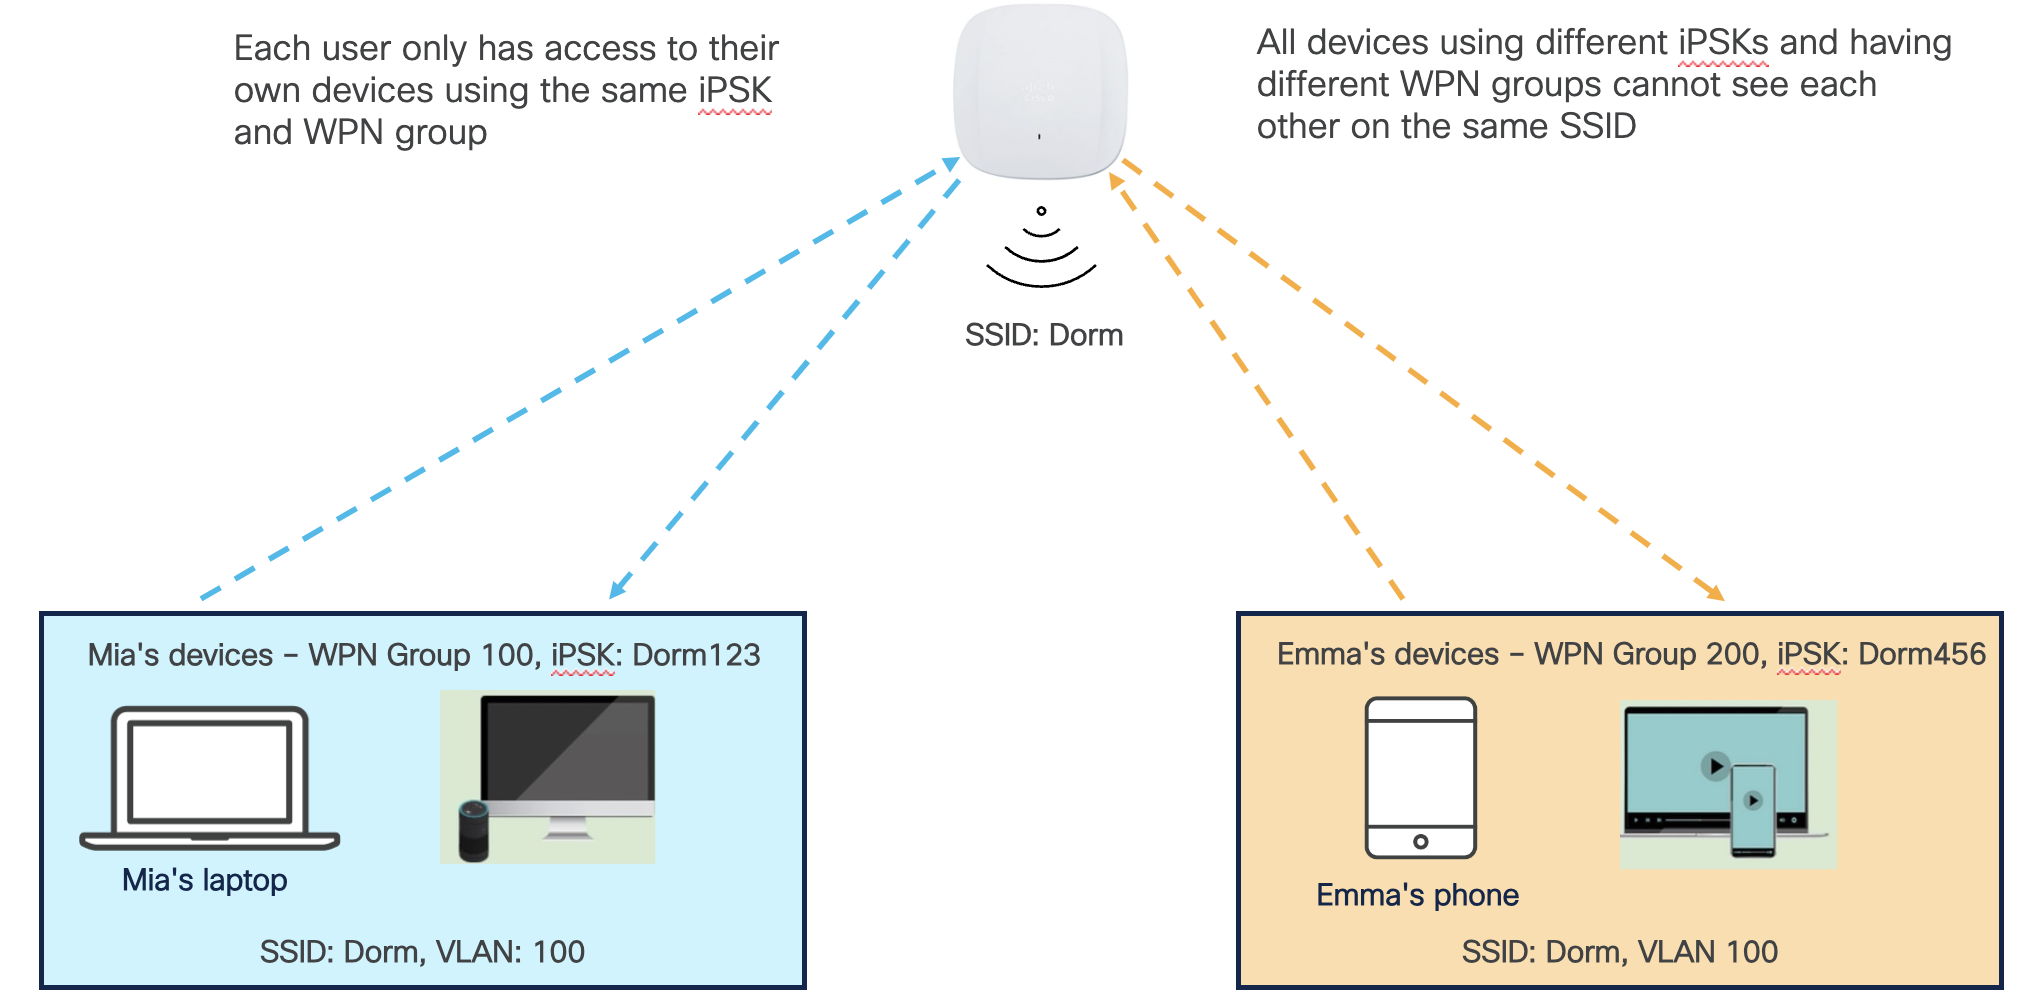
Step 5. Mia uses the pre-shared key generated in step 2 to connect her laptop to the SSID named "Dorm".
Step 6. Mia's laptop is assigned to WPN group 100, and traffic from her laptop is tagged with WPN ID 100.
Next, another student named Emma goes through the same steps and connects to the SSID named "Dorm" using her unique preshared key generated in the Splash Access self-service portal during step 2.
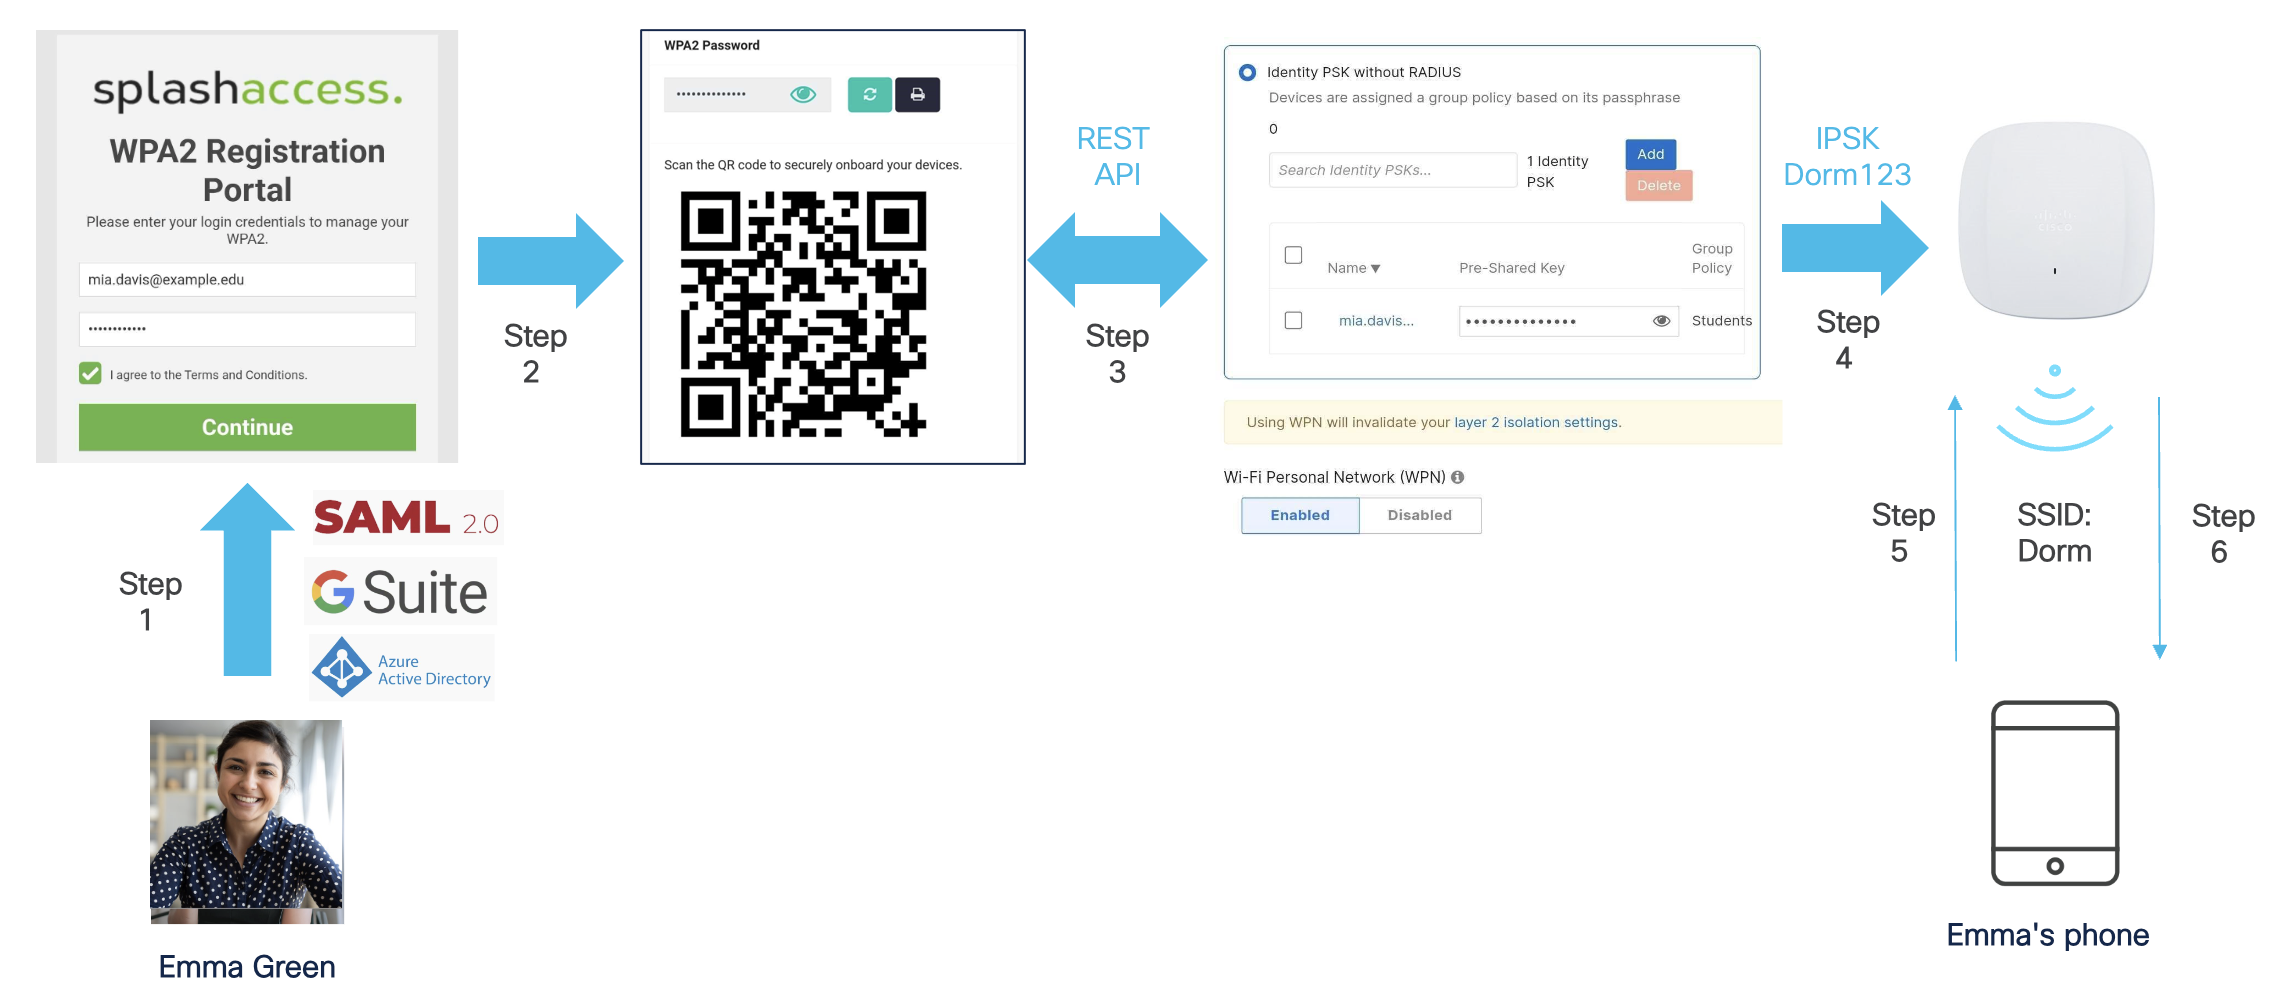
Even though Mia and Emma are connected to the same SSID and VLAN, they can only discover and connect to their own devices that share the same iPSK and belong to the same WPN group.
MR 30.X WPN Enhancements
We added the following enhancements to the WPN feature in the MR 30.X firmware:
-
WPN support on MR30H/MR36H LAN ports
-
Ability to view the number of client devices using a particular iPSK
WPN Support on H-series AP LAN ports
We extended WPN support to wired clients connected to MR30H/MR36H and CW9172H wired ports. This enhancement allows wired and wireless clients to share the same WPN group. This can be done in two ways described below.
WPN Assignment via Port Profiles
AP Port Profiles provide the ability to map an SSID to wired ports on 2- and 4-port access points. In addition, you can use port profiles to assign a WPN name (iPSK name) manually to ports on MR.
Note: WPN assignment via port profiles is only supported for the 4 port profile type.
Dashboard Configuration
Please follow these steps:
-
Navigate to Wireless > Configure > Access control page
-
Select Identity PSK without RADIUS under Security
-
Set Wi-Fi Personal Network (WPN) to “Enabled”
-
Save changes at the bottom of the page.

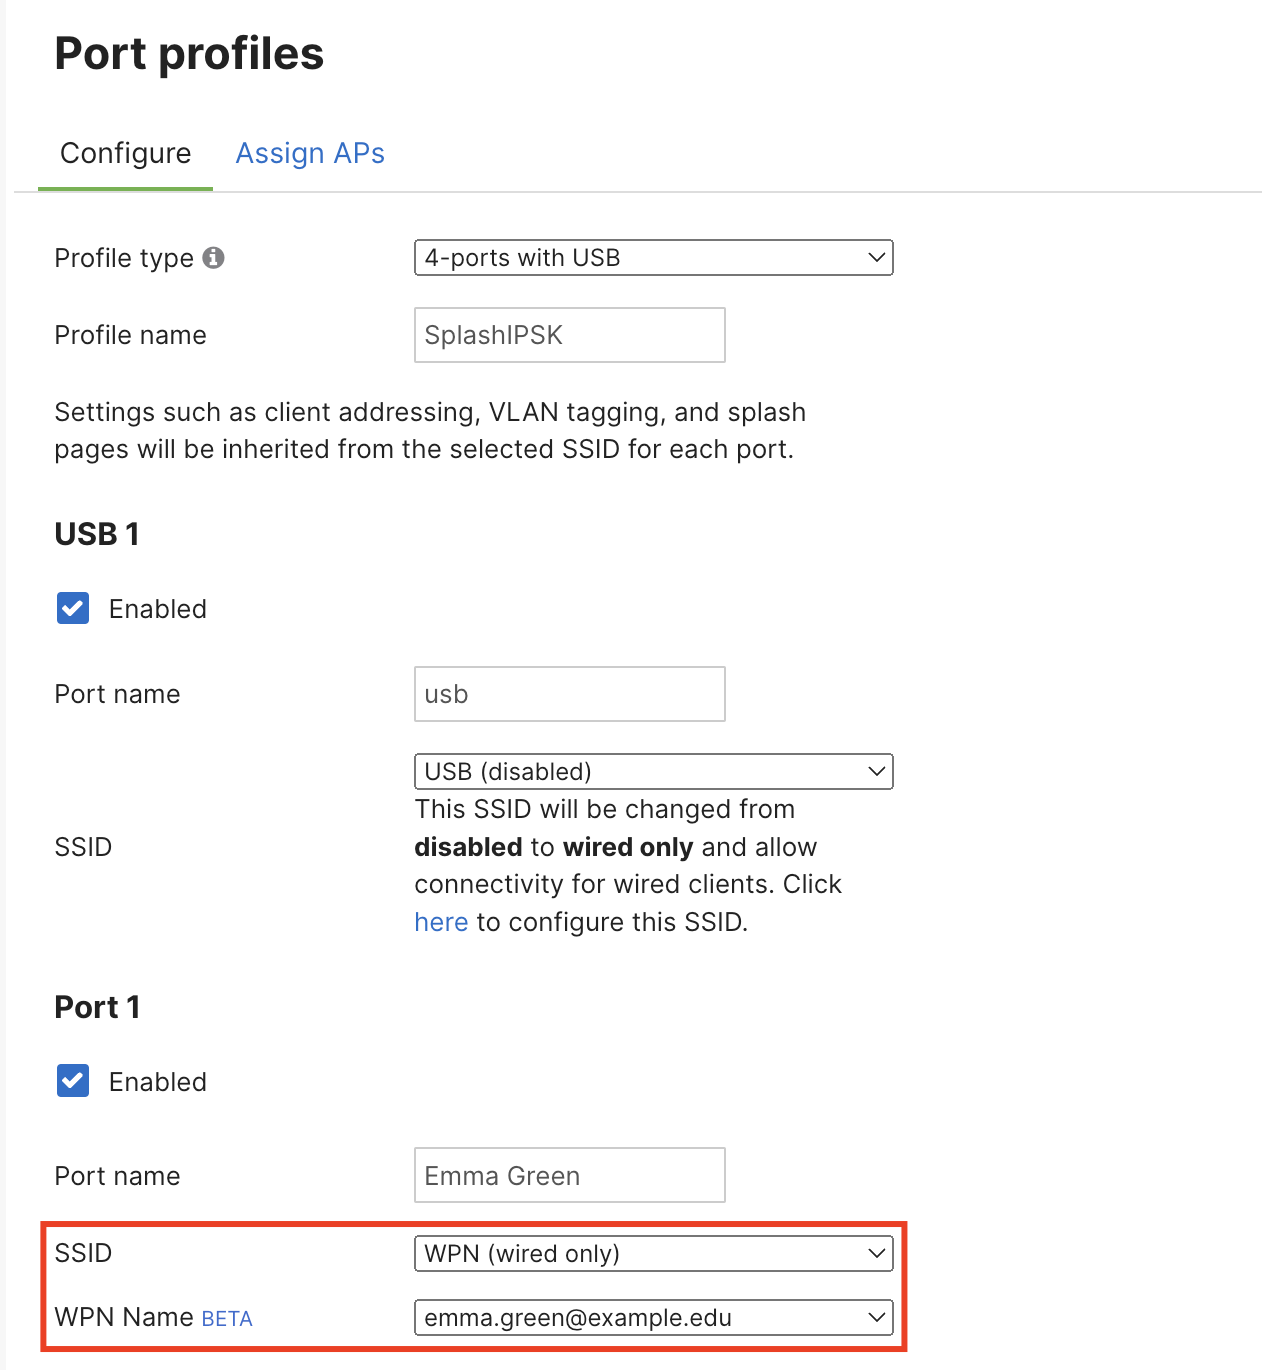
6. Go to the Wireless > Configure > Port Profiles page and create a new profile (profile type (4-ports with USB)
7. Assign the previously configured SSID to an MR30H/36H LAN port
8. Select one of the iPSK names configured on that SSID from the dropdown and assign it to an MR30H/36H LAN port.
Note: Please ensure that iPSK names are unique when using this feature. Duplicate iPSK names are not allowed.
9. Save changes at the bottom of the page.
10. Go to the Assign APs tab
11. Assign desired MR30H/36H APs to the newly created port profile.
A search capability is available when assigning port profiles to supported APs:

Note: Wired clients connected to MR30H/36H ports with a WPN assigned will get the same WPN ID as wireless clients within the same WPN group. However, wired clients will not inherit the Group Policies associated with the iPSK/WPN group.
Note: Please ensure to unassign an iPSK from a port profile before attempting to delete this iPSK. Otherwise, the Meraki dashboard will display a validation error.
API Configuration
WPN (iPSK) groups can also be assigned to 4-port AP profiles via APIs.
1. Use https://developer.cisco.com/meraki/a...identity-psks/ to get pskGroupId
2. Use https://developer.cisco.com/meraki/a...ports-profile/ to assign the pskGroupId to the desired port.
UDN ID Assignment to MR30H/36H Ports via RADIUS
Meraki is committed to providing an inclusive experience for our customers. The following section contains language that does not adhere to our standards for inclusivity. We are working with our partners to replace it.
The WPN feature available on Meraki APs is loosely based on the User Defined Network (UDN) feature available on Catalyst APs. WPN and UDN use a 24-bit "UDN ID" to represent each WPN/UDN group.
Note: While the format of UDN ID is similar between WPN and UDN, some values have different meanings between the Meraki and Cisco solutions. Therefore, these solutions are not interoperable.
The UDN ID can also be assigned via RADIUS. In this case, the UDN ID is carried in a Cisco vendor-specific attribute "udn:private-group-id" in the RADIUS ACCESS-ACCEPT message.
Note: The UDN ID value shall be present in “Cisco VSA 1”, a single VSA used to return key/value pairs understood by Cisco APs. udn:private-group-id is case sensitive and must be in a lower case, for example, udn:private-group-id=500.
The following VSA definition can be used for this purpose:
Note: The expected range of UDN IDs in ACCESS-ACCEPT is 2 - 16777200 (in decimal). UDN ID 1 is reserved for particular purposes and should not be used.
This assignment would work for wireless and wired clients using the same SSID with supported RADIUS-based authentication with the WPN option enabled.
Wired clients must be connected to an MR30H/36H port assigned to an 802.1X SSID with WPN enabled to receive a WPN id from a RADIUS server.
Note: In this setup, UDN IDs are managed entirely by the RADIUS servers. There is no iPSK configuration or monitoring in the Meraki dashboard.
To enable WPN assignment via RADIUS,
-
Navigate to Wireless > Configure > Access control
-
Set your SSID to a RADIUS-based authentication type
-
Set Wi-Fi Personal Network (WPN) to “Enabled”
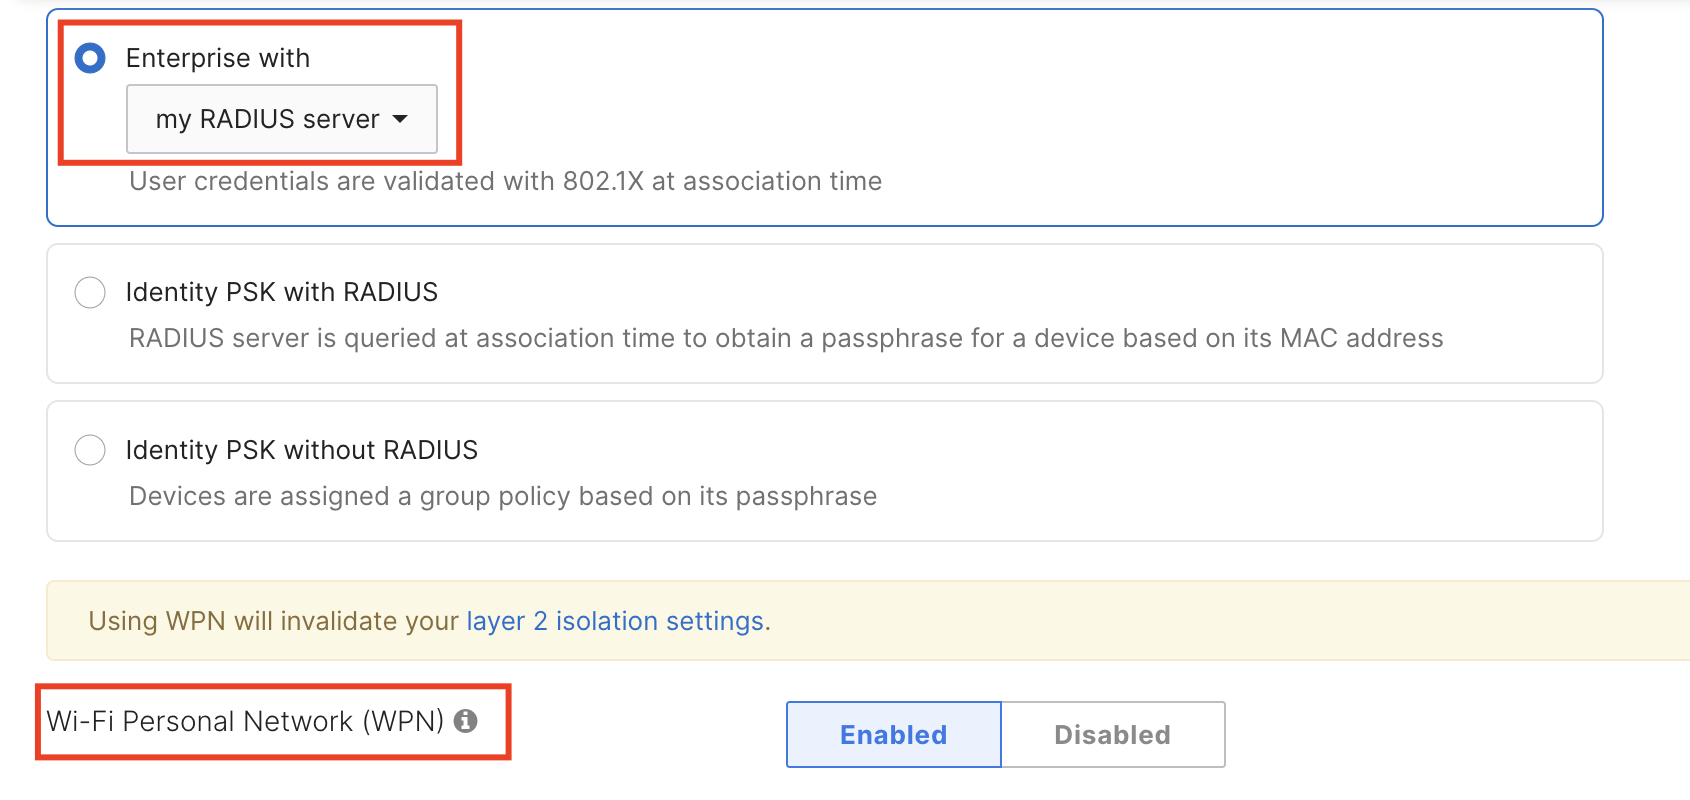
WPN Support for RADIUS-based Authentication Types
The following RADIUS-based authentication types support WPN (Wireless > Configure > Access control)
-
MAC-based access control (no encryption)
-
Enterprise with my RADIUS server
-
Identity PSK with RADIUS (MAC-based Authentication)
To configure WPN with these options, select an appropriate option under the Security section and set WPN to Enabled.
Once configured, APs will expect a UDN ID returned as part of the ACCESS-ACCEPT message from the RADIUS server, similar to the process described in the UDN ID Assignment to MR30H/36H Ports via RADIUS section.