
Sharing Video
Click 日本語 for Japanese
You can share video clips or a video stream from the video wall or the camera status page. Proper camera permissions are required to access these features.
Video clips
If you have export privileges, you can share video clips using the Export feature. Each export requires at least 1 Mbps of upload bandwidth. This requirement does not apply when viewing historical footage on the dashboard.
Export Video
-
Navigate to a camera's video page or a video wall. For fisheye cameras, zoom and pan to a specific dewarped view to export that view. To view the fisheye camera in dewarped, refer to this article for more information.
-
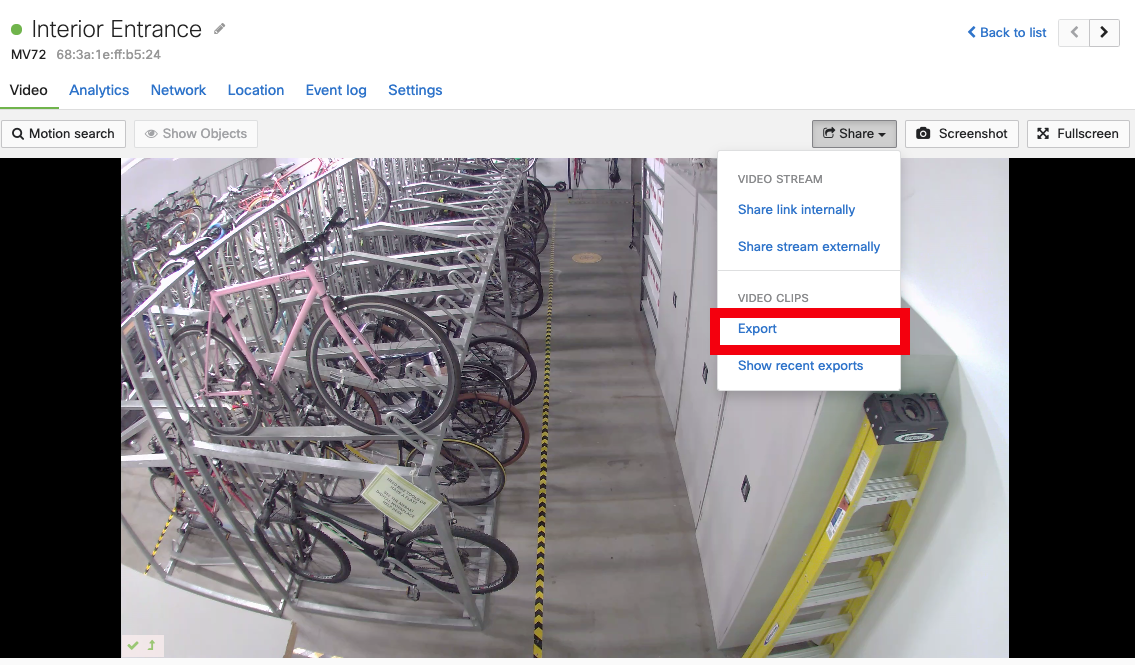
Select Share > Export.
For the fisheye camera, you can export in both the warped (circular) and dewarped views.
-
When exporting from a video wall with multiple cameras, use the drop-down menu to select the camera for the export.

Dewarped video tiles are not supported. Only full-frame exports are available from the video wall. To export dewarped fisheye footage, go to the single camera page, adjust the field of view, and export the footage.
-
Select the start and end time and date for the export. You can schedule the export at a convenient time. Scheduling exports after hours can minimize bandwidth impact on critical business applications.

-
Alternatively, use the timeline slider to chose the export duration.

-
-
Click Export to start the export.
-
You can monitor the status of your exports by navigating to Share > Show recent exports. Click on each item to download the export, copy link to clipboard, delete the export, or calculate the checksum. You can also view all exports within your network from the Exports page.

The current minimum time allowed for a single export is 5 seconds and maximum time allowed for a single export is 12 hours. Video exports are trimmed to the requested size with no buffer. If an invalid time range is selected, the export will automatically default back to 30 seconds to provide a valid export. The 'Download Now' link for an export can be used for one hour, from the time of page load. Refreshing the dashboard page generates a new download link. The 'Copy link to clipboard' button, generates a 7 day link, to download the export.
Exports Checksum
You can verify the integrity of a video clip by saving a copy of the original export's calculated SHA-256 checksum provided on the dashboard and referring to it every time you need to compare a copy to the original. A SHA-256 checksum is a 256-bit or 32-byte hash serves as the file's "signature", and can be calculated over and over again to the same result. However, once the file is changed in any way, this value becomes different. It is generated using the SHA-256 secure hash algorithm. The algorithm is a one-way function, it cannot be decrypted back.
- Click on the export under Recent Exports and select Calculate Checksum to view the video checksum.
- The 256-bit checksum will be printed underneath. Take a screenshot or copy-paste to save this in a safe place.

- To verify a copy of an exported video, calculate its checksum and compare it to the dashboard's checksum. A match confirms the video is identical; a mismatch indicates corruption or tampering.
- To calculate the SHA-256 of a downloaded file, you can use a terminal. We provide the instructions for Windows, Mac or Linux below.
- Windows Power Shell
- Get-FileHash -Algorithm SHA256 .\Filename.mp4
- Linux
- sha256 .\Filename.mp4
- Mac OS Terminal
- shasum -a 256 .\Filename.mp4
- Windows Power Shell
- To calculate the SHA-256 of a downloaded file, you can use a terminal. We provide the instructions for Windows, Mac or Linux below.
Exports Page
You can also view all exports within your network from the Exports page. Additionally, combine exports into a single file from this page.
Exports Retention Period
Exports are stored in the Meraki cloud for one year by default. If a maximum retention time is set on a node, the export will follow that duration.
A firewall must allow outgoing connections on specific ports to certain IP addresses for MV export functionality to connect to the Cisco Meraki cloud. The most current list of outbound ports and IP addresses for your particular organization can be found here.
Video Links
Share a link to live video or a past timestamp for dashboard users to view. Alternatively, share a link accessible to non-dashboard users.
Internal Dashboard Link
Users with live and historical camera viewing privileges can share a video link by navigating to the Video Wall or Camera Status Page and selecting
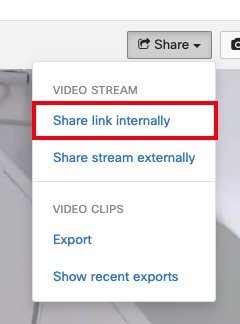
Share > Video Stream > Share link internally.
Dashboard permissions determine access to the shared link. For example, Users without viewing privileges for the camera cannot view the link. Users with live viewing access only cannot view links to historical video.
External Live Stream Link
You must have the required permissions to share an external live stream URL. The permissions include:
- Full/read-only organization admin
- Full/read-only network admin
- Camera-only admin with export footages permission
In few instances, administrators may need to grant quick access to video without adding someone as a Meraki dashboard administrator. For emergencies or temporary access, you can now share live video streams externally using the recipient's email address. These links automatically expire after 24 hours and can be revoked at any time to ensure sensitive information remains secure.
All streams initiated this way use a cloud proxy.
Initiating a Stream
-
Navigate to the camera whose live stream you wish to share.
-
Select the Share button.
-
Select Share stream externally.

-
Fill out the following fields:
- Email (required)
If the same email has been used to share another camera’s stream, all active streams will be accessible through the new link. The links will now share the same expiration time of 24 hours for any new stream. If the same email was used to share a stream that is no longer active, you must extend the stream to receive a valid link. The user will be deleted from the list of users on expired cameras.
- Name (optional)
-
Description (optional)
-
As a best practice, you can use this field to add reasoning for why you are sharing the stream.
-
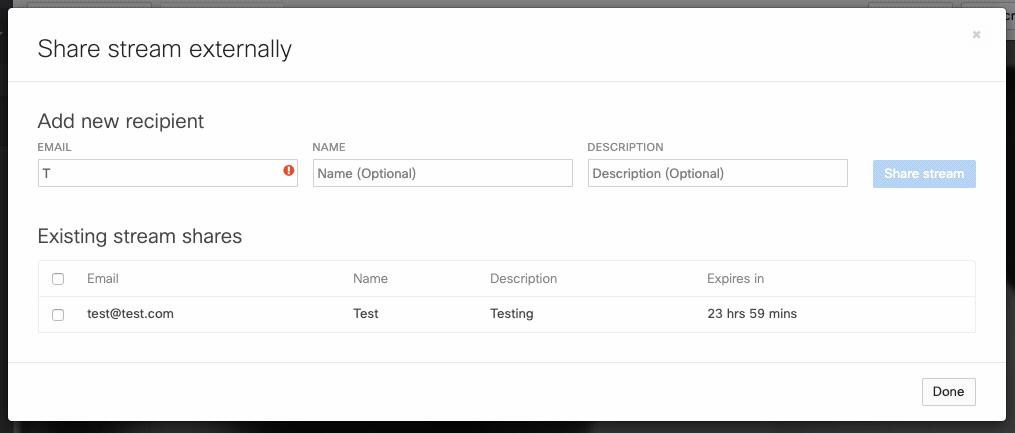
These stream shares are also tracked on the network-wide External stream users page.
-
Select Share stream. This sends a unique link to the email address provided that will automatically expire after 24 hours.
-
Select Done.
This link can be used to view any other active streams shared to the same email address.
Opening a Stream
-
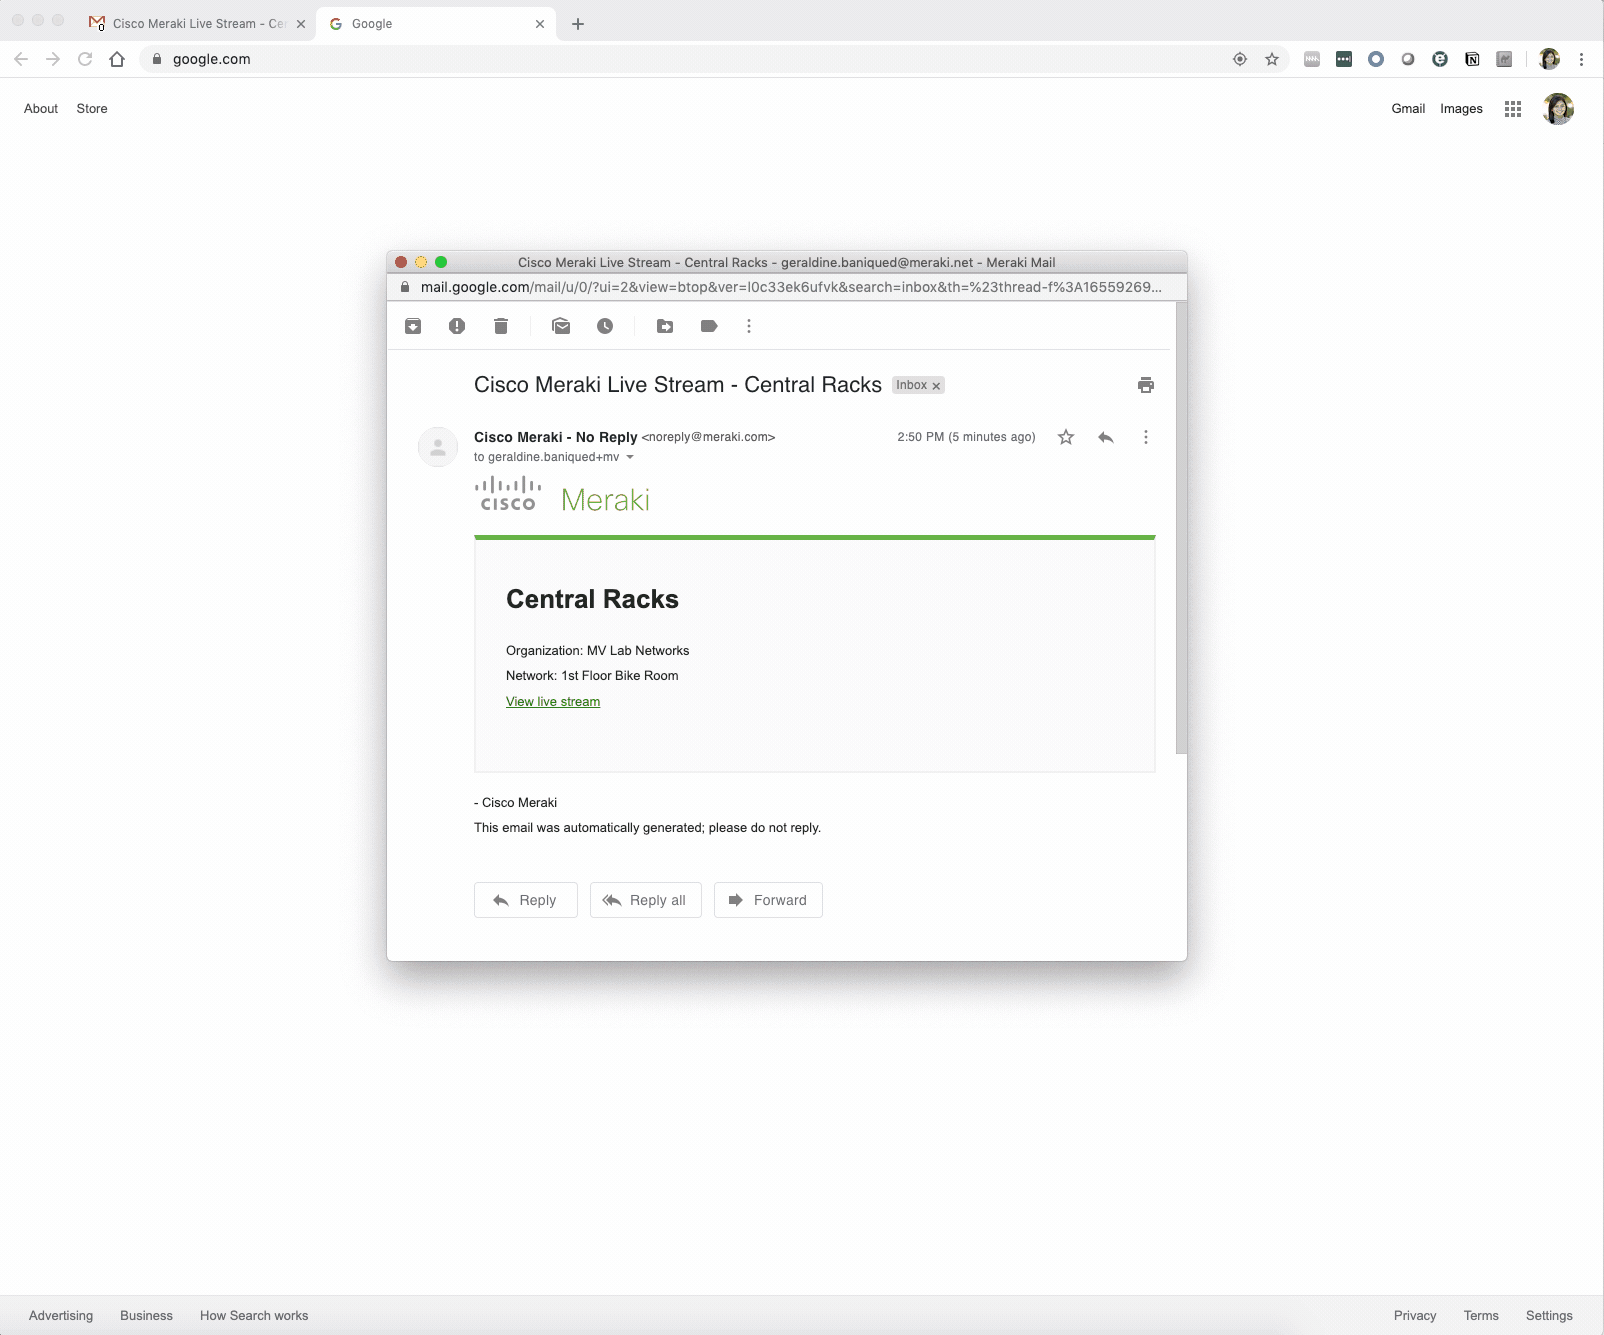
The share recipient will see an email entitled “Cisco Meraki Live Stream - [camera name]” with the name of the shared camera.
-
Open the email and select the View live stream link.
This link will be used for any previously shared camera streams to the same email address.
-
This will open a page in your browser that contains a cloud proxy stream from the selected camera along with details about the camera name and location.
-
You cannot view dewarp views of the MV32 or hear any audio using this live stream link.
-
When new streams are created for the same email, the link to navigate to previous streams becomes invalid. However, the resulting URL in the browser for the previous streams remains functional.
Switching Between Camera Streams
If an email includes multiple camera streams, the recipient can select the camera name in the top-left corner and choose a camera to view from the dropdown menu.

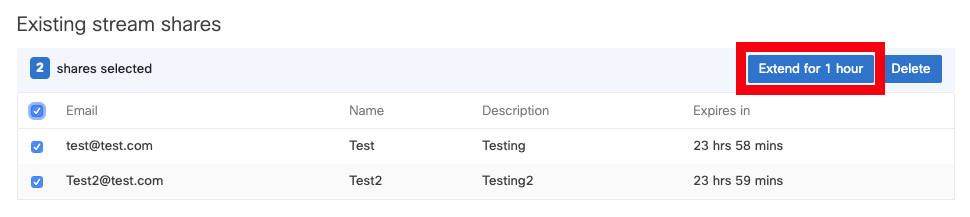
Extending a Stream
-
Navigate to a camera’s video page, and click Share > Video stream > Share stream externally.
You will see a list of all the previous users with live stream access.
-
Select the user whose access you want to extend.
-
Click Extend for 1 hour as many times as needed.
This extends access for all active streams shared with the selected user.
-
Click Done.
Deleting a Stream
You can revoke streams for individual cameras, even if multiple cameras are shared with the same user or email.
-
Navigate to a camera’s video page, then select Share > Video Stream > Share stream externally.
The dialog box shows a list of previous users with live stream access.
-
Select the checkbox for the stream share you wish to delete.
-
Click Delete.
-
Click Done.

Tracking External Live Stream Link Access
You can track when a live stream link is generated, viewed, extended or disabled by visiting the Video access log.
- The "Recipient" column indicates the external email the link was shared to.
- The "User" column will be blank for entries pertaining to viewing the external link since these are non-Dashboard viewers.

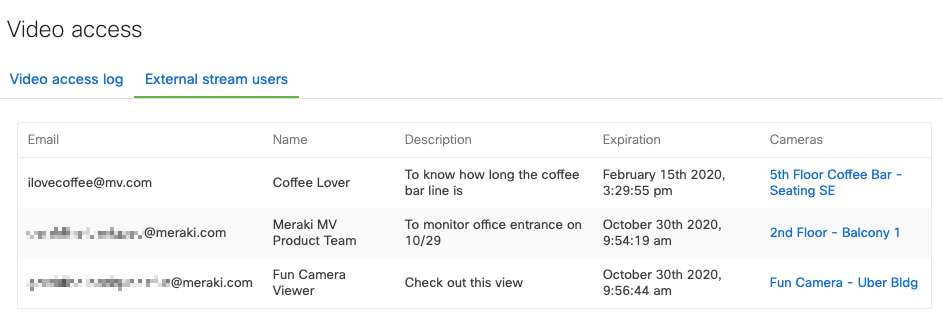
Tracking External Live Stream Users
You can view all users with shared live stream links and their expiration dates on the Cameras > Video access page.
Summary of Important Considerations to External Live Stream Link
-
This technical capability allows authorized users with live and historical camera viewing privileges to share a link to live video streams externally to any email address. This action is logged on the Video access log with the action “External stream link generated”.
-
These temporary links provide external access to live streaming video for anyone with the link.
-
These links do not limit the number of external participants viewing the live video stream.
-
These links provide unauthenticated access and do not confirm the identity of remote viewers.
-
These links contain no warnings and do not require any acceptance of terms and conditions prior to access.
-
These links can be shared with others via email, messaging, or social media.
-
In addition to possible images of subjects, the streams provided by these links include the following information:
-
Meraki Dashboard Organization Name
-
Provisioned Meraki Network Name
-
Meraki MV Camera Name
-
Physical installation address of the camera (if added by Meraki Dashboard user)
-
-
Access for these live links is logged by original email and IP address as “External stream link viewed”
-
To revoke access, the links must be manually removed prior to automatic expiration after 24 hours.