MV Sense Custom Computer Vision
Custom Computer Vision
Custom Computer Vision (Custom CV) allows users to deploy and run custom Machine Learning models directly on MV cameras to perform object detections that are tailored to their unique requirements.
This functionality is available on all second and third-generation hardware. Custom CV allows to run one custom model at a time and needs to be enabled per camera. It is available under MV Sense License, and 10 free MV Sense Licenses are included in every MV organization.
When Custom Computer Vision is enabled, the default Meraki analytics are disabled. This includes motion detection, people & vehicle detection, and audio analytics.
Custom CV is available in networks running MV 4.17+.
Uploading of new Custom CV artifacts requires Organization Administrator access.
High-Level Overview
A customer or a partner develops a custom computer vision model to detect objects tailored to the business use case, making sure that the model format is compliant with the Custom Artifact Requirements described in this document. Then, enables MV Sense license for the camera of their interest and uses Custom CV APIs or Dashboard UI interface to enable Custom CV and upload a model to the camera. Optionally sets additional parameters such as detection threshold. Once a model is successfully uploaded to the camera, if all Custom Artifact Requirements requirements are satisfied, the chosen camera starts model inference. To retrieve the detection output results from the camera MQTT protocol is used for communication between the device and the customer's, or partner's application. Follow the documentation to learn more about MQTT and how to get started.

Before starting
The term artifact is used to describe a zip archive file that contains model.tflite file and an optional configuration file.
Custom Artifact Requirements
-
The artifact should be a zip archive which extracted size is no more than 40 MB
-
The artifact should contain a tflite model file which is named exactly "model.tflite"
-
The tflite model should comply with the following interface:
Inputs
|
Index |
Type |
Description |
|---|---|---|
|
0 |
float32 |
A tensor representing an RGB image in NHWC order, i.e. taking the shape of [1, height, width, 3]. The tensor should represent a normalized image, where each value should be between -1 and 1. |
Outputs
|
Index |
Type |
Description |
|---|---|---|
|
0 |
float32 |
Locations. Multidimensional array of [N][4] floating point values between 0 and 1, the inner arrays representing bounding boxes in the form [top, left, bottom, right]. |
|
1 |
float32 |
Classes. Array of N integers (output as floating point values) each indicating the index of a class label |
|
2 |
float32 |
Scores. Array of N floating point values between 0 and 1 representing probability that a class was detected. |
|
3 |
float32 |
Number of detections. Value of N. |
If you use the tflite converter to create a tlite model from a saved TensorFlow model, the output order may sometimes differ from what you expect. This can result in not receiving MQTT messages. To resolve this issue, try using a tflite converter version (<=2.5) or lower.
If you are unsure how to begin, use the example tflite object detection model.
Artifact Packaging
-
Starter model: ssd-mobilenet-v1 - a tflite model trained on COCO dataset
-
Use any tflite model that meets the above requirements and is smaller than 40MB.
-
Rename your tflite file as "model.tflite". This is a necessary step. A model file with other names will not be accepted.
-
Compress your model to a .zip archive, make sure the file is at the root of the archive, i.e., do not put it under any directories when zipping.
Get Started
There are two ways to get started with MV Sense Custom CV: the Meraki Dashboard UI or Custom CV APIs.
Dashboard UI
To enable MV Sense Custom CV using the Meraki Dashboard, navigate to the desired camera's Settings > Sense > Custom CV section. If the Custom CV section is not visible, ensure the Sense API is enabled.

If you have not uploaded any Custom CV artifacts:
1. Click Custom CV Enable button.
2. Agree to the terms and conditions
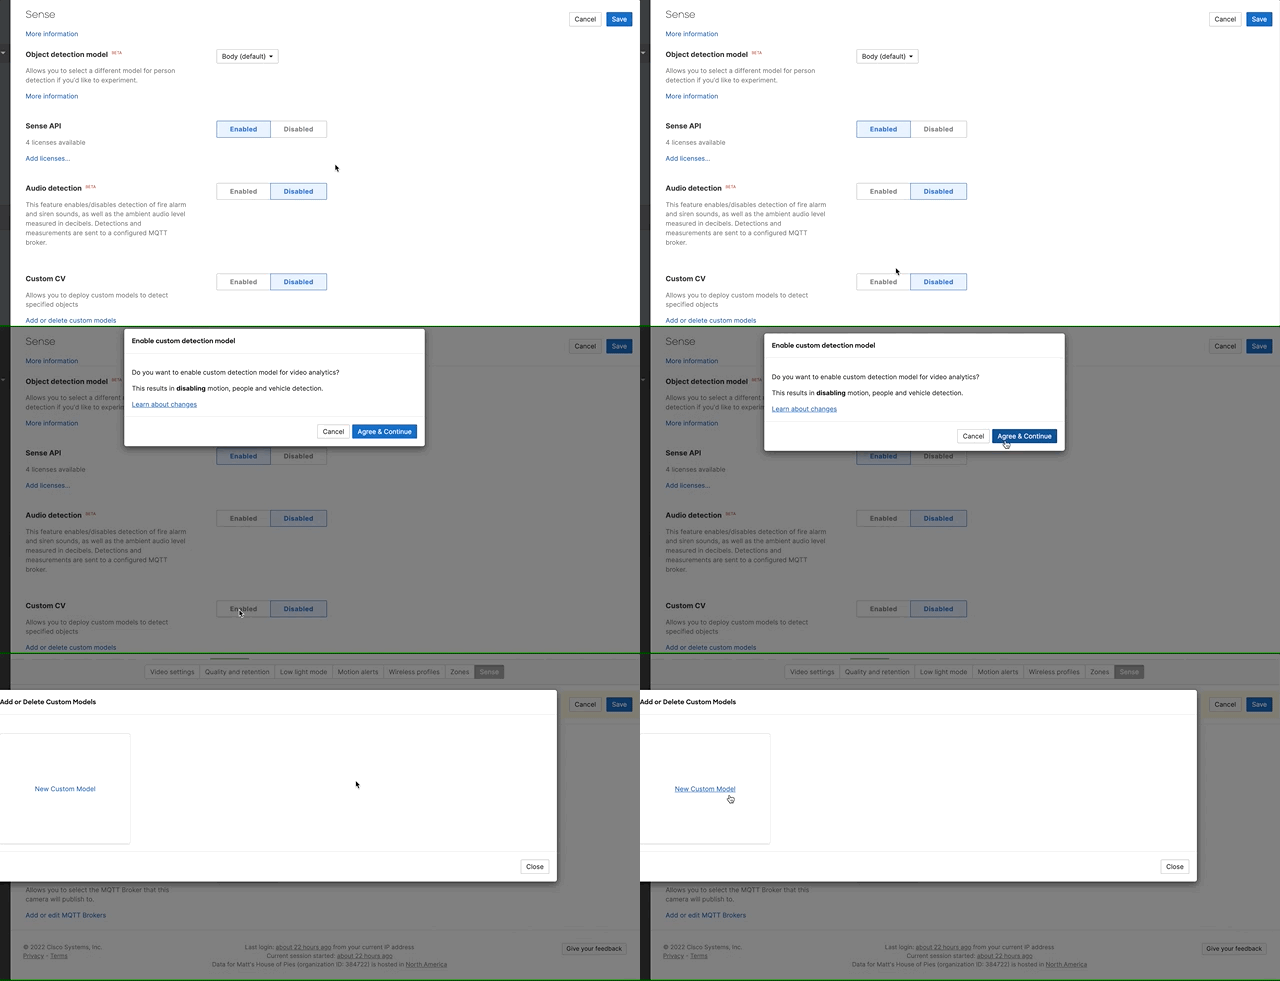
3. Click add custom model.
4. Upload an artifact: provide a model name and an artifact zip file
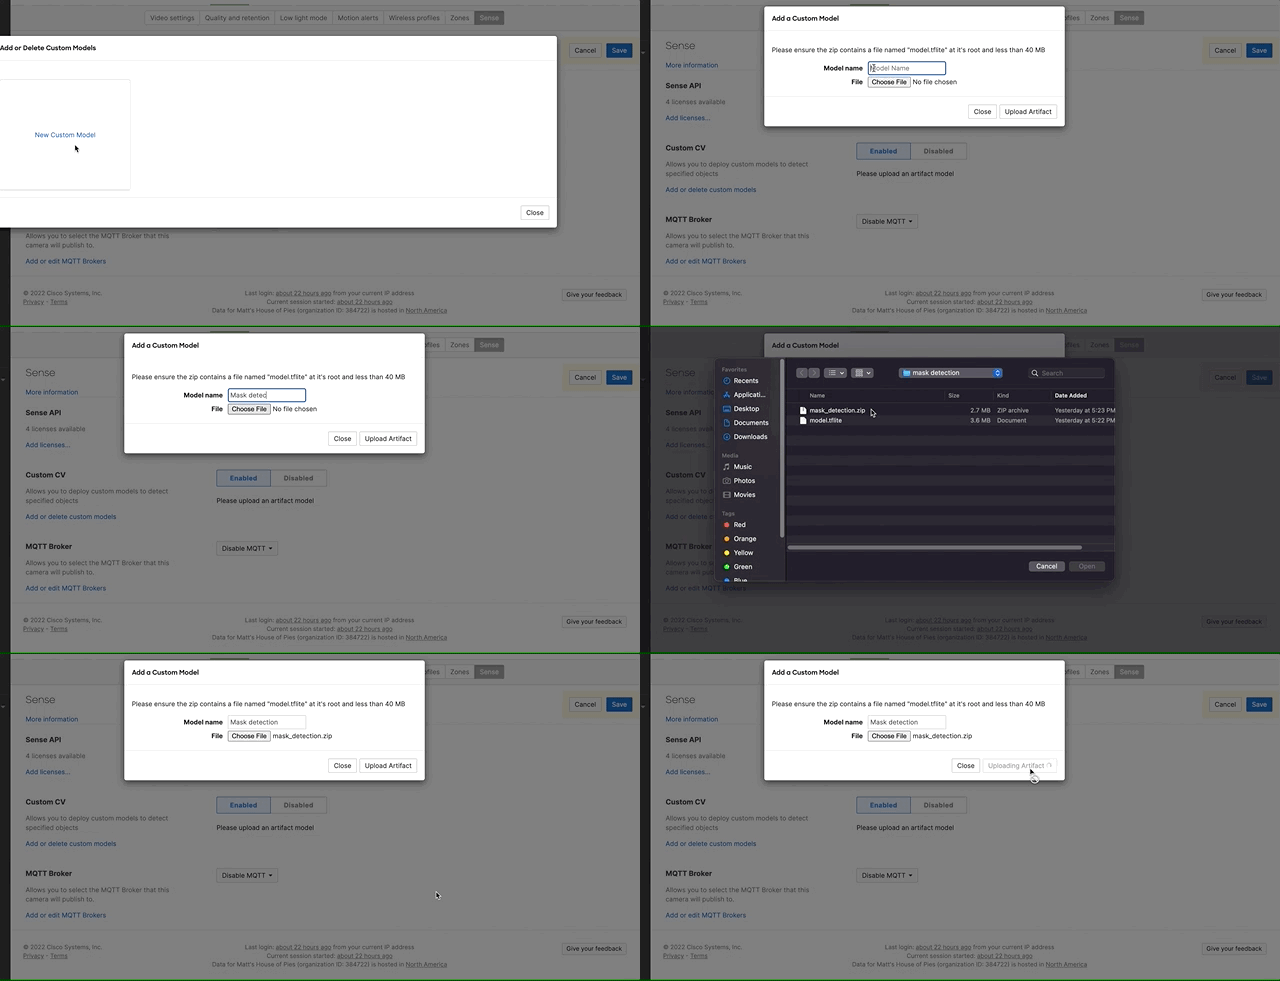
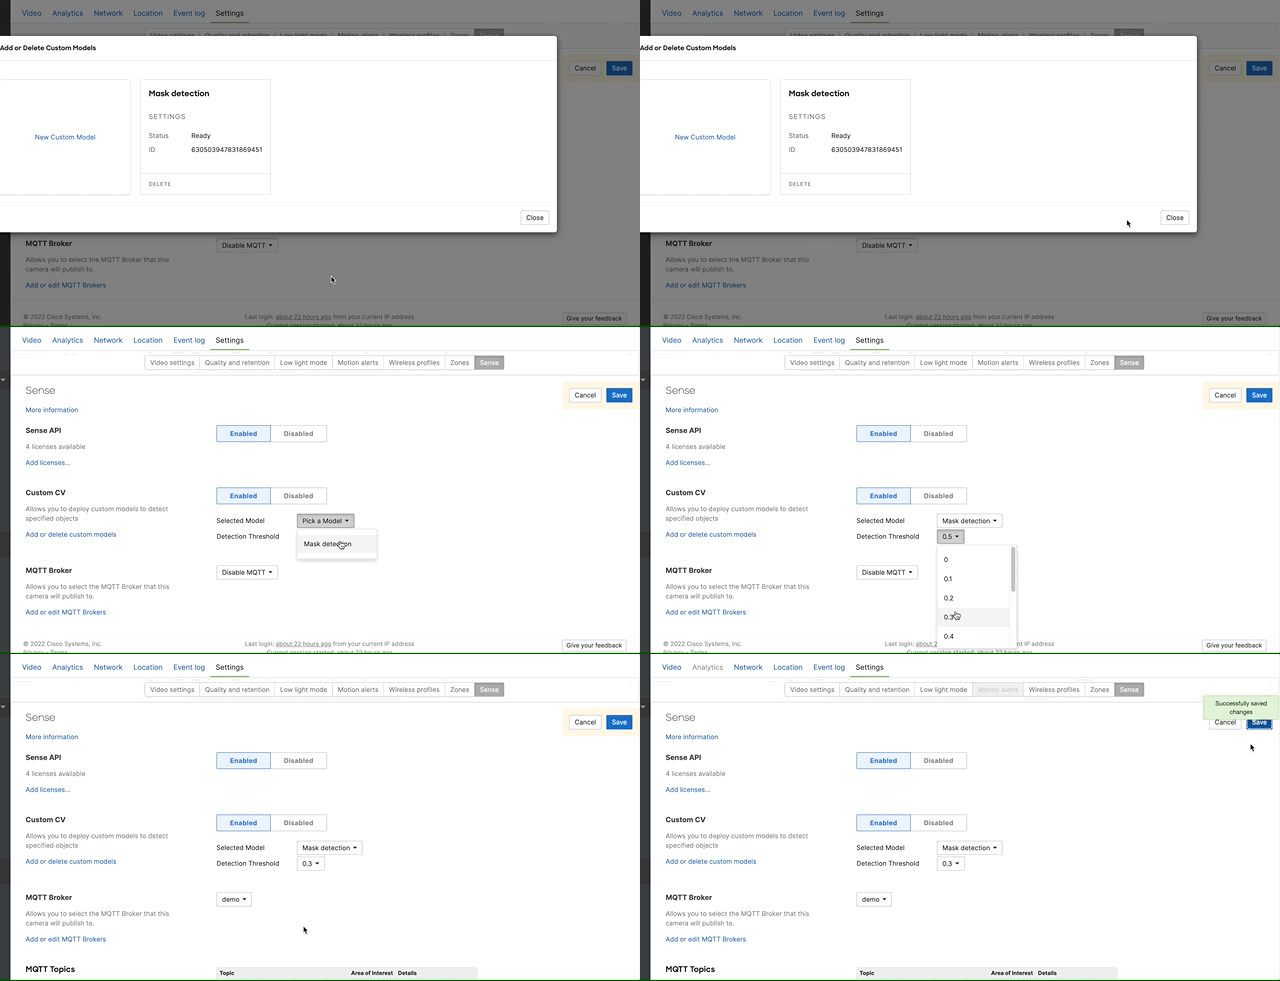
5. Once uploaded, close the modal window.
6. Select a model from the dropdown list.
7. Optionally, you can set a detection threshold that filters detections based on prediction confidence score. Defaults to 0.5 (50%).
8. Click Save on the top right corner when artifact is successfully uploaded.
If you have already uploaded an artifact:
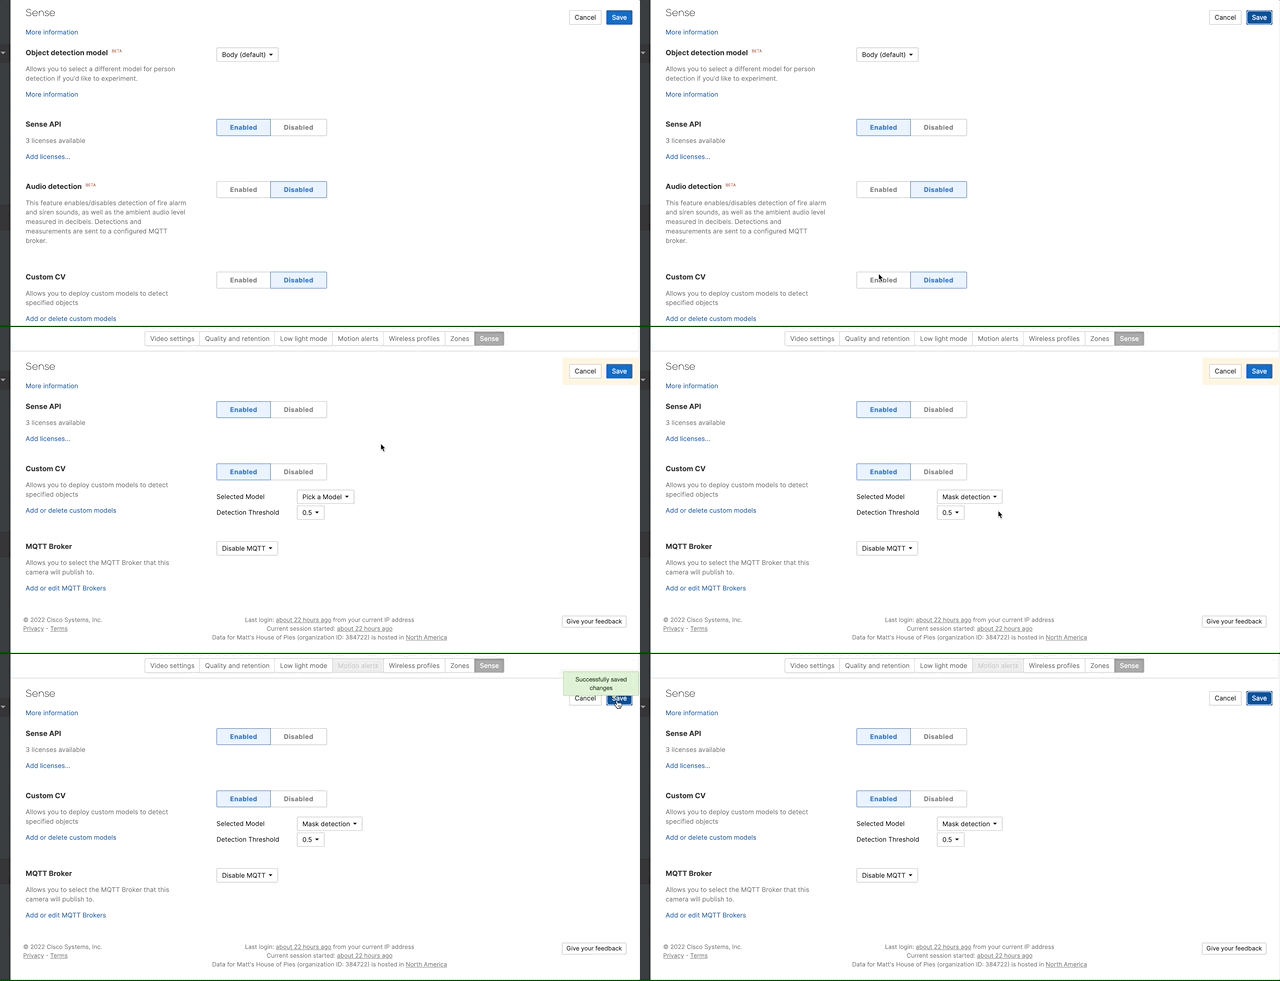
1. Click Custom CV Enable button.
2. Agree to the terms and conditions.
3. Choose the model from the dropdown list.
4. Optionally, you can set a detection threshold that filters detections based on prediction confidence score. Defaults to 0.5 (50%).
5. Click button “save” on the top right corner.
Dashboard API
To get started with API please refer to the API documentation which is accessible through Dashboard > Help > API docs Custom CV section.
To use the API, ensure you have both the Dashboard API Key and the Organization ID.
Getting the data
MQTT
All the MV cameras provide MQTT client to retrieve detection outputs. If you are not familiar with MQTT follow this documentation to learn more about protocol and how to enable it for your organization.
To receive detection outputs from camera subscribe to the topic below from your MQTT broker.
`/merakimv/<DEVICE_SERIAL>/custom_analytics`
Example MQTT message:
{
    "outputs":
        [{
            "class":0,
            "id":123,
            "location":[0.1,0.2,0.4,0.3],
            "score":0.7
         }],
     "timestamp":1646175500000
}
Outputs: An array of detected objects
Detections: Each detection represents a detected object that has its object class type, detection id, location coordinates [left, top, right, bottom] or [x0,y0,x1,y1] and probability score.
Timestamp: time & date when detections occur
Custom CV Webhooks
Custom CV Webhooks are a powerful feature that allow you to receive real-time custom model detections and/or frames from your Meraki MV cameras. Custom CV Webhooks extend Meraki Cloud webhooks capabilities.
Key Concepts
Before diving into the configuration details, let's cover some key concepts related to Meraki webhooks:
-
Webhook: A webhook is an HTTP callback or POST request that is triggered by specific events or data changes in your Meraki network. When an event occurs, Meraki sends an HTTP request to a customer owned specified URL (webhook receiver) with relevant data, allowing you to respond to the event programmatically.
-
Custom Payload Template: Webhooks in Meraki require you to provide a custom payload template in the webhook server configuration. This template defines the structure of the data you will receive in your webhook message. While creating the template, you will use Liquid template tags and filters to format the data.
-
Liquid Template: Liquid is a lightweight templating language used to generate dynamic content in web pages and, in this case, in webhook payloads. In Meraki, you can use Liquid tags and filters to access and manipulate data from events.
Configuration Steps
To get started with Custom CV webhooks, follow these steps:
Configure a Webhook Service: In your Meraki dashboard, go to the "Webhook" section under "Network-wide > Alerts." Here, you'll configure the webhook service, define the events you want to monitor, and set up the URL where Meraki should send webhook data.
Create a Custom Payload Template: Click on "Add or edit webhook templates" to create a custom payload template. Configure the template per your needs and hit "Save". This template will determine how the data is formatted when it's sent to your webhook receiver.
The creation of custom payload templates via Dashboard UI using "Add or edit webhook templates" button is only available when you opt-in “Early API Access” at Organization > Early Access; If you don't want to opt-in, please create a custom payload template using a webhook API.
Custom Payload Template Example:
{
    "device": "{{ deviceSerial }}",
    "data": {{ alertData | jsonify }}
}
Configure Custom CV Webhook: Click “Add an Https Receiver”. Provide all necessary information e.g. name and select the custom template. (Optional): To ensure that your webhook is properly configured, you can use the "Send test webhook" feature to send a test event to your webhook receiver URL.
Configure Webhook on Camera: To enable webhooks on the device you need to use Custom CV Webhook API [A LINK TO THE CUSTOM CV WEBHOOK API DOC].
| Parameter Name | Value |
|---|---|
|
X-Cisco-Meraki-API-Key (Header) |
Meraki Dashboard API KEY |
|
|
Custom CV artifact ID |
|
detection_threshold
|
artifact detection threshold |
|
dev_output_webhook_server |
Use the following API to receive retrieve a webhook ID, for that you will need to have a Network ID. |
|
dev_output_enable_snapshot_end_time |
Expiration date "YYYY-MM-DD" for sending camera detection frames, can be set to max 7 days starting from the date of configuration |
| dev_output_json_filter | Set to:
{\"type\":\"object\"}
To customise this further, view the "How do I manage filters?" section below. |
The following is an example command to set these parameters, note that you need to substitute the parameter values with your own:
cURL
curl -s -H "Content-Type: application/json" \
    -H "Accept: application/json" \
    -H "X-Cisco-Meraki-API-Key: $MERAKI_DASHBOARD_API_KEY" \
    -d '{"enabled":true,"artifactId":"$ARTIFACT_ID","parameters":[\
   {"name":"detection_threshold","value":$DETECTION_THRESHOLD},\
     {"name":"dev_output_webhook_server","value":"$WEBHOOK_ID"},\
     {"name":"dev_output_enable_snapshot_end_time","value":"$EXPIRATION_DATE"},\
     {"name":"dev_output_json_filter","value":"{\"type\":\"object\"}"}]}'\
    -X PUT "https://api.meraki.com/api/v1/devices/$DEVICE_SERIAL/camera/customAnalytics
Python Requests
import requests
import json

merakiHeaders = {"X-Cisco-Meraki-API-Key": "$MERAKI_DASHBOARD_API_KEY", "Content-Type": "application/json"}

ciBody = {
    "enabled": True,
    "artifactId": "$ARTIFACT_ID",
    "parameters": [
        {
            "name": "detection_threshold",
            "value": $DETECTION_THRESHOLD
        },
        {
            "name": "dev_output_webhook_server",
            "value": $WEBHOOK_ID
        },
        {
            "name": "dev_output_enable_snapshot_end_time",
            "value": $EXPIRATION_DATE
        },
        {
            "name": "dev_output_json_filter",
            "value": "{\"type\":\"object\"}"
        }
    ]
}
res = requests.put(url=f"https://api.meraki.com/api/v1/devices/$DEVICE_SERIAL/camera/customAnalytics", headers=merakiHeaders, data=json.dumps(ciBody))
Making this request will modify the Camera's MV Sense settings on the Dashboard. Any changes made to the Camera's Sense Settings on the Dashboard will currently remove the Webhook Server configuration from the camera.
Example of payload body received by the server (based on the template above)
{
  "serial": "XXXX-YYYY-ZZZZ",
  "mac": "00:00:00:00:00:00",
  "data": {
    "outputs": [
      {
        "class": 0,
        "id": 1,
        "location": [
          0.422,
          0.363,
          0.508,
          0.623
        ],
        "score": 0.344
      }
    ],
    "snapshot": "data:image/jpeg;base64,/9j/4AAQSkZJRgABAQAAAQABAAD/2wBDAAIBAQEBAQIBAQECAgICAgQDAgICAgUEBAMEBgUGBgYFBgYGBwkIBgcJBwYGCAsICQoKCgoKBggLDAsKDAkKCgr/2wBDAQICAgICAgUDAwUKBwYHCgoKCgoKCgoKCgoKCgoKCgoKCgoKCgoKCgoKCgoKCgoKCgoKCgoKCgoKCgoKCgoKCgr/wAARCAIcA8ADASIAAhEBAxEB/8QAHwAAAQUBAQEBAQEAAAAAAAAAAAECAwQFBgcICQoL/8QAtRAAAgEDAwIEAwUFBAQAAAF9AQIDAAQRBRIhMUEGE1FhByJxFDKBkaEII0KxwRVS0fAkM2JyggkKFhcYGRolJicoKSo0NTY3ODk6Q0RFRkdISUpTVFVWV1hZWmNkZWZnaGlqc3R1dnd4eXqDhIWGh4iJipKTlJWWl5iZmqKjpKWmp6ipqrKztLW2t7i5usLDxMXGx8jJytLT1NXW19jZ2uHi4+Tl5ufo6erx8vP09fb3+Pn6/8QAHwEAAwEBAQEBAQEBAQAAAAAAAAECAwQFBgcICQoL/9k=",
    "timestamp": 1686669655302
  }
}
The data received is dependent on the configured webhook server. Example above does not include the entire encoded base64 image.
How do I manage filters?
Provide meraki representative with a filter json schema, they will update the camera configuration for you.
Please refer to https://json-schema.org/ to learn more about supported json schema version is draft v4.
Example json schema
This example schema passes when all detected objects in a frame have a score less than 0.9:
 {
    "type": "object",
    "properties": {
        "outputs": {
            "type": "array",
            "items": {
                "type": "object",
                "properties": {
                    "Score": {
                        "Type": "number",
                        "Maximum": 0.9
                    }
                }
            }
        }
    }
}
Example json schema in payload
This is the above example schema when formatted for the API request:
{
    "name": "dev_output_json_filter",
    "value": "{\"type\":\"object\",\"properties\":{\"outputs\":{\"type\":\"array\",\"items\":{\"type\":\"object\",\"properties\":{\"Score\":{\"Type\":\"number\",\"Maximum\":0.9}}}}}}"
}
Example result for filtering
{
    "outputs": [
        {
            "class": 0,
            "id": 1,
            "location": [
                0.422,
                0.363,
                0.508,
                0.623
            ],
            "score": 0.344
        }
    ],
    "timestamp": 1686669655302
}
Custom CV artifacts uploads are failing
1. We allow only .zip files that contain only "model.tflite" file inside. Check .zip file for any other foreign files e.g. ".DS_store" and remove them. Try uploading again.
2. Check the error message when upload happens. Make sure that model is built using the approved tflite version listed in the document above, and model input and outputs satisfy the custom artifact requirements.
Custom CV models aren't available for selection
Confirm your custom artifact has been successfully uploaded to your artifact store. You can observe this by either using the Dashboard API to GET all custom artifacts or by viewing the "Add or delete custom models" on the Custom CV subsection of your camera settings' Sense subtab.
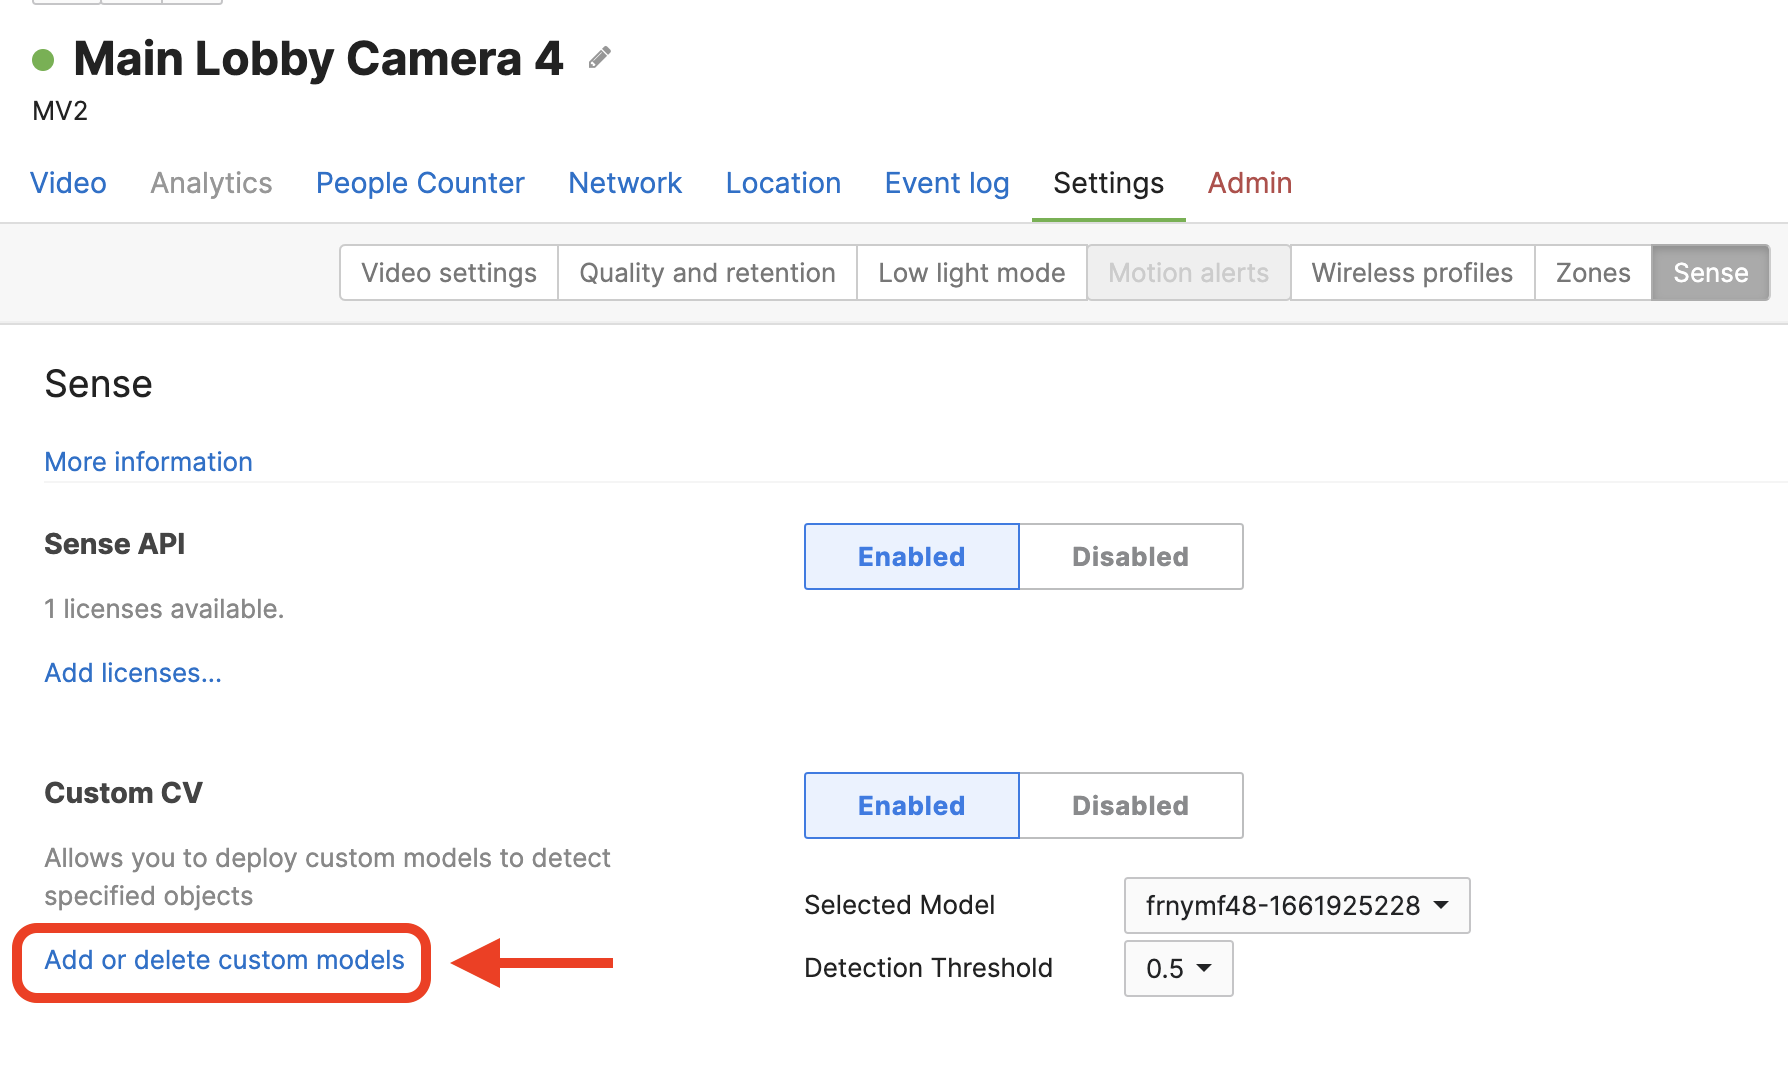
Before contacting support, please verify following cases:
1. Camera can detect objects but not all - please see "Custom CV model perfomance issues" section below.
2. The camera is connected to MQTT broker, but MQTT broker does not receive any detections. A potential issue may lie in mqtt broker config settings or in network restrictions.
Custom CV model performance issues
If there is an issue with model performance (e.g. object detections are inconsistent, detections are slow, object tracking is poor), Meraki Support cannot assist with these matters directly. Please consult the documentation of your Custom CV developer/provider or contact their support directly. If you are using a service from a Cisco SolutionsPlus provider, please see the following section.
Support for Cisco SolutionsPlus Offerings for Custom CV
Below are the contact details for Custom CV offerings available through Cisco SolutionsPlus vendors. Please use review their documentation or contact their support if there are performance issues with the model. If there is an issue with the Custom CV service, please review the troubleshooting guidelines above and contact Meraki Support for further assistance.
Cogniac

Cogniac provides a simple, no-code platform for customers to easily define and deploy their own custom object detection with as few as 50 images to start. To learn more, please see their product page here.
Regions supported: America, EMEA, APJC, LATAM
· Support Email Address: Support@cogniac.co
160 W Santa Clara St, San Jose, CA 95113
· Support Phone Number:
+1 (888) 634-7483
+1 (805) 392 9976
· Support Hours:
24 X 7 (round the clock support)

