
Understanding Image Quality on Fisheye Form Factor Cameras
Overview
This article explains the differences in sensor resolution and field of view between fisheye form factor cameras and dome form factor cameras, and how those differences affect image quality. It also provides examples of how to determine an optimal deployment using pixels-per-foot (PPF), and other configurable settings to estimate the expected quality at a given distance of a subject.
This article assumes a basic understanding of key camera terms. For a review of the terminology needed, see the article Meraki MV Cameras - Introduction and Features.
For guidelines on where to deploy fisheye cameras for optimal results, refer to the MV32 Installation Guide or the MV93 Installation Guide.
Image quality differences across camera form factors
The fisheye form factor uses the widest of all wide-angle lenses, which means it can capture more of a scene than any other camera form factor. As a result, an object seen through a fisheye camera occupies a smaller portion of the image compared to the same object viewed through a narrow-angle lens such as a dome form factor camera. Fisheye cameras are useful for scenarios that require a wider field of view and overall context, whereas other form factors provide higher levels of detail.
Below are examples of the same scene captured by different form factor cameras:
.png?revision=1)
An MV63 at 4MP, 102° FoV:

An MV93 at 2880x2880, 180° FoV:

Image quality comparisons of fisheye and dome cameras
Every camera has fixed specifications and user-configurable settings that affect quality. For fisheye cameras, the most important specifications are:
-
Sensor resolution, which determines what image resolutions are available.
-
Lens focal length, which dictates the camera's field of view (FoV).
The table below outlines these specifications for select Cisco Meraki MV smart cameras, showing how fisheye cameras differ from dome cameras:
|
Specification |
Resulting image |
|
|---|---|---|
|
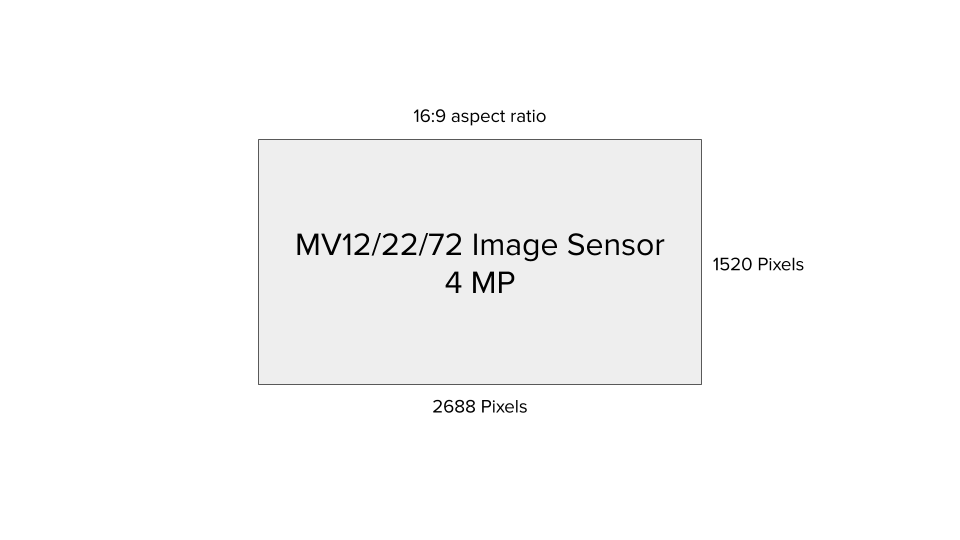
Sensor resolution The MV32 has an 8.3MP sensor and the MV12, MV22, and MV72 have a 4MP sensor. The usable sensor resolutions for all these cameras are essentially equivalent. |
MV12/22/72: 4MP |
4MP with all 4MP usable due to 16:9 aspect ratio
|
|
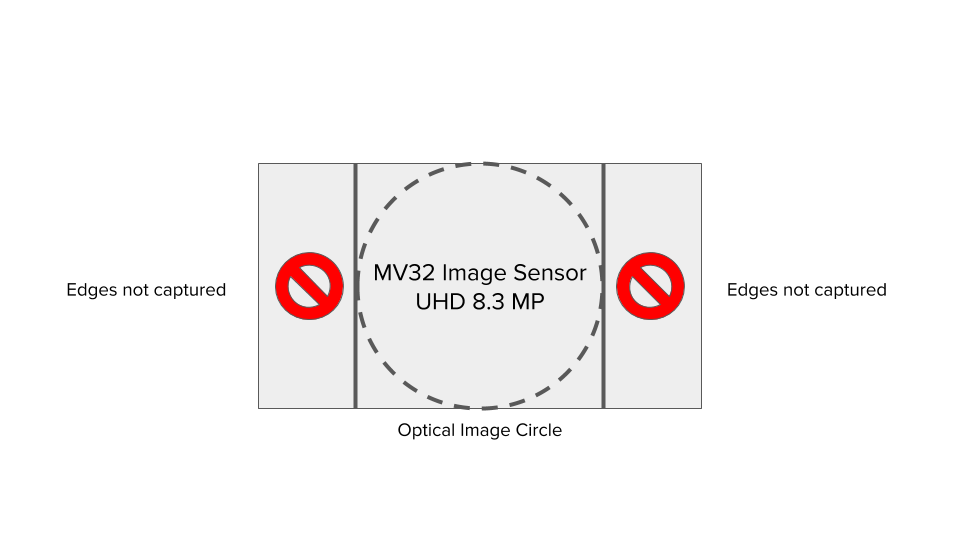
MV32: 8.3MP |
8.3MP but effectively only ~4.2MP usable due to 1:1 aspect ratio
|
|
|
Sensor resolution The MV93 has a 12.4MP sensor and the MV63 has an 8.41MP sensor. The usable sensor resolutions for all these cameras are essentially equivalent. |
MV63: 8.41MP |
8.41MP with almost all 8.4MP usable due to 16:9 aspect ratio
|
| MV93: 12.4MP |
12.4MP but effectively only ~8.3MP usable due to 1:1 aspect ratio
|
|
|
Lens focal length Although the usable sensor resolution for the MV12, MV22, MV72, and MV32 cameras are essentially equivalent, the MV32 covers a much larger field of view. As a result, a specific object is captured using fewer total pixels, as characterized by PPF. |
MV12N: 73° MV12W: 114° MV22/72: 36° - 112° |
The amount of detail decreases linearly the further away it is from the camera:
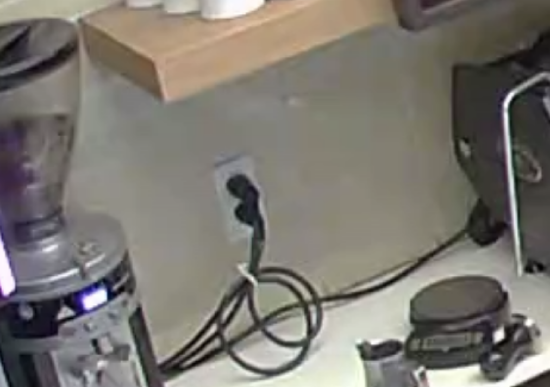
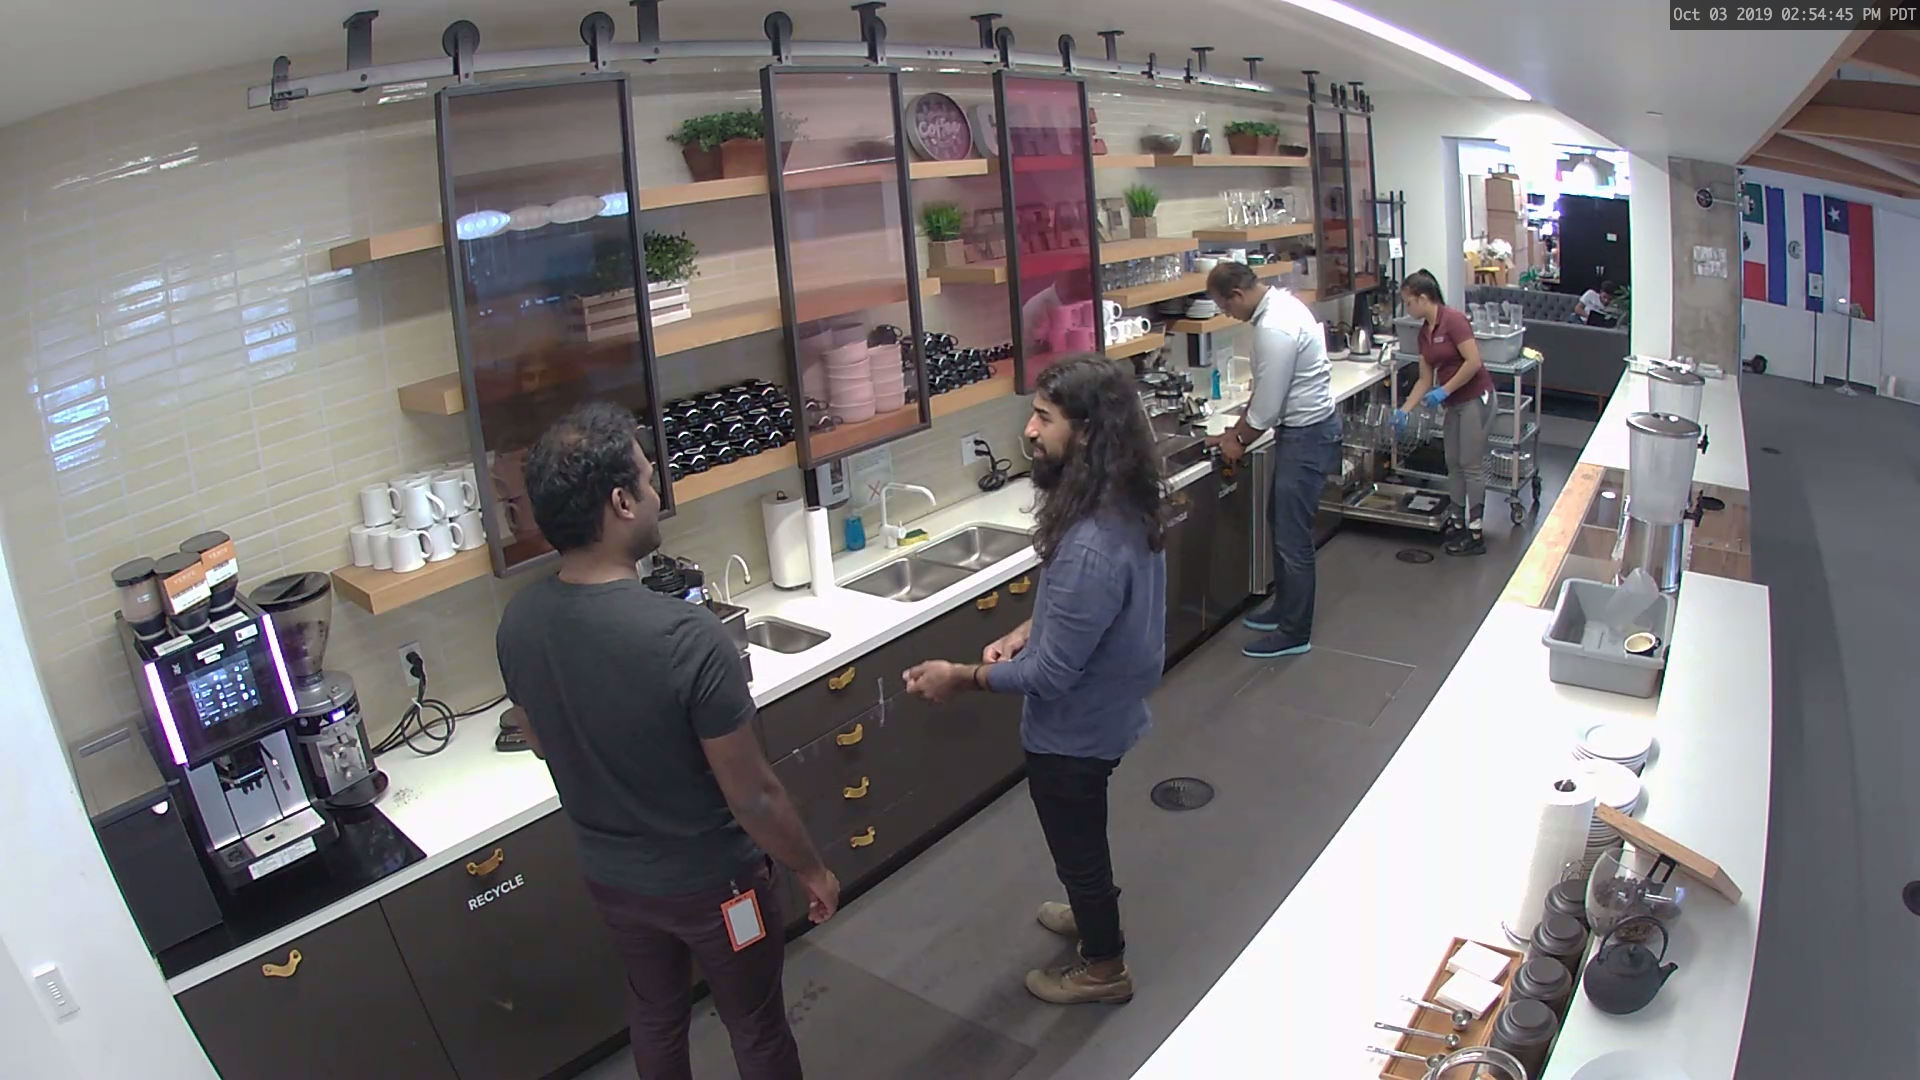
A zoomed-in shot of the coffee bar:
|
|
MV32: 180° |
The amount of detail decreases at a faster rate the further away it is from the camera:
A zoomed-in shot of the coffee bar:
|
|
|
Lens focal length Although the usable sensor resolution for the MV63 and MV93 cameras are essentially equivalent, the MV93 covers a much larger field of view. As a result, a specific object is captured using fewer total pixels, as characterized by PPF. |
MV63: 102° Amount of detail decreases linearly the further away it is from the camera: |
A digitally zoomed-in shot of the "Camera sign":
|
|
MV93: 180° |
The amount of detail decreases at a faster rate the further away it is from the camera:
A digitally zoomed-in shot of the "Camera sign":
|


The configured image resolution and field of view (FoV) determine the pixels-per-foot (PPF) of a subject at a specific distance and angle from the camera. PPF measures image quality, but several other user-configurable settings also influence it.
Understanding sensor resolution and image resolution
Image resolution
Image resolution is the main setting that affects quality. It is the number of pixels used to capture details in a scene. Higher resolution means better quality because more pixels are available.
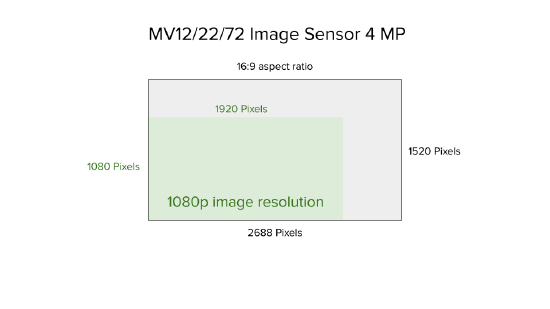
A camera's sensor resolution determines the highest image resolution the camera can produce. Sensor resolution is measured in megapixels (MP), where 1 MP equals one million pixels. For example, a 4MP sensor (2688 pixels wide by 1520 pixels high at a 16:9 aspect ratio) cannot create an 8MP image. However, the sensor can produce images at or below its maximum resolution, such as:
- 4MP
- 2MP (1080p or 1920 x 1080 pixels)
- 1MP (720p or 1280 x 720 pixels)
Image resolution example of a fisheye camera: MV32
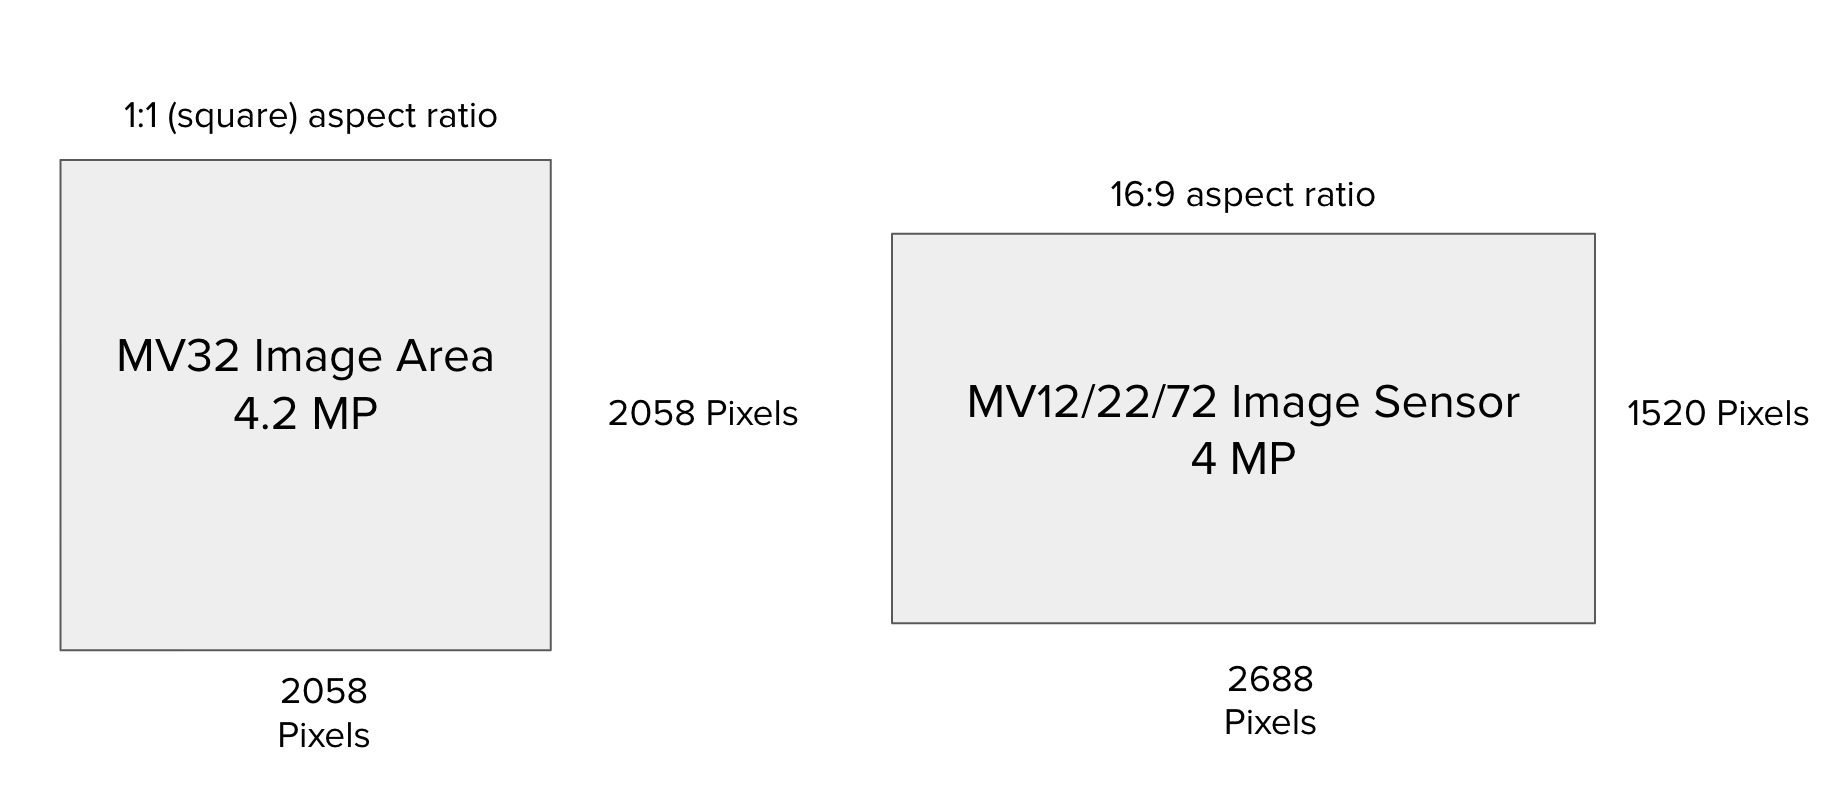
The MV32 has an 8.4MP sensor, and the MV12, MV22, and MV72 models have a 4MP sensor. Although the MV32 has a higher sensor resolution, the maximum number of pixels used for the MV32 is 2058 x 2058, which is an effective ~4.2MP sensor resolution — comparable to the 4MP sensor resolution of the MV12, MV22, and MV72.
Image resolution example of a fisheye camera: MV93
The MV93 has a 12.41MP sensor, and the MV63 has an 8.4MP sensor. Although the MV93 has a higher sensor resolution, its maximum effective resolution is 2880 x 2880 pixels, which is an effective 8.3MP — close to the MV63's 8.4MP sensor resolution.
Sensor resolution
Sensor resolution is the total pixels available on the image sensor. It is calculated by multiplying the horizontal pixel count by the vertical pixel count.
Sensor resolution example of dome cameras: MV12, MV22, and MV72
The sensor of the MV12, MV22, and MV72 is composed of 2688 x 1520 pixels = 4,085,760 pixels = ~4MP.

This sensor uses a 16:9 aspect ratio, which is common in image resolutions like 720p and 1080p. The full 4MP resolution (2688 x 1520) is used for 16:9 images. To capture a 4:3 image, the sensor omits some pixels to match the different shape.
To accommodate reasonable bitrates and video retention, the MV12, MV22, and MV72 do not support 4MP image resolution. Instead, these cameras offer 720p and 1080p options.
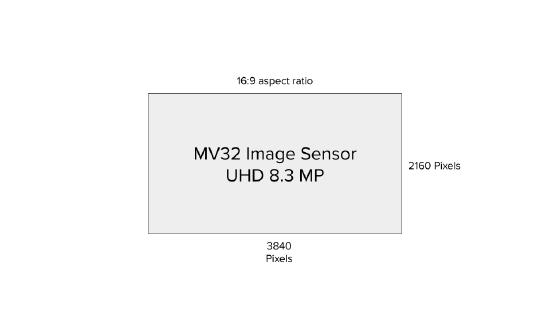
Sensor resolution example of a fisheye camera: MV32
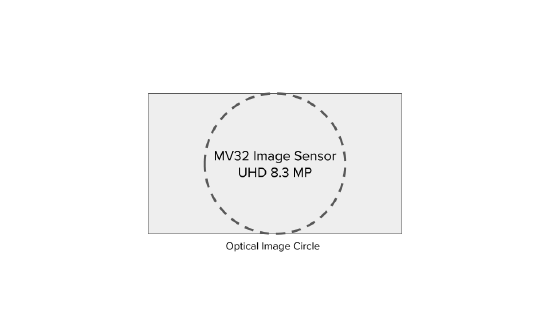
The sensor of the MV32 is composed of 3840 x 2160 pixels = 8,294,400 pixels, which is ~8MP. This sensor has a 16:9 aspect ratio. However, because a 360-degree camera creates a circular image best enclosed in a 1:1 aspect ratio, the image can theoretically use at most 2160 pixels in both the horizontal and vertical directions.
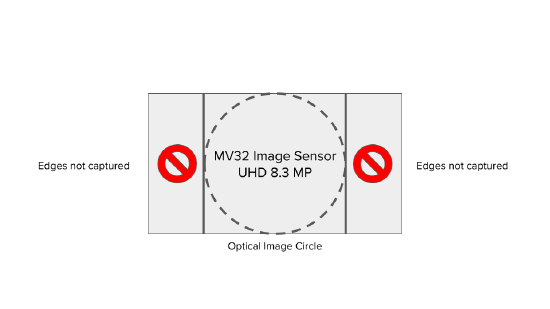
The MV32 crops a few pixels at the edges due to lens distortion. The camera exposes a maximum image resolution of 2058 x 2058, with a downsampled option of 1080 x 1080.
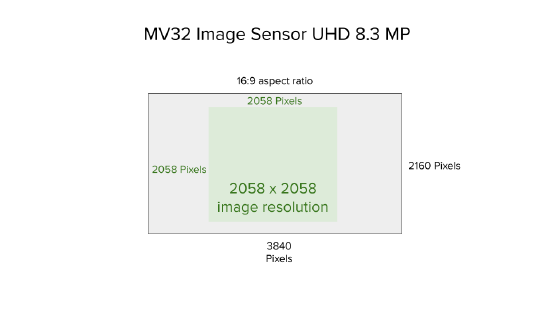
The MV32 has an 8.4MP sensor, but uses a maximum of 2058 x 2058 pixels, which equals about 4.2MP effective resolution. This is similar to the 4MP sensor resolution of the MV12, MV22, and MV72. However, both cameras do not capture the same image quality. The MV32's field of view greatly influences the detail it can capture. The next section explains this using the pixels-per-foot (PPF) concept.
Sensor resolution example of a dome camera: MV63
The MV63 sensor has 3854 x 2176 pixels, totaling 8,386,304 pixels, which is approximately 8.4MP.

This sensor has a 16:9 aspect ratio, common in image resolutions like 720p, 1080p, and 4K. The sensor can use the full 8MP (3840 x 2160) to capture an image with a 16:9 aspect ratio, resulting in an 8MP image. To use a different aspect ratio, such as 4:3, some pixels are unused to fit the new shape on the image sensor.
![]()
Sensor resolution example of a fisheye camera: MV93
The MV93 has a sensor with 4072 x 3046 pixels, totaling 12,403,312 pixels, or about 12.4MP. This sensor has a 16:9 aspect ratio. However, because a 360-degree camera creates a circular image best enclosed in a 1:1 aspect ratio, the image can only use up to 3046 pixels in both the horizontal and vertical directions. The MV93 crops a few pixels at the edges due to lens distortion. The camera exposes a maximum image resolution of 2880 x 2880, with downsampled options of 2112 x 2112 and 1080 x 1080.
![]()
![]()
![]()
The MV93 has a 12.4MP sensor, but uses a maximum of 2880 x 2880 pixels, which equals about 8.3MP effective resolution. This is similar to the 8.4MP sensor resolution of the MV63. However, both cameras do not capture the same image quality. The MV93's field of view greatly influences the detail it can capture. The images below highlight the differences between the two cameras, comparing their equivalent aspect ratios and pixel density:


Using pixels-per-foot (PPF) to estimate image quality
Lens focal length dictates the camera's field of view (FoV). A shorter focal length generally means a larger FoV. FoV affects image quality by controlling the rate at which detail decreases the farther a subject is from the camera.
Detail in images can be quantified using the concept of pixels-per-foot (PPF). Assuming ideal conditions and good image tuning, PPF is a reliable way to compare the quality of a subject at different distances as viewed through different cameras. Refer to Other user-configurable settings to determine which settings can tune the image for the most ideal conditions and a more accurate PPF calculation.
PPF is calculated as follows:
PPF = horizontal pixels / FoV width (in feet)
Achieve a higher PPF (more detail) by:
-
Increasing horizontal pixels
-
Decreasing field of view width
On fisheye cameras, the field of view is fixed at 180°, so the only way to increase PPF is by using a higher image resolution. Because the field of view width for an object viewed through a fisheye camera is greater than the same object viewed through a dome camera, the PPF for the fisheye camera will generally be lower.
|
[BETTER] MV12 @ 73° FoV |
MV32 @ 180° fixed FoV |
 |
 |
|
[BETTER] MV63 @ 102° FoV |
MV93 @ 180° fixed FoV |
 |
 |
Horizontal pixels
Increase PPF by increasing horizontal pixels or by selecting a higher image resolution. The horizontal pixels for each image resolution available on MV cameras are shown below:
|
Resolution |
Horizontal x vertical |
|---|---|
|
720p |
1280 x 720 pixels |
|
1080p |
1920 x 1080 pixels |
|
1080x1080 |
1080 x 1080 pixels |
|
2058x2058 |
2058 x 2058 pixels |
| 2560 x 1440 | 2560 x 1440 pixels |
| 2112x2112 | 2112 x 2112 pixels |
| 2880x2880 | 2880 x 2880 pixels |
| 4K | 3840 x 2160 pixels |
FoV width
FoV width results from the camera's FoV, which is dictated by its lens focal length. FoV width is the physical distance captured by the horizontal pixels in the image resolution.
Fisheye cameras cannot be adjusted to optimize FoV width. Use optical zoom on varifocal dome cameras such as the MV22 and MV72, or select the narrower field of view MV12N, to obtain a smaller field of view width.
|
[BEST] Zoomed in 36° FoV |
Zoomed out @ 111° FoV |
|
|
|
For example, the image below is a 1080p image, so the horizontal pixel width is 1920. Measure the FoV width by finding the distance between an object at the far left of the image (for example, the yellow pots on the left) and an object on the far right of the image (for example, the black legs of the chair on the right). PPF is measured in feet, so by converting 10 meters to 32 feet, the PPF of this image is approximately 1920 pixels / 32 feet = 60 PPF.
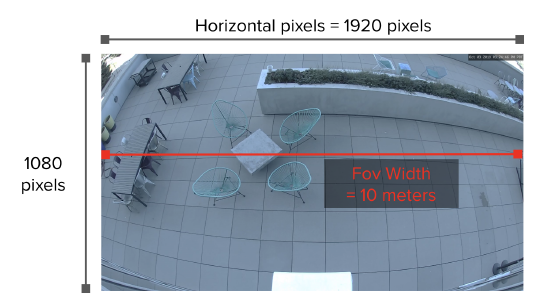
In another example, the image below is a 4K image, so the horizontal pixel width is 3840. Measure the FoV width by finding the distance between an object at the far left of the image (for example, the pink shoes on the left) and an object on the far right of the image (for example, the white strip that runs along the length of the wall). The PPF of this image is approximately 3840 pixels / 10.7 feet = 358 PPF.
![]()
Example PPF values
Below are images with different PPF values:
|
10PPF |
20PPF |
[BEST] 50PPF |
|
|
|
|


|
35PPF |
48PPF |
[BEST] 71PPF |
|---|---|---|
|
|
|
|


Notice how the same distance produces different PPF values across these examples. The PPF is significantly lower for fisheye cameras. Faces are generally distinguishable at approximately 50 PPF. Depending on the mounting height, a fisheye camera may not provide sufficient detail to meet that threshold.
|
Camera type |
Resolution |
Horizontal x vertical |
Distance |
FoV width |
PPF |
Distance |
FoV width |
PPF |
|---|---|---|---|---|---|---|---|---|
|
Dome |
720p |
1280 x 720 pixels |
10 feet |
10 ft |
128 |
15 feet |
~15 ft |
~85 |
| Dome | 1080p | 1920 x 1080 pixels | 10 ft | 192 | ~15 ft | ~128 | ||
|
Super telephoto |
1080p |
1920 x 1080 pixels |
5 ft |
384 |
~7.5 ft |
~256 |
||
| Dome | 4MP | 2560 x 1440 pixels | 10 ft | 256 | ~15 ft | ~170 | ||
|
Fisheye |
1080x1080 |
1080 x 1080 pixels |
~63 ft |
~17 |
~94 ft |
~11.5 |
||
| Fisheye | 2058x2058 | 2058 x 2058 pixels | ~63 ft | ~32.7 | ~94 ft | ~21.9 | ||
| Fisheye | 2112x2112 | 2112 x 2112 pixels | ~63 ft | ~33.5 | ~94 ft | ~22.5 | ||
| Fisheye | 2880x2880 | 2880 x 2880 pixels | ~63 ft | ~45.7 | ~94 ft | ~30 | ||
| Dome | 4MP | 2560 x 1440 pixels | ~10 ft | 256 | ~15 ft | ~170 | ||
| Dome | 4K | 3840 x 2160 pixels | ~10 ft | 384 | ~15 ft | ~256 |
Calculating PPF, example with an MV12N and MV32
Understanding the relationship between PPF, resolution, and FoV is sufficient to conclude that fisheye camera image quality will often be lower than other camera types. However, when a target PPF is set, calculate the required PPF and work backwards to determine what camera provides sufficient detail.
For example, to determine whether a fisheye camera provides sufficient detail for faces (approximately 50 PPF) in the main area of coverage, follow these steps:
-
Identify the image resolution.
-
Assume 1080 horizontal pixels.
-
-
Identify the target PPF.
-
50 PPF
-
-
Calculate the ideal FoV width.
-
50PPF = 1080 / FoV width, so FoV width = 1080 / 50 = 21.6 feet
-
-
Calculate the FoV width for the camera and compare it to 21.6 feet. Use a measuring tape to estimate the FoV width directly. Alternatively, use the distance of the subject from the center of the camera to estimate the FoV width:
-
For dome cameras with a triangular field of view (such as the MV12N), calculate FoV width accurately using trigonometry. A common estimate is that FoV width is approximately equal to the distance from the camera for dome cameras, and approximately half the distance for super telephoto cameras.
-
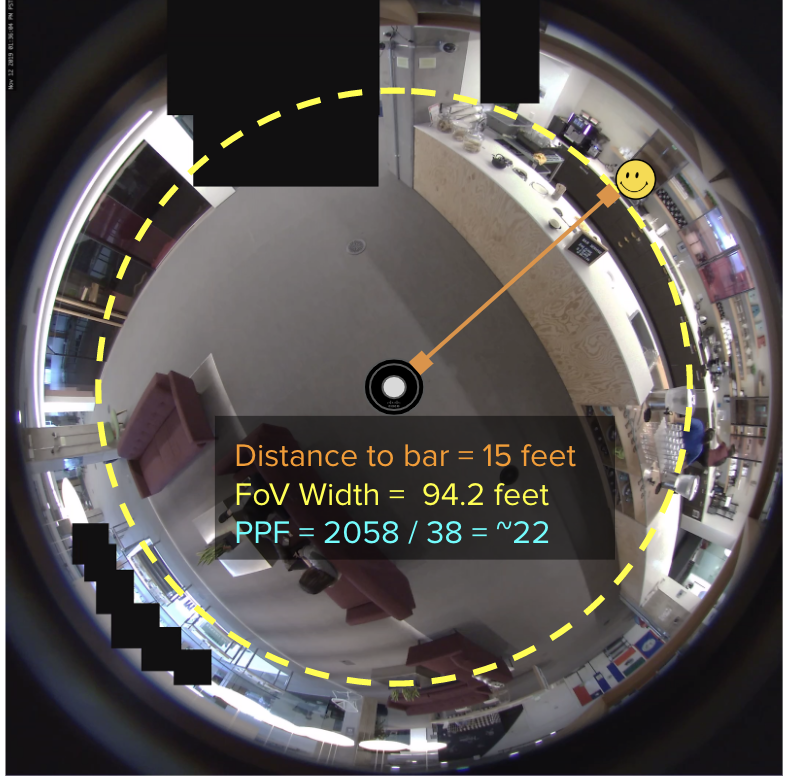
For fisheye cameras with a 360-degree circular field of view (such as the MV32), FoV width equals the circumference (2 × π × radius), where the radius is the distance from the center of the camera (see the diagram below). PPF decreases at a rate of 2 × π for fisheye cameras. At the same distance from the camera, the resulting PPF can be up to approximately 6.28 times lower for a 360-degree camera compared to a standard camera.
-

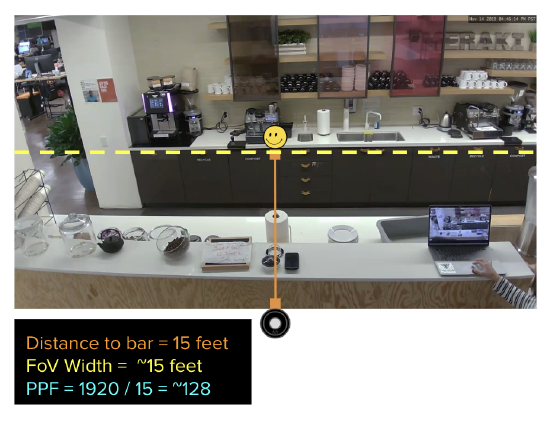
With this information, consider the following scenario using an MV32: capturing sufficient detail to identify faces of people at a coffee bar 15 feet from the camera. This produces a FoV width of 94.2 feet. This exceeds 21.6 feet, so the MV32 is unlikely to provide sufficient detail at that distance. Objects approximately 3.4 feet away (21.6 / 6.28) fall within the MV32's sufficient detail range. Alternatively, use a camera with a smaller FoV that produces a FoV width under 21.6 feet, such as the MV12N, as shown below.
|
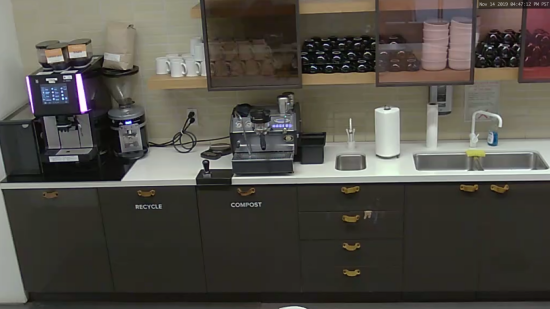
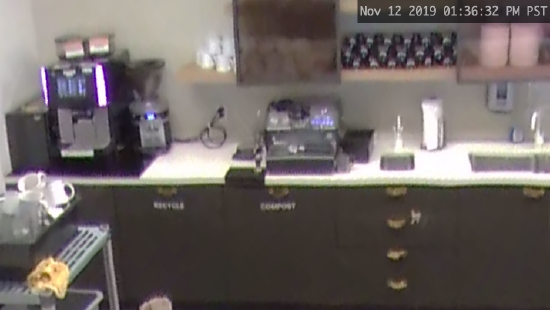
[BETTER] MV12N, zoomed into the coffee bar (PPF = ~128) |
MV32, zoomed into the coffee bar (PPF = ~22) |
 |
 |
Calculating PPF, example with an MV63 and MV93
-
Identify the image resolution.
-
Assume 2560 horizontal pixels.
-
-
Identify the target PPF.
-
50 PPF
-
-
Calculate the ideal FoV width.
-
50 PPF = 2560 / FoV width, so FoV width = 2560 / 50 = 51.2 feet
-
-
Calculate the FoV width for the camera and compare it to 51.2 feet. Use a measuring tape to estimate the FoV width directly. Alternatively, use the distance of the subject from the center of the camera to estimate the FoV width:
-
For dome cameras with a triangular field of view (such as the MV63), calculate FoV width accurately using trigonometry. A common estimate is that FoV width is approximately equal to the distance from the camera for dome cameras, and approximately half the distance for super telephoto cameras.
-
For fisheye cameras with a 360-degree circular field of view (such as the MV93), FoV width equals the circumference (2 × π × radius), where the radius is the distance from the center of the camera (see the diagram below). PPF decreases at a rate of 2 × π for fisheye cameras. At the same distance from the camera, the resulting PPF can be up to approximately 6.28 times lower for a 360-degree camera compared to a standard camera.
-

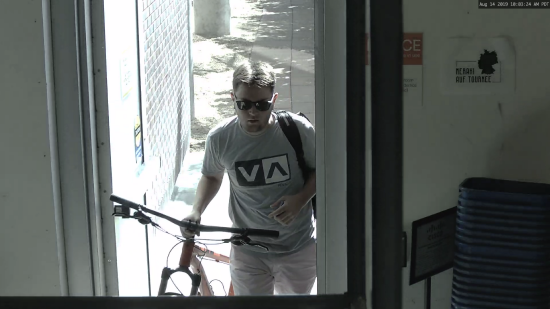
With this information, consider the following scenario for an MV93: capturing enough detail for faces at a camera sign placed 13 feet from the camera. The FoV width is 81.6 feet. This exceeds 51.2 feet, so an MV93 is unlikely to provide sufficient detail at that distance. Objects approximately 8.15 feet away (51.2 divided by 6.28) fall within the MV93's sufficient detail range. Alternatively, use a camera with a smaller FoV that produces a width under 51.2 feet, such as the MV63, as shown below.
|
[BETTER] MV63 (PPF = ~71) |
MV93, zoomed in (PPF = ~22) |
.png?revision=2) |
 |
Other user-configurable settings to optimize image quality
PPF is not a perfect metric. Focus, bitrate (which depends on video compression), and capture modes such as high dynamic range (HDR) and IR mode all influence the final image quality.
The following user-configurable settings can help further optimize image quality.
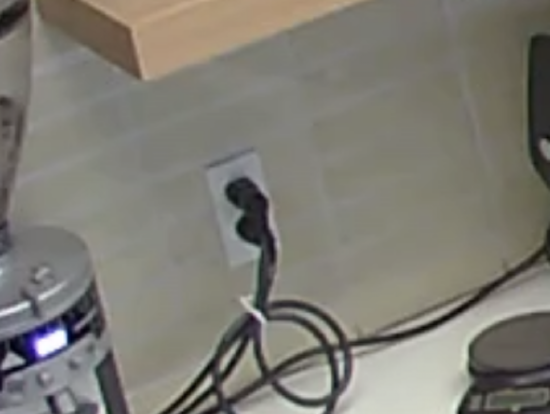
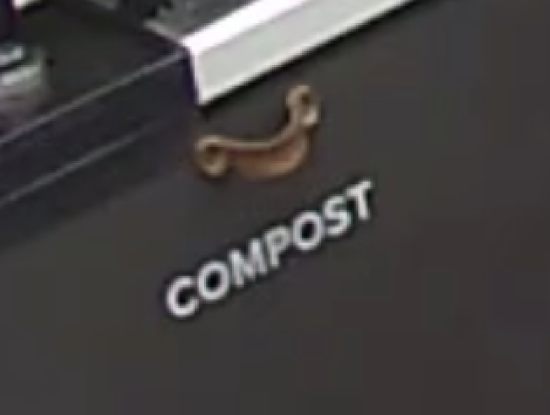
Quality (bitrate, frame rate, and compression)
Quality, as defined in the Meraki dashboard, encompasses bitrate and frame rate. A lower bitrate results in more compression, which can reduce detail in some pixels to save bandwidth. A lower frame rate can cause blurriness in moving objects. Cameras support different compression technologies such as H.264, H.265, and Smart Codec, which influence how low the bitrate can go for a specific scene.
In the example below, there is a slight reduction in detail in the lines between the tiles below the white mugs, and more noise around the letters in "COMPOST".
|
Better quality |
Worse quality |
|
1080p at Enhanced Quality (3138 kbps at 20fps) (these shots were zoomed in for comparison) |
1080p at Standard Quality (1024 kbps at 8fps) (these shots were zoomed in for comparison) |
|
|
|

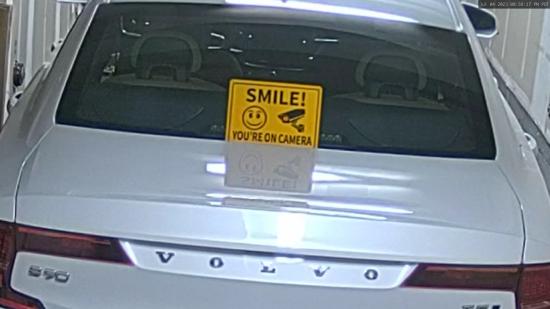
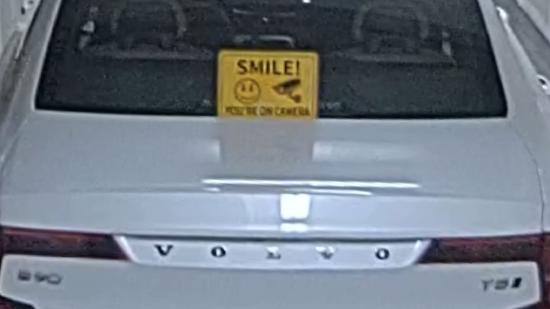
In the example below, there is a slight reduction in detail in the smiley face, and more noise around the edges of the sign.
|
Better quality |
Worse quality |
|
4K at Enhanced Quality (8000 kbps at 15fps) (these shots were zoomed in for comparison) |
4K at Standard Quality (4500 kbps at 8fps) (these shots were zoomed in for comparison) |
|
|
|
_with_zoom.png?revision=2)
Focus
A camera must be focused correctly on the subjects of interest to capture the best available detail for those subjects.
| Better quality |
Worse quality |
|
Subjects in focus |
Subjects out of focus |
|
|
|
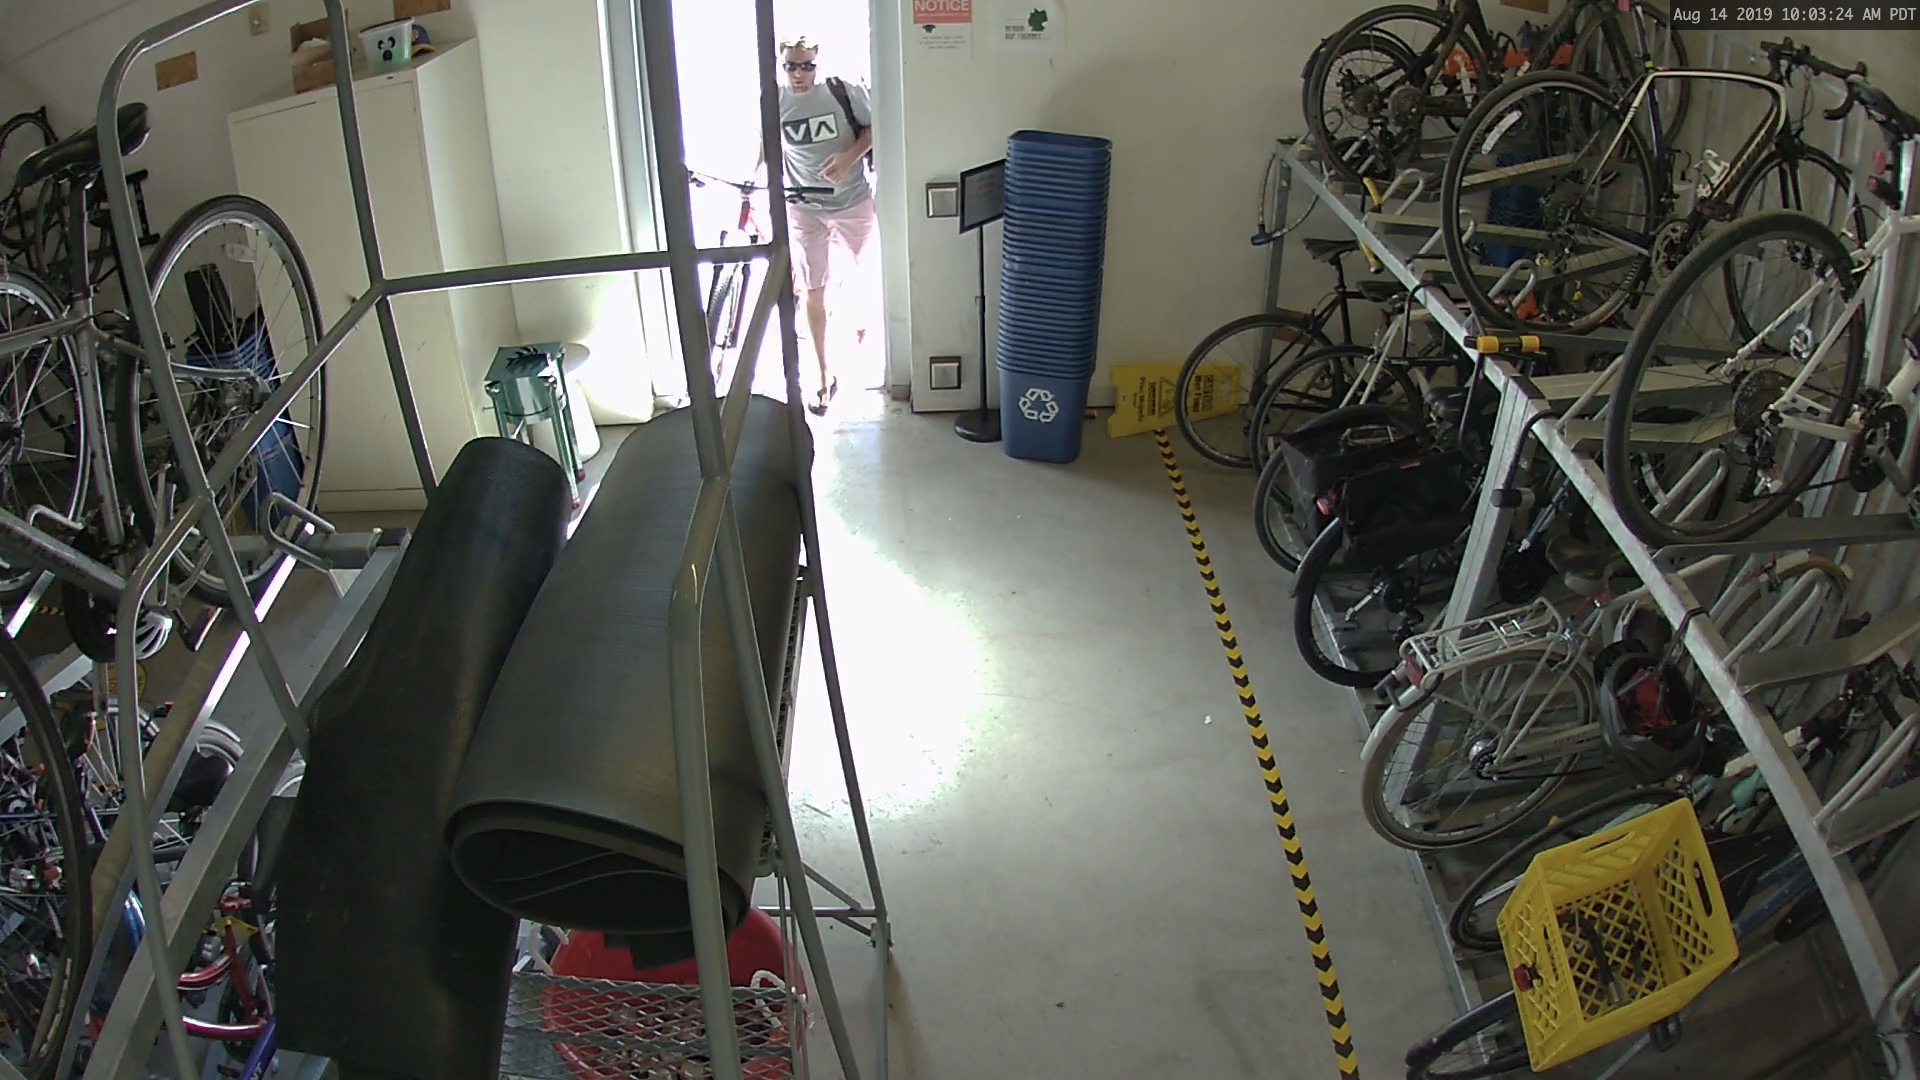
High dynamic range (HDR)
HDR allows both bright and dark areas of an image to be properly exposed, revealing detail in both regions. HDR works best when a bright light source is present in the frame, such as a door, window, or a light shining directly toward the camera from a distance.
In the example below, the details of the overhead lights and the back conference room are discernible with HDR enabled.
|
Better quality of the back conference room and overhead lights |
Worse quality of the back conference room and overhead lights |
|
With high dynamic range (these shots were zoomed in for comparison) |
No high dynamic range (these shots were zoomed in for comparison) |
|
|
|

