Understanding Image Quality on the MV93
Overview
This article explains why MV93 image quality differs from fixed dome cameras like MV63 and second-generation fisheye cameras like MV32. It also shows how to get the best images.
Refer to the MV93 Installation Guide for placement guidelines on where to deploy fisheye cameras for best results.
This article requires basic camera understanding. Read our article, Meraki MV Cameras - Introduction and Features, for an introduction to MV cameras.
What Affects the MV93 Image Quality?
The MV93 has one of the widest wide-angle lenses, similar to the MV32. It captures much more of a scene than other cameras. Because of this, an object viewed through the MV93 appears smaller in the image than the same object seen through a regular dome camera. The MV93 suits use cases needing a wide field of view and overall context. Other cameras work better when higher detail is required.
MV63@4MP with 102° FoV MV93@2880x2880 with 180° FoV
The rest of this article will discuss how the MV93’s sensor resolution and field of view affect the image quality, and the different settings that can be adjusted to get the best results as well as a comparison to the second generation of our fisheye camera.
Summary MV93 vs Other Gen3 MV Cameras
Fixed specifications and user settings both impact image quality. For the MV93, the key fixed specifications include:
-
Sensor resolution, which determines what image resolutions are available
-
Lens focal length, which dictates the camera’s field of view (FoV)
The table below shows the specifications of the second-generation MV cameras and highlights how the MV93 differs from the others.
|
Specification |
Resulting Image |
|
|---|---|---|
|
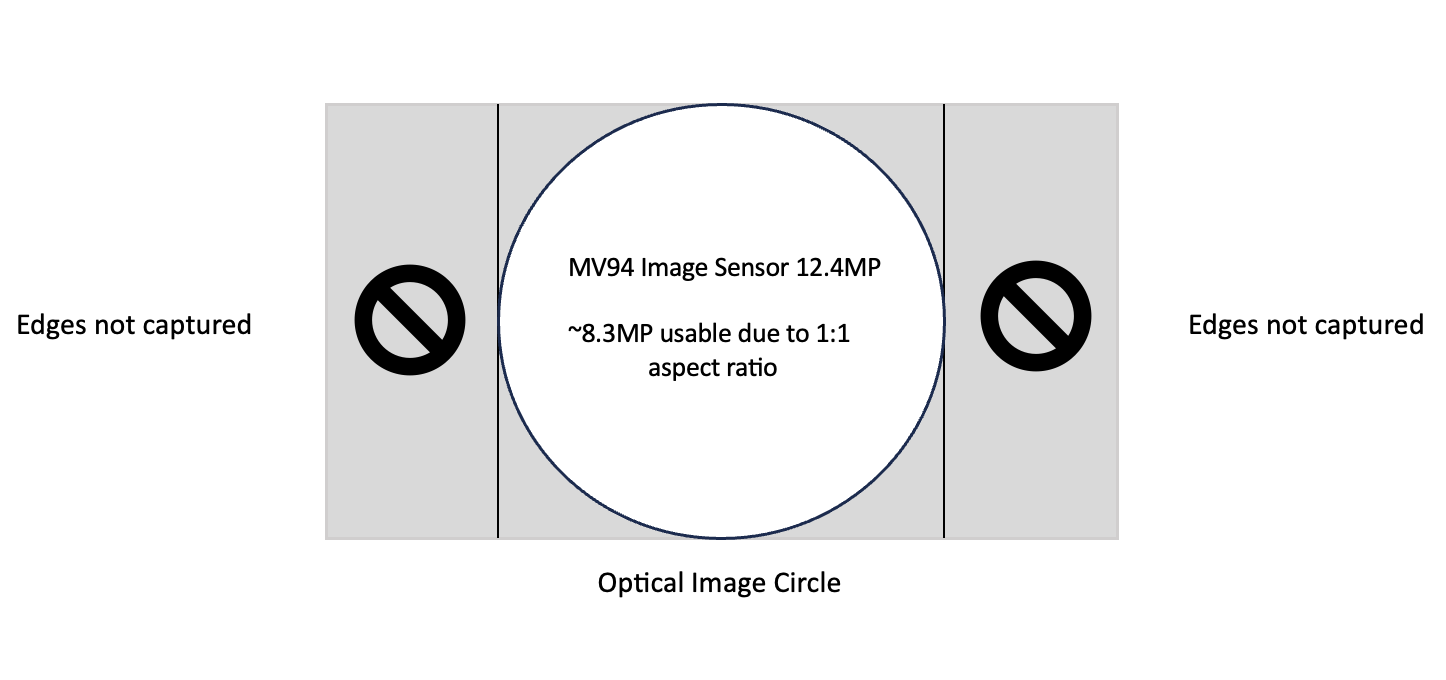
Sensor Resolution
Though the MV93 has a 12.4MP sensor and the MV63 has a 8.41MP sensor, the usable sensor resolutions for all the cameras are essentially equivalent. |
MV63: 8.41MP |
8.41MP with almost all 8.4MP usable due to 16:9 aspect ratio
|
|
MV93: 12.4MP |
12.4MP but effectively only ~8.3MP usable due to 1:1 aspect ratio
|
|
|
Lens Focal Length
Although the usable sensor resolution for the MV63 and 93 cameras are basically equivalent, the MV93 covers a much larger field of view, and so a specific object will be captured using less total pixels (characterized by PPF). |
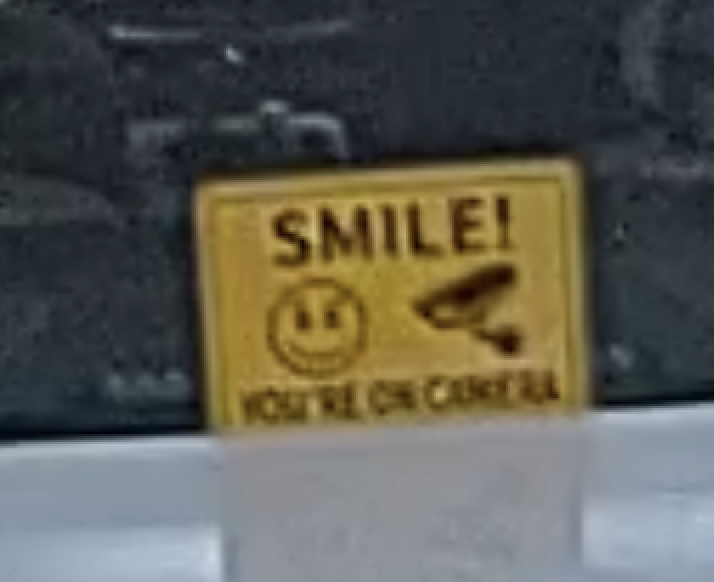
MV63: 102o Amount of detail decreases linearly the further you go from the camera |
Digitally zoomed-in shot of the "Camera sign"
|
|
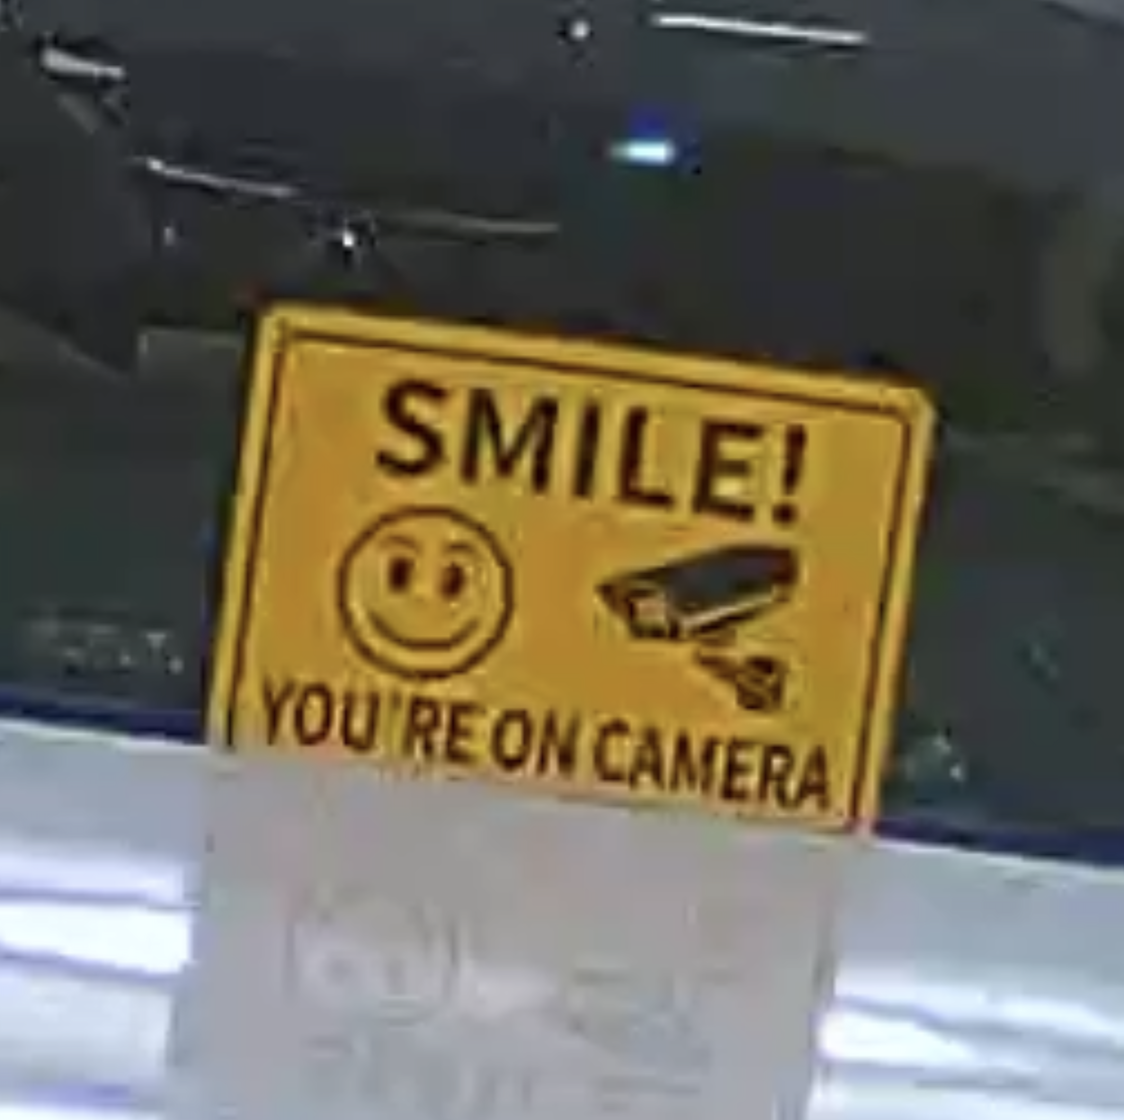
MV93: 180o |
Amount of detail decreases at a faster rate the further you go from the camera
Digitally zoomed-in shot of the "Camera sign"
|
The configured image resolution and field of view (FoV) determine the pixels-per-foot (PPF) of a subject at a specific distance and angle from the camera. PPF measures image quality, but several other user-configurable settings also influence it.
The rest of this document will go into more detail on how sensor resolution and PPF affect MV93 image quality, and will cover what other user-configurable settings can affect image quality.
This does not include inherent camera hardware specifications and settings such as sensor size, pixel size, and image tuning, as these are not relevant to the camera end-user.
More Details on Image Quality
Understanding Sensor Resolution (vs. Image Resolution)
Image resolution is the main setting that affects quality. It refers to the number of pixels used to capture details in a scene. Higher resolution usually means better quality because it has more pixels.
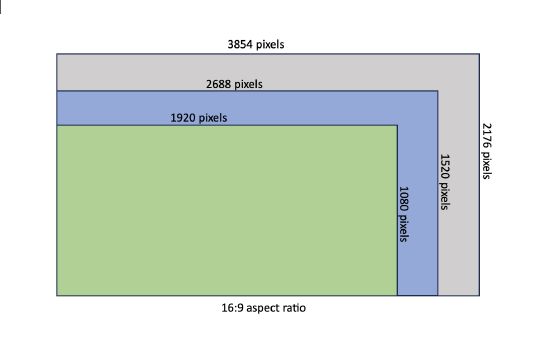
A camera’s sensor resolution determines the highest image resolution it can produce. It is measured in megapixels (MP), where 1 MP equals one million pixels. For example, a 4MP sensor (2688 pixels wide by 1520 pixels high at a 16:9 aspect ratio) cannot create an 8MP image. However, it can produce images at 4MP, 2MP (1080p or 1920 x 1080 pixels), or 1MP (720p or 1280 x 720 pixels), which are equal to or lower than its maximum resolution.
The MV93 has a 12.41MP sensor, and the MV63 has an 8.4MP sensor. Although the MV93’s sensor resolution is higher, its maximum effective resolution is 2880 x 2880 pixels, about 8.3MP, which is close to the MV63’s 8.4MP sensor resolution.
The reasoning for this is explained in the following paragraphs.
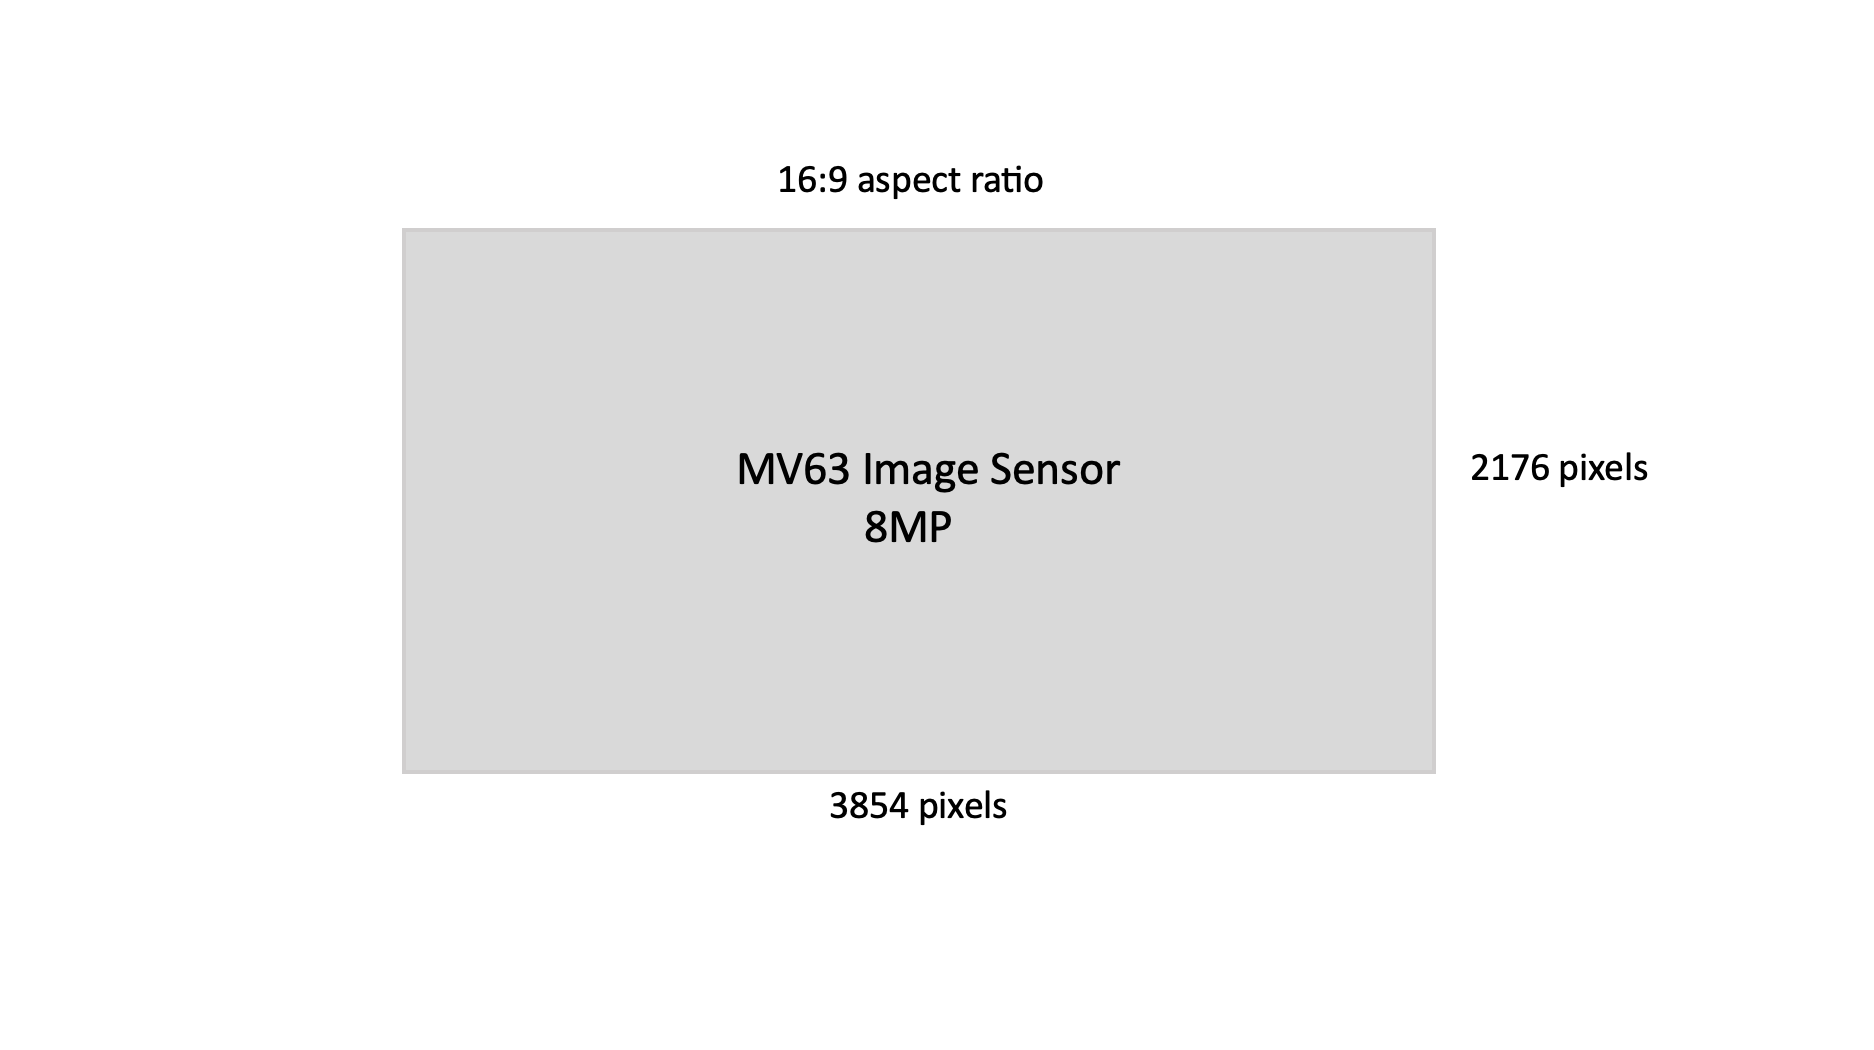
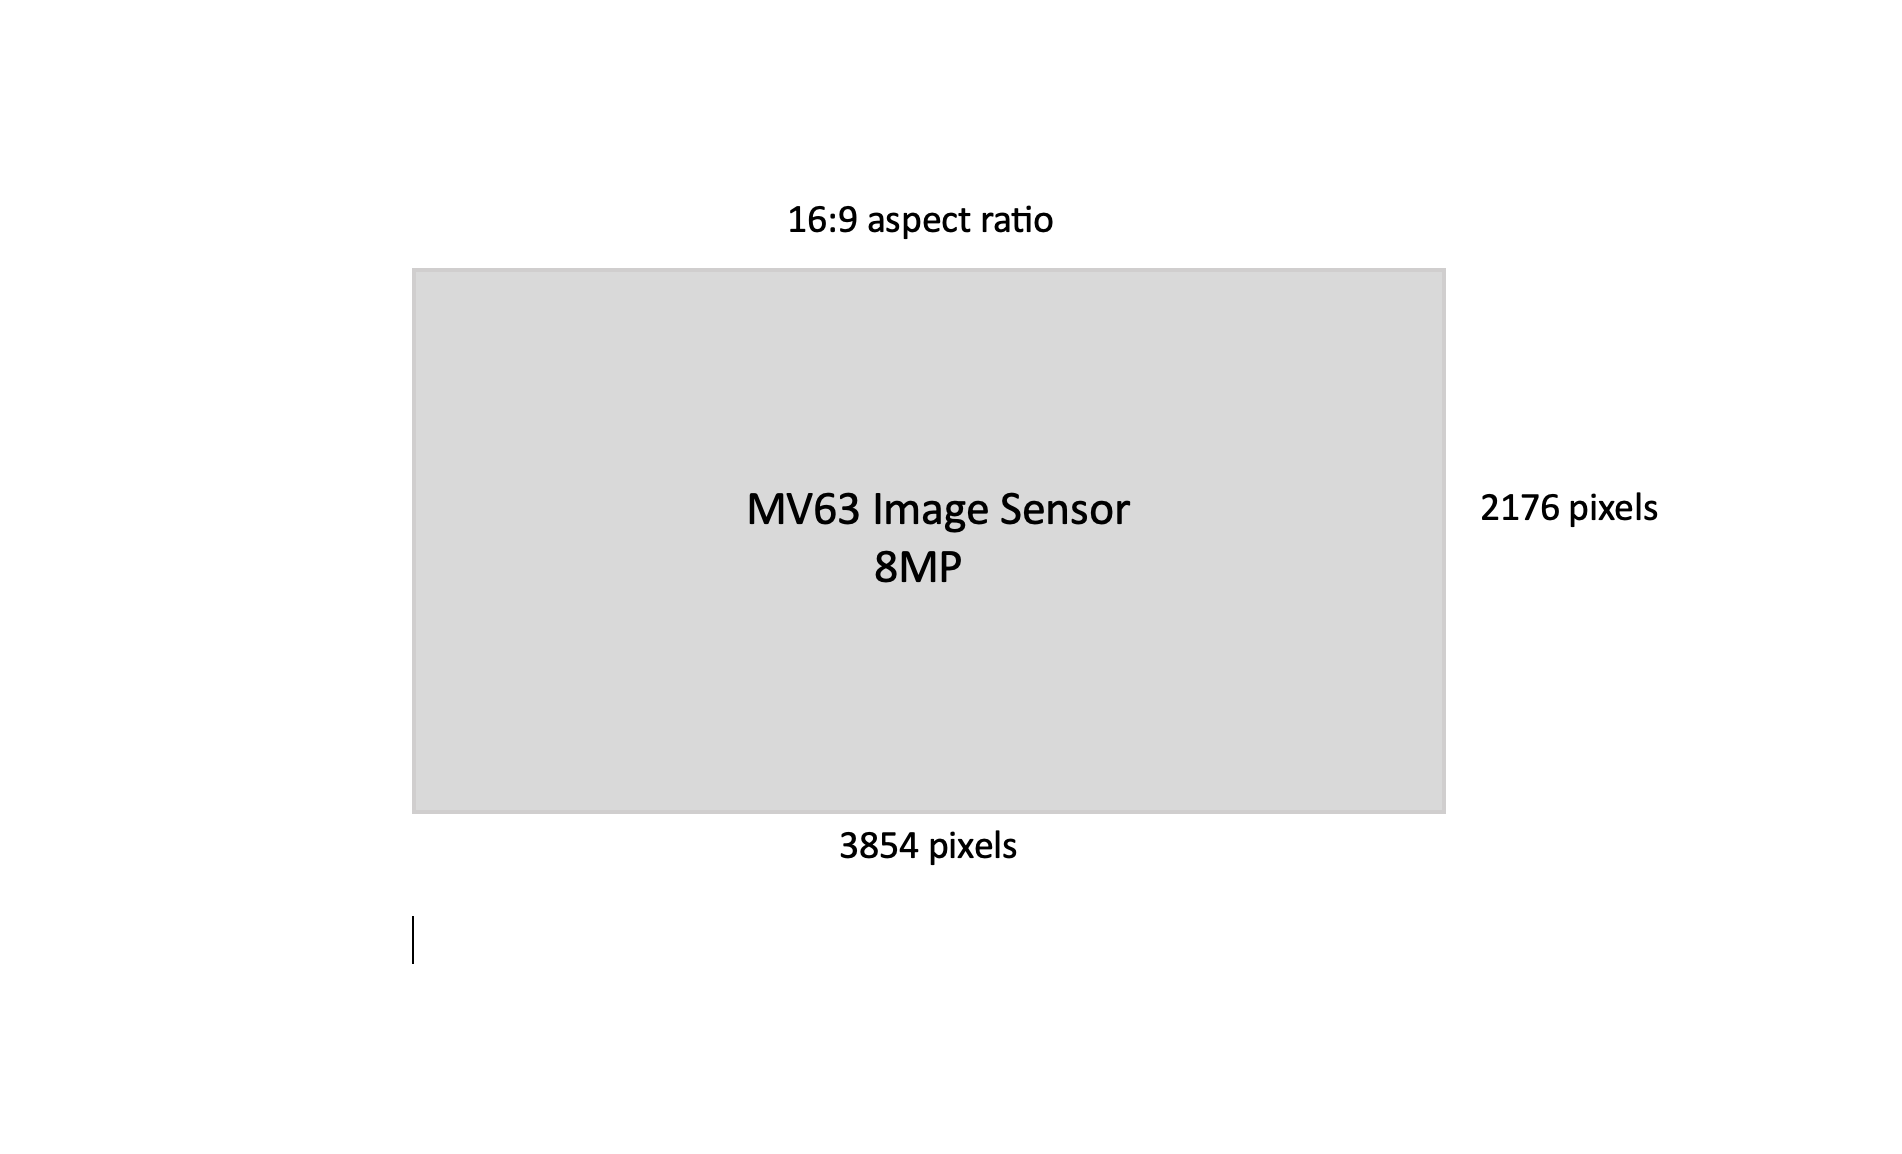
The sensor resolution estimates the total pixels available on the image sensor. It is calculated by multiplying the horizontal pixel count by the vertical pixel count. For example, the MV63 sensor has 3854 x 2176 pixels, totaling 8,386,304 pixels, which is approximately 8.4MP.
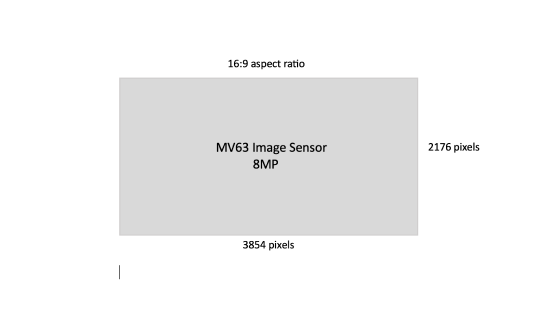
This sensor has a 16:9 aspect ratio, common in many image resolutions like 720p, 1080p, and 4K. It can use the full 8MP (3840 x 2160) to capture an image with a 16:9 aspect ratio, resulting in an 8MP image resolution. To use a different aspect ratio, such as 4:3, some pixels are left unused to fit the new shape on the image sensor.
MV93 Sensor Resolution
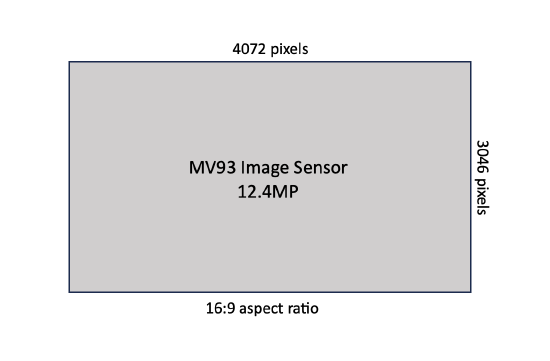
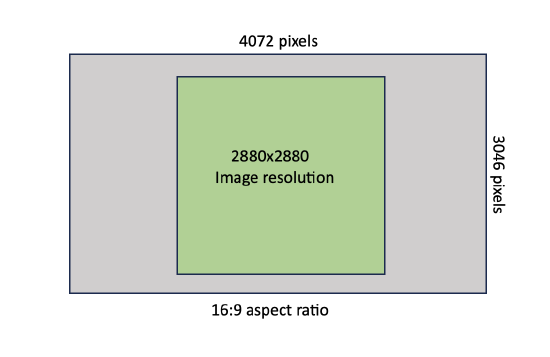
The MV93 has a sensor with 4072 x 3046 pixels, totaling 12,403,312 pixels, or about 12.4MP. This sensor has a 16:9 aspect ratio. However, since a 360-degree camera creates a circular image best enclosed in a 1:1 aspect ratio, the image can only use up to 3046 pixels in both horizontal and vertical directions.
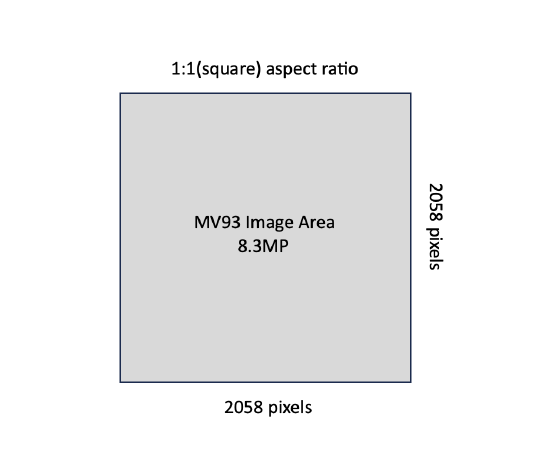
The MV93 crops a few pixels at the edges due to lens distortion. It exposes a maximum image resolution of 2880 x 2880, with down sampled options of 2112 x 2112 and 1080 x 1080.
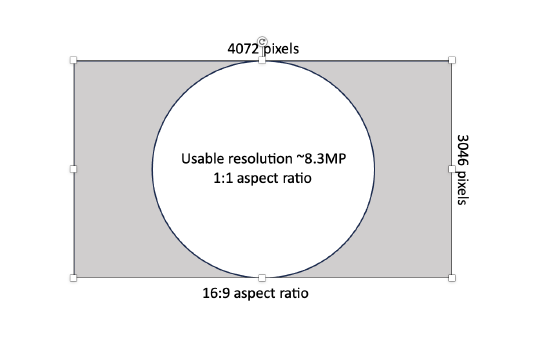
The MV93 has a 12.4MP sensor, but it uses a maximum of 2880 x 2880 pixels, which equals about 8.3MP effective resolution. This is similar to the 8.4MP sensor resolution of the MV63. However, this does not mean both cameras will capture the same image quality. The MV93’s field of view greatly influences the detail it can capture. The next section explains this using the pixels-per-foot (PPF) concept.
Using Pixels-per-Foot (PPF) to Estimate Quality
The lens focal length is what dictates the camera’s field of view (FoV). A shorter focal length generally means larger FoV. One way FoV affects image quality is by the rate at which the amount of detail decreases the farther you get from the camera.
“Detail” on images can be quantified by the concept of pixels-per-foot or PPF. Assuming ideal conditions and good image tuning, it is a great way to compare the quality you would get for a subject at different distances as viewed through different cameras. You can read through the section, Other User-Configurable Settings, bwlow if you want to know what user-configurable settings you can modify to produce closer to ideal conditions and image tuning and therefore more accurate PPF calculations.
It can be computed as follows:
PPF = horizontal pixels / FoV width (in feet)
This implies that you can get a higher PPF (more detail) by:
-
Increasing horizontal pixels
-
Decreasing field of view width
On the MV93, the field of view is fixed at 180o so the only way you can increase PPF is by using a higher image resolution.
Because the field of view width for an object viewed through an MV93 camera will be higher than if the same object was viewed through an MV63, the PPF for the MV93 will generally be lower as well.
|
[BETTER] MV63 @ 102o FoV |
MV93 @ 180o fixed FoV |
 |
|
Horizontal Pixels
You can improve your PPF by increasing horizontal pixels below. You can do this by using a higher image resolution. The horizontal pixels for each image resolution available on MVs are underlined below.
|
Resolution |
Horizontal x Vertical |
|---|---|
|
720p |
1280 x 720 pixels |
|
1080p |
1920 x 1080 pixels |
|
1080x1080 |
1080 x 1080 pixels |
| 2560 x 1440 | 2560 x 1440 pixels |
| 2112x2112 | 2112 x 2112 pixels |
| 2880x2880 | 2880 x 2880 pixels |
| 4K | 3840 x 2160 pixels |
FoV Width
FoV width is a result of the camera’s FoV, which is dictated by its lens focal length. It is essentially the physical distance that will be captured by the horizontal pixels in the image resolution.
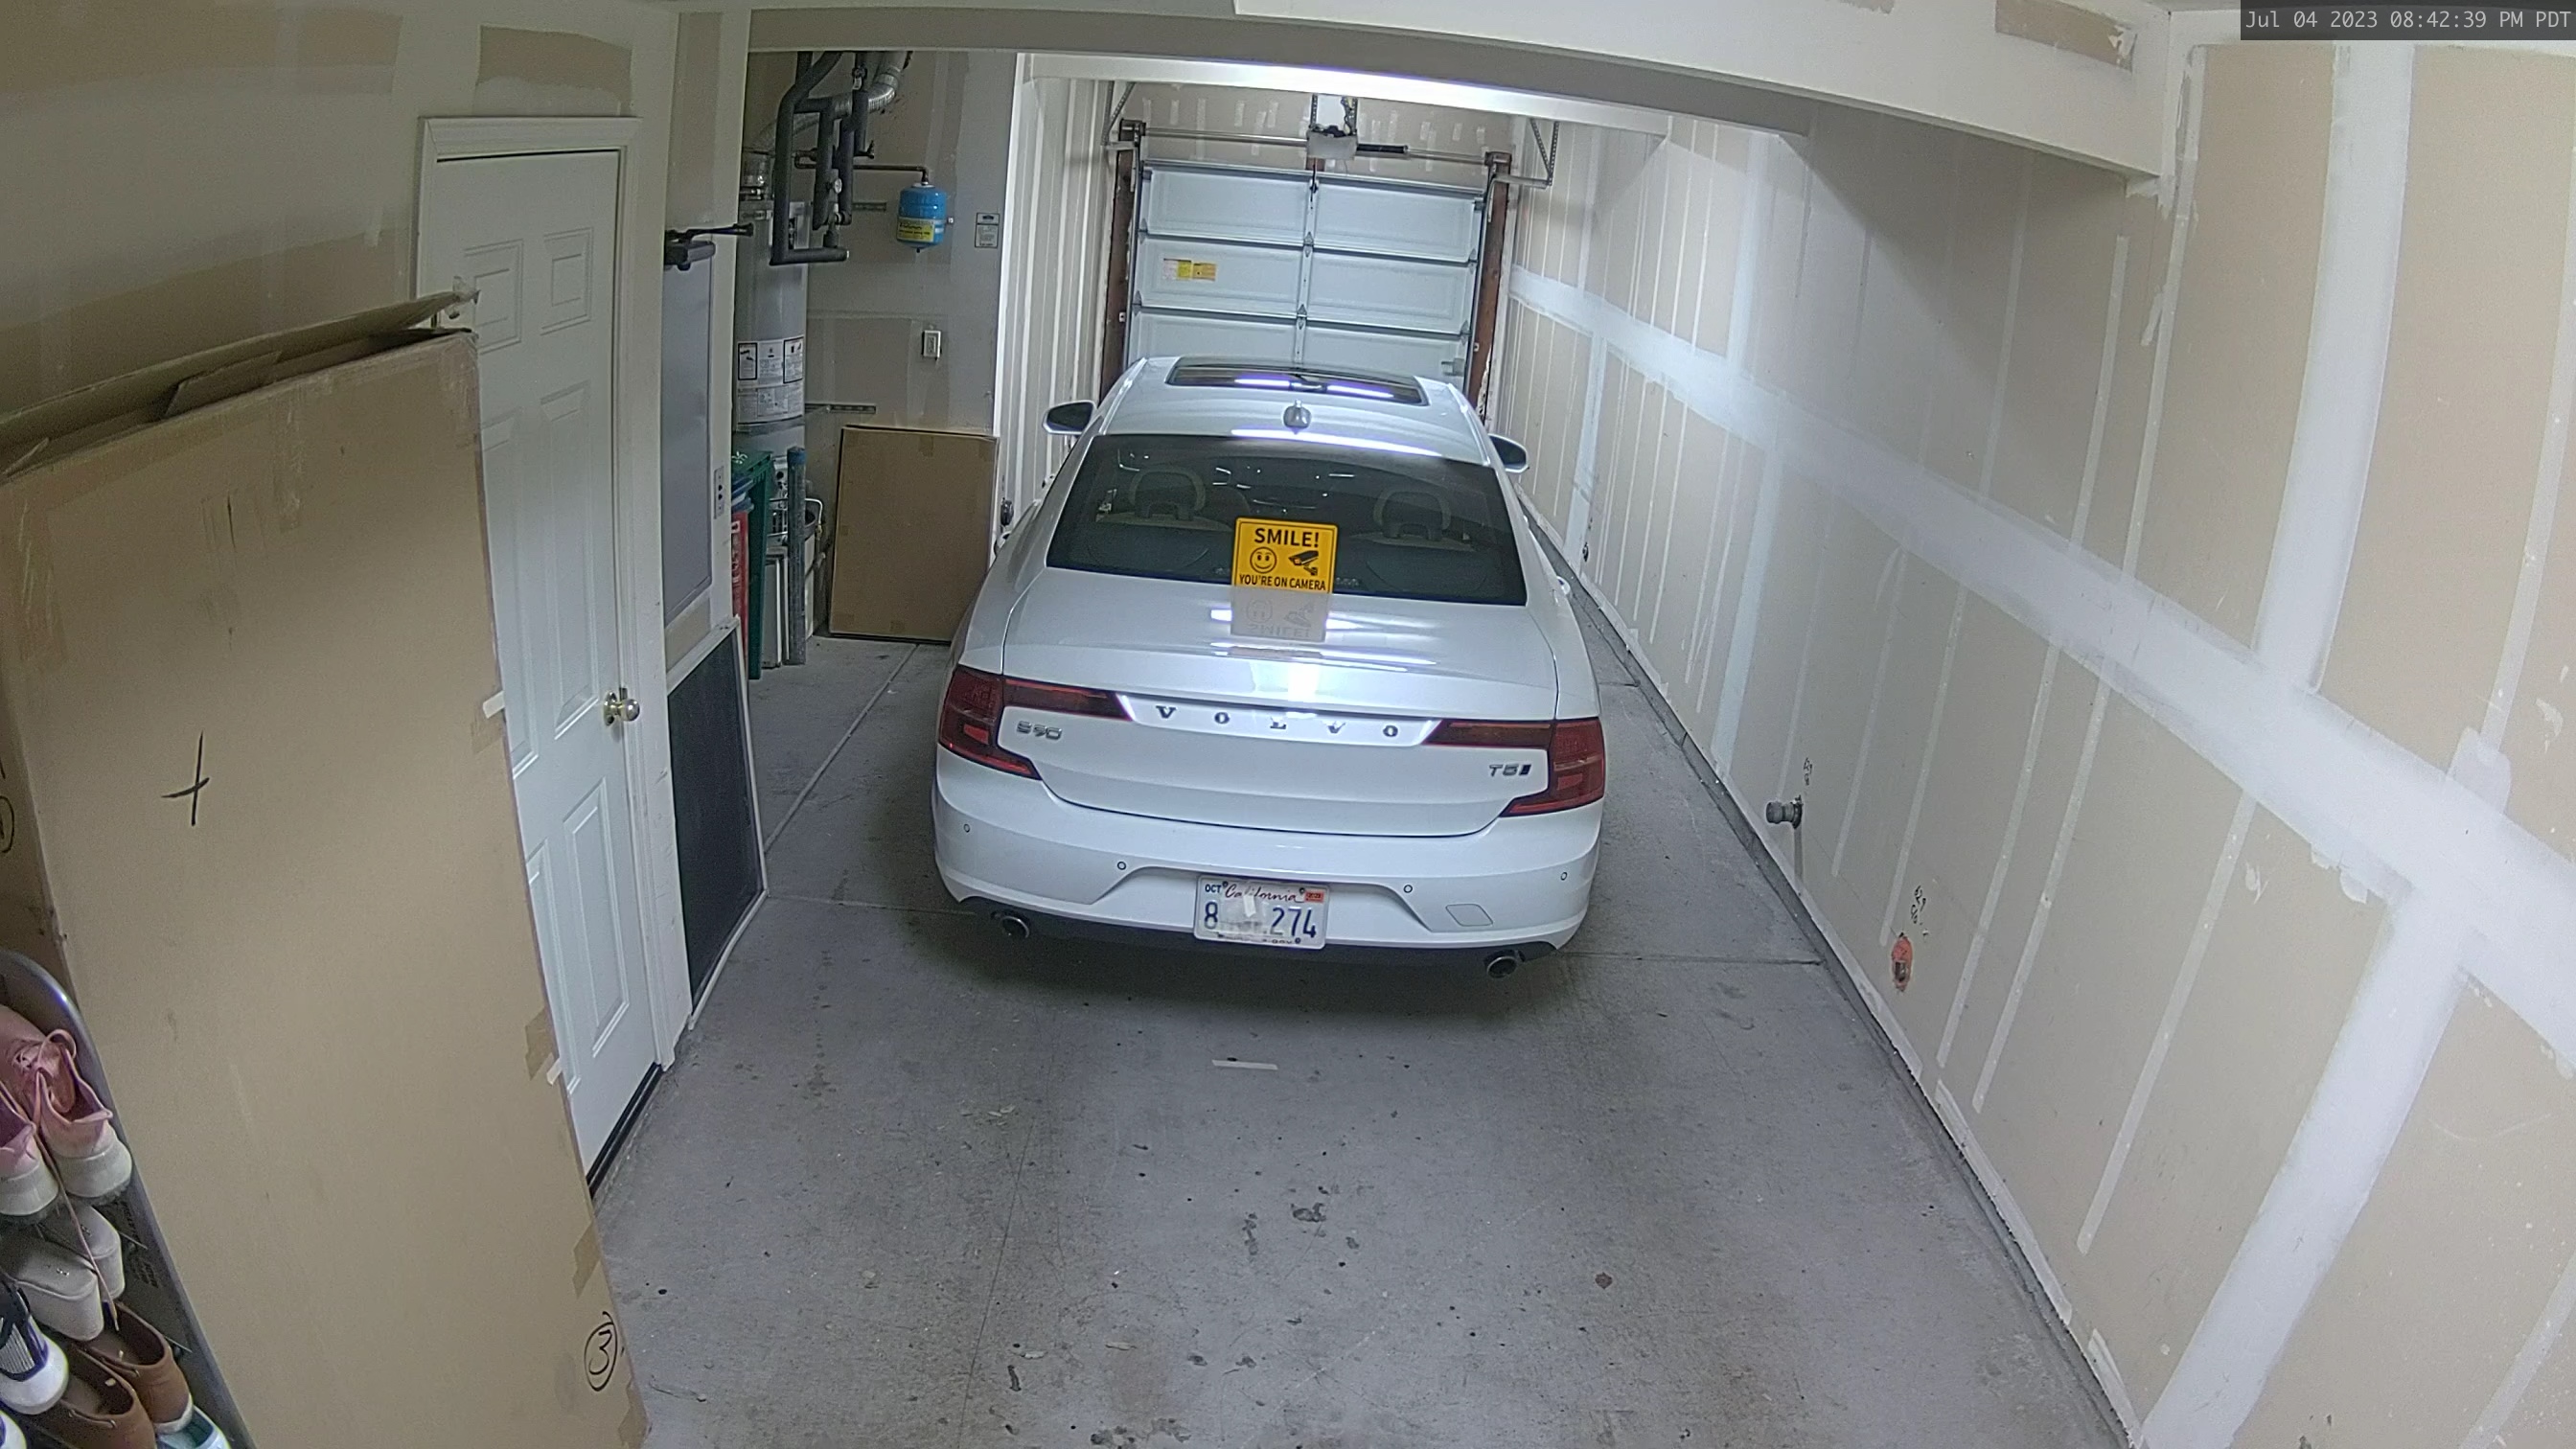
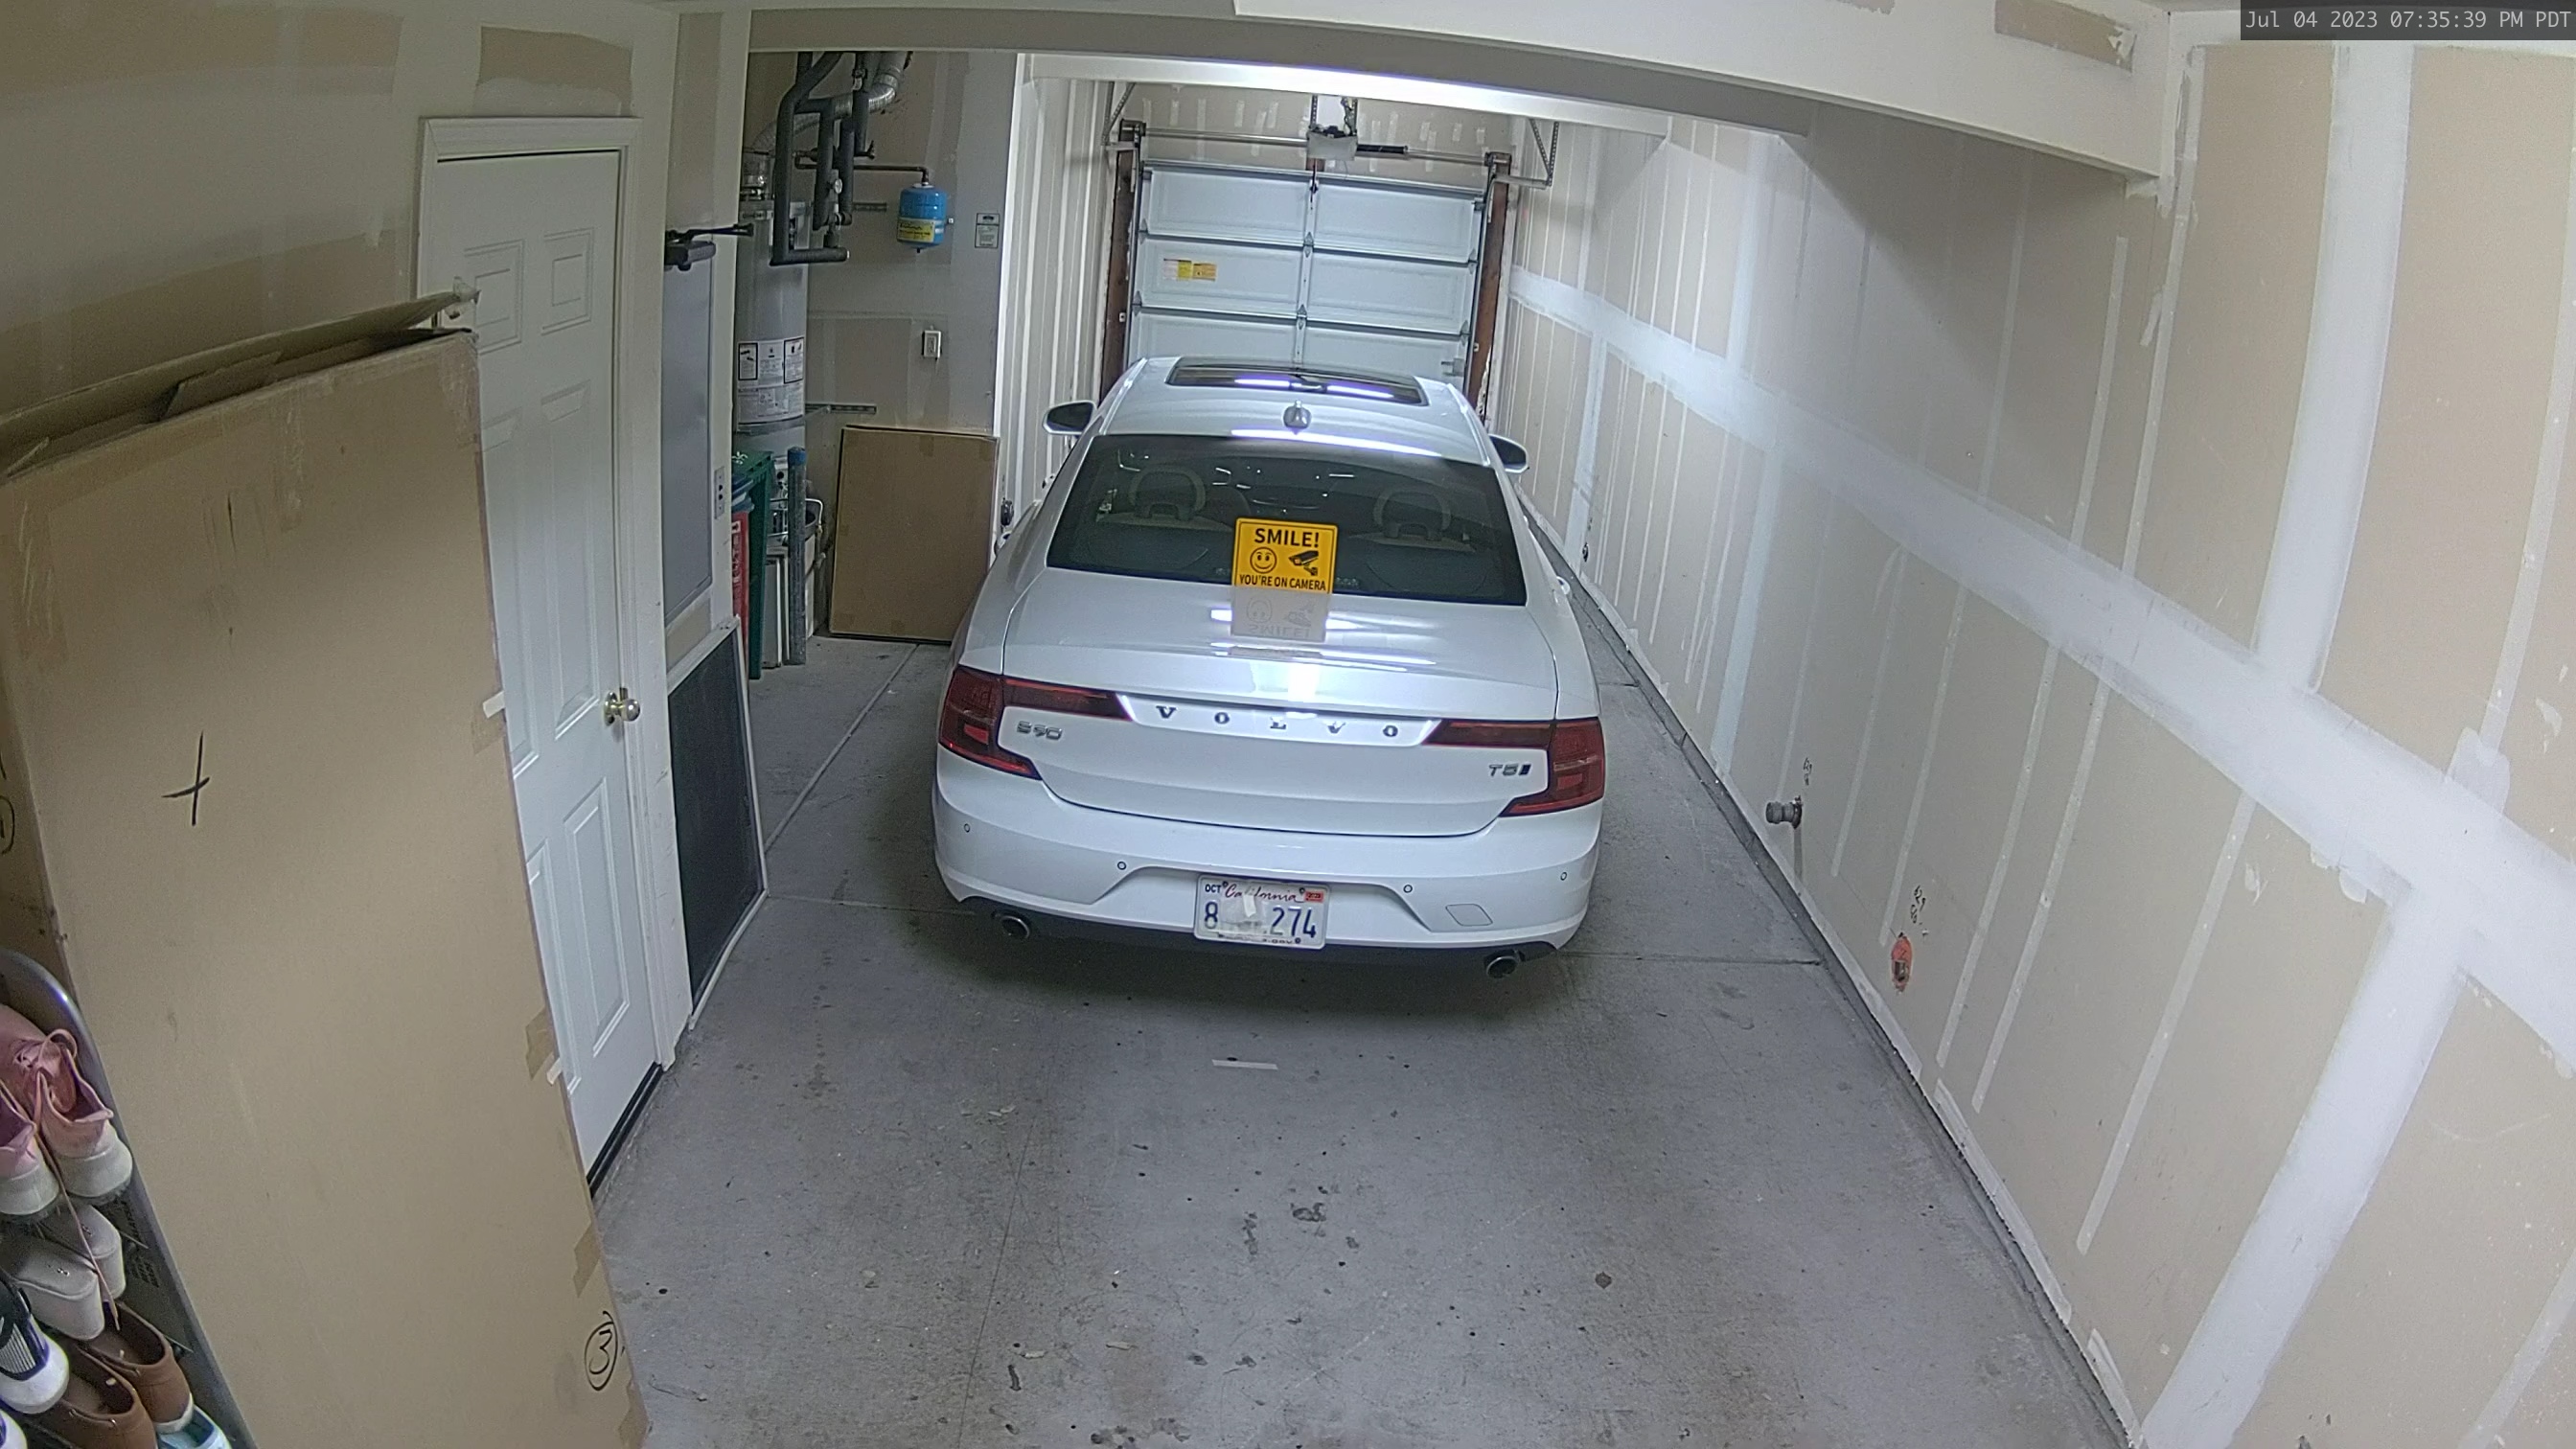
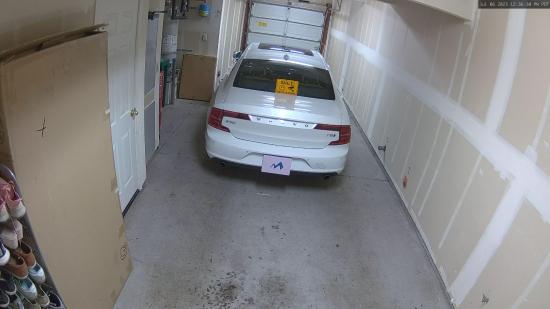
For example: This image is a 4K image, so the horizontal pixel width is 3840. One can measure the FoV width by finding the distance between something at the far left of the image (for example, the pink shoes on the left of the image below) up to something on the far right of the image (like the white strip that runs along the length of the wall) . Note that PPF is in feet, the PPF of this image is about 3840 pixels / 10.7 feet = 358 PPF.
Example PPFs
Here is a set of images with different PPF values.( All images are taken at 5x digital zoom )
|
35PPF |
48PPF |
[BEST] 71PPF |
|---|---|---|
|
|
|
|
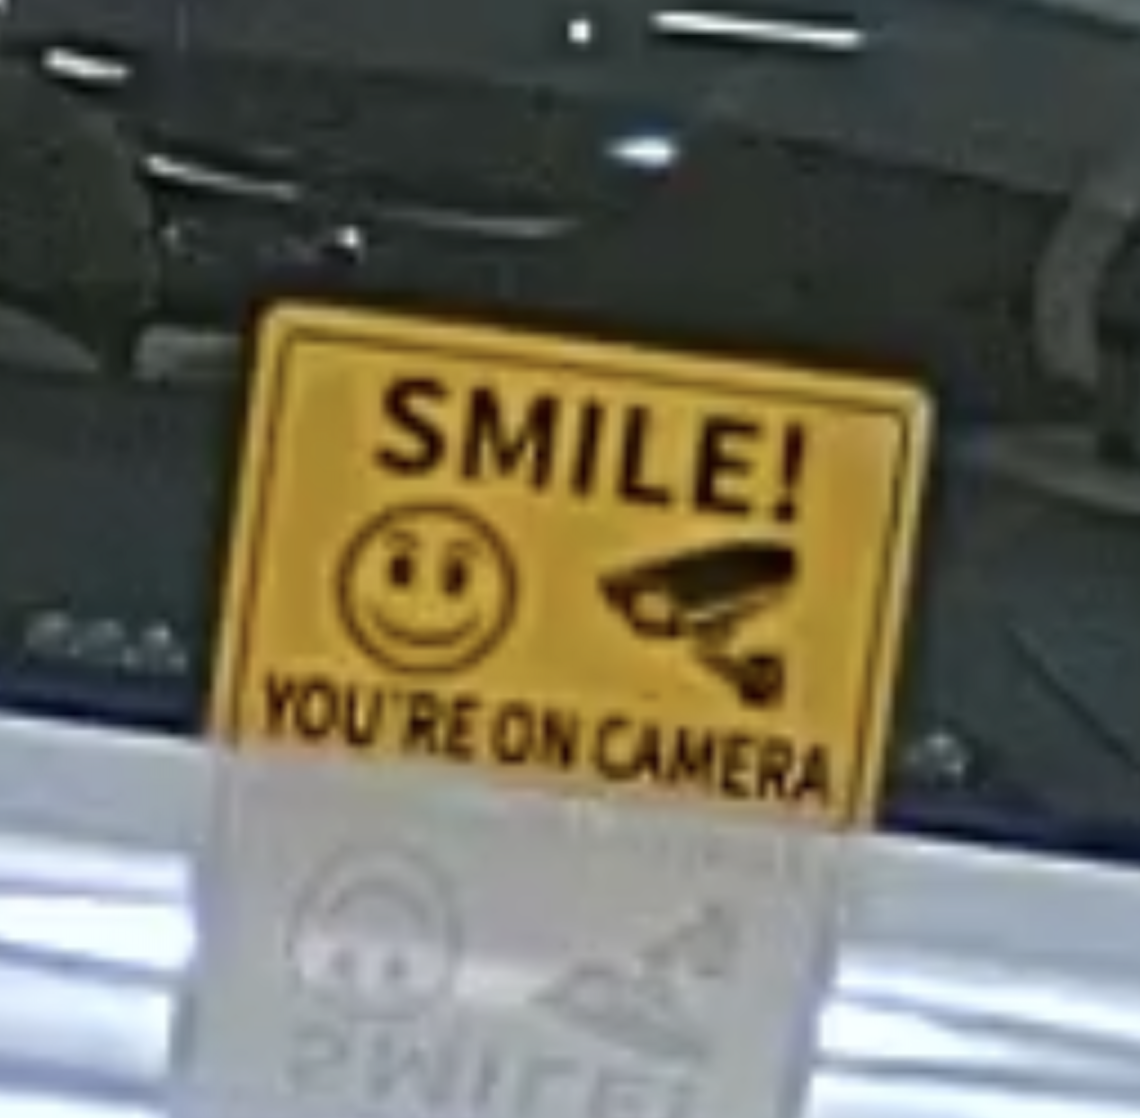

Notice how the same distance produces different PPFs in these examples, and especially how the PPF is much smaller for the fisheye cameras. A good rule of thumb is that faces are usually distinguishable around ~50 PPF, so if you want that level of detail, the fisheye camera might not be enough.( depending on the mounting height)
|
Camera Type |
Resolution |
Horizontal x Vertical |
Distance |
FoV width |
PPF |
Distance |
FoV width |
PPF |
|---|---|---|---|---|---|---|---|---|
|
Normal |
720p |
1280 x 720 pixels |
10 feet |
10 ft |
128 |
15 feet |
~15ft |
~85 |
| Normal | 1080p | 1920 x 1080 pixels | 10ft | 192 | ~15ft | ~128 | ||
|
Super Telephoto |
1080p |
1920 x 1080 pixels |
5ft |
384 |
~7.5ft |
~256 |
||
| Normal | 4MP | 2560 x 1440 pixels | 10ft | 256 | ~15ft | ~170 | ||
|
Fisheye |
1080x1080 |
1080 x 1080 pixels |
~63ft |
~17 |
~94ft |
~11.5 |
||
| Fisheye | 2112x2112 | 2112 x 2112 Pixels | ~63ft | ~33.5 | ~94ft | ~22.5 | ||
| Fisheye | 2880x2880 | 2880 x 2880 Pixels | ~63ft | ~45.7 | ~94ft | ~30 | ||
| Normal | 4MP | 2560 x 1440 pixels | ~10ft | 256 | ~15ft | ~170 | ||
| Normal | 4k | 3840 x 2160 pixels | ~10ft | 384 | ~15ft | ~256 |
Calculating PPFs
It is sufficient to understand the relationship between PPF, resolution and FoV to conclude that the MV93 image quality will often be inferior to that of other cameras.
However, in cases were you have a target PPF, this section below shows how you can calculate PPFs. You can then work backwards and determine what camera would be sufficient.
For example, a nice rule of thumb is that faces are usually distinguishable around ~50 PPF and you would like to see if the MV93 would provide sufficient detail for subjects around the main area of the camera (depending on the resolution you prefer)
-
What is the image resolution?
-
Let’s assume you are going to use 2560 horizontal pixels.
-
-
What is your target PPF?
-
50PPF
-
-
Compute the ideal FoV width.
-
50PPF = 2560 / FoV width, so FoV width = 2560 / 50 = 51.2 feet
-
-
Compute the FoV width you can obtain with the MV93 and compare.
-
It is difficult to directly measure the field of view width. However, if you are able to use a measuring tape to estimate this, you can use that.
-
However, it may be simpler to use the distance of the subject from the center of the camera to estimate this FoV width as shown below.
-
For normal cameras with a triangular field of view (MV63), the FoV width can be calculated accurately using trigonometry (fun!) but is usually estimated as equal to the distance from the camera for normal cameras and half for super telephoto cameras.
-
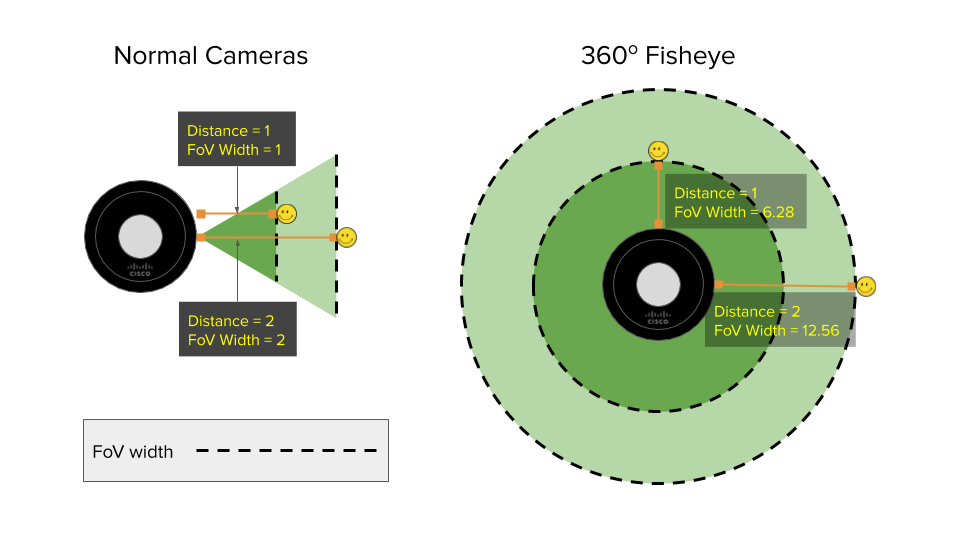
For 360 degree cameras with a circular field of view (MV93, MV32), the FoV width is the circumference (2*pi*radius), where the radius is the distance from the center of the camera (see the diagram below that illustrates this). This means that PPF decreases at a rate of 2*pi for fisheyes.
-
At the same distance from the camera (for example = 1), the resulting PPF can be up to ~6.28 times lower for a 360-degree camera (2*pi = 6.28) compared to a normal camera.
-
-
-
If capturing enough detail for faces at the camera sign placed 13 feet from the camera is important, the field of view (FoV) width is 81.6 feet. This is larger than 51.2 feet, so the MV93 likely will not provide enough detail. However, if objects are about 8.15 feet away (51.2 divided by 6.28), the MV93 should be sufficient. Alternatively, use a camera with a smaller FoV that produces a width less than 51.2 feet, like the 63 model below.
|
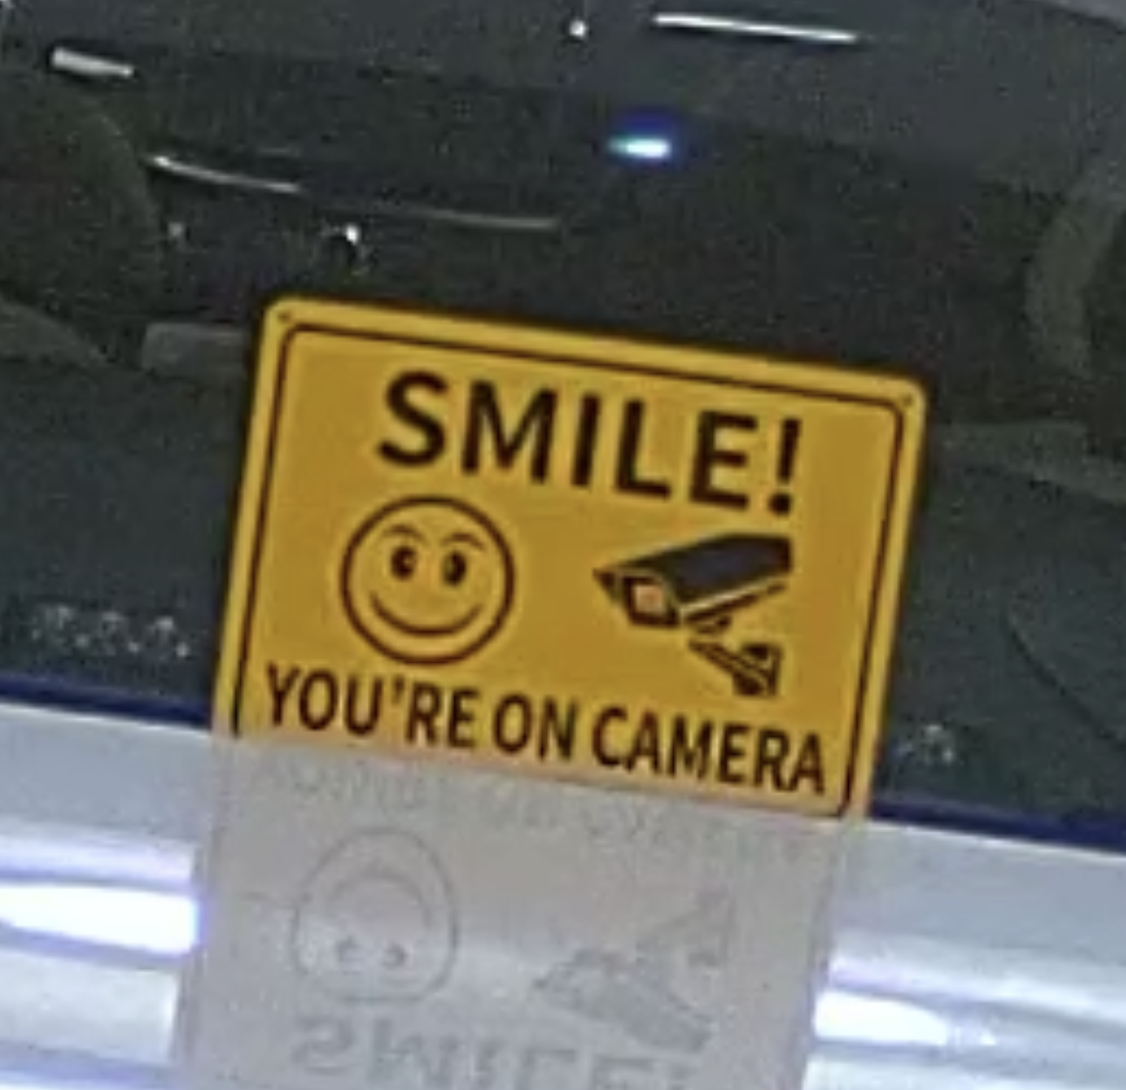
[BETTER] MV63 (PPF = ~71) |
MV93, zoomed in (PPF = ~22) |
 |
 |
With this knowledge, you can make better judgments about the level of detail that the MV93 can provide for a particular use case.
Other User-Configurable Settings to Optimize Image Quality
PPF is not a perfect metric and can be influenced by many factors such as focus, bitrate (which depends on video compression), and the use of other capture modes like HDR (high dynamic range) and IR mode.
Here are some examples of user-configurable settings that would help optimize your image quality even further.
-
Quality (bit rate, frame rate and compression)
-
Quality (as defined on the Meraki Dashboard) is essentially the bitrate and the frame rate. A lower bitrate will have more compression which may cause loss in detail in some pixels in order to save bandwidth. A lower frame rate may cause blurriness in some moving objects. Note that cameras will have different compression technology such as H.264, H.265, SmartCodec etc, which influences how low the bit rate can go for a specific scene.
-
In the example below, you can see that there is a slight reduction in detail in the smiley face, and more noise around the edges of the sign.
|
Better Quality |
Worse Quality |
|
4k at Enhanced Quality (8000kbps at 15fps) ((these shots were zoomed in for comparison) |
4k at Standard Quality (4500kbps at 8fps) (these shots were zoomed in for comparison) |
|
|
|
-
High Dynamic Range (HDR)
-
This image correcting feature will allow both bright and dark areas of your image to be properly exposed, with better detail.
-
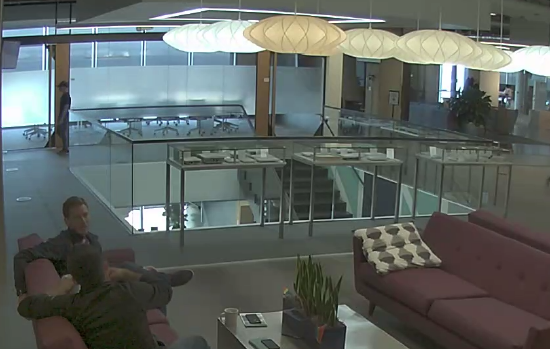
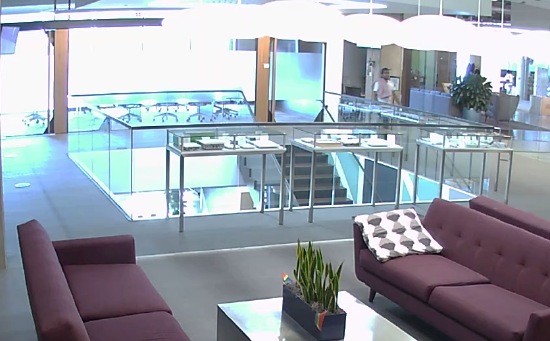
In the example below, you can note that you can better discern the details of the lights and the back conference room with HDR on. Please note that HDR works best ONLY when there is a bright source of light in the frame like a door/window or a light directly shining on the camera for afar.
|
Better Quality of the Back Conference Room & Overhead Lights |
Worse Quality of the Back Conference Room & Overhead Lights |
|
With High Dynamic Range (these shots were zoomed in for comparison) |
No High Dynamic Range (these shots were zoomed in for comparison) |
|
|
|