
vMX NAT Mode Use Cases and FAQ

Any vMX running MX19.1+, will support full routed NAT mode with a dedicated WAN and LAN port, along with support for advanced security capabilities.
This greatly simplifies cloud deployments and let's customers use the vMX as a secure cloud gateway for their cloud environments.
Some of the benefits of running the vMX in NAT mode with Advanced Security Features include;
-
Advanced Protection Capabilities : Industry leading and proven technology stack for secure and reliable connectivity powered by Talos
-
Unified Policy Management: Leverage the Meraki Dashboard for both on-prem and cloud security management
-
Decreased Cost and Complexity: Reduced reliance on third party VNFs for security, leading to a decrease in total cost of ownership
LAN Port Configuration
Cloud Configurations
Before configuring the routed mode configuration on the Meraki dashboard, make sure that the vMX is deployed on the latest MX19.1+ firmware with the LAN port deployed on the vMX compute instance on the cloud platforms. For cloud specific configuration to add the LAN port, please refer below:
AWS
You can use the following steps to add additional Elastic Network Interface (ENI) to the existing vMX instance.
- Go to the AWS EC2 dashboard and stop the running vMX instance.

- The the LAN port of the vMX needs to be associated with an appropriate subnet for the LAN segment on the cloud. If no LAN segment is present a new subnet for LAN should be created in the VPC. Make sure that the LAN subnet is also in the same avalaibiltiy zone as the vMX instance. To create a new subnet in an AWS VPC, please refer here.

- Create a security group to allow traffic between interfaces in the LAN segment.

- Next, create an Elastic Network Interface (ENI) in the LAN segment. This interface will require the Security Group created above and will be used as the LAN port for the vMX. More details about creating an ENI can be found here.

- Disable Source/Dst Check for the new ENI. Details on how to disable the SRC/DST checks can be found here. Each EC2 instance performs source/destination checks by default. This means that the instance must be the source or destination of any traffic it sends or receives. However, since the vMX would be acting as a SD-WAN GW for the cloud , the instance must be able to send and receive traffic when the source or destination is not itself. Therefore, you must disable source/destination checks on the NAT instance.

- Next, create a Route Table which will control traffic flow in the LAN subnet. For Internet bound traffic, set the next hop as the Network Interface created in the previous step. More details on how to create a route table in your AWS VPC can be found here.

- Now configure the LAN subnet with a Route Table Association to this Route Table.

- Attach the ENI to the vMX instance.

- Once, the LAN port is added the vMX will now have two interfaces, Device Index 0 is the WAN port and Device Index 1 is the LAN port.

- Allocate a public IP for the vMX's WAN IP.

- Start the instance and make sure it's connected to the cloud.

- Finally, in the Meraki Dashboard Addressing & VLANs page, set the LAN subnet mask and LAN private-IP address of the vMX LAN ENI. The LAN ENI address can be checked by going to the AWS EC2 console and checking the network settings for the vMX VM as mentioned in Step 9 above.
Azure
1. The Managed Application launch tool has been updated to automatically deploy a vMX LAN interface into a new subnet managed by the Managed Application or a pre-existing subnet managed by the user. On the Basics page, select “Enable and configure LAN interface”
2. Next, on the Deployment Details page, configure a new VNET and subnets for the vMX WAN and LAN, or select existing virtual network resources.
3. While the Managed Application is deploying, create a new Azure Route Table, which will be used to apply routing logic in the LAN subnet.
4. Configure this Route Table with a VirtualAppliance rule, so that all Internet bound traffic in the LAN subnet is routed to the vMX LAN interface private-IP address.
5. Now associate this Route Table with the LAN subnet configured for the vMX during the Deployment Details step in the Managed Application launch.
Google Cloud Platform (GCP)
Please refer to vMX Setup Guide for Google Cloud Platform (GCP) KB when deploying a vMX in GCP.
Dashboard Configuration
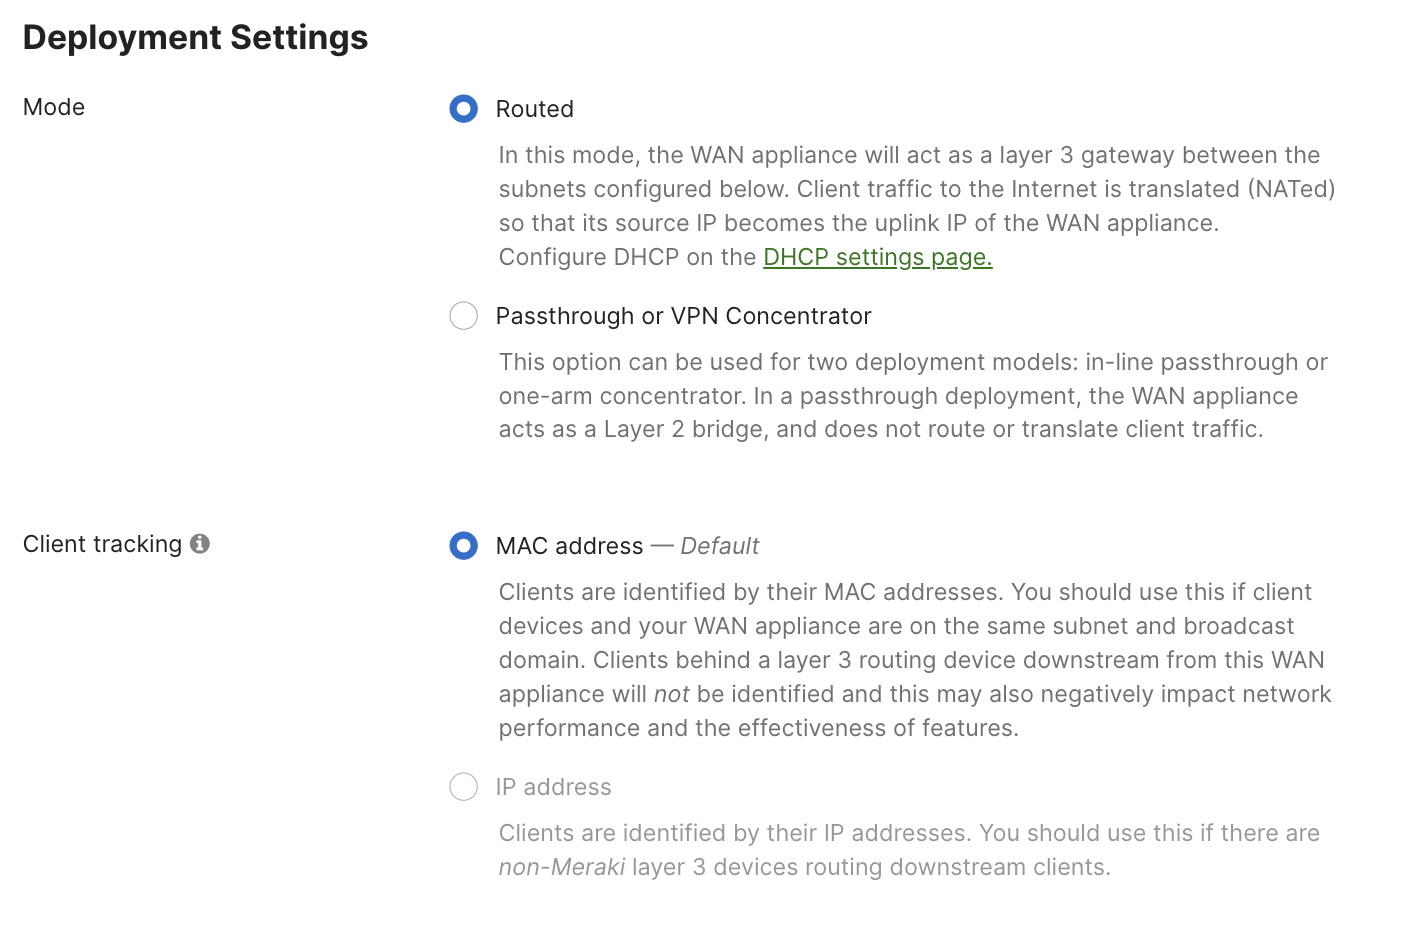
Deployment Mode
All new vMXs deployed post October 31, 2022, will be deployed in Routed/NAT Mode by default, existing vMX deployments will not be effected. If you wish to use the vMX in passthrough mode, please change the deployment settings to Passthrough or VPN Concentrator mode from the Security & SD-WAN > Configure > Addressing & VLANs page.
LAN Port Addressing and VLAN Configuration
Go to the Addressing & VLANs page on the Meraki Dashboard and configure the vMX LAN interface private address and the LAN subnet.
The IP Address and Subnet on the Meraki Dashboard should match the one assigned by the cloud provider in the steps mentioned above. Also, the vMX can only function as a Single LAN appliance on cloud platforms.

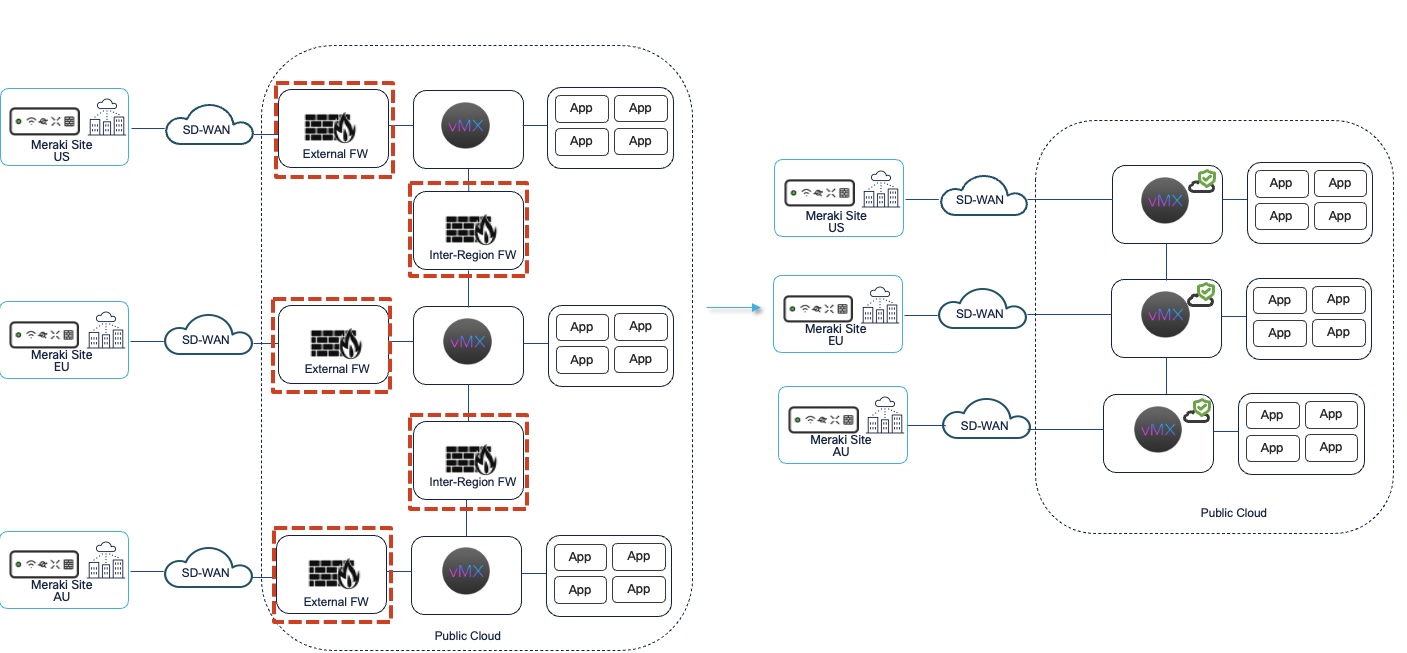
Secure Cloud Gateway Simplified
The vMX with advanced security features further simplifies cloud architectures by reducing the reliance on third party VNFs for security.
FAQs
How to enable NAT mode vMX?
NAT mode is enabled by default on the vMXs deployed after October 31st, 2022. However, if you want to enable NAT mode on an existing vMX instance, you can change the settings from the Security & SD-WAN > Configure > Addressing & VLANs page.
How to check if NAT mode is enabled for vMX?
Go to Security & SD-WAN > Configure > Addressing & VLANs and make sure that the vMX is set to "Routed" mode.
Does the vMX support multiple LAN/WAN interface in NAT mode?
Starting from MX19.1, the vMX now supports single WAN and single LAN interfaces. Prior to MX19.1, the vMX was a single NIC appliance and did not have support for a LAN port.
Does the Meraki Dashboard configuration have to match the subnet and IP address configuration of the cloud provider?
Yes, the vMX LAN interfaces configuration on the Meraki Dashboard should match the same IP address and subnet as the one allocated on the cloud provider side.
To configure the LAN port go to Security & SD-WAN > Configure > Addressing & VLANs > Routing > LAN Settings > Single LAN

Under Single LAN Settings, make sure that the IP Address matches to the one that is allocated by the CSP (AWS, Azure, GCP).
How to configure spokes for NAT mode vMX?
Enable Site-to-Site VPN for the spokes and set the NAT mode vMX as the Hub. More information about Auto-VPN and IPsec VPN can be found in the documents below:
Meraki Auto VPN - Configuration and Troubleshooting: https://documentation.meraki.com/MX/Site-to-site_VPN/Meraki_Auto_VPN_-_Configuration_and_Troubleshooting
Site-to-Site VPN Settings: https://documentation.meraki.com/MX/Site-to-site_VPN/Site-to-Site_VPN_Settings
How to setup routing for NAT mode vMX on the cloud?
Once, the vMX is deployed in NAT it can essentially act as the Gateway for your VPC/VNET cloud resources and there is no need to setup an explicit return path for the VPN traffic. Meaning, that no additional routes needs to be setup for the auto-vpn routes in the VPC. In most cases, the default VPC routes should suffice. The vMX will essentially be operating the same way an on-premise MX would, and therefore would not require any additional routing configuration to work.