
Device ID for posture compliance tracking with Cisco ISE and Meraki Systems Manager
Device ID for posture compliance tracking with Cisco ISE and Meraki Systems Manager
Relying on the device's Wi-Fi MAC address for device tracking has become impractical on modern mobile platforms, as devices may change their MACs exposed on the network via MAC randomization privacy. The good news: administrators can now leverage Systems Manager to install certificates on enrolled devices which Cisco ISE identifies to accurately track devices during 802.1X EAP authentication. This guide will show how to configure setup Cisco ISE with SM MDM enrollment and then how to create a Wi-Fi profile for secure EAP-TLS security with this ISE tracking technique.
For more information about how to configure Cisco ISE with Cisco Meraki please review the knowledge base documentation.
Meraki MDM to ISE setup
In a Meraki Organization where Systems Manager is enabled, go to Organization > MDM and find the ISE settings. Set your enrollment network and make note of the Setup URL, Username, Password, and download the SCEP CA. All of these will be added into the Cisco ISE portal.

ISE setup
Add Meraki SSL to Cisco ISE as Trust Certificate
Go to dashboard.meraki.com, and download the current Meraki SSL certificate. This can be done from a web browser by click on the secure lock icon in the URL and selecting More Information.
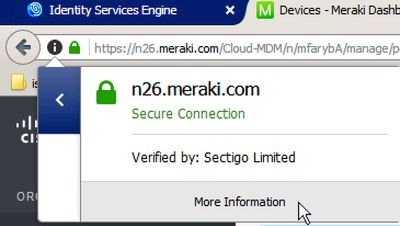
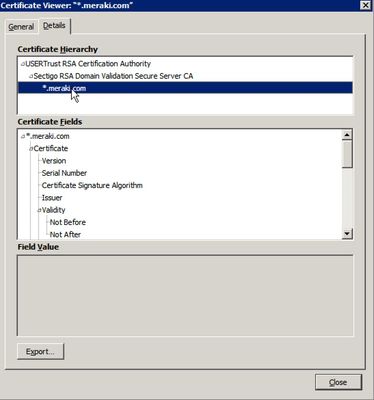
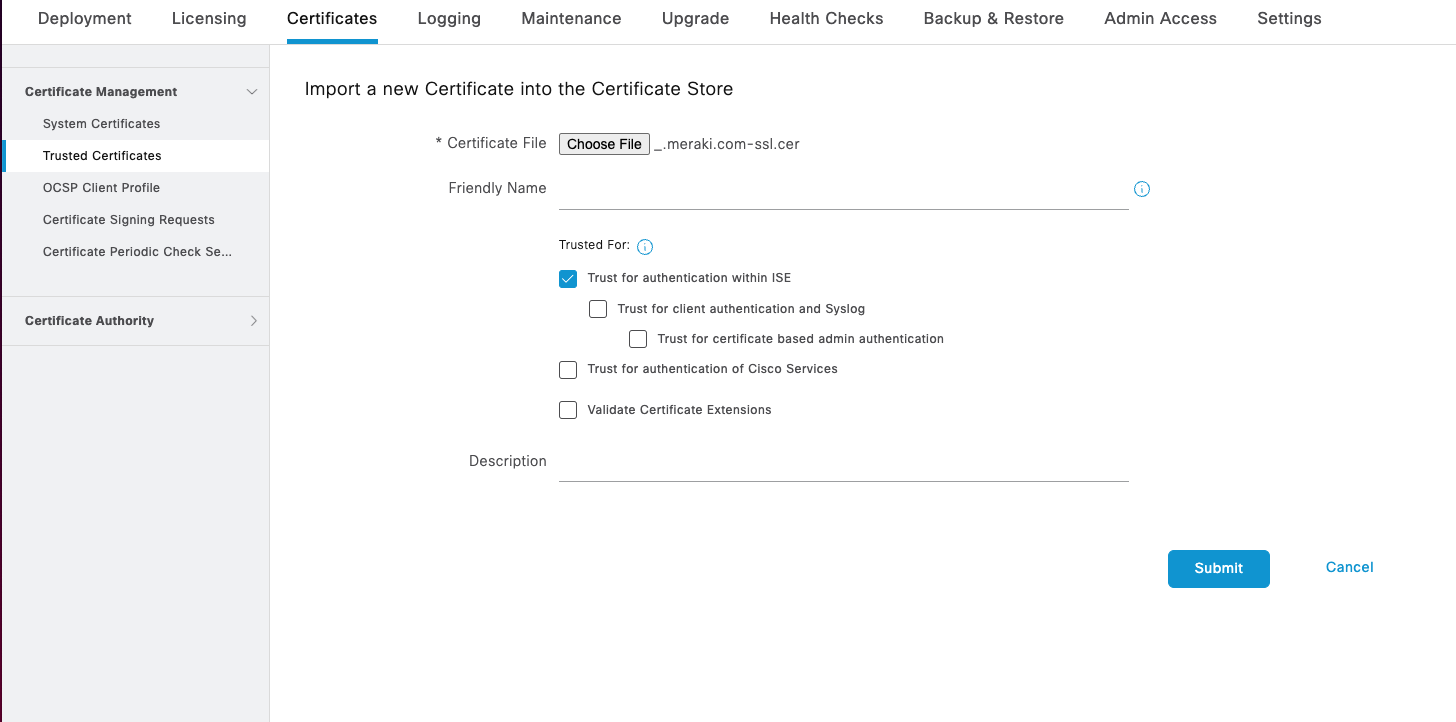
Select the *.meraki.com SSL certificate, and choose Export so it can be downloaded. Now, upload this same certificate into Cisco ISE in Administration > System > Certificates > Trust Certificates > Import.

Upload the Meraki SSL certificate and click Submit.
Add Meraki SCEP CA to Cisco ISE as Trust Certificate
In Cisco ISE, navigate to Administration > System > Certificates > Trust Certificates > Import
Click Choose file and upload the Meraki SCEP CA .pem certificate (downloaded from Meraki SM Dashboard Org> MDM in the steps previously).

Click Submit to save this Meraki SCEP CA .pem can be saved as a Trusted Certificate in Cisco ISE.
Add ISE Trusted Root CA in Systems Manager
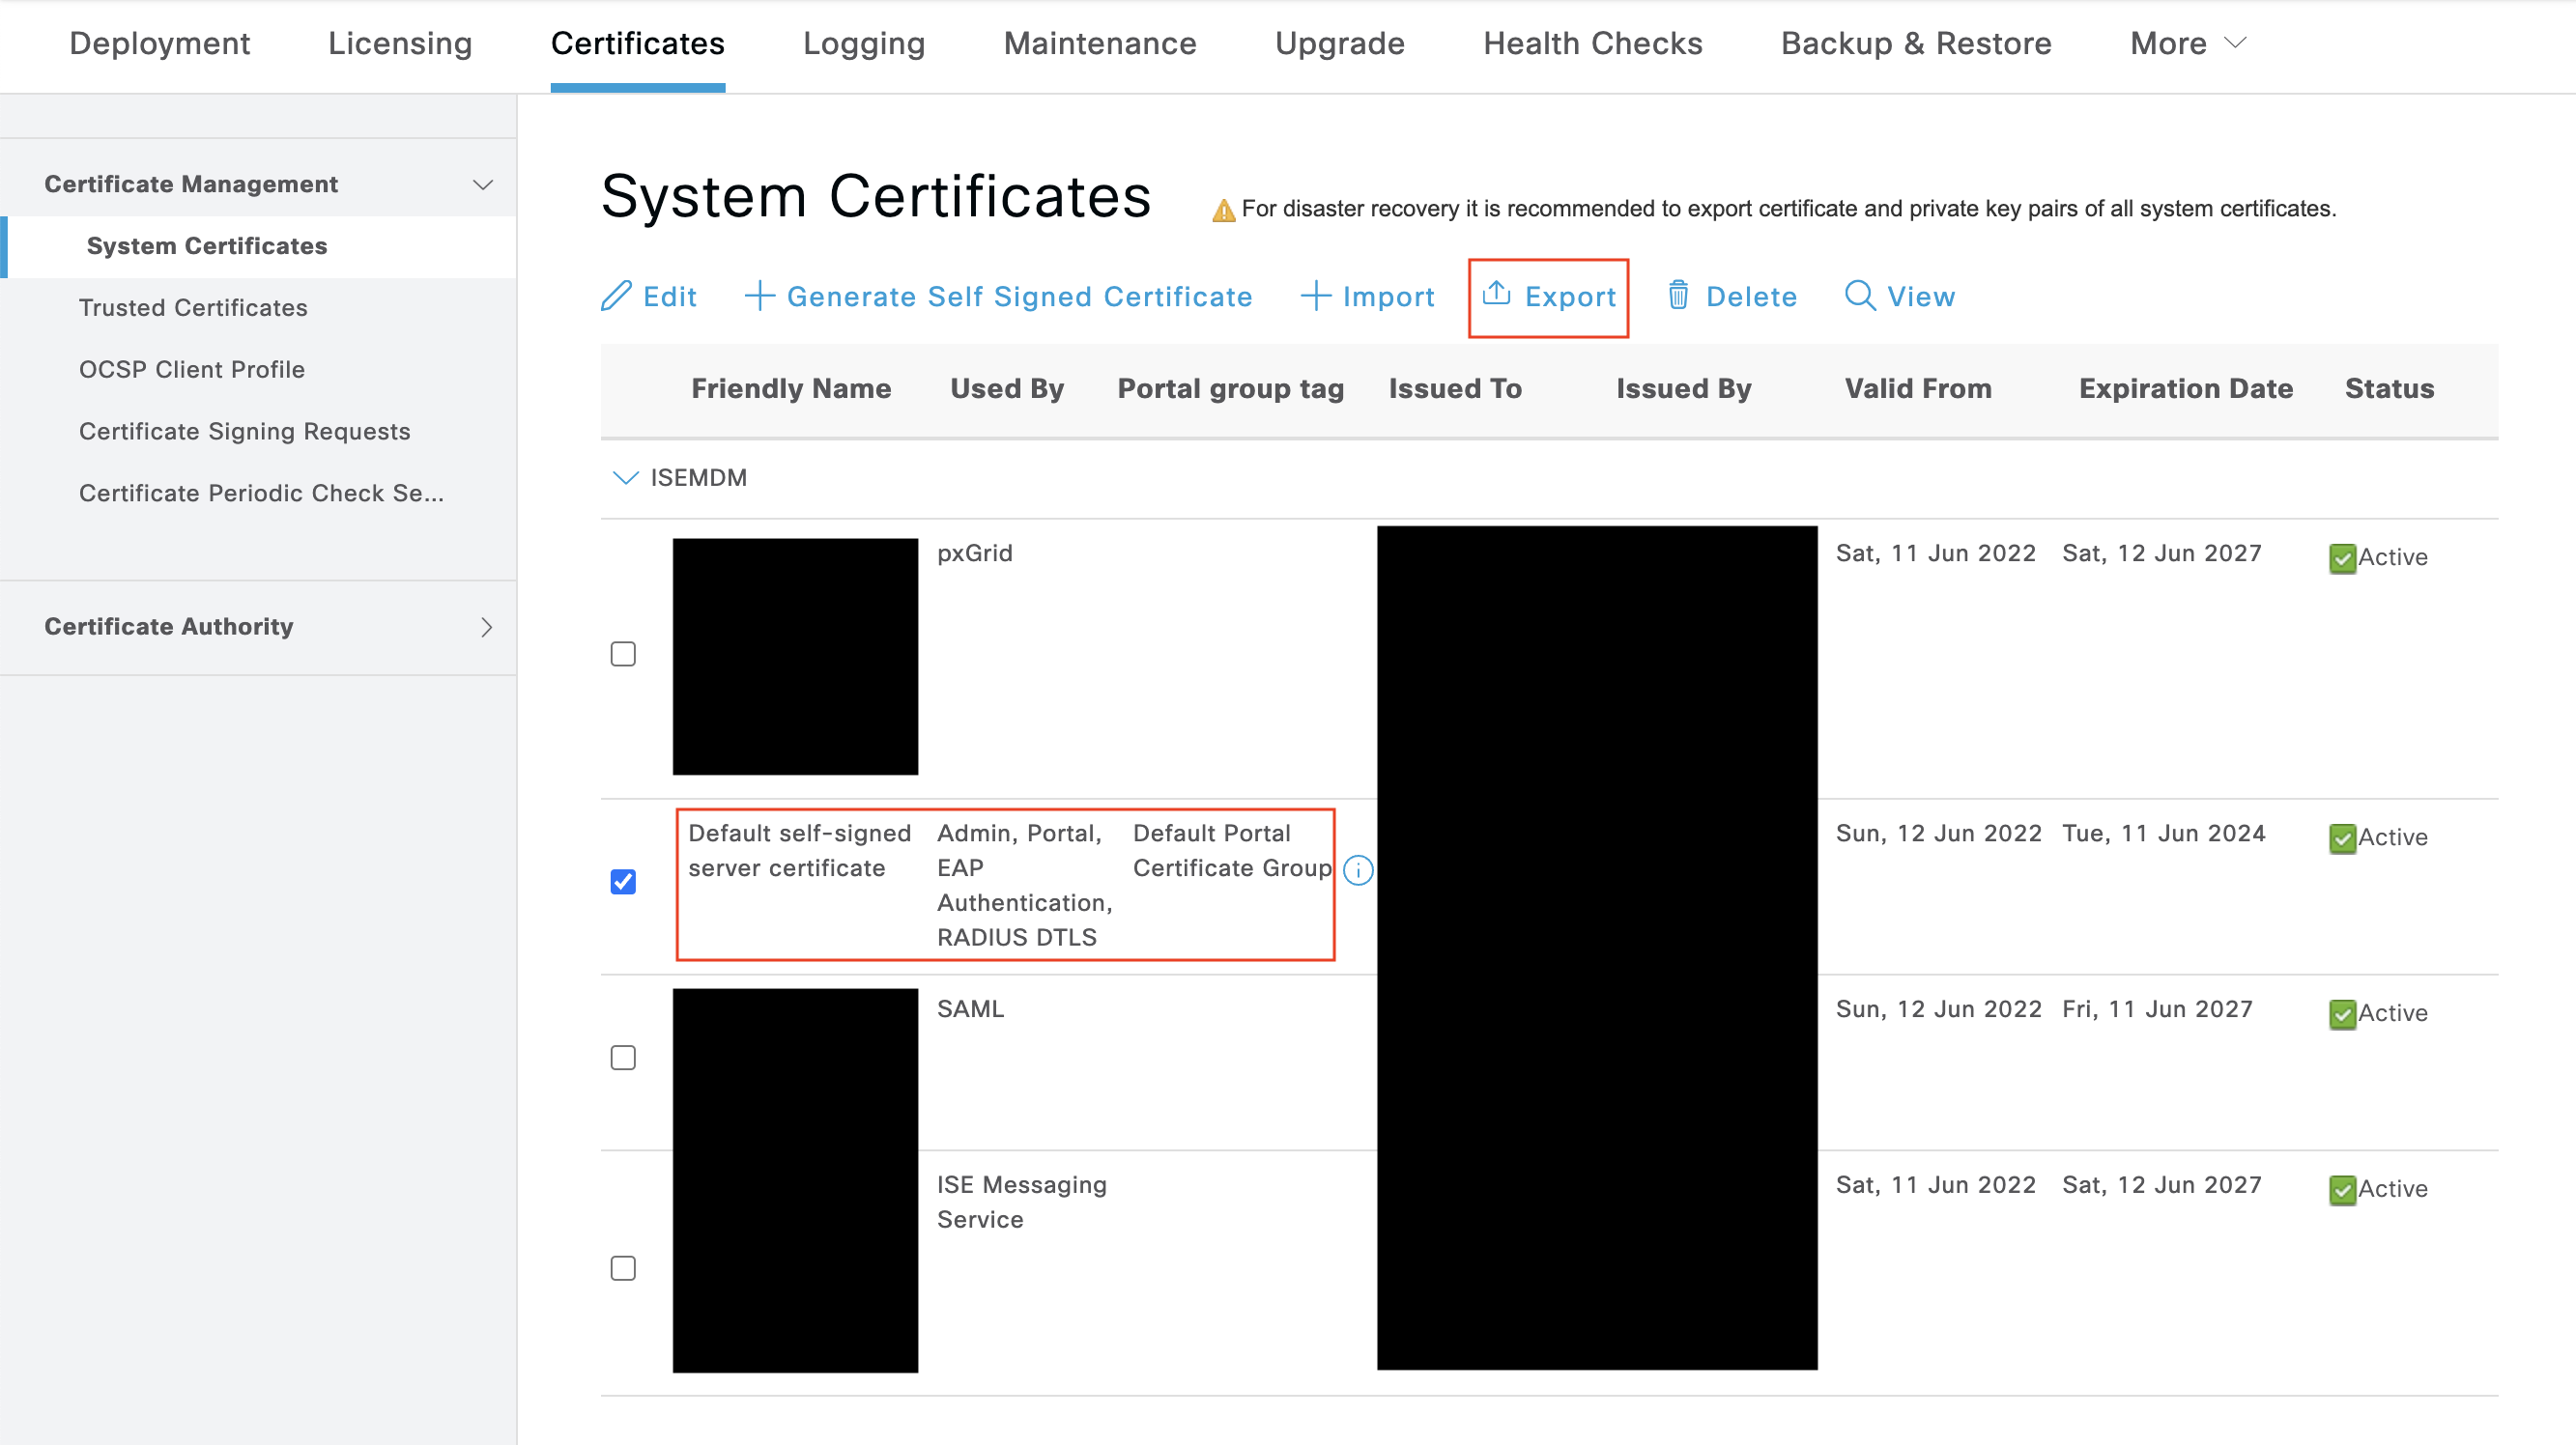
In order to have ISE's root CA trusted for a 802.1X EAP authentication to take place, it must be downloaded from ISE and added into the Systems Manager profile for network authentication. To download this certificate from ISE navigate to Administration > System > Certificates > System Certificate. Export the certificate "used by" EAP authentication. Save this exported certificate as we will upload it to Meraki Dashboard in a minute.
Enable Cisco ISE External MDM for Meraki Systems Manager
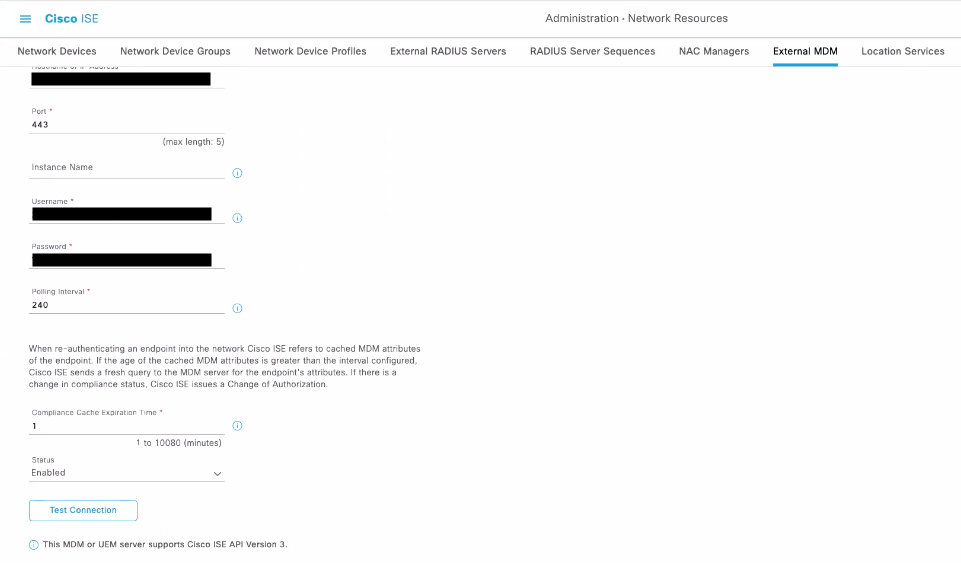
In Cisco ISE, navigate to Administration > Network Resources > External MDM.
Create a new External MDM in ISE. Fill in the Setup URL, Username, and Password previously gathered from Meraki into this new External MDM configuration.
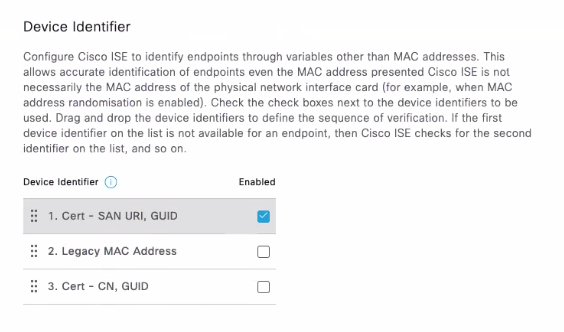
When creating this, make sure to set the Device Identifier as Cert - SAN, URI, GUID. This is extremely important because it allows ISE to track the devices via a certificate which will be installed on enrolled devices via Systems Manager.
Create the Cisco ISE enabled EAP-TLS Wi-Fi profile
In order for ISE to property track the device authenticated via Wi-Fi, SM can now create and install a Wi-Fi profile containing a ISE tracking certificate payload enabled along with the required ISE certificates.
Manually create ISE EAP-TLS Wi-Fi Profile in SM
In the SM > Settings page, create a new profile with 3 payloads:
- 1 Certificate payload containing the identity:
This is very important for tracking identity via certificate:
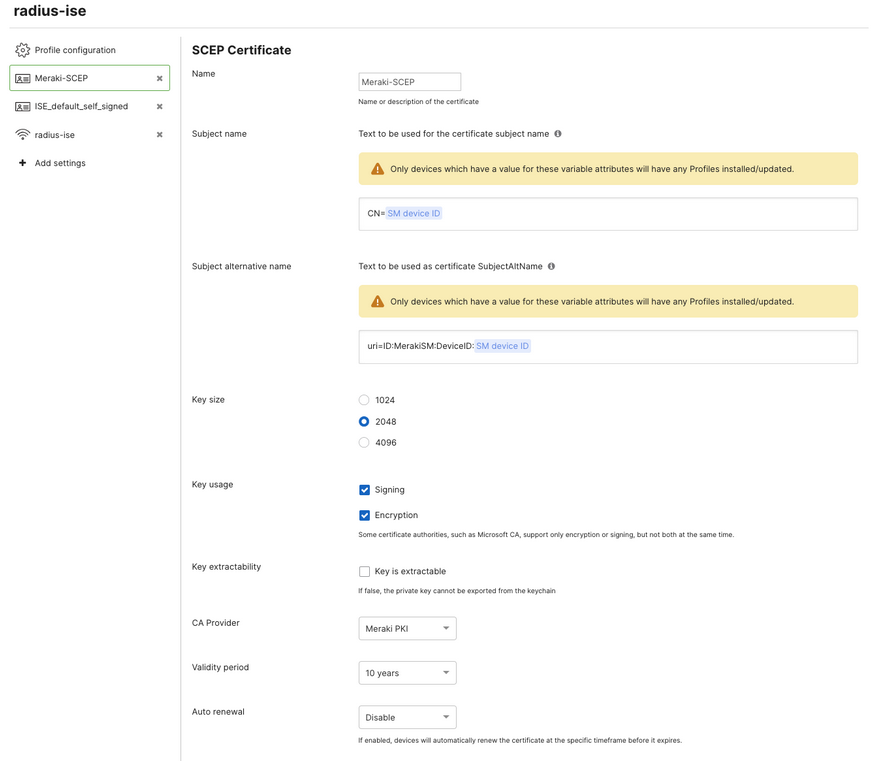
When using ISE MDM Identifier as "Cert - SAN URI, GUID" make sure to configure the identity certificate subject alternative name to uri=ID:MerakiSM:DeviceIS: $SM Device ID so a variable for each device ID inside Meraki SM can be dynamically filled into the SAN.
When using ISE MDM Identifier as "Cert - CN, GUID" make sure to configure the Subject name to CN=$SM Device ID so a variable for each device ID inside Meraki SM can be dynamically filled into the CN.
- 1 Certificate payload containing the server trust
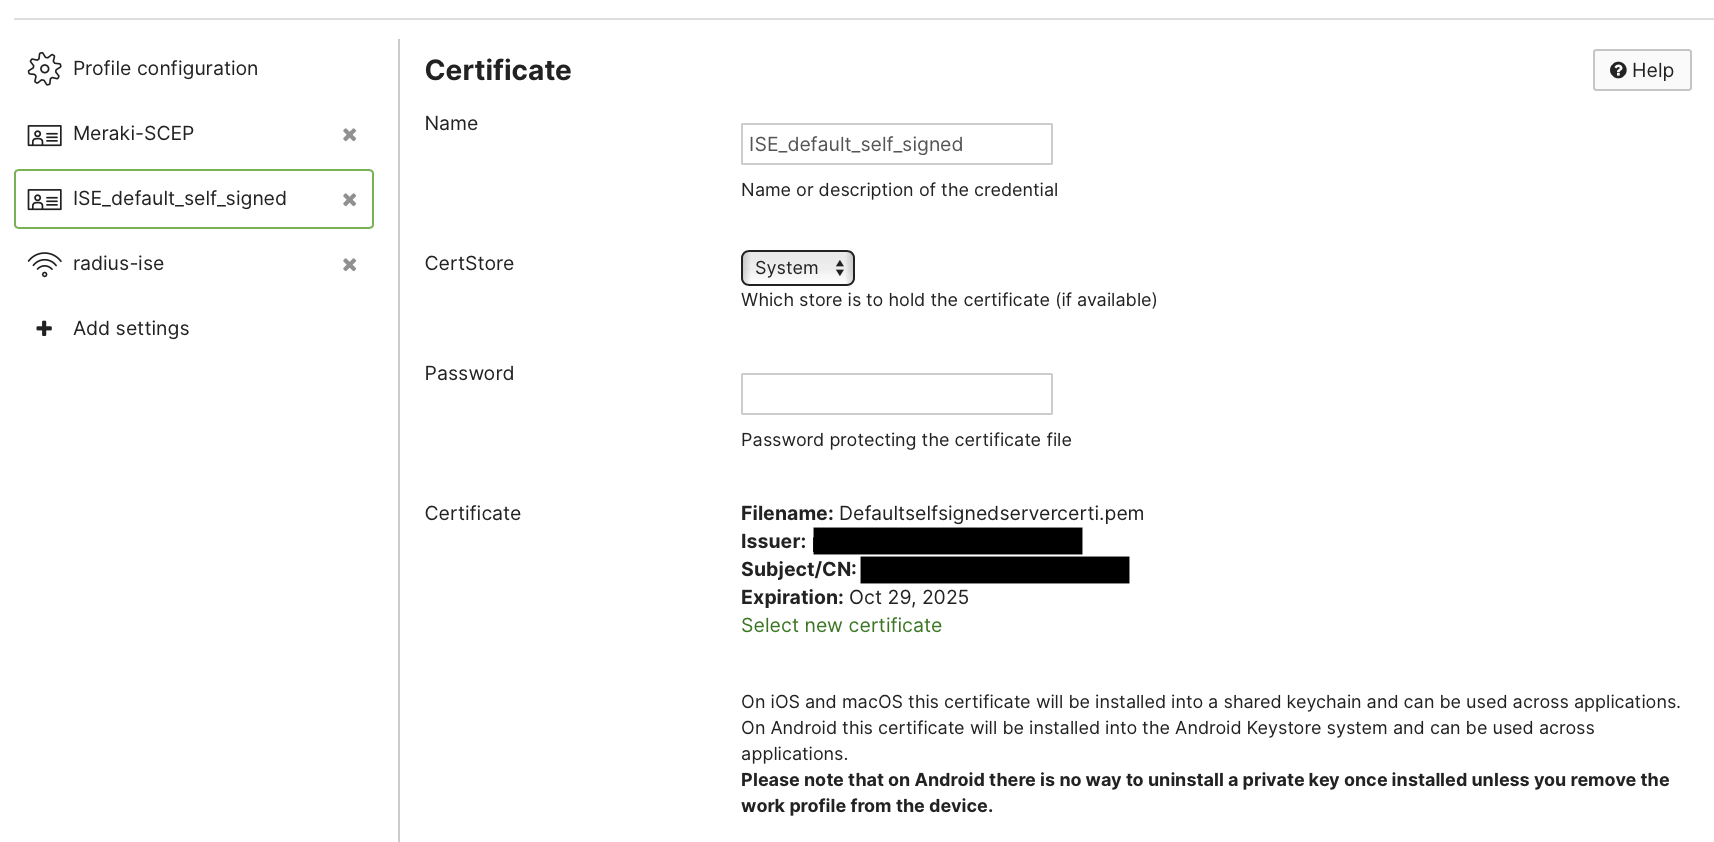
Remember! This .pem for ISE server trust can be downloaded from ISE > Administration > System > Certificates > System Certificates. Be sure to download the default self-signed server certificate which is used for EAP Authentication.
- 1 Wi-Fi payload configured to EAP-TLS and referencing the identity and trust of these^ certificates
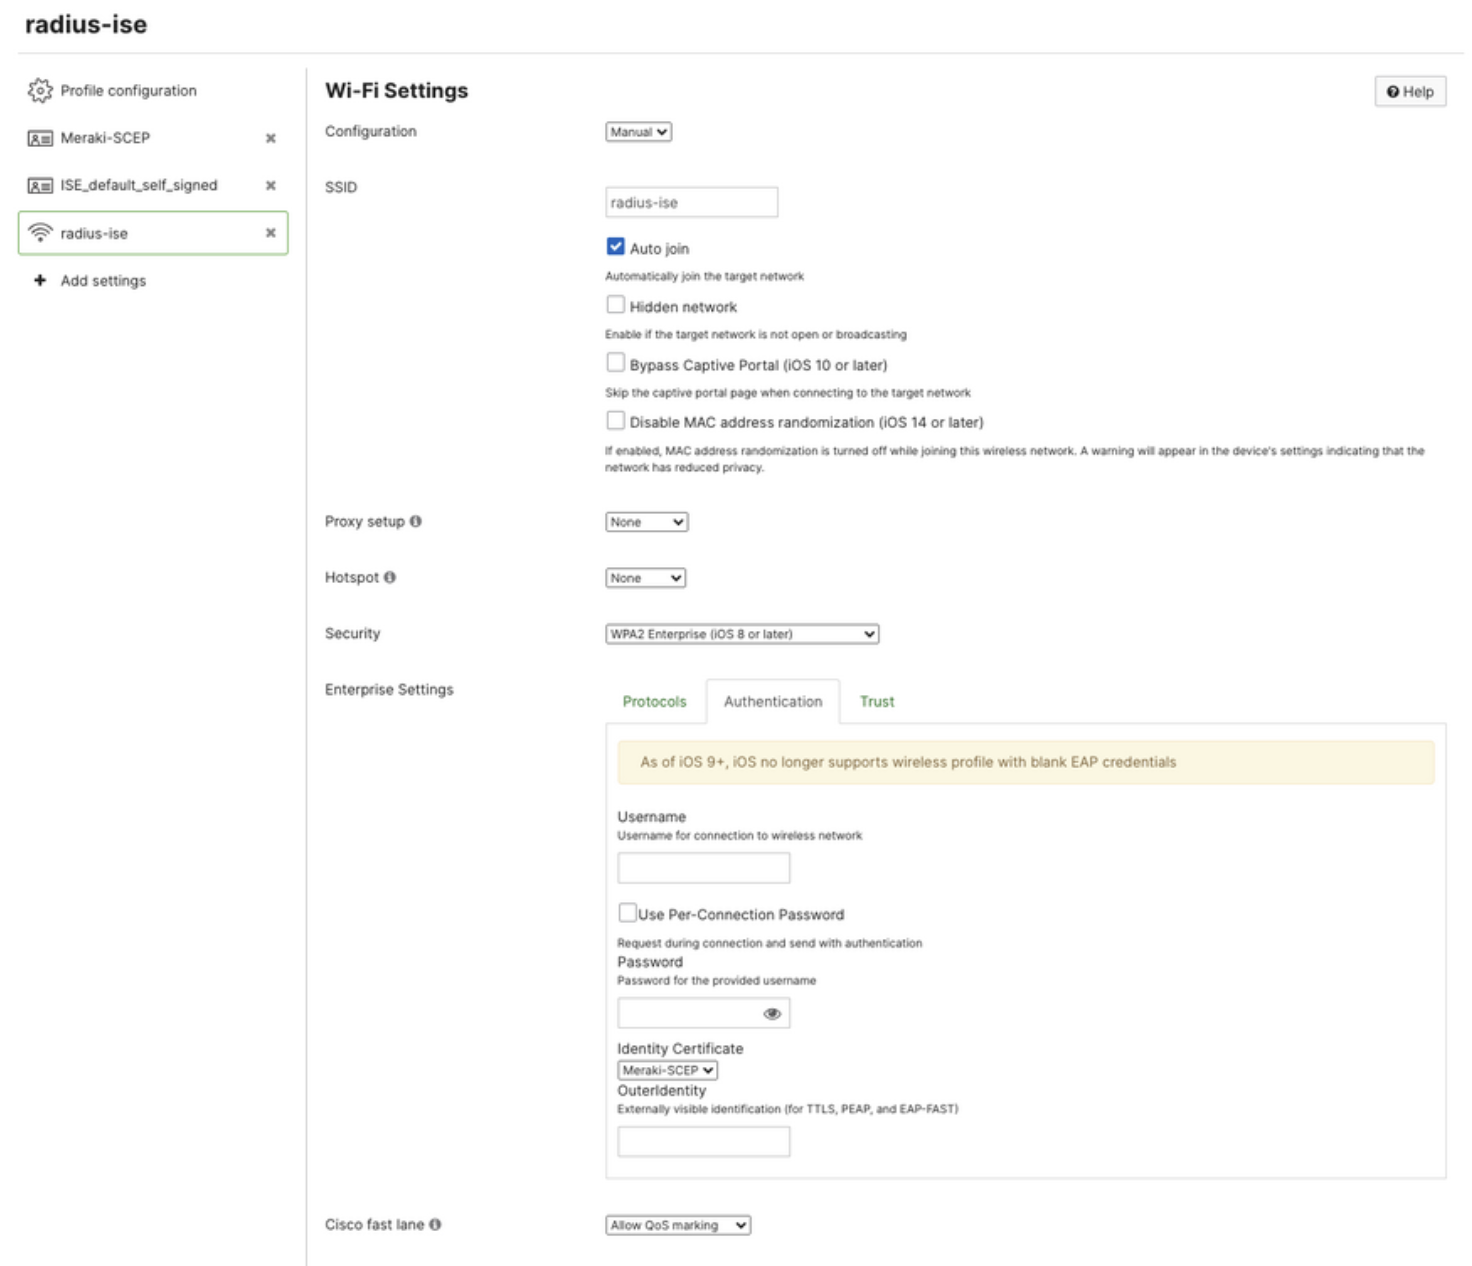
For certificate based authentication and ISE+SM device tracking: make sure the Protocols tab is set to EAP-TLS. The Authentication tab is setting the identity certificate to the same identity certificate within the profile. And the Trust tab is setting the ISE self signed server .pem as trusted.
Automatically create ISE EAP-TLS Wi-Fi Profile in SM
Alternative to the manual steps, we can create the Cisco ISE Wi-Fi payload via Meraki Systems Manager in an automatic wizard. Navigate to Systems Manager > Configure > General > ISE settings. Here we can add configurations for ISE Wi-Fi profiles and map directly to SM security policies.
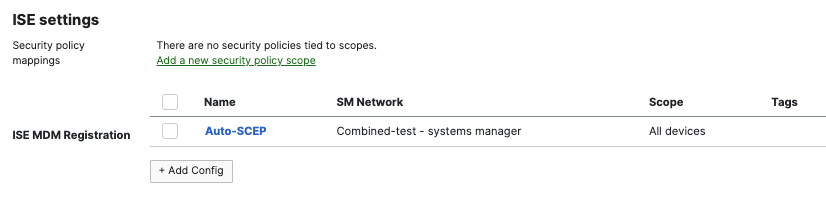
Click on Add Config.

Copy down the Setup URL, Username, Password, and download the current SCEP CA certificate. To add this certificate into Cisco ISE follow the instructions above for "Add Meraki SCEP CA to Cisco ISE as Trust Certificate".

Give the profile a name, and define an installation target scope.
When using an Owner variable, such as $owner email, please ensure that devices have Owners defined, or else this value will be nil and may not assign the policies appropriately. To enforce owners upon initial device enrollment, use Enrollment Authentication. Or manually assign Owners after enrollment.
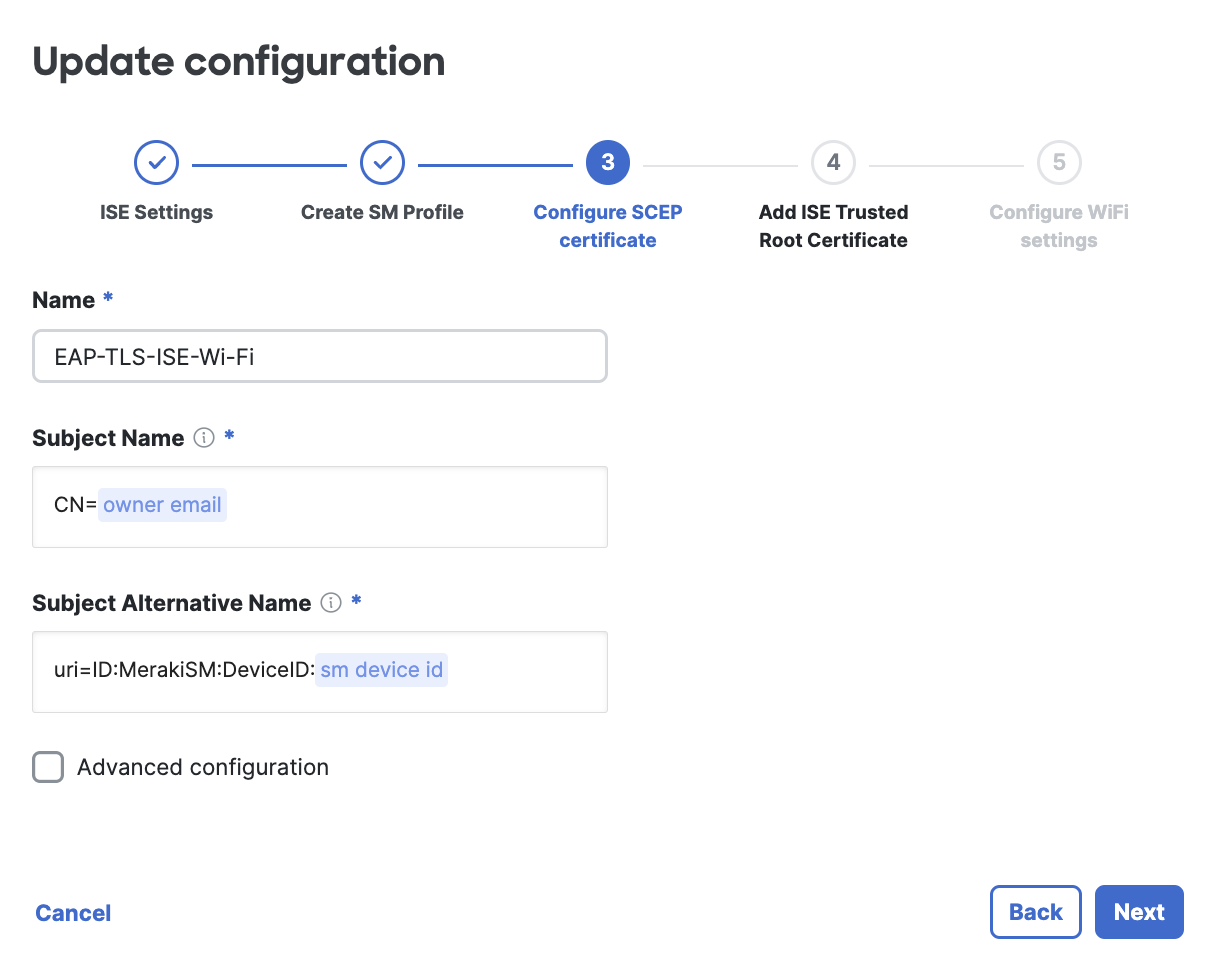
Give the SCEP certificate a name. Using the default configuration will make the ISE API lookups to Meraki simple. You can customize this further, if desired. For example, you may want to use the $SM device ID variable instead of the $owner email for the subject's common name. This subject name and subject alternative name are the values ISE will see on their side to uniquely track the devices/users.

Upload the ISE CA certificate used for EAP authentication. This is the ISE Trusted Root CA which can be downloaded from your ISE portal (steps above).
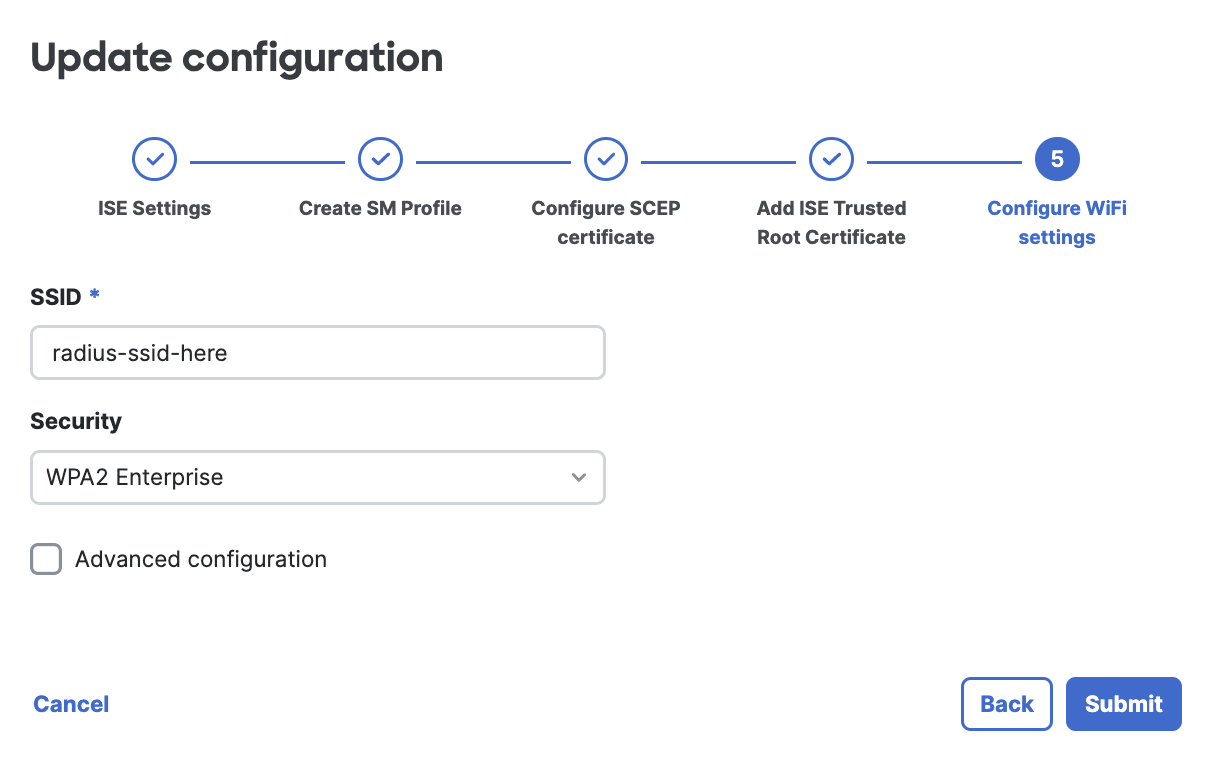
Set the SSID name and WPA security settings for the Wi-Fi profile.
Click Submit to save the profile. At this point the profile will start installing on all device in-scope of this profile configuration. And then in ISE, you will be able to view the devices to track further based off of the SM device compliance.
Confirmation
After the Wi-Fi profile installs on the Meraki SM device and device associates to the SSID, ISE will now track these devices via their Meraki SM device identity and be able to make CoA decisions based on the SM device posture security policy compliance/violating statuses in MDM.
Inside the ISE Live Logs, we can see the device associate to the SSID via EAP-TLS and being tracked with its device id:
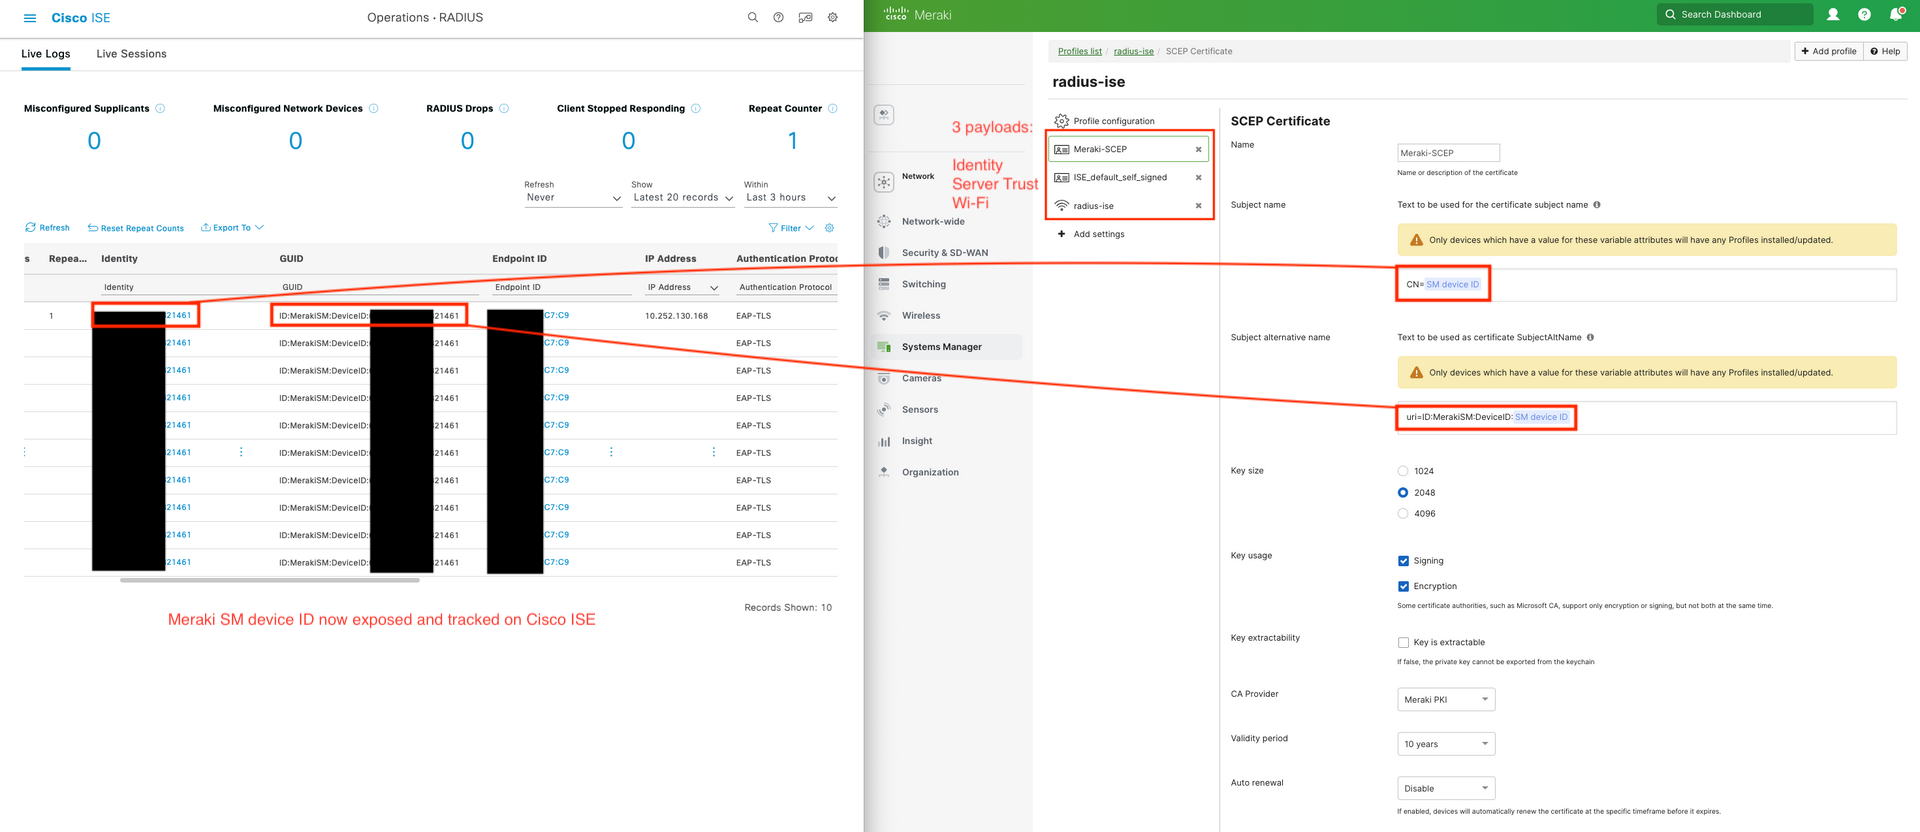
Success! Cisco ISE can now use this SM Device ID to lookup SM security policy compliance/violating status to make CoA decisions based on MDM posture. No need to rely on randomized MAC addresses for device tracking anymore!
This SM device ID is the same ID used inside Meraki Dashboard and Meraki API to track the same SM device.