
Education Deployment Guide and Best Practices
Introduction
Cisco Meraki Systems Manager is an industry leading EMM (Enterprise Mobility Management) solution that can be used to manage mobile devices across all types of education deployments. This document reviews recommended best practices and outlines steps required to configure Systems Manager using the Meraki Dashboard for education deployments.
Overview
For those who are in the process of staging a roll out of Systems Manager to their device fleets, we recommend following the basic steps outlined below.
-
Read through this guide and determine your requirements and use cases.
-
Set up and link your external integrations, as described in the pre-provisioning section.
-
Set up your apps, profiles, and tags layout.
-
Deploy a few test devices: test enrollment, tag scoping, and app/profile installation. Customize any settings as needed.
-
Roll out your remaining devices.
Deployment Considerations
Please consider the following when rolling out your mobile deployments:
-
What types of devices do you have? (iOS, Android, Windows, macOS, Chrome OS)
-
How many devices do you have, and how many do you expect to add to your device fleet over the next 18-36 months?
-
Who owns the devices? (student owned, school owned)
-
What is the deployment model for your devices? (e.g. 1:1 student:device, shared iPad carts, lab)?
-
Are you integrating with Apple School Manager, or using the Apple Classroom app?
-
What do students need to do on these devices? (e.g. use apps in the classroom, work on assignments, collaborate with other students)?
-
What do teachers need to do on these devices? (e.g. check emails, use Apple Classroom)?
-
How heavily do you need to restrict certain types of behavior (e.g. camera usage, installation of apps)?
-
What is your device provisioning strategy? Do you use Apple’s Device Enrollment Program (DEP) and/or Apple’s Volume Purchase Program (VPP) as part of Apple School Manager? Do you need to distribute apps and/or app licenses?
-
Do you plan to license applications to individual users, or directly to the devices?
-
Do you have a directory service (e.g. Active Directory, SIS, LDAP, Google for Education, etc.) for student/staff login management?
Decisions on the above criteria will drive your Meraki Systems Manager configuration. The following sections talk about common education use cases and deployment best-practices, but please contact your Cisco Meraki partner, sales, or support teams for more personalized assistance.
Core Concepts
There are a few key concepts in Systems Manager, and it is helpful to understand them before setting up anything in your network. Thinking about these things prior to enrollment will make your initial deployment and ongoing management much simpler.
For an introduction to some of these concepts, see our quick start guide and video here.
Access Rights
By default, Systems Manager will grant administrators the maximum amount of control available when applied to your Apple devices upon enrollment. However, in certain bring-your-own-device (BYOD) environments where the device is personally owned, device owners may not want administrators having this level of control over their personal devices.
Systems Manager can be customized to meet the needs of different deployment models by changing the permissions of what can be retrieved from or sent to the device. It is important to note that Access Rights must be set before devices are enrolled; changes made after enrollment will only take effect if a device is re-enrolled.
Access rights limitations can be found in Configure > General. See the article here for more info
Tags
For a comprehensive guide to tags, please visit the following documentation article: Using Tags in Systems Manager.
Tags are used to group devices, as well as inform administrators of a device’s current state within Systems Manager. These tags, once generated, can be used to define the apps, profiles, and settings that are provisioned by Systems Manager.
There are two main types of tags: static and dynamic.
-
Static tags are generally applied manually to individual devices by the administrator.
-
Dynamic tags are applied automatically and can change depending on certain factors.
Dynamic tags are applied based on time of day (schedule), physical location (geofence), or security posture. These policy-based tags are automatically applied to devices based on their state. Owner tags can also be created, or automatically imported from certain directory systems. For more information on these types of tags, please refer to the documentation below:
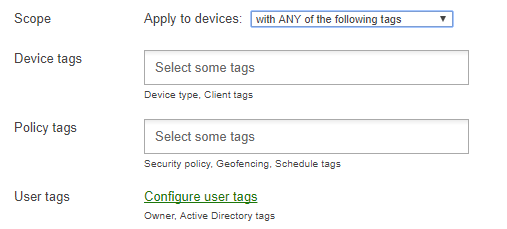
Scoping apps and profiles with Tags is accomplished by using logical operators (AND and OR), which allows for a high degree of granularity when setting a device scope. For information on scoping apps and profiles, see this article.
Profiles
Configuration profiles are containers or wrappers for various configuration settings that are installed onto your managed devices in Systems Manager. These profiles are not to be confused with management profiles, which are installed when a device is first enrolled into Systems Manager. Multiple configuration profiles can be applied to a device at a time, and each applies settings like device restrictions, wireless configurations, document access, etc.
Note: For a comprehensive guide to profiles, please visit the following documentation article.
Profiles are scoped to devices based on Tags, which allow you to specify the devices, users, or specific conditions required for a device to receive a profile. To read more about how to use Tags to scope profiles, read this article.
Pre-provisioning and Administration
Before you begin enrolling your devices into Systems Manager, it's important to determine what level of management access to grant your IT team and any other staff that may need to use the Meraki Dashboard. Depending on the devices you manage and which vendor services you plan to use, you may also need to link the Meraki Dashboard with external integrations prior to your deployment.
Dashboard Administrators
In addition to Dashboard’s distinction between organization and network admins and the permission sets belonging to each of those (read vs write access), Systems Manager also allows you to configure limited access roles in Dashboard.
- Organization admin privileges can be granted to IT staff that needs access to all your Cisco Meraki deployments, including networks for any other Meraki products (e.g. wireless APs, security appliance, etc.). Org admins will be responsible for externally linked Apple or Google services like DEP, VPP, and APNs, detailed later in this section.
- Network admin privileges can be granted to IT or school staff that will only be managing Systems Manager, and not other Cisco Meraki equipment. Or if you have separate Dashboard networks for each school in your district, network admins can be placed in charge of a particular school without accessing other campuses. These admins will not have access to organization-wide settings like DEP or VPP.
- Limited access roles allow admins to grant teachers access to a subset of devices enrolled through Systems Manager, based on tags. A common use case is scoping a teacher to their class, so that a class teacher can only control his or her students’ devices. See more info on tagging here.
Apple Programs
If you are managing iOS or macOS devices, you will need to link APNs with Systems Manager. The remaining programs are optional but useful for simplifying device management. It is recommended to use a shared or school-owned Apple ID to set up these services, instead of a personal Apple ID, because others may need to access the account to renew these services in the future.
For Apple's official education deployment guide, visit this link.
Apple Push Notification service (APNs): Systems Manager uses APNs to communicate between Apple, Cisco Meraki, and your enrolled Apple devices. This makes an APNs token required to enroll & manage Apple devices.
Device supervision: Supervision is an important concept for managing iOS devices with MDM. Supervising your Apple devices is typically recommended (but not required) if they are organization-owned, or if you want to enable Systems Manager to control additional configurations. Note that supervision requires either setting up new devices, or factory resetting existing devices.
There are two options for supervision:
- Device Enrollment Program (DEP): DEP allows you to permanently manage your organization's macOS and iOS devices. Your devices need to qualify for Apple's program to use this method, but DEP also grants you the most control over your devices. For example, DEP allows you to make MDM enrollment mandatory and unremovable.
- Apple Configurator 2: Unlike DEP, AC2 is a Mac application, not an Apple program you need to sign up for in advance. Use AC2 to supervise iOS devices manually, if your devices don't qualify for DEP.
Apple's Volume Purchase Program (VPP): VPP allows you to centrally manage and maintain ownership of a library of purchased application licenses. In conjunction with supervision, it also allows Systems Manager to push apps silently (without user interaction) to iOS devices.
Apple School Manager (ASM): For education deployments, ASM allows you to create managed Apple IDs and utilize the Apple Classroom app for controlling student devices. It also supports Shared iPad mode, in the case where multiple students are using a device.
Android Domain
If you are managing Android devices with Systems Manager, you will need an Android domain bound to the Meraki Dashboard to enroll devices. If you have an existing custom Google domain and want to authenticate devices during enrollment with a Google sign-in, follow the instructions to add Systems Manager as an EMM in the Google admin console. Otherwise, you can generate a Meraki-managed Android domain with any Gmail address.
Provisioning and Enrollment
As described in the concepts section, tagging is used universally across Systems Manager to match devices with the apps and profiles they receive. Because tags are crucial to your deployment regardless of device type and can be configured in Dashboard before devices are brought online, Cisco Meraki suggests reviewing the recommendations below and planning out a high-level tag schema prior to deployment.
Tagging Best Practices
It’s important to set up your tag infrastructure in a consistent manner that scales to your deployment - for example, creating a separate tag for every individual app pushed to a student can work but can quickly become messy.
General
Most education deployments will scope applications and profiles by role (IT, teacher, student) and further subdivide by grade level or class/subject for students. Specific individuals such as executive board members, or special education students with more particular apps/profiles can leverage manual device or owner tags for additional granularity.
As a reminder, devices can receive multiple profiles, so there’s no need to try to force every device into a single student or staff profile. For example, something like wireless access to a general school SSID may apply to both staff and students and can be deployed as a separate profile from other staff/student specific restrictions. Certain payloads like Apple Classroom Education or ActiveSync email are required to be configured in a separate profile.
User Directory Integrations
Tag architectures can be quickly simplified by integrating with Apple School Manager, which can import your Student Information System (SIS) and dynamically generate group tags in Systems Manager based on the classes students are enrolled in.
Additionally, or as an alternative, enrolling with Active Directory Authentication allows Systems Manager to import your organization units (e.g. staff, IT) as tags. (See SM Enrollment Authentication for more information). When a user authenticates on a device during enrollment, their owner groups or AD groups will automatically be applied as tags that device, which can then be used to scope apps/profiles.
These integrations save you time by reducing the need to manually tag devices or owners, allowing you to more quickly map the necessary settings to devices.
The Meraki Dashboard will not automatically sync in changes made in your SIS or in ASM. After making changes you will need to sync in those changes on the Systems Manager > Configure > Owners page.
Geofencing and Dynamic Security Tags
In addition to Owner Tags, which can allow you to tailor apps and settings to particular users, Systems Manager supports another layer of provisioning through dynamic tags. Systems Manager can automatically install or revoke apps and settings based on the device’s state, such as geolocation, time, or security posture.
Some example use cases:
-
For 1:1 iPads that can be taken home, scope a profile based on geofence, so that when the device is on school grounds it has additional restrictions (e.g. block camera access, hide distracting apps, or enforce WiFi SSID allow so it only connects to a particular SSID), but when it is taken home these restrictions are automatically lifted.
-
Similar to the previous point, configure profiles/apps based on time-based tags, so that devices are only usable or accessible during school hours, and locked down afterward.
-
Security policies can be used to notify administrators if teachers or other less restricted users with App Store access violate school policy, e.g. downloading a blocked app
Pre-tag for Seamless Onboarding
Devices receive app and profile install commands immediately when tagged to match the corresponding app/profile. To expedite deployment, they can be configured to automatically receive specific tags during enrollment. This allows devices to auto-install its specified profiles and apps immediately after enrollment for a seamless onboarding experience.
The flow would be as follows:
-
Set up apps and profiles with the desired tags.
-
Pre-tag devices in DEP, or configure a default tag to be applied upon enrollment.
-
Enroll the device.
-
The device will automatically install apps and profiles with matching tags.
To pre-tag devices in DEP, follow the steps here. To apply a default tag to all other enrollment methods, see here.
Enrollment Methods
Before devices can be managed within Systems Manager, they have to be enrolled in your EMM network. Mobile device enrollment varies depending on whether it is school-owned or a BYOD device, and is outlined below at a high level. For a comprehensive guide to enrolling each device type, see the Enrolling Devices article.
Enrollment Best Practices
For school-owned iOS devices, it is highly recommended that administrators use Apple School Manager and Device Enrollment Program (DEP) whenever possible. These programs allow an administrator to enforce mandatory device supervision, customize device setup, and automate enrollment into Systems Manager in bulk. This means administrators can pre-configure devices online even before they arrive on site, and these devices will enroll in SM out of the box during the setup assistant, without having to first physically configure the devices.
Recommended DEP Settings
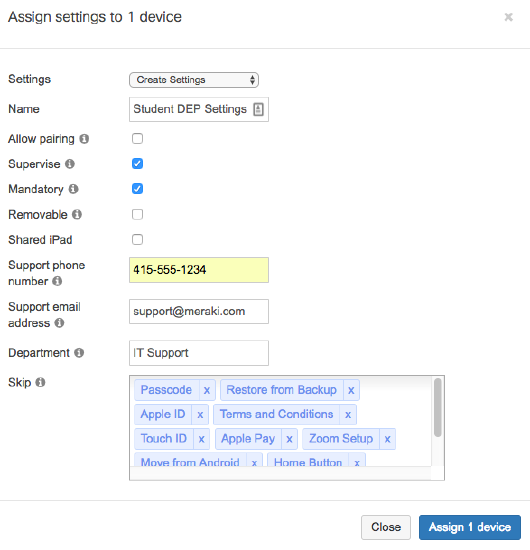
When configuring your DEP settings, devices issued to end users should typically be supervised, with mandatory and unremovable management. This is advantageous to the administrator, as it enables additional MDM functionality, prevents users from unenrolling from Systems Manager, and also ensures the devices stay under school ownership even in the case they are factory reset.
- The ‘Skip’ section at the bottom speeds up your deployment process by removing unneeded setup pages during device setup. If using supervision in conjunction with VPP for silent app installs via device assignment (i.e. not using Apple IDs), or to avoid users signing in with their personal Apple accounts, skip the ‘Apple ID’ prompt.
- Shared iPad should only be checked if multiple students will be signing in with managed Apple IDs to share devices, e.g. in cart-based deployments. See here for more info.
Example settings below - note that disabling pairing will prevent functions like backing up or troubleshooting through computer programs like iTunes or XCode.
DEP Onboarding Tips
We recommend pre-tagging devices whenever possible so that devices can immediately pull down their configured settings and profiles after setup assistant, upon hitting the iOS home screen.
Note that the iOS setup assistant requires an internet connection to check for DEP enrollment, and pull down its DEP settings. If end users or other staff members that do not have access to a wireless network during the setup process are the ones first booting the devices, you can first pre-provision a WiFi profile through Apple Configurator 2 to avoid giving out credentials.
Non-DEP Enrollments
For iOS devices that are not set up in a DEP account, there are various other methods to enroll them into management. If you are supervising non-DEP devices, you will need to run Apple Configurator 2 to enroll devices. This can be done in bulk by connecting multiple iPads via USB hubs, and can also be used to provision additional settings or custom profiles to be distributed through Systems Manager.
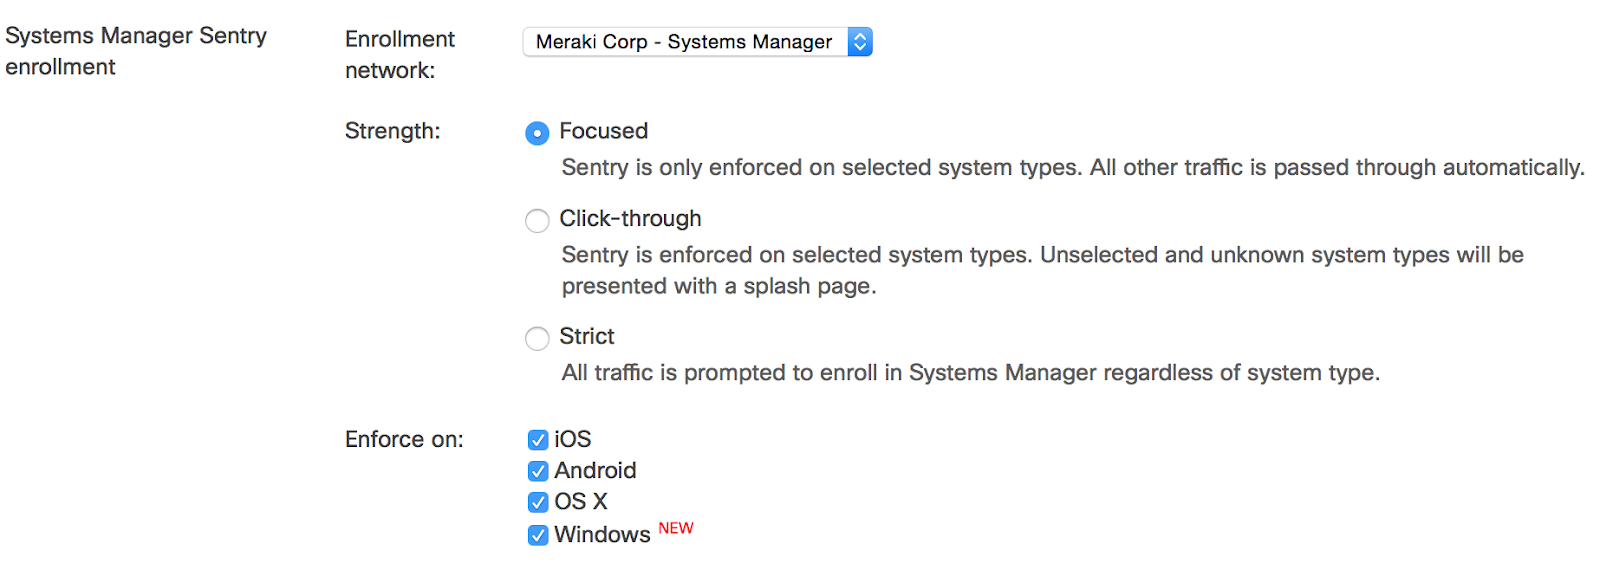
For unsupervised iOS device enrollment, and devices of any other operating system, devices can be more rapidly enrolled into Systems Manager with Meraki MR access points via a Sentry Enrollment SSID. This can be set up as a self-service where end users enroll their own devices or handled specifically through IT, e.g. broadcasting the enrollment SSID just near the IT area.
Manual enrollment and email/SMS enrollments are also described in Dashboard under the Systems Manager > Manage > Add devices page. For more information on enrolling specific platforms, see our Device Enrollment documentation.
Deploying Applications
For instructions on how to provision and update applications through Systems Manager, review and reference the following articles:
VPP Best Practices
We recommend using VPP whenever possible for Apple devices, as the program greatly simplifies license management, enabling silent app installation and removing the need for Apple ID sign-ins on iOS.
The VPP article covers setup and uses in great detail, but a few recommendations when deploying apps via VPP are listed below.
Provision in Advance
Provision your licenses in advance from Apple’s VPP site, before you need to push apps down.
You’ll need to ‘purchase’ licenses for all apps, even free ones, but don’t overprovision the number of licenses just because they are free. For example, if you know you will have 500 iPads, provision maybe 600 licenses of a free app to have a buffer, and not just 10,000 for the sake of having licenses, as this will slow down VPP syncs with Apple.
If possible, deploy your apps in advance as well, before the school season starts. VPP servers sometimes experience delays in granting licenses in August/September, when most schools are pushing out licenses and app installs.
Device vs User Assignment
Determine if you are assigning licenses by Apple ID (user assignment) or device assignment (to a specific iPad, identified by serial), as each method requires a different workflow, covered in the main VPP article. Mac App Store apps currently only support user assignment, although software installer can be used to push other software packages.
We typically recommend using device assignment for iOS to eliminate the overhead of managing students’ Apple IDs and having to sign in to install apps. Device assignment also makes it easier to grant and revoke licenses, but there may be cases where you want a license granted to a particular user, regardless of which device he or she is using.
Allow Users to Choose Pre-approved Apps
In most education deployments, schools will disable iOS App Store access. By default, saving changes on an app in the Systems Manager Dashboard (Systems Manager > Manage > Apps) will immediately push down the app install, but there are cases where schools want to configure a list of allowed apps and have students select the ones they want to install, instead of automatically installing all configured apps.
In these cases, you can add your approved apps into the Systems Manager > Manage > Apps page, configure the scope, and select ‘Disable auto-install’. Users that are scoped to receive the app can then browse for the app in the Systems Manager MDM app, and download it if they desire.
Warning: this deployment can make it difficult to audit missing apps on devices, as all scoped apps that are not installed will be labeled as ‘missing. It can also make troubleshooting app installs more difficult, as VPP licensing and app install commands will be sent when the user selects a download.
For Android devices in device owner mode, the badged Play for Work store will by default only show approved applications, although they can also be accessed from the SM MDM app.
Caching Services
If deploying apps in bulk, stagger the app downloads or have users self-install using the above self-service deployment to avoid congesting the network. An even better option is to configure a local Apple caching server for your app installs to avoid uplink congestion. For Mac and Windows app installs, you can configure a locally hosted web server to point your software installer links as well.
For more information on Apple Caching services, visit the following link here.
Managed App Settings
Systems Manager can not only deploy apps to devices but also preconfigure any app that is part of the AppConfig community, for example by pushing down email settings for users during install. Check with your app developers if they support managed app settings.
Profiles and Settings
Best Practices
A device can have multiple configuration profiles installed at a time. This means settings can be split out logically into separate profiles, e.g. one profile that provides basic wireless access to all student and staff devices, and a second profile that only provides staff SSID access to teachers.
Certain profile payloads, such as ActiveSync email settings and Apple Classroom education payloads, should be configured in separate profiles, so they can be updated and reinstalled without re-pushing other settings at the same time.
Recommended Restrictions
Locking down certain device functionality is critical for keep students focused and productive, especially when using school-owned devices. With supervised iOS or device owner Android devices, Systems Manager has many useful restrictions, which can be configured by adding the ‘Restrictions’ payload setting in Systems Manager > Manage > Settings.
Some commonly used restrictions are detailed below, but be sure to review the full list of options to find what matches your deployment requirements.
Unsupervised Restrictions
Cross-platform restrictions
-
Allow use of camera
-
Allow screen capture
-
Unless needed for school work, these can help prevent sharing any sensitive information like test questions to other students.
-
iOS & macOS Restrictions
-
Allow FaceTime
-
Disallow sharing of managed documents with AirDrop
-
This, in conjunction with the two ‘Allow documents from managed/unmanaged…’ restrictions help lock down the sharing and distribution of school files, such as homework or test documents. Managed apps are any apps pushed through Systems Manager.
-
-
Allow use of iTunes Store
-
Allow use of Safari
-
If enabled, consider using the web filters under the supervised restrictions.
-
-
Various iCloud settings
-
Dependent if you want to allow iCloud use on your Mac and iOS devices - note that students may sign into their personal accounts. iOS can restrict this by preventing modifying account settings.
-
Supervised iOS Restrictions
Meraki is committed to providing an inclusive experience for our customers. The following section contains language that does not adhere to our standards for inclusivity. We are working with our partners to replace it.
-
Allow iMessage
-
Student devices typically will not allow SMS/text messaging.
-
-
Allow app removal
-
Allow Bookstore
-
Allow modifying account settings
-
This will lock devices from editing the account options in the Settings app, which will prevent students from signing into personal Apple IDs.
-
-
Allow AirDrop
-
Depending if AirDrop is needed to collaborate between students, though this could be used as a mechanism sharing homework or tests. See the ‘disallow’ sharing restriction under unsupervised settings.
-
-
Allow Erase All Content and Settings
-
Prevent students from factory resetting the devices. Meraki Admins can still reset the device through the MDM command on the client’s page
-
-
Allow keyboard auto-correction/ Allow spell-check / Definition lookup
-
You may want to disable this if spelling is being tested on the devices.
-
-
Allow App Store
-
This is often used to limit students to only access pre-approved applications provisioned through Systems Manager.
-
-
Allow modification of passcode settings (iOS 9+)
-
Allow modification of device name (iOS 9+)
-
Keep device name up-to-date with Dashboard (iOS 9+)
-
To initially sync the device’s local name with the Dashboard configured name, both of these will need to be checked. After the name has been set, allow modification can be disabled to prevent students from modifying it again.
-
-
Enforce Wi-Fi whitelisting
-
Also known as SSID whitelisting, this powerful feature prevents devices from connecting to any SSID that isn’t a configured and deployed through a Systems Manager WiFi payload. This means you can force devices to only connect to your approved student school SSID, and not a phone hotspot, or any other SSID broadcasted in range.
-
Warning: it is recommended to configure a second SSID for backup connectivity, which can be disabled on your access points unless needed. With only one SSID configured, you may run the risk of bricking your device if that SSID’s credentials are changed while the device is offline and unable to update, since connectivity is required to pull down the latest settings. A wired ethernet adapter can also be used in this situation.
-
-
Web content filter
-
Filter out the sites students are allowed to access on Safari, if the app is still accessible.
-
Single App Mode
For supervised iOS devices, single app mode can be configured in the restrictions payload as well, to lock devices in bulk to a specific app (e.g. for a display, or kiosk deployment).
iOS Show/Hide Apps
This section allows you to configure either blocking the apps to remove off the device (including pre-installed system apps), or a allowing them, which will block all apps that aren’t explicitly detailed in this payload. Using this in conjunction with restrictions locking out the app store ensures students only access apps you approve of and configure in Systems Manager, without necessarily being constrained to just a single app.
Other Useful Settings
Aside from restrictions, there are many useful configuration settings that Systems Manager can deploy in an education setting. A few suggestions, and some potential use cases are detailed below. For more info on all the available settings, see this article.
Wireless Configuration
WiFi access can be distributed through Systems Manager by adding the ‘WiFi’ payload into your configuration profile. Typically, schools will have multiple SSIDs configured separately for staff, students, and guests or external devices, each with a different set of firewall rules and filters.
One common issue, however, is that wireless passcodes are easily distributed, shared, or otherwise used on devices that should not be accessing an internal network, instead of a more secure guest SSID.
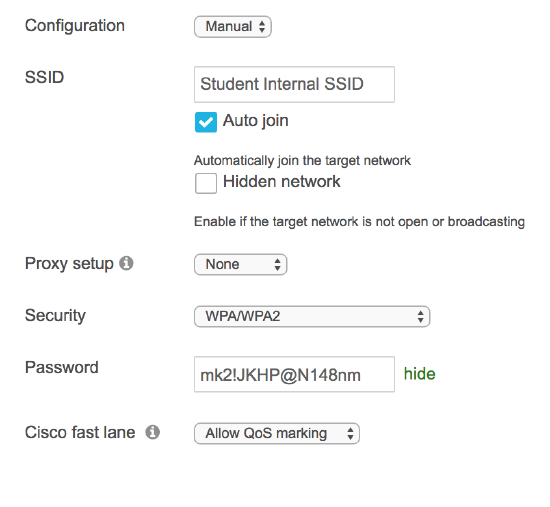
If using Sentry WiFi with Meraki MR access points, this can be mitigated by simply specifying the SSID to connect to, and not distributing the password. Sentry wireless also allows you easily configure cert-based auth automatically without having to generate or upload certificates and custom profiles.
For other SSIDs, administrators can still combat passcode sharing using WPA/WPA2 by configuring an unguessable password, such as an arbitrarily long string of numbers and letters. Only devices enrolled into SM that receive the profile will be able to connect, as pushing down the profile does not reveal the plaintext password to the end user, who will not be able to authenticate unmanaged devices.
As mentioned in the restrictions section, this payload can be used in conjunction with SSID whitelisting to prevent users from connecting school-owned devices to non-approved SSIDs.
AirPlay
With AirPlay configuration in Systems Manager, devices can be pre-provisioned with the connection details for AirPlay devices. This can be a great way to secure Apple TV and other AirPlay resources from students while ensuring that teacher’s devices have all the information required to connect. This allows teachers to spend more time running the class and less time finding the right device to connect to and inputting the appropriate password.
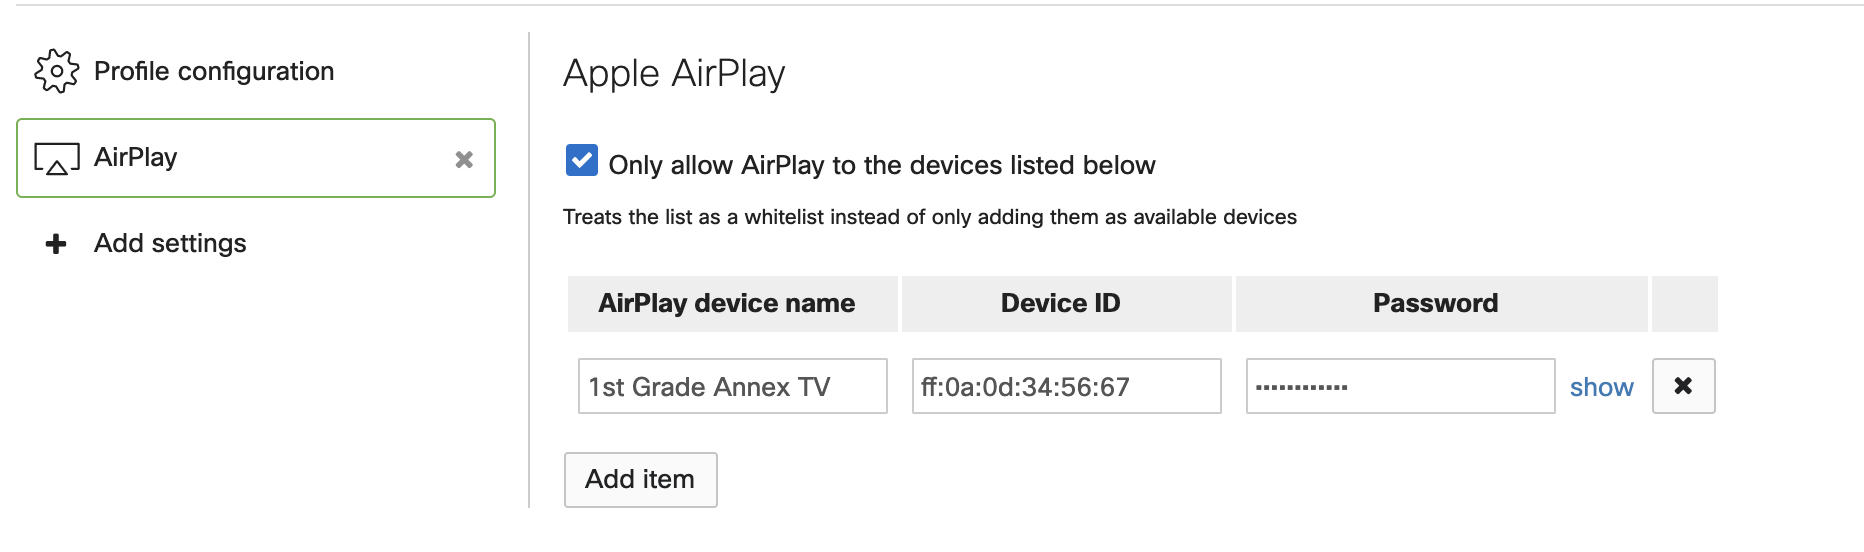
Systems Manager can also be customized to only list specific AirPlay devices, allowing for restricted student access to these resources.
Apple Classroom
If your school is using Apple Classroom, you’ll need to configure an Education payload in Systems Manager > Manage > Settings, by selecting ‘Education’. With Apple School Manager linked, you can automatically import your classes. Note that this Education payload should be deployed independently, in a separate profile to all your student and teacher devices.
See info on how to configure ASM and Classroom with Systems Manager in this article.
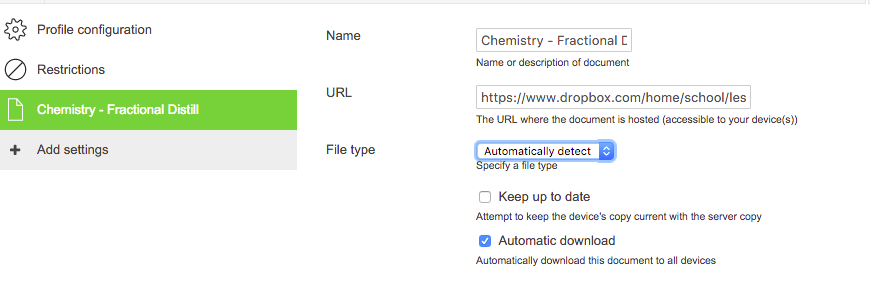
Backpack
The Backpack payload allows administrators to securely deliver content like student assignments or teacher lesson plans to managed devices. See the full article here for more info.
Home Screen Layout
This payload requires supervision and allows you to specify how application icons will be arranged across devices. This also prevents users from rearranging icons or uninstalling apps from the home screen. Note that apps that are installed that are not explicitly placed in this payload will appear in random order behind the icons that are set.
Wallpaper
This payload requires supervision. This payload allows you to specify the background wallpaper and lock screen image for your supervised iOS devices. Choose images with dimensions that exactly match your devices' dimensions.
In conjunction with Home Screen Layout, this allows admins to standardize how their devices will appear, in terms of home page background and icon arrangement.
Per-app VPN
Even for iPads that can be taken home by students, administrators can maintain device security by configuring per-app VPN and tunneling specific applications back to the school network. One example would be for Safari, to ensure network filters are still applied to browsing activity.
Per-app VPN can be found under ‘More iOS’ and can be configured with AnyConnect or any IKEv2 VPN connection.
Android Settings
For Android deployments, some restrictions to be aware of under the ‘More Android’ header.
School-owned devices will typically be enrolled through Device Owner mode, which allows you to block certain functions like factory reset, WiFi modification, SMS, and hotspot tethering. Preventing ‘modifying accounts’ is important to keep users from signing into personal Google accounts), as is USB file transfer to prevent sideloading applications or other files onto the device.
Warning: disabling 'WiFi modification' only allows devices to connect to SSIDs provisioned through Systems Manager. See the iOS supervised restrictions for recommendations when using this setting.
For general Android Restrictions, consider disabling the camera, ADB, and app uninstallation.
The System Apps payload allows you to specify which default, pre-installed apps (e.g. SMS, phone apps) are made available, in the form of allowing or blocking.
Sentry and Security Policies
As a reminder, all of these settings and apps can be scoped to require location or security compliance, by using dynamic tags. For example, at school, administrators may want to restrict camera or game apps from launching, but with a geofence or time-based tags set up, these restrictions can be automatically lifted when the devices are taken home, or after school hours.
With Cisco Meraki hardware, these policies can be taken to the network level as well through Sentry Policies, which allow administrators to map Systems Manager tags, including dynamic security tags, to network group policies. This allows for further remediation action, such as blocking compromised devices off your internal network automatically, or assigning different VLANs based on the user of a device via owner tags.
Conclusion
This guide is meant to provide guidance on a specific selection of features and functionality within Systems Manager, and is not a comprehensive guide to every education deployment or use case. Additional documentation can be found at https://documentation.meraki.com/SM. Contact your Cisco Meraki partner, sales, or support teams for additional assistance.