
Enterprise Deployment Guide and Best Practices
Introduction
Meraki Systems Manager is an industry leading cloud EMM (Enterprise Mobility Management) platform that can be used for managing mobile devices across large enterprise deployments. This document reviews recommended best practices and outlines steps required to configure Meraki Systems Manager using the Meraki Dashboard (http://dashboard.meraki.com) for enterprise deployments.
Deployment Considerations
Please consider the following when rolling out your mobile deployments:
-
What device types do you have? (iPhones, Windows PCs, Samsung Androids, etc)
-
How many devices do you have, and how many do you expect to get on your network over the next 18-36 months?
-
Who owns the devices? (employee-owned, enterprise-owned, contractor etc.)
-
What do your employees do on these devices? (Use apps in the office, check email on the road, use directly with customers, etc.)
-
How heavily do you want to restrict certain types of behavior (e.g. camera usage, installation of apps)?
-
What is your device provisioning strategy? Do you use Apple’s Device Enrollment Program (DEP) and/or Apple’s Volume Purchase Program (VPP)? Do you need to distribute apps and/or app licenses?
-
Do you have Directory services for login management (e.g. Active Directory or LDAP)?
Based on the above considerations, we recommend developing a mobility management strategy for your enterprise's assets and handling “bring your own device” (BYOD) scenarios.
Decisions on the above criteria will also drive your Meraki Systems Manager configuration. The following sections talk about generic use-cases and deployment methodologies. Please contact Meraki sales if you have further questions.
Core Concepts
There are a few key concepts in Systems Manager, and it is helpful to understand them before setting up anything in your network. Thinking about these things beforehand will make your initial deployment and ongoing management much simpler.
Access Rights
The first of these items is access rights. By default, Systems Manager will grant administrators the maximum amount of control available when applied to enrolled devices. However, in bring-your-own-device (BYOD) environments, device owners may not want administrators having this level of control.
Systems Manager can be customized to meet the needs of different deployment models by changing the permissions of what can be retrieved from or sent to the device. It is important to note that Access Rights must be set before devices are enrolled; changes made after enrollment will only take effect if a device is reenrolled.
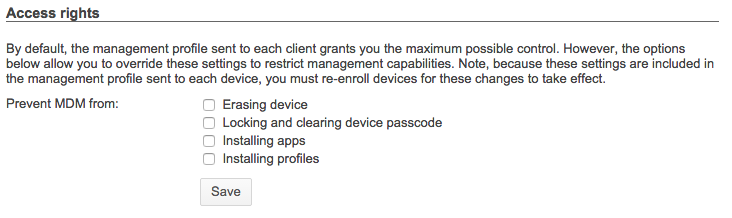
Navigate to Systems Manager > Configure > General > Access rights.
Tags
Tags are used to group devices within Systems Manager. These tags are used to define the apps, controls and settings provisioned by Systems Manager. Tags can be applied to a device, or the the owner of a device (or devices).
There are two main types of tags: static and dynamic:
- Static tags are generally applied to individual devices by the administrator.
- Dynamic tags are applied automatically, and can change depending on certain factors.
When tags are applied at the owner level, SM relies on a user database to manage these tags. This database can also be used to authenticate a device owner upon enrollment, which provides an extra layer of security. Authentication can be done via Active Directory integration, or using Meraki-hosted owners/accounts (see SM Enrollment Authentication for more information). When a user authenticates on a device, their owner groups or AD groups will automatically be applied as tags to devices they own. This is one example of dynamic tags, dynamic tags can also be applied based on policies, like time of day (schedule), physical location (geofence), or security posture.
In addition, tags are used to scope or group devices, and apply profiles and push content accordingly. This can be done with boolean logic which allows highly granular application of functionality to a device. The example below shows scoping for an App, but the same method would be used to scope other things, like profiles.
-
If you want this app to be available to all devices of the type selected (iOS or Android), then from the scope drop down select ‘All devices’
-
If you want this app to be available for a select group of devices, then select the option ‘with ALL of the following tags’ as shown below.
Scoping app installation with tags
For a detailed explanation of tags, the available dynamic and static tags, or how to evaluate tags with boolean expressions, please reference our documentation regarding Using Tags in Systems Manager.
Enrollment
Before devices can be managed within Systems Manager, they have to be enrolled in your EMM network. There are different types of enrollment that can be used to meet the needs of different device types or deployment models. For example, while the simplicity of fully automated enrollment is ideal, this method does not suit BYOD deployments, and isn’t compatible with all devices.
SM Enrollment Authentication
As mentioned previously, to provide an extra layer of security regarding which devices are able to enroll in Systems Manager, you can require authentication upon enrollment. Authentication is compatible with all types of enrollment, and there are additional benefits beyond security. First, enrollment authentication ties an owner to a device automatically. Second, enrollment authentication ties a user’s groups (either LDAP (e.g. LDAP, Active Directory) or Meraki Managed) to all of their devices as dynamic tags, for automatic grouping.
Authenticating prior to SM enrollment
Fully Automated Enrollment
With fully automated enrollment, a device will be enrolled into Systems Manager automatically, and can be configured so the user has no option to cancel or prevent the enrollment. In addition to this, the device will automatically have apps, controls and settings provisioned based on the person using the device (device owner) with no direct user or administrator configuration required.
This type of enrollment allows for the highest levels of EMM control, and is only possible with iOS and macOS devices that are eligible for Apple’s Device Enrollment Program (DEP). Automated enrollment can reduce the administrative cost of deploying devices significantly; the benefits increase with the number of devices being deployed.
With DEP, devices can be directed by Apple to install Systems Manager when the user first opens the box and powers on the device. This eliminates all pre-staging and the need for Apple Configurator.Partially Automated Enrollment
Partially automated enrollment supports a wider range of devices (such as iOS devices that are not enrolled in DEP) and can be completed by the end user or by an administrator pre-staging the device.
As with automated enrollment, two core functions are performed: The installation of the Systems Manager profile, app, or agent to the device, and the configuration of apps, settings, and controls.
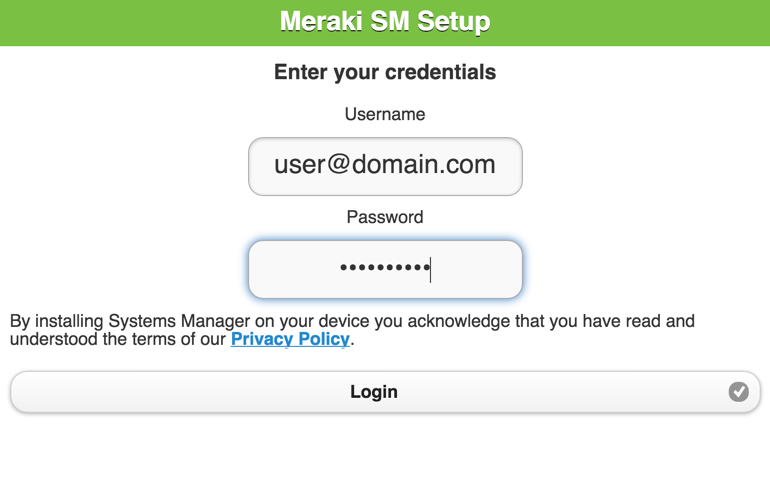
The installation of the Systems Manager components can be performed by a user or the administrator by visiting enroll.meraki.com and following the instructions. To reduce the administrative workload, this can be done by the end user.
Meraki wireless products can be integrated with Systems Manager to simplify and automate this process for the end user. This feature, called Endpoint management Sentry enrollment, checks all connecting devices and forces the clients to go through the on-boarding process through enroll.meraki.com if it detects that they don’t have Systems Manager installed.
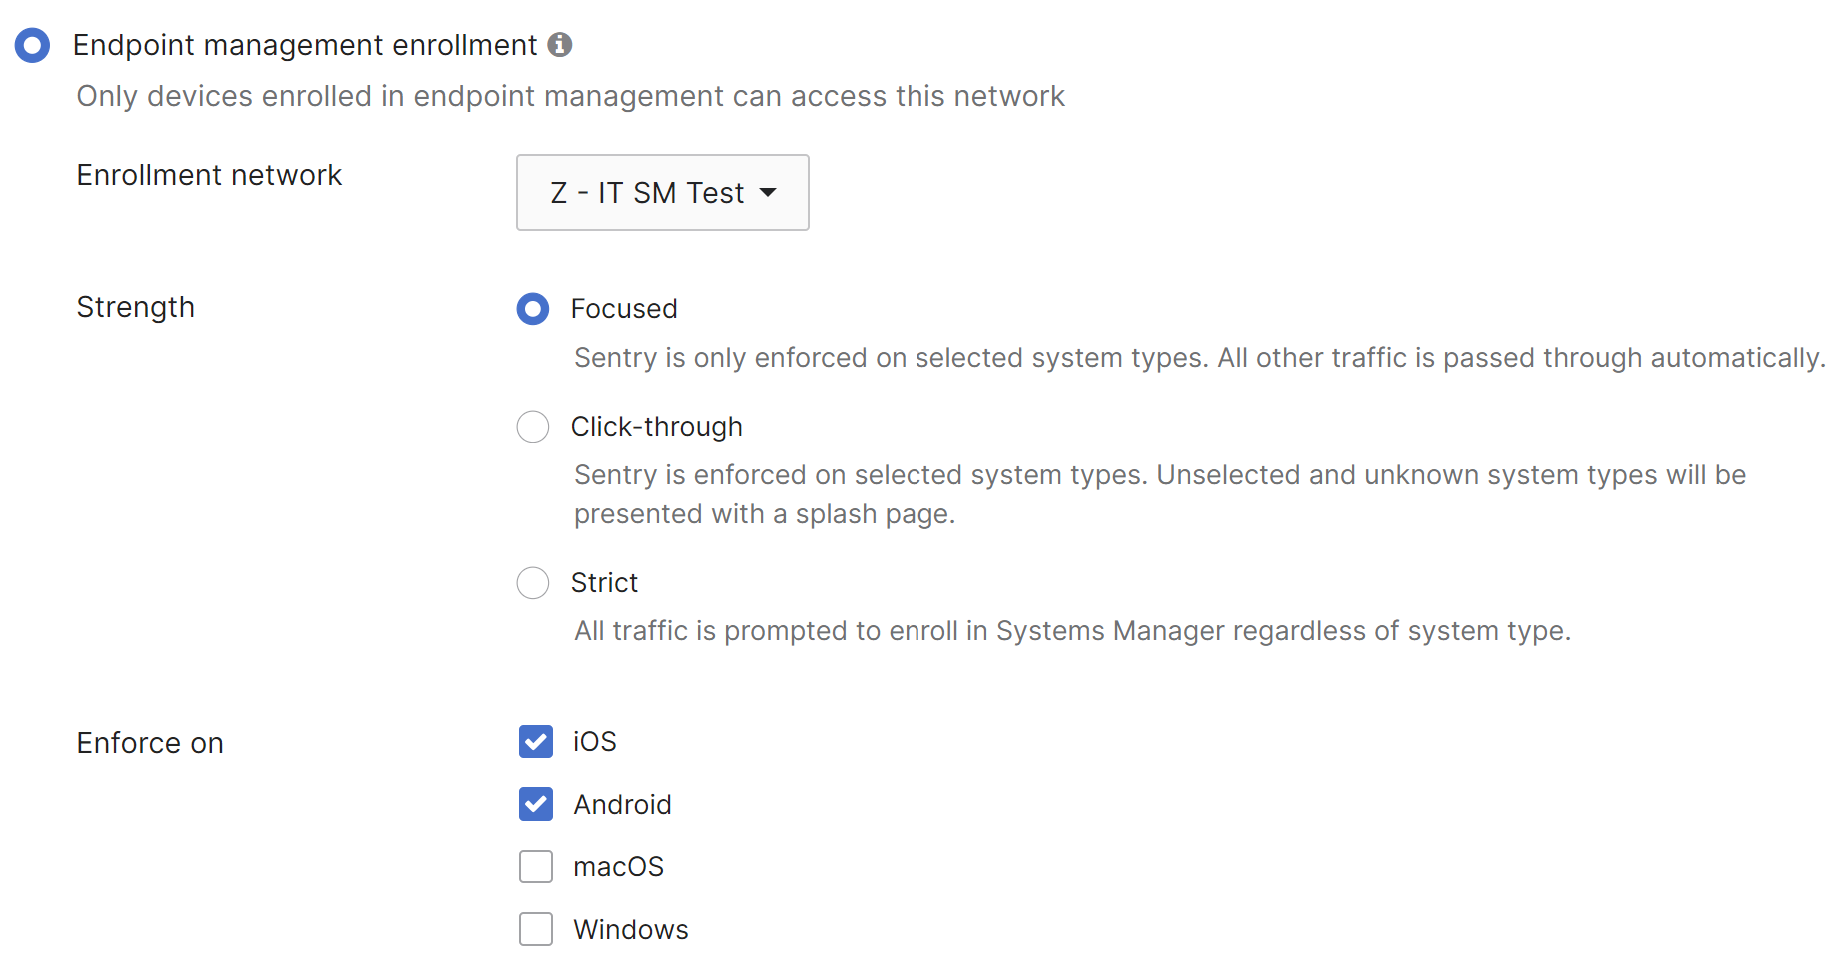
Navigate to Wireless > Configure > Access Control.
The user database integration and assignment of owners can be accomplished without DEP or User Authentication, allowing mixed device types to be assigned to a user.
Manual Enrollment
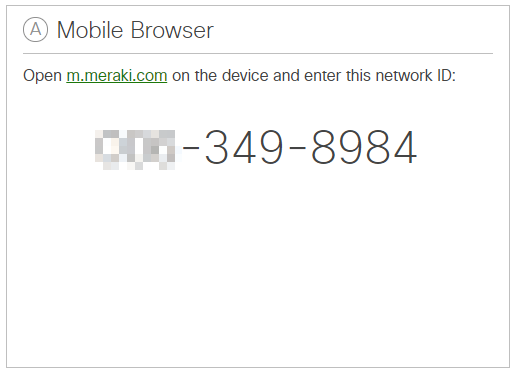
With manual enrollment, the widest range of devices can be supported as there isn’t a reliance on vendor or platform specific features. This type of enrollment is often suitable for BYOD environments. Installation of the Systems Manager components can be performed by a user or the administrator by visiting enroll.meraki.com and following the instructions. Manual enrollment doesn’t require a user database, and tags used to configure devices can be assigned by the administrator in the Meraki dashboard.
When a user visits enroll.meraki.com in this configuration they will be asked to enter a network number:
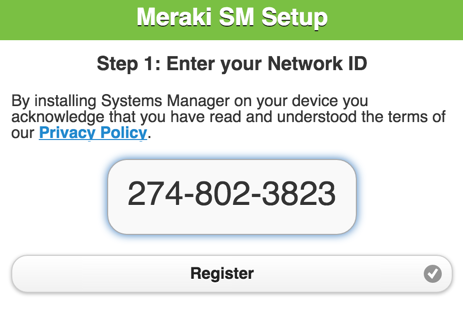
This number is used to identify which Systems Manager network the device should be joined to. The network ID and distribution options (email, SMS, or QR code for the end-user) can be found in Dashboard:
Navigate to Systems Manager > Manage > Add Devices and select the device type to be enrolled.
Navigate to Systems Manager > Manage > Add Devices and select the device type to be enrolled.
Navigate to Systems Manager > Manage > Add Devices and select the device type to be enrolled.
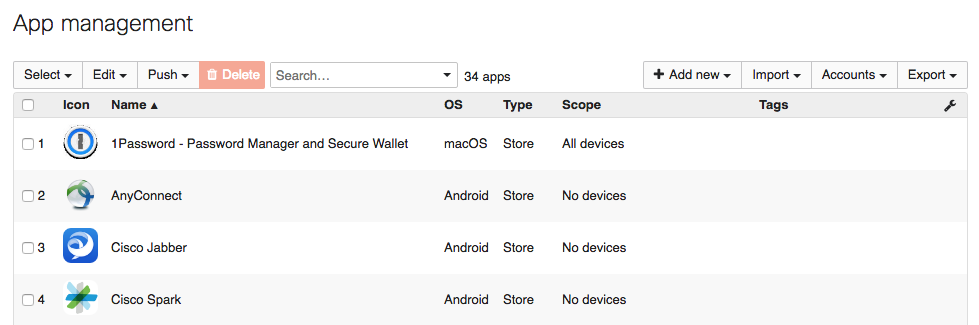
App Management
App management scopes which applications will be added to which devices, and installs them accordingly. Native (built-in) applications on devices provide functionality for managing everyday activities like e-mail, calendars, contacts, and web browsing. For increased productivity and functionality on top of these native applications, there are hundreds of thousands of third-party apps that are available in the Apple App Store and the Google Play store, as well as applications for Windows and macOS devices.
There are several ways to distribute apps and apps licenses to devices, as well as options to scope your app installation to certain devices in the Meraki Dashboard. The following sections will go over suggestions and examples for grouping devices and distributing apps in the Meraki Dashboard.
Adding Apps in Dashboard
There are several considerations for distributing applications based on the device, and type of application. For mobile devices, there are public apps, like those found in the Appstore and Google Play store, and there are private apps, which are custom or enterprise iOS and Android apps. There are also traditional software “apps” for Windows and macOS platforms.
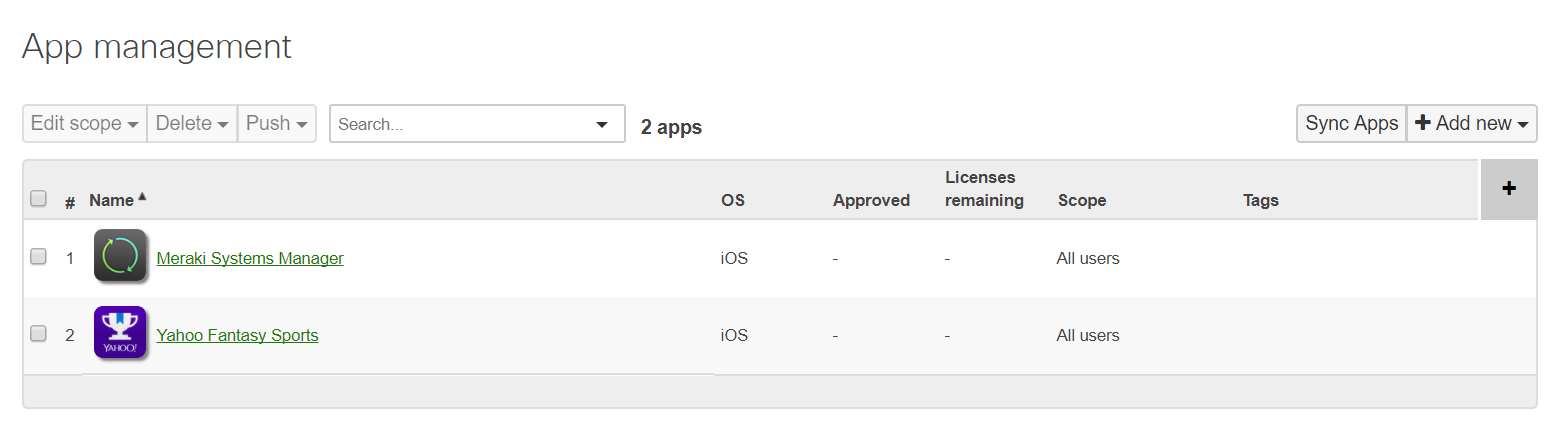
To add applications to your Meraki Dashboard, navigate to Systems Manager > Manage > Apps.
Next, click the Add new button on the far right hand side, as shown below. There are options for Store apps as well as Custom apps for iOS, macOS, and Android, Custom apps for Windows:
Navigate to Systems Manager > Manage > Apps.
Publicly available Store apps will be searched for in and downloaded from their respective app stores. For other types of applications, the install file host is specified. You can upload the file to the dashboard, or point to a URL accessible by the device. For more information on installing software for Windows or Mac devices, please reference our documentation on the subject.
Assigning VPP licenses for use with Apple App Store apps
With Apple’s Volume Purchasing Program (VPP) it is possible to bulk purchase licenses for iOS and macOS applications. This is particularly useful in an enterprise where groups of employees will all need the same applications.
With a configured VPP account, the applications that you have purchased and are available are displayed in the Meraki dashboard. This single view makes it easy to keep track of what you have purchased and how many licenses have been assigned.
Navigate to Systems Manager > Manage > VPP.
Systems Manager supports and fully integrates with all of Apple's methods of deploying VPP apps. With device assignment and iOS 9, licenses can be assigned directly to a device based on serial number and does not require the management of Apple IDs. With managed distribution, users are invited to receive VPP apps through their Apple ID. These licenses can be revoked at any point, and transferred to another user or device. Thus, the distributing organization retains full ownership and control of purchased VPP apps.

Navigate to Systems Manager > Manage > VPP > User management.
For more information about deploying VPP licenses to iOS devices, please see our documentation regarding Deploying Apple Volume Purchase Program (VPP) Apps.
Profiles
In an enterprise environment it is often necessary to pre-configure or limit the availability of some features. These can be restrictions like disabling the camera, or configuring settings like email or Wi-Fi. Restrictions or settings can be collected together into a profile, and devices can have multiple profiles applied to them:
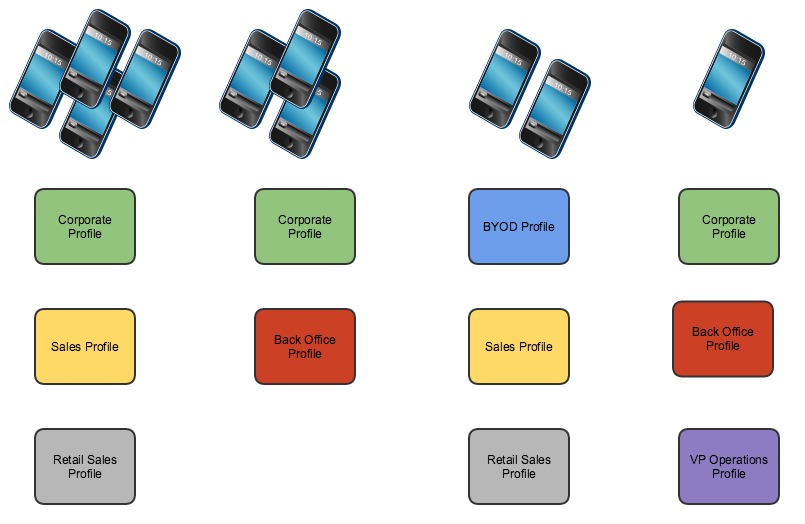
Multiple profiles allow for granular device restrictions and simple management
Systems Manager also uses tags to scope which devices get which profiles. This allows for a highly granular or a hierarchical approach to applying restrictions to devices. In an enterprise environment, you may want to create baseline or global profiles that apply to a larger group of devices, like “BYOD” or “Corporate”, then more specific profiles targeted at smaller groups, like “Sales” or “Back Office”. This eliminates the need for administrators to maintain the same global settings across multiple profiles for each device use case. This global profile can then be updated in the future and all associated devices will automatically update. If a device receives multiple profiles where the policies have conflicting settings, the most restrictive applies.
Assigning a profile to devices in Dashboard uses the same scoping method as discussed earlier; profiles can be scoped to static or dynamic tags. Dynamic tags reduce the work required to manage a large number of devices, while also providing automated control. For example, if a device is not physically in the office, then it can have the office restrictions removed for home use through the Geofencing feature. Please reference our documentation for more information on Geofencing.
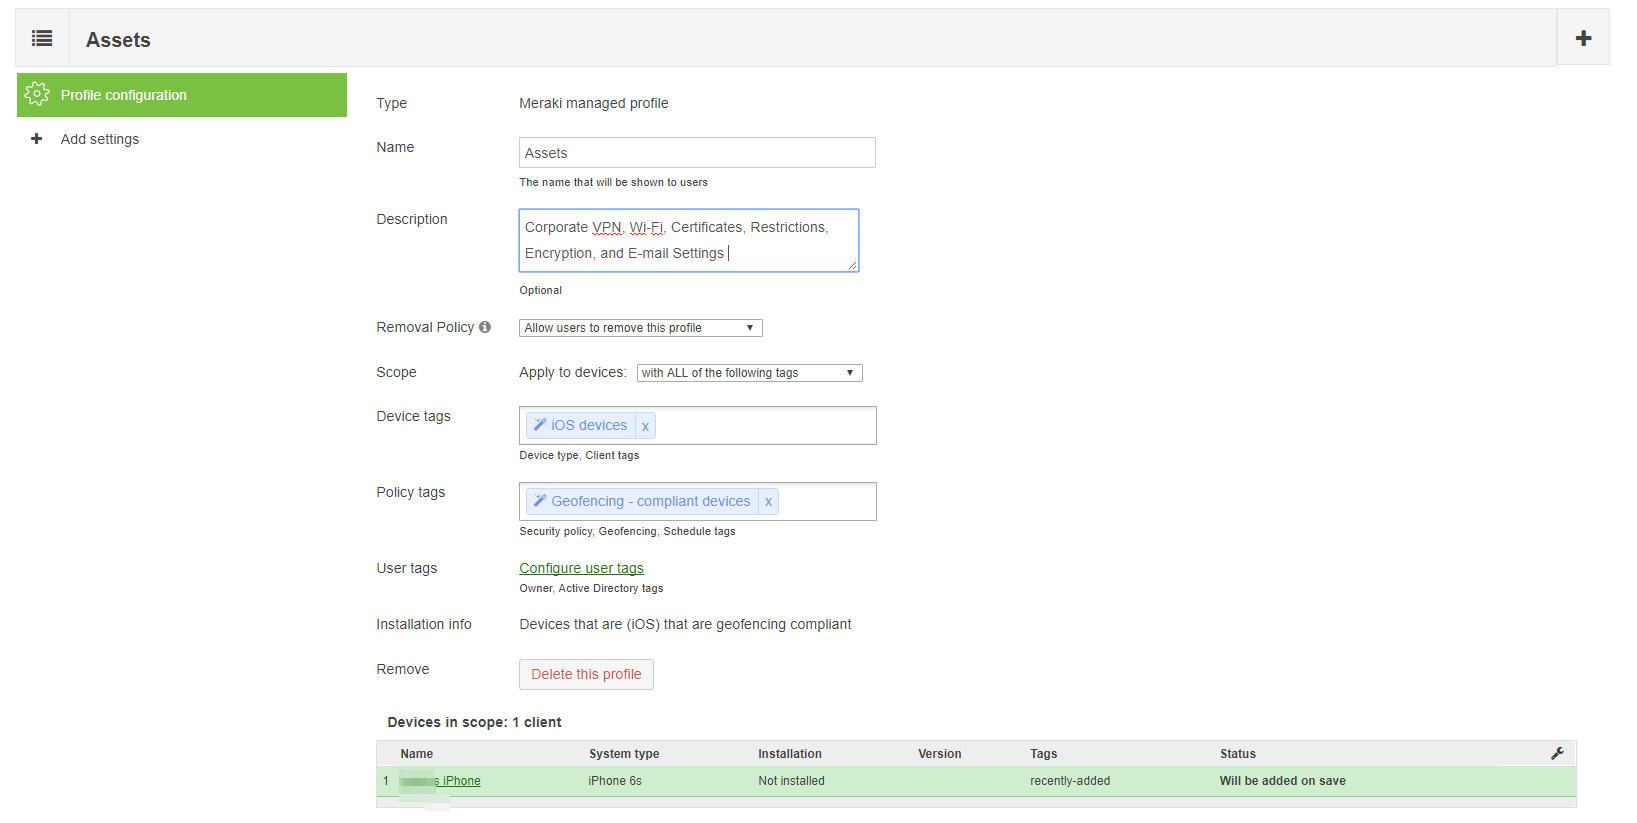
Navigate to Systems Manager > Manage > Settings > Profiles list (add profile or click on an existing profile) > Profile configuration.
For further detail on how to configure profiles, please reference our documentation on Configuration Profiles.
Settings
There are numerous types of settings that can be configured within a profile. Functionality differs by device type, with iOS generally having the most options. Settings that can be managed include:
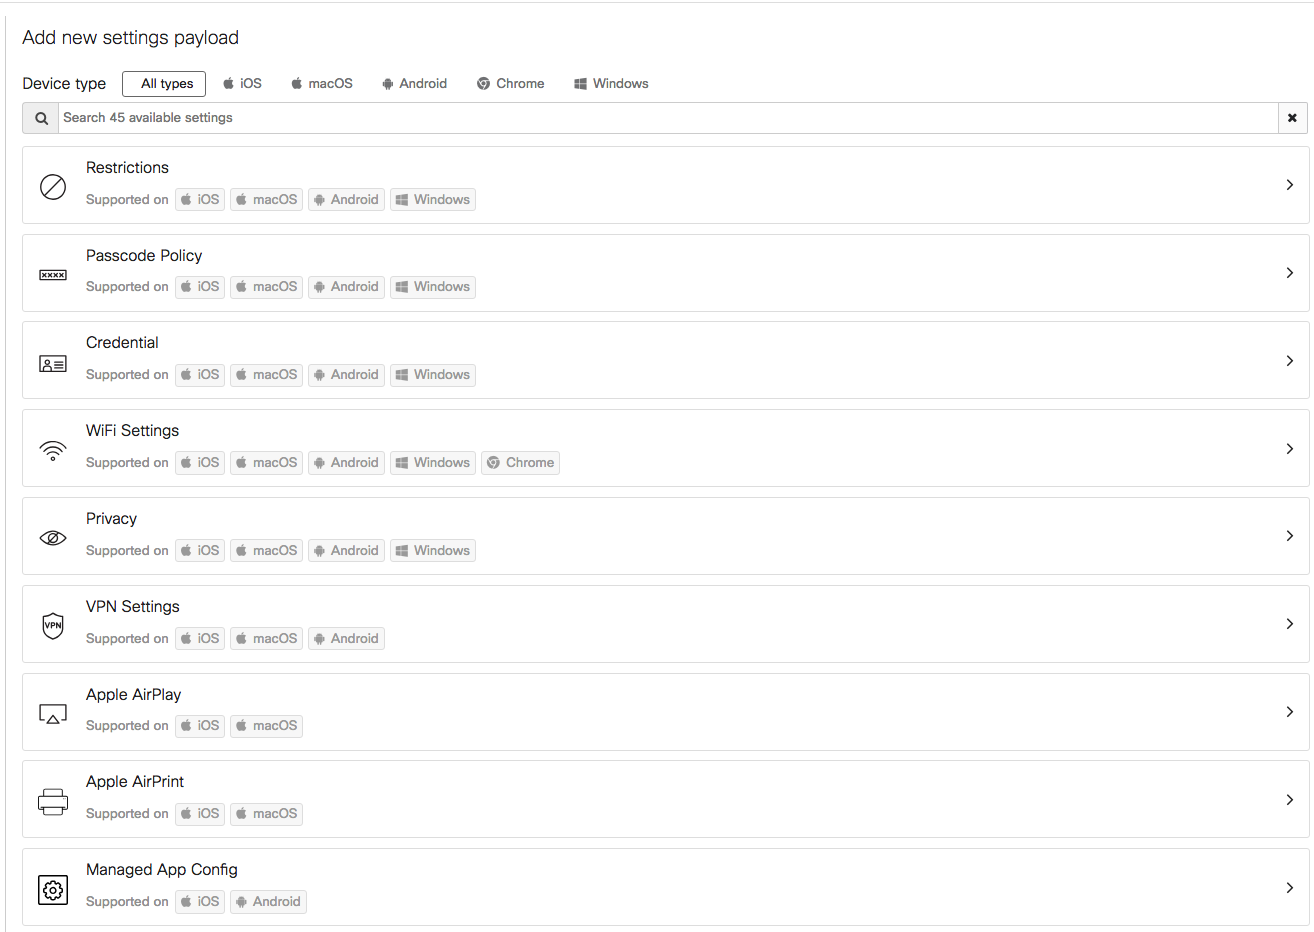
Navigate to Systems Manager > Manage > Settings > Profiles list (add profile or click on an existing profile) > Add settings.
This document will not cover all available settings, but will provide examples of how some can be used in an enterprise environment. For further information about these settings, please reference our articles regarding Configuration Profiles and Settings Payloads.
Restrictions
Restrictions are among the more commonly used settings. Available restrictions differ based on the device type. Restrictions include things like enabling/disabling the camera, and limiting the user's ability to install/remove apps. A good example of a restriction that could be implemented in a global corporate policy would be to enforce open-in containerization on iOS devices. This provides the ability to separate all unmanaged apps, data and settings, from managed apps, data, and settings (including e-mail settings).
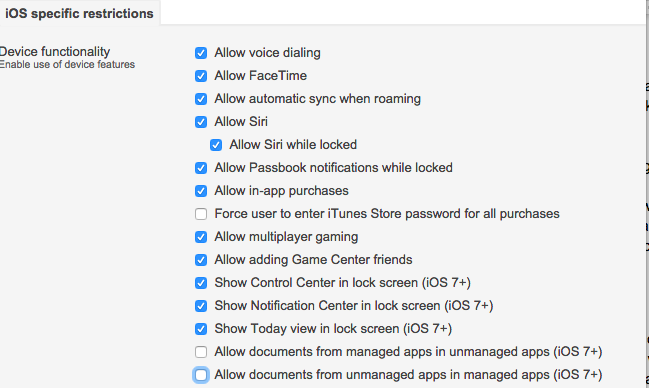
Navigate to Systems Manager > Manage > Settings > Profiles list (add profile or click on an existing profile) > Add settings and select the Restrictions payload.
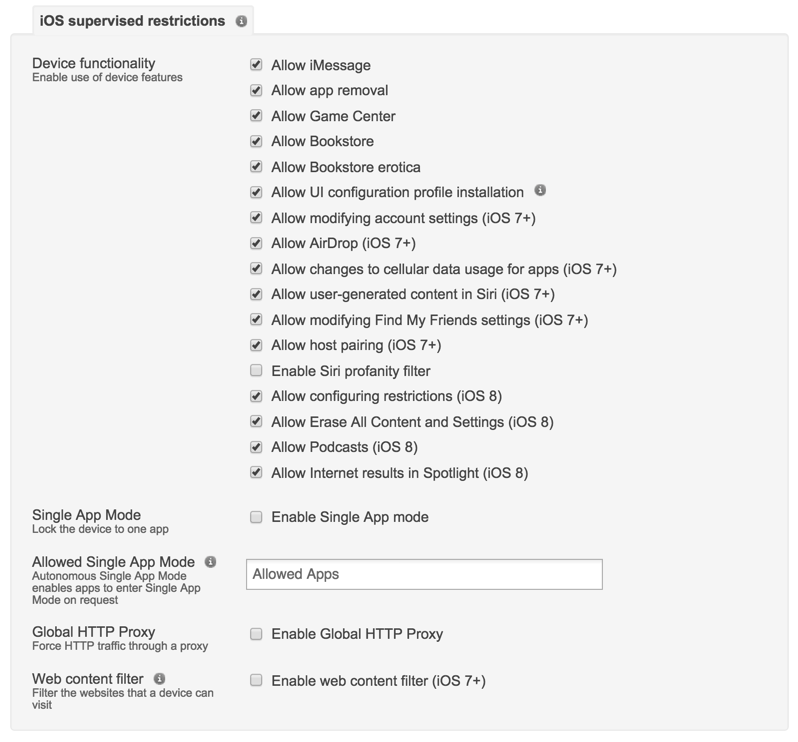
When iOS devices are in supervised mode, additional restriction options are available. Typically, supervised mode is not suitable in a BYOD environment, so these restrictions are generally reserved for institution owned devices. Single App Mode is an example of one of these supervised restrictions. Single App Mode restricts an iOS device to only one app. This option can be used to lock down the device, and prevent any other activity from being performed.
Note: This functionality is also available for Samsung KNOX capable Android devices using the “Kiosk Mode” feature under Systems Manager > Manage > Settings > Profiles list (add profile or click on an existing profile) > Add settings and selecting the Samsung KNOX payload.
Navigate to Systems Manager > Manage > Settings > Profiles list (add profile or click on an existing profile) > Add settings and select the Restrictions payload.
ActiveSync
Systems Manager can be used to provision or remove ActiveSync Settings from a device automatically. This is accomplished by tying the profile to a dynamic tag, like security posture, or location. Systems Manager checks the device throughout the day, and the profile will only apply if the criteria is met.
For enterprise, it is also important to consider Data Leakage Protection (DLP). Using Systems Manager, the administrator can restrict mail to only the built-in mail application, preventing untrusted third-party apps from being used, and thus preventing users from moving their e-mail out of the app:
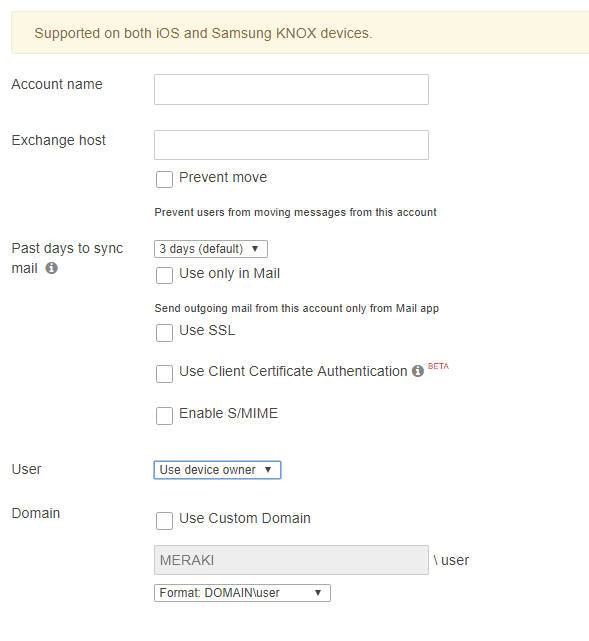
Navigate to Systems Manager > Manage > Settings > Profiles list (add profile or click an existing profile) > Add settings and select the "Exchange ActiveSync Email" payload.
When device owners are configured in Systems Manager, the account credentials are automatically provisioned with the profile, ensuring zero-touch configuration for the end user. This can help to prevent support desk calls that result from users entering incorrect username or domain info when setting up their account.
For further information regarding ActiveSync settings and configuration, please reference the article on Configuring an Exchange ActiveSync Profile.
Passcode
In enterprise environments, it is critical to secure sensitive data. This task becomes even more challenging when workers are on the move. Strong device encryption and containerization can resolve this concern for many situations, but only if strict passcode policies are enforced as well. Without these in place, it becomes easier for an individual to steal a device, and access the data on it.
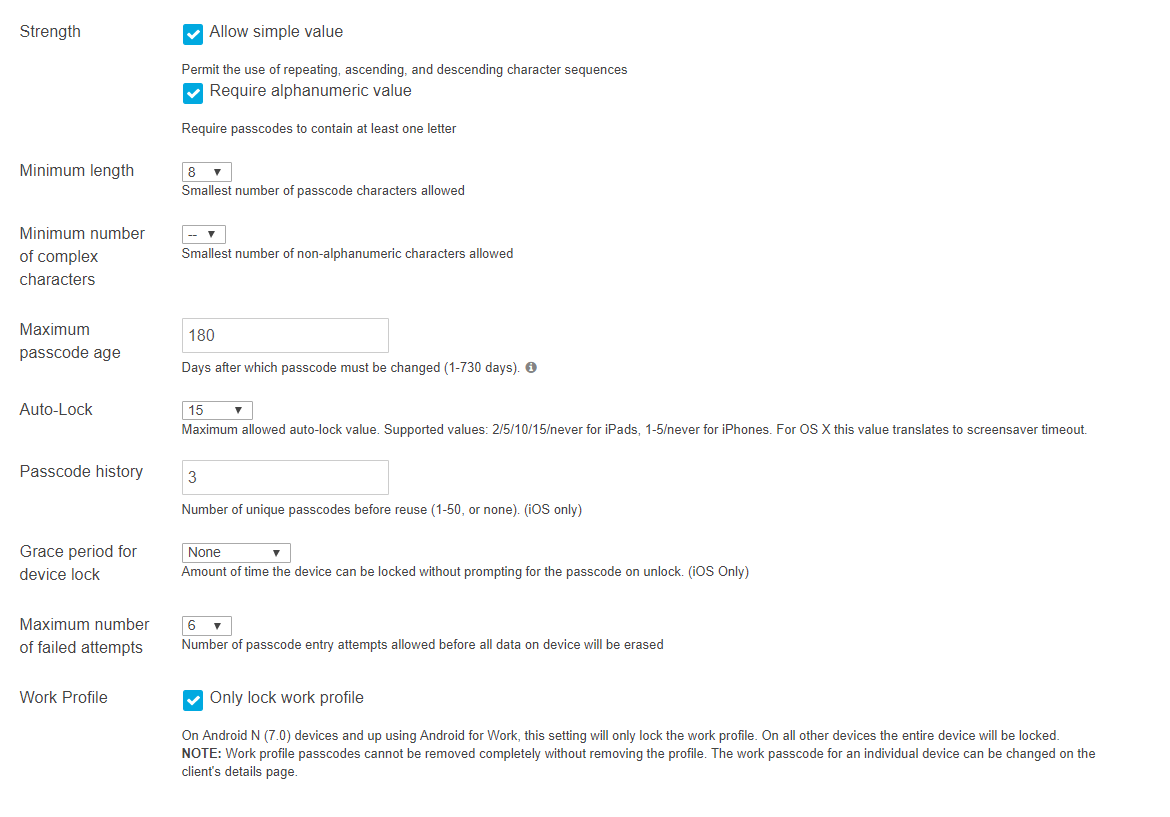
Navigate to Systems Manager > Manage > Settings > Profiles list (add profile or click an existing profile) > Add settings and select the Passcode Policy payload.
Systems Manager offers a variety of options for ensuring passcode security. It is highly recommended that a passcode be sufficiently complex in enterprise situations. Fortunately, if a user legitimately becomes locked out of their device, Systems Manager offers built-in tools for unlocking and clearing passcodes on a device.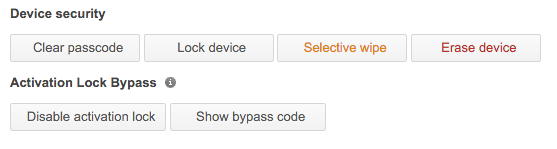
Navigate to Systems Manager > Monitor > Devices, click on the relevant device and then scroll down to MDM Commands.
VPN
It is essential in the modern enterprise to enable remote access to business systems, but this is difficult if applications or data aren’t cloud-ready yet. Remote access via VPN is the industry standard for securely connecting to a corporate network remotely, but it can be complex to configure, especially on mobile devices with less than tech savvy users.
Systems Manager can provision VPN settings on a device in two ways:
- A manual configuration, in which relevant configuration information (connection type, VPN Server address, authentication details, etc.) is entered in SM, and sent to the device.
- Using a Meraki MX WAN Appliance with Systems Manager, where connection information is automatically imported into the profile. By choosing Sentry as the configuration type, the requisite information is pulled into the settings.
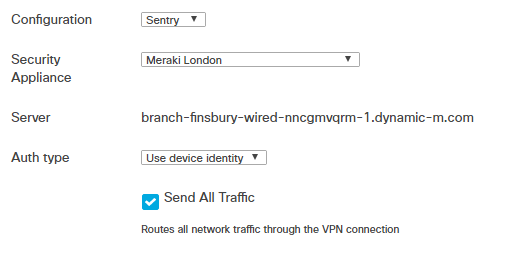
Navigate to Systems Manager > Manage > Settings > Profiles list (add profile or click on an existing profile) > Add settings and select the VPN Settings payload.
As with ActiveSync profiles, using the device owner for authentication simplifies the process further with the elimination of username/password management.
Summary
This guide is meant to provide guidance on a small selection of features and functionality within Systems Manager. This is not a comprehensive guide to every enterprise deployment or use case. It is highly recommended that a list of user profiles and requirements are developed prior to deployment. This way, parameters can be adjusted iteratively to meet the different use cases, based on real world experience.