Systems Manager Sentry Overview
Systems Manager Sentry is the unification of Systems Manager with Meraki network solutions such as Wireless and Security. The solution set offers everything from seamlessly delivering certificates to connect devices to Meraki Wi-Fi, to identifying unapproved changes to devices and triggering remediation throughout the network.
There are four key parts of the solution set. Broken down by Meraki hardware integration, they are:
MR Access Point Integration
-
Sentry Enrollment - Automatically onboard/enroll devices connecting to a provisioned Wi-Fi SSID
-
Sentry Wi-Fi - Automatically connect devices to corporate Wi-Fi using auto-provisioned certificates for EAP-TLS authentication
MX Security Appliance Integration
-
Sentry VPN - Automatically configure VPN on devices
-
Sentry Policies - (*MR and MX) - Use device posture to affect network traffic rules based on security policies
Sentry Enrollment
Sentry Enrollment enables fast and easy device self-onboarding for end users. Through integration with Cisco Meraki MR access points, network admins can provision an SSID that detects whether connecting devices are enrolled in Systems Manager. If the associating device is not enrolled in Systems Manager, a special enrollment splash page appears to help guide end users through profile installation.
This feature is available on iOS, Android, Mac OS, and Windows 10 devices.
Note that Wired Sentry Enrollment is available as an access policy feature for MS switches, but wired Sentry Enrollment is currently only compatible with MacOS devices, and not Windows or Linux devices.
Configuring Sentry Enrollment
To configure Sentry Enrollment, set the splash page on an SSID to Endpoint management enrollment.
Best Practice Tip: Configure Sentry Enrollment on an SSID with limited access to a guest VLAN, as there is no active authentication with this SSID model.
Sentry Wi-Fi Security
Sentry Wi-Fi Security enables secure wireless connections between your endpoint devices and Cisco Meraki MR access points. In just a few clicks, network admins can deploy automatic EAP-TLS certificate-based Wi-Fi profiles to their device fleet, eliminating most of the typical configuration pain points like integrating a certificate authority or managing certificate validation.
Sentry Wi-Fi Security is far more secure than basic Pre-Shared Key (PSK) wireless authentication for a number of reasons. Basic PSK requires little more than just a passphrase to authenticate devices associating to your wireless access points, which can make your network vulnerable to unauthorized access. Sentry Wi-Fi Security protects your wireless networks by delivering unique user certificates to a secure storage enclave on your endpoint devices which:
-
Validates user identity at time of wireless authentication, preventing access to your network by unapproved entities and bad actors
-
Encrypts network traffic between the device and the access point using mutual TLS authentication techniques, and preventing network traffic interception & traffic snooping
Configuring Sentry Wi-Fi Security
There are 2 methods to create a Sentry Wi-Fi Security configuration:
-
Auto-profile via Wireless configuration
-
Manual profile via Systems Manager configuration
Method 1: Auto-profile via Wireless Configuration
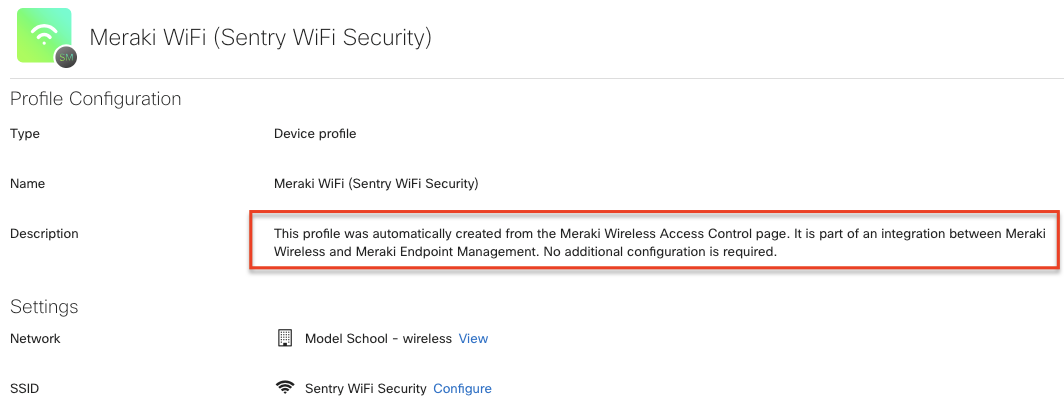
Configure an SSID to use Sentry Wi-Fi with desired networks and scoped device tags. This will auto-generate a “Meraki Wi-Fi” device profile in Systems Manager (see image below), and no additional configuration is required. Endpoint devices enrolled in Systems Manager within scope of the targeted tags will receive a wireless network and certificate payload.
Method 2: Manual Profile via Systems Manager
After confirming that SSIDs are set up properly, configure a new Wi-Fi profile in Systems Manager. Change the configuration method to "Sentry" and select the appropriate Meraki network and SSID. Be sure to select a network that has WPA2-Enterprise with Meraki Authentication already enabled.
Using manual profiles provides the added ability to create Sentry Wi-Fi profiles with additional advanced configuration. In addition to granular control over the authentication methods, you may:
-
Configure proxy settings
-
Configure Quality of Service (QoS) settings with Cisco Fastlane
Best Practice Tip: Use Sentry Enrollment to help onboard devices and configure Sentry Wi-Fi profiles for auto-deployment to enrolled devices. Devices will be ushered through enrollment while connected to the Sentry Enrollment SSID, then will seamlessly connect to the Sentry Wi-Fi SSID with access to the corporate VLAN after receiving the configuration.
Sentry VPN
Sentry VPN helps admins configure and deploy client VPN profiles directly to Systems Manager-enrolled devices across platforms. Enrolled devices can then seamlessly connect to VPN without additional end user configuration.
Configuring Sentry VPN
There are 2 methods to create a Sentry VPN configuration:
-
Auto-profile via Client VPN configuration
-
Manual profile via Systems Manager configuration
Method 1: Auto-profile via client VPN Configuration
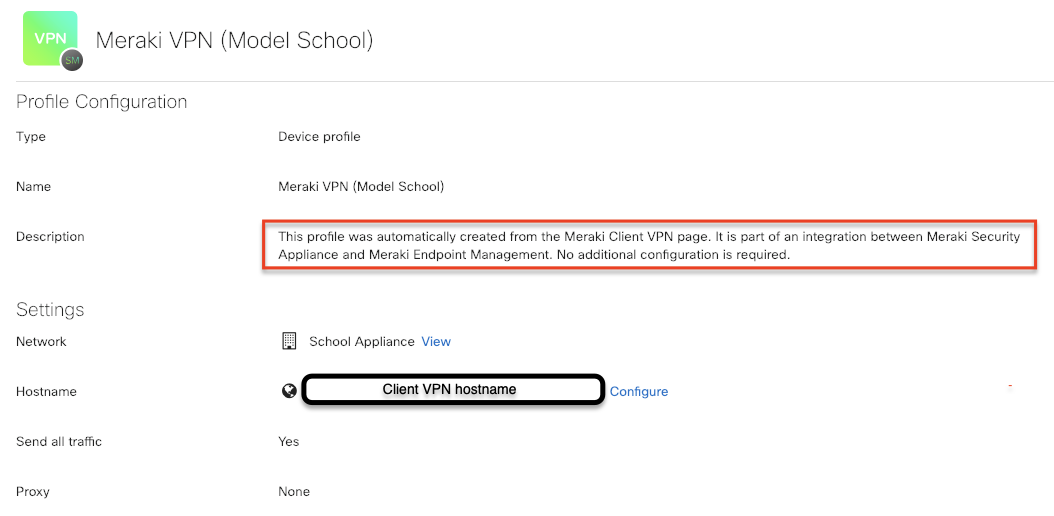
When configuring client VPN in your MX settings, enable Sentry VPN. This will auto-generate a “Meraki VPN” device profile in Systems Manager (see image below), and no additional configuration is required. Endpoint devices enrolled in Systems Manager within scope of the targeted tags will receive the VPN payload.
Method 2: Manual Profile via Systems Manager
In Systems Manager > Manage > Settings, create a Sentry VPN profile. Using manual profiles provides the added ability to create Sentry VPN profiles with a single common username instead of separate VPN authentication identities per device.
Sentry Policies
Sentry Policies enable administrators to enforce corporate policy compliance by device or by groups of devices. If a device is no longer compliant, actions can be taken automatically both on the device and on the network, without adding any additional hardware into your network infrastructure. For example, Systems Manager enables administrators to remove applications or email automatically and also instruct the Meraki MX Security Appliance or MR Access Points to block network traffic if the device is misused.
NOTE: Sentry policies are not supported for devices connected via Client VPN.
Configuring Sentry Policies
Step 1: Create a Network Group Policy
First, create a group policy, which the access points or WAN applainces will enforce at the network level. These can be customized to apply firewall rules, application traffic shaping, VLAN tagging etc.
For example, to quarantine jailbroken iOS devices, which opens them up to additional security vulnerabilities, create a group policy to assign it the guest VLAN tag and block access to internal corporate or school resources.

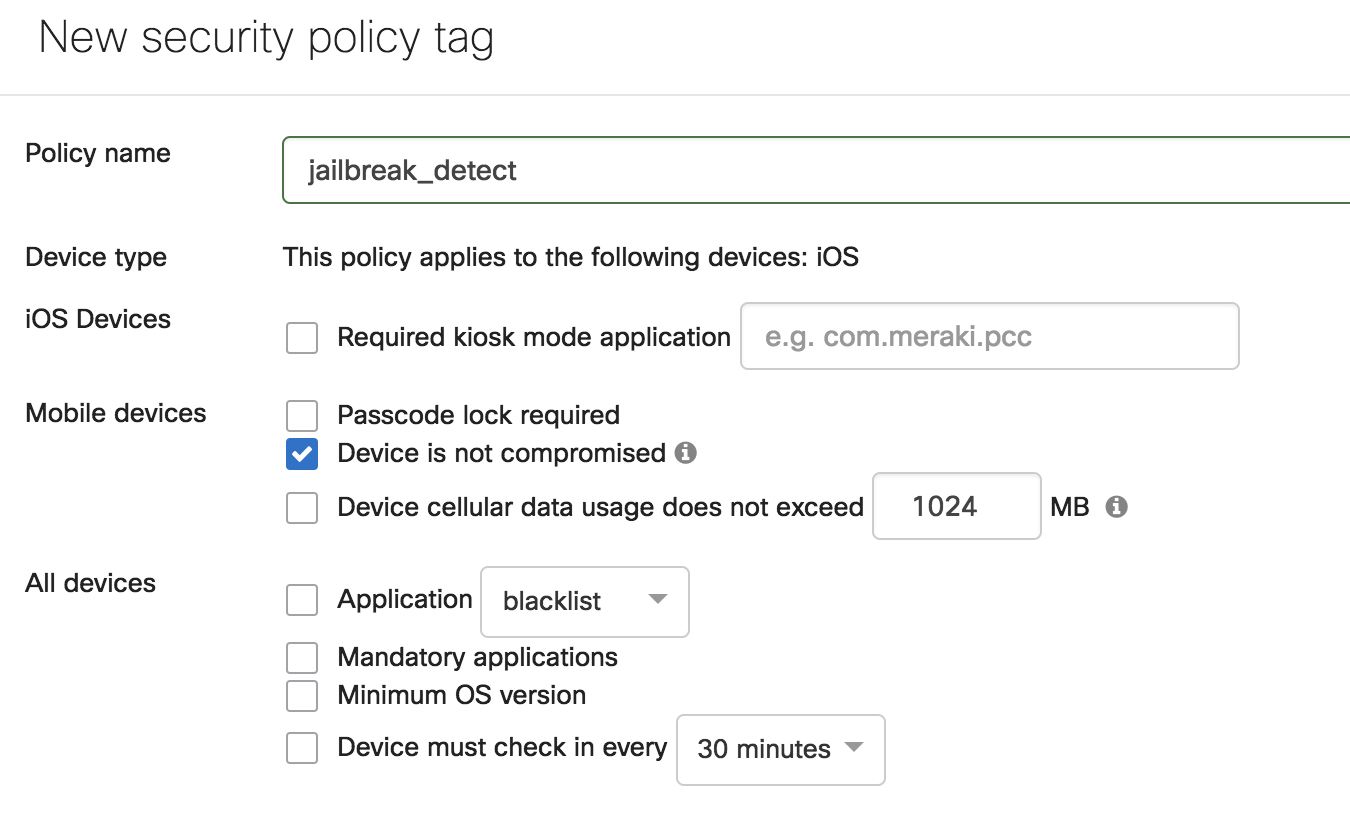
Step 2: Create a Systems Manager Tag or Policy
Second, navigate to Systems Manager > Configure > Tags to create a Systems Manager security policy, geofencing, schedule, or manual tag to define which devices you want the new network group policy to apply to.
In this example, to identify jailbroken devices, set a security policy that detects when the ‘Device is not compromised’. This will create two tags - a violating and a compliant tag. Every iOS device enrolled in a network will be applied one of these tags depending on whether it is jailbroken. See here for more information on setting conditional access with dynamic tags like geofencing or security policies.
Sometimes a manual tag may be more appropriate to apply network policies based on how admins want to segment network access. For example, an admin can tag all relevant devices ‘mobile’ or ‘desktop’ in Systems Manager if different network rules should be applied depending on the device type.
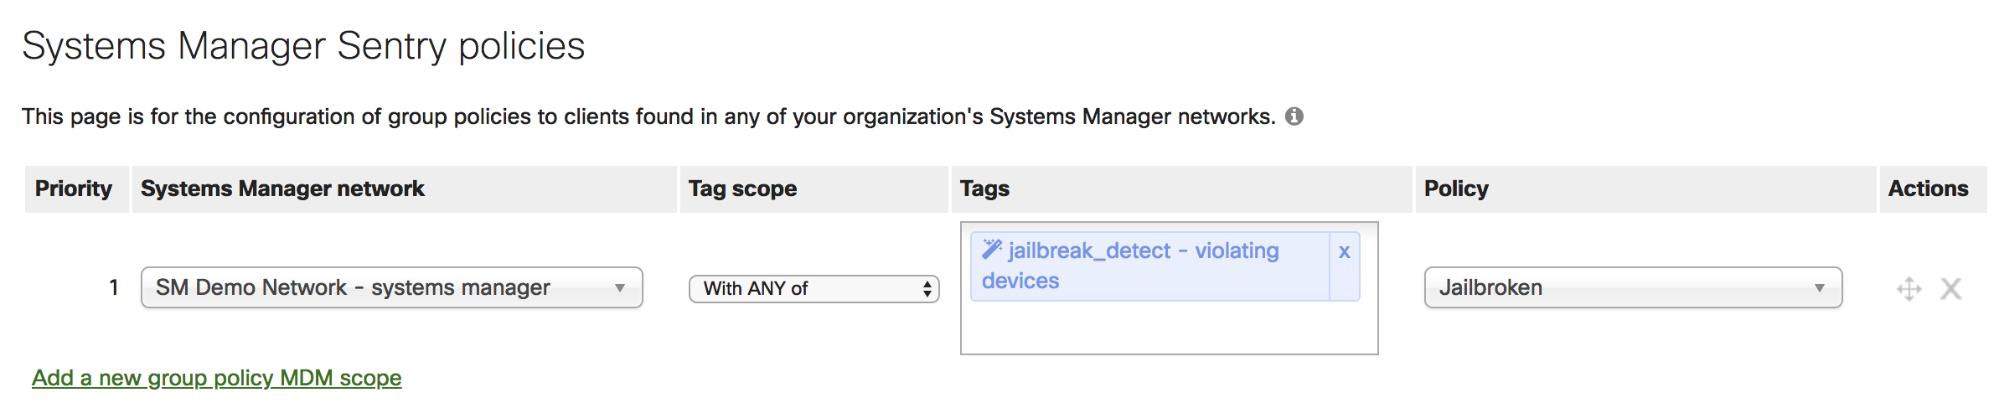
Step 3: Create the Sentry Policy Link
Lastly, link the group policy to Systems Manager tags under Network-wide > Configure > Group policies. Specify the Systems Manager network where devices are enrolled, then select the tags that define which devices should have a policy applied.
In the current example, map the appropriate 'Violating’ tag to the Jailbroken group policy. Now, whenever an enrolled iOS device is detected as jailbroken by Systems Manager, the MX or MR will protect the network by assigning it the guest VLAN and blocking internal network access.