Using Tags in Systems Manager
Tags are powerful tools used to apply profiles, deploy apps, and organize groups of client devices together. This article will cover the types of tags available, and to how to add and remove them in Systems Manager.
Types of Tags
Before creating and applying tags, it's important to understand the different types of tags available.
For more information on the different types of tags in systems manager, refer to this article.
Applying Tags with the Tags Management Page
Tags can now be applied simply from the Tags Management page. The Tags Management page allows Dashboard admins to holistically create, manage, and delete all their Systems Manager tags on one page. For more information on the Tags Management page, refer to this article.
Applying Tags without the Tags Management Page
Tags manually created in Dashboard can be structured or named however your organization sees fit for your deployment model. Recall, these tags are used to map devices to applications and profiles, so create tags that makes sense for how devices will be differentiated.
As an example, a business with multiple offices may want to tag devices 'HQ' or 'san_francisco' if different office locations receive different settings. A school may want to tag devices by grade level, or by subject topic if 'first_grade' devices receive a different set of apps from 'second_grade'. For more considerations, see our deployment guides.
The interface for adding or removing manual tags is the same for clients, owners, and geofences. Begin by navigating to the correct configuration pane from the lefhand 'Systems manager' menu.
- Client devices are tagged from Monitor > Devices, or Manage > DEP for DEP devices that have not yet been enrolled.
- Owners are tagged from Configure > Owners
- Geofences are tagged from Configure > Geofencing
Note: Admin generated tags cannot contain spaces. E.g. "example tag" is not acceptable and would be treated as two separate tags, while "example_tag" would be treated as a single tag.
In all of the above pages, tags can be edited on multiple items at once.
- Click the checkbox next the items to add/remove tags on.
- Click Tag or Edit Scope.
In the box that appears, options will be available to add or remove tags.

Creating a New Tag
To create and add a new tag:
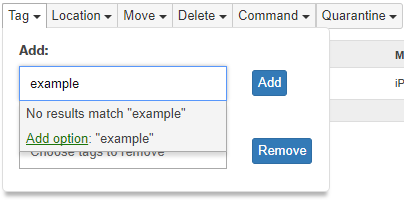
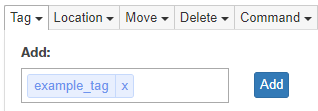
- Click in the Add box.
- Enter the name of the tag desired.
Remember that this must not contain spaces. - Click Add option. The tag will appear in the Add box with a bubble around it.
- Repeat steps 1-3 as needed. Then click Add.
Adding an Existing Tag
To add an existing tag:
- Click in the Add box.
- Select the tag from the list suggested. Begin typing to locate a tag within the list.
- Once selected, the tag will appear in the Add box with a bubble around it.
- Repeat steps 1-3 as needed. Then click Add.
Removing a Tag
To remove an existing tag:
- Click in the Remove box.
- Select the tag from the list.
- Repeat steps 1-2 as needed. Then click Remove.
Note: Tags will continue to be listed as an option for addition until they are no longer in use anywhere.

Modifying a Specific Client's Tag
Tags can also be removed on an individual basis by selecting a particular client, geofence, or owner.
As an example, instructions on modifying tags for a specific client are listed below:
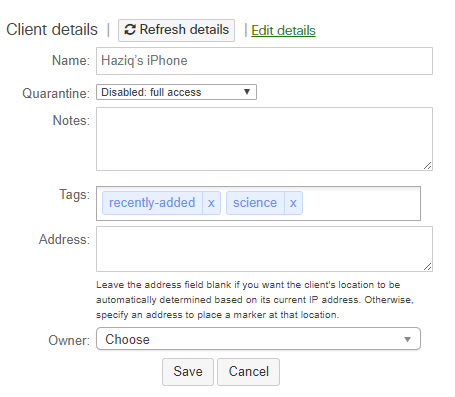
- From Monitor > Clients, click on the name of the client to update.
- Click Edit details.
- Click in Tags.
- To remove a tag, click the X in the bubble with it.
To add an existing tag, select it from the list.
To add a new tag, type the name of the tag (must not have spaces) and click Add option. - Repeat steps 3-4 as needed to add/remove all desired tags.
- Click Save.
Scoping Profiles and Apps
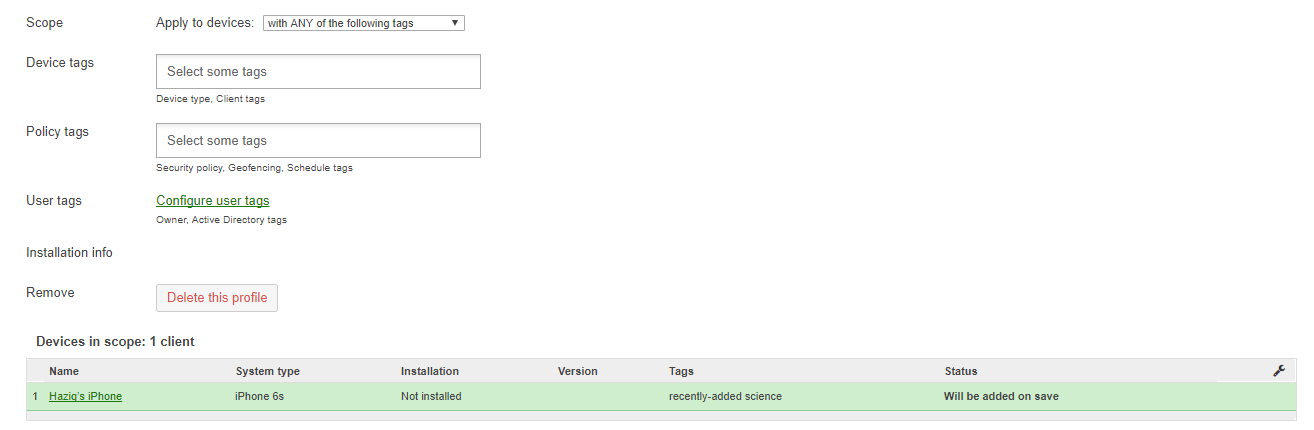
Which devices should receive a profile is controlled by the Scope of the profile, and tags associated with a device. From the Systems Manager > Manage > Profiles page, select the desired profile. Use the Scope section to indicate what the criteria are for receiving a profile. For more information on configuring the scope of a profile, refer to the article on using tags. Once configured, devices that are within scope will automatically receive the profile. If they are removed from the scope, the profile will automatically be removed.
For info on unscoping or removing profiles and apps, see this article.
Manual Scoping Example
This example will quickly cover applying a basic profile to a device with a manual tag. This is how an administrator would manually designate devices that should receive settings.
Start by creating a profile and scoping it.
- Navigate to Systems Manager > Settings.
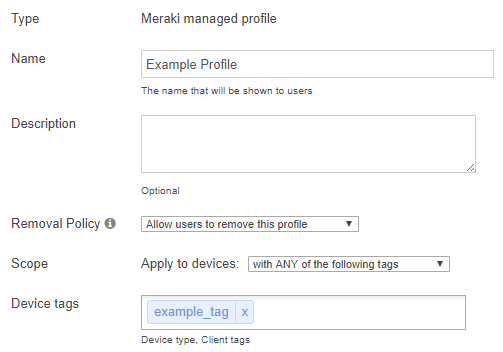
- Click + Add new > New mobile profile.
- Give the profile a Name and configure the Scope. In this case, the tag "example_tag" is used.
- Click Save Changes.
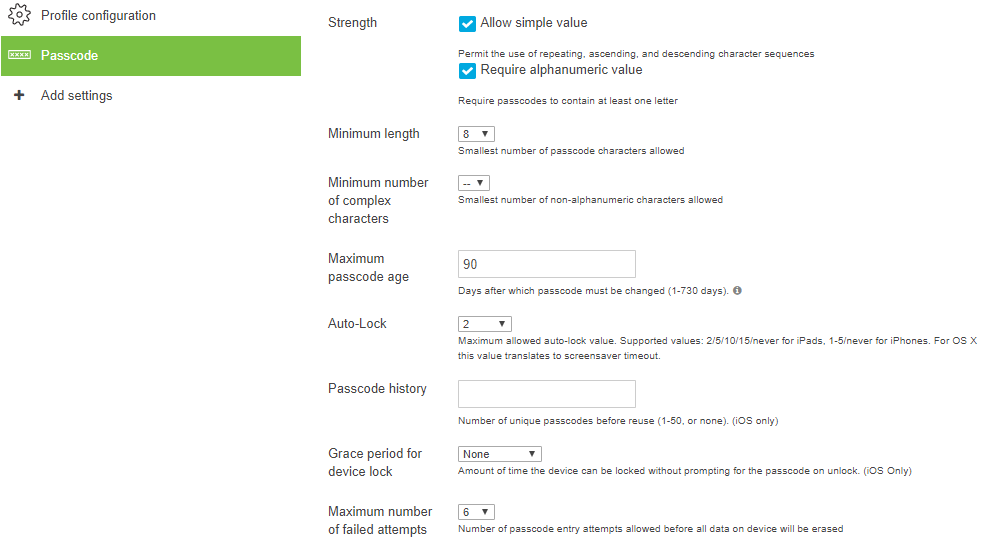
Configure settings for the profile.
- Navigate to Systems Manager > Settings.
- Select the Profile configured earlier.
- Open a tab and configure the desired settings. The example below enabled various restrictions regarding passcodes on devices.
- Click Save Changes.
Tag the desired devices. In this case, manual tags are being used, but various options are available to dynamically tag devices based on different criteria.
- Navigate to Systems Manager > Clients.
- Click the checkbox next to the desired client(s).
- Click Tag, and Add the desired tag. Detailed steps can be found here. In this case, the tag "example_tag" created earlier is used.
Once a device is in scope, the device must check-in before the settings can be applied. This may take a few minutes to occur, and requires that iOS devices be unlocked. To confirm if the profile was pushed to the device:
- From Systems Manager > Clients click on the desired client.
- Scroll down to the Profiles section.
- The profile created earlier should now be listed.
After you specify a scope to apply your profile or app, the bottom of the page will update to reflect which devices are in scope have the profile/app either installed (or removed, if you are unscoping). In the below example, all 10 enrolled devices in Systems Manager will install the profile because the scope was set to 'All devices'.
Note: Apps/profiles only be pushed to supported devices, even if an unsupported devices is within scope. For example, an iOS app will only install on iOS devices, even if the scope is set to 'All devices'.
Dynamic Scoping Example
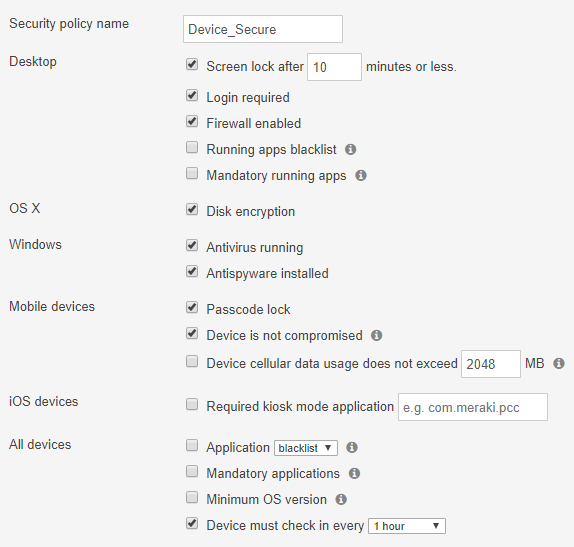
This example will illustrate how settings can be dynamically applied to a device based on more complex criteria. In this case, devices should only receive VPN access if they are considered secure.
Start by configuring a security policy. In this case, the policy is designed to confirm that devices have various security measures enabled.
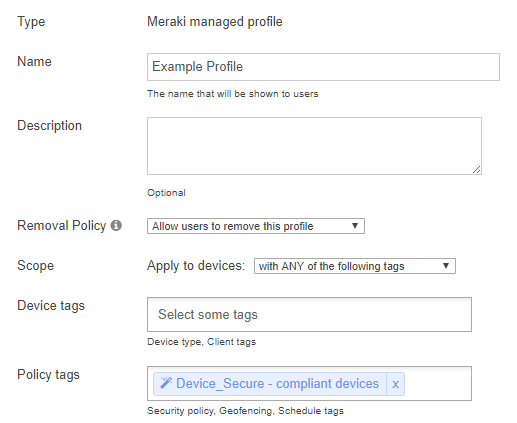
Next, create a profile that is dynamically pushed to only devices which are compliant with the security policy.
- Navigate to Systems Manager > Settings.
- Click + Add new > New mobile profile.
- Give the profile a Name and configure the Scope. In this example, the security policy tag for "Device_Secure" is used.
Note: Multiple tags can be combined in various combinations, as discussed in the tags article. This can allow different sets of criteria to all be required in order for profiles to be applied to clients. - Click Save changes.
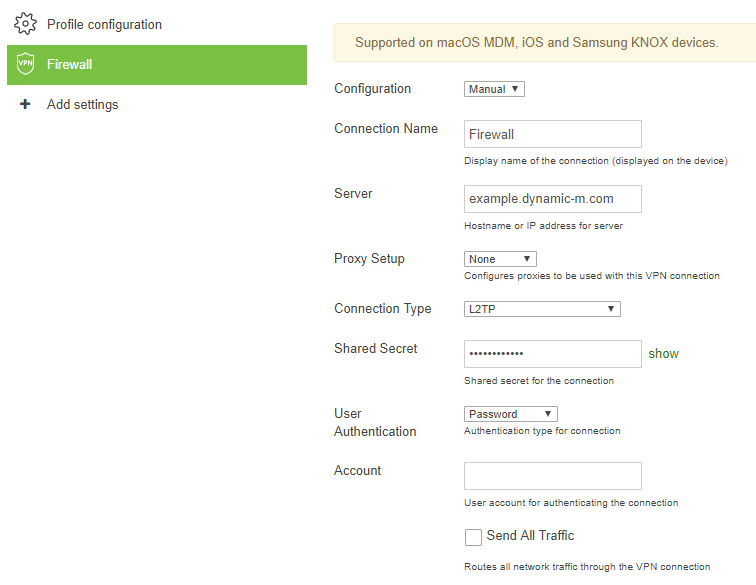
Then configure the policy with the desired settings. In this case, it contains VPN settings for connecting to the corporate network.
- Navigate to Systems Manager > Settings.
- Select the Profile configured earlier.
- Open a tab and configure the desired settings. The example below provides devices with a VPN connection.
- Click Save Changes.
Once a device is in scope, the device must check-in before the settings can be applied. This may take a few minutes to occur, and requires that iOS devices be unlocked. To confirm if the profile was pushed to the device:
- From Systems Manager > Clients click on the desired client.
- Scroll down to the Profiles section.
- The profile created earlier should now be listed.

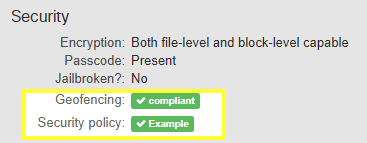
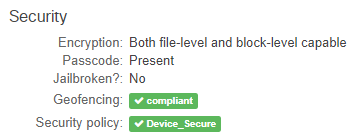
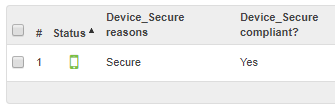
Since a security policy was configured, compliance for individual devices can be seen under the Security section of the client details page. If a device isn't compliant, the profile will be removed automatically when the device next checks in. For more information, read the section on checking device compliance in the security policies article.
Or using the appropriate columns in the clients list.
Scope Operators
Scoping combines a logic operator with your organization's tags to help you narrow down the set of devices that will receive apps/profiles.
All devices - The setting/feature will be applied to all supported devices.
with ANY of the following tags - Requires at least one tag. Supported devices matching 1 or more of the tags listed will receive the feature/setting. If 3 tags are defined, clients with 1 or more of those tags will receive the feature/setting.
with ALL of the following tags - Requires at least one tag. Supported devices matching all of the tags listed will receive the feature/setting. If 3 tags are defined, clients with all 3 tags will receive the feature/setting.
WITHOUT ANY of the following tags - Requires at least one tag. Supported devices that do not have any one or more of the tags listed will receive the feature/setting. If 3 tags are defined, clients that have 2 or less of them will receive the feature/setting.
WITHOUT ALL of the following tags - Requires at least one tag. Supported devices that do not have any of the tags listed will receive the feature/setting. If 3 tags are defined, clients that have 0 of them will receive the feature/setting.
Checking Client Tags
At any time, the tags currently active on a device can be seen by navigating to the Monitor > Clients page and clicking on the client in question.
Manual tags will appear under the Client details section as Tags. Click any of these tags to get a list of clients with that tag.
Schedule and device tags will appear under the Client details section as Auto tags.
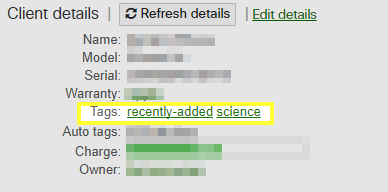
Geofencing and security policy tags will appear under Security as their own respective fields.