Managing Multiple Networks with Configuration Templates
Configuration templates can allow many Cisco Meraki devices to be deployed following a single base configuration. This makes it easier to roll out new sites/users and maintain consistency across each site's configuration. It is most useful in cases where a large number of sites exist that share a common network design. Such as a retail deployment with many stores, or a large number of home users with Z3s connecting to a corporate network over VPN.
Sites as part of a template can have exceptions to the configuration, and devices that need to be treated differently can be bound to a template. However, it's important to note that not all settings can be changed on a site bound to a template.
Configuration templates cannot be used on networks with Systems Manager.
Creating a Configuration Template
To begin, a configuration template must be created. This template will then be used as the base for all of the networks that are bound to it.
To create the configuration template:
- Navigate to Organization > Configuration templates.

- Click Create a new template.
- To create a template based on an existing template or network, choose Copy settings from and select the appropriate network or template.

Or to create a blank template, choose Create new and name the template.

- Provide a Template name.
- Click Add.

- Select any Target networks that should be bound to use this template, then click Bind.
If no networks should use this template yet, skip this step by clicking Close.

- Click Save Changes.
Modifying a Template
Once a network has been created, any changes desired for all of the bound networks must be made to the template. To edit the template's configuration, select it from the Network dropdown under "Select a template", and make any desired changes. The tabs on the left-hand side of the page can be used to navigate configuration options as normal. Some settings may exist which aren't relevant for all devices in bound networks, such as Wireless settings on a bound MX100, or extra port configurations. Extraneous settings will be ignored on devices not able to use them.

MR - Wireless Network Templates
Note: To enhance the security of customer networks, the encryption settings for the default SSID (enabled by default) have been updated starting Jun 10, 2025. When a Meraki administrator creates a new template (using the “Create new” option) and binds a new combined or wireless-only network to this template, the default SSID's encryption setting will now use Security: Password (randomly generated 30-character PSK), WPA Encryption: WPA2 only, 802.11w: Disabled (never use) instead of Open (no encryption).
MR access points can be managed and deployed in bulk using network templates. It may be helpful to group into common deployment types, such as retail locations or branch offices, so APs deployed at different locations all use the same SSIDs and authentication methods. This way, a user at one location can seamlessly join wireless networks at another location without needing to provide a different PSK or credentials.
MX - Template VLAN IP Address Range Allocations
While Configure > Addressing & VLANs > VLANs is set to "Disabled", all bound security appliances will use the same subnet. This allows for a high level of consistency across all sites, but it inherently disallows the use of Site-to-site VPN, as each site would result in a duplicate route. This means that VLANs must have unique subnets to allow for Auto VPN, as VPN subnet translation is not enabled by default.
Note that, in order to avoid subnet overlap issues, Auto VPN is disabled for cloned networks when using templates.
To allow for the use of Site-to-site VPN, set the VLANs field to Enabled. This will then provide several new configuration options specific to templates:
- Subnetting: Determines how addressing for the VLAN will be handled on each bound network.
- Same: All networks will use the same Subnet and Appliance LAN IP for this VLAN. Not eligible for site-to-site VPN.
- Unique: Each network will get a uniquely assigned Subnet and Appliance LAN IP based on the Subnet options.
- Subnet: The network addressing for this VLAN, based on the Subnetting selection.
- Same: The subnet in CIDR notation to be used for all networks bound to this template.
- Unique: Select a subnet mask in CIDR notation, and the private address range for it to come from.
When using Unique Subnetting, the appliance IP will always be the first usable IP address within the range automatically allocated. The subnet will be randomly selected based on the address space and subnet mask, but will not use any subnets that have previously been used in the organization.
When selecting a subnet allocation, it's important to keep in mind how many unique networks can be created with that selection. More networks cannot be bound to a template than can be supported by the number of unique allocations available. To calculate the number of unique subnets, take the number after the "/" in the second box and subtract it from the number after the "/" in the first box. Then use the result as a power of 2.
Ex. /24 from 192.168.0.0/16 would allow for 256 unique subnets.
Ex. /23 from 10.0.0.0/8 would allow for 32,768 unique subnets.
If a network is unbound from a template, its subnet is made available for use by other future networks. If that same network is then re-bound to the template, it will be assigned a new randomly selected subnet rather than receiving the same subnet previously allocated.
For more information on IP addressing and subnet masks, refer to the following articles on IP addressing and subnetting and subnetting fundamentals.
Note: When selecting Unique subnets, ensure that the address space being provided for use by the template is not currently in use by other networks. Otherwise, networks utilizing the template may overlap with other individually configured networks.
MX - Firewall Rules and DHCP Reservations for Templates
You have additional source and destination options when configuring layer 3 firewall rules for a configuration template. Because the subnet for a given VLAN may be different in each template child network, VLAN objects allow you to create firewall rules using the VLAN names as source and destination network objects, rather than actual IPs or CIDR subnets. These VLAN objects are automatically translated by each child network into the local subnet associated with that VLAN.
If you wish to use only a certain IP within a VLAN object in a firewall rule, you can add an IP Offset.
DHCP reservations can be configured in much the same way. The VLAN name for each DHCP scope will be autopopulated, and only the IP offset needs to be set.
IPv6 LAN capabilities are a requirement for VLAN Objects. VLAN objects and HA MXs (warm spare) do not work together since HA pair does not currently support IPv6. When a warm spare is added to a network, you will lose the ability to use VLAN objects and any existing L3 rules utilizing VLAN objects will be removed.
Firewall rules on Template networks do not show a hit counter column this is expected behavior for this column to be missing.
MS - Switch Templates
MS Switch templates consist of two components: Template networks and switch templates. Whereas a template network is a standard template as defined above, a switch template is a set of port configurations that can be shared by multiple switches of the same model.
For more information about MS templates, please refer to our Switch Templates Deployment Guide.
Binding Networks to a Template
Once a template has been created, networks that are bound to it will utilize its configuration as a base. Any changes made to the template will then be pushed out to all bound networks.
To bind an existing network to a template:
- Navigate to Organization > Configuration templates.
- Click on the row for the template (but not on the name of the template).
- Click Bind additional networks.

- In Target networks, select any additional networks that should be bound to this template.
- Click Bind.
- Click Save Changes.
Note: When binding an existing network to a template, its current configuration will be lost and it will begin using the template configuration.
To bind a new network to a template:
- Select Create a network from the network dropdown.
- Enter a Name, and select the appropriate Network type.
- For Configuration, select Bind to template and the name of the template created earlier.

- Click Create network.
Once bound to a template, individual networks will lose most of their Configure menu, and any changes impacting the network's configuration should be made from the template.
Viewing Networks bound to a template
Navigating to Organization > Configuration Templates and then clicking on the respective Template will show the number of networks bound to the template.

Note: Since multiple combined networks, or networks of individual product types can be attached to a combined template, navigating to each product type under the template may show different number of networks attached to it. For example, there can be X Switching networks and Y Wireless networks attached to the same Template.
Creating Multiple Template-Bound Networks
Once a template has been created, the bulk network tool can be used to create multiple networks, bound to the same template (or based on an existing network configuration).
Moving Networks Between Templates
Once a network has been bound to a template, it can be moved to another template.
To move a network to another template:
1. Navigate to Organization > Monitor > Configuration Templates
2. Select the template where the network is currently bound
3. Select the network you wish to move
4. Click Rebind
5. Select the new template and then click Rebind
Note: It is not possible to rebind a network to the same template it is already bound to.
Unbinding Networks from a Template
If a network needs to stop following the shared configuration, so that it can be configured independently, it must be unbound from the template. There are two options when unbinding from a shared template. A network can be unbound while retaining the configuration or a network can revert to the configuration last used prior to any template binding, regardless of the current network.
To unbind a network while retaining the configuration:
- Navigate to Organization > Configuration templates.
- Click on the row for the template (but not on the name of the template).
- Check the box next to the network(s) that must be unbound.
- Click Unbind

5. Select "Unbind and Retain Configurations".
6. Click Continue.

7. Click Yes, unbind template and retain configuration after reading through the warning.

Note: If an error is thrown when trying to unbind please reach out to support to troubleshoot further.
To unbind a network from a template and clear configuration:
- Navigate to Organization > Configuration templates.
- Click on the row for the template (but not on the name of the template).
- Check the box next to the network(s) that must be unbound.
- Click Unbind.

5. Select "Unbind and Clear Configurations".
6. Click Continue.
7. Click Yes, unbind template and clear configuration after reading the warning and verifying the intended result.

Note: When a network is unbound from a template, it will retain some settings (such as addressing and VLANs) but most settings will revert to their state before binding, if there were any.
Local Overrides
Once a network has been bound to a template, some options can still be configured normally. Any local configuration changes made directly on the network will override the template configuration.
Note: Updating the same options on the template will not clear a network’s local overrides. To clear local overrides, the network needs to be unbound and rebound to the template. The only exception is non-combined MR template, which can be reverted via the Organization > Monitor > Configuration templates page.
Below are overrides that can be configured for networks bounded to a template. Please refer to the product specific guides for more details:
MX/Z - MX Templates Best Practices
-
Addressing & VLANs subnets
-
DHCP exceptions
-
NAT / Forwarding rules
-
SD-WAN & Traffic shaping Uplink Configuration
-
Client VPN
MS - Templates for Switching Best Practices
-
Switch ports (Access Policies*, Port Schedules*)
-
Routing and DHCP
-
OSPF Routing
-
Port Management Profile
-
Stack Management
-
DHCP Snooping
-
Dynamic ARP Inspection (DAI)
MR Access Points
-
SSIDs (name, enable/disable)
-
Access control
-
Radio Settings (RF Profiles)
*Note: These configuration must be defined at the template level
Deleting a Configuration Template
If a template must be deleted, it can be done so using the instructions below. When a template is deleted, all networks bound to it will be automatically unbound.
- Navigate to Organization > Configuration templates.
- Check the box next to any templates that should be deleted.
- Click Delete.

- Read the important information on the next page, and confirm deletion. Once a template has been deleted, it cannot be recovered.

- Click Delete networks.
MX Port Numbers/Mappings
Port numbering can differ between MX models, which can cause confusion when assigning a configuration to a specific port number in a template. For example, a configuration on LAN 2 in a template doesn't affect any ports on an MX65.
The table presented at Port Mapping for different MXs models outlines template port numbers and their corresponding physical port on some MX models.
Modifying/Setting Secondary WAN Ports
You can toggle the LAN2 port between LAN and Internet, through Uplink configuration under the Local status tab on the Local Status Page.
Modifying a single product Template to a Combined Template
There may be scenarios in which a single product network and template were created. For example, an initial deployment is for MX only and therefore MX only networks are created along with a MX (Security Appliance) only template(s). Now you want to deploy other Meraki devices to the networks such as MR Access Points and MS Switches. In order to accomplish this you need to modify the template(s) and the networks to be type "Combined".
Note, newly created Templates and Networks default to type Combined.
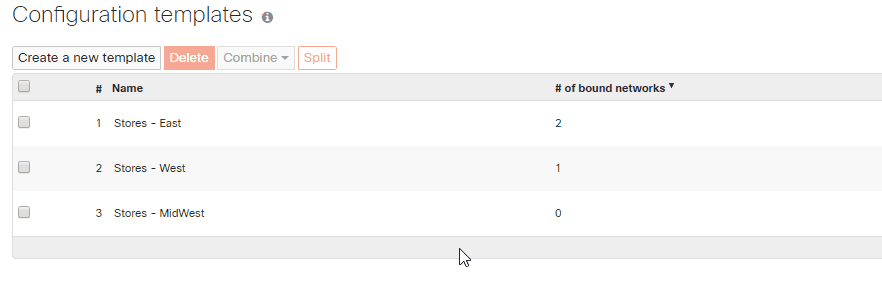
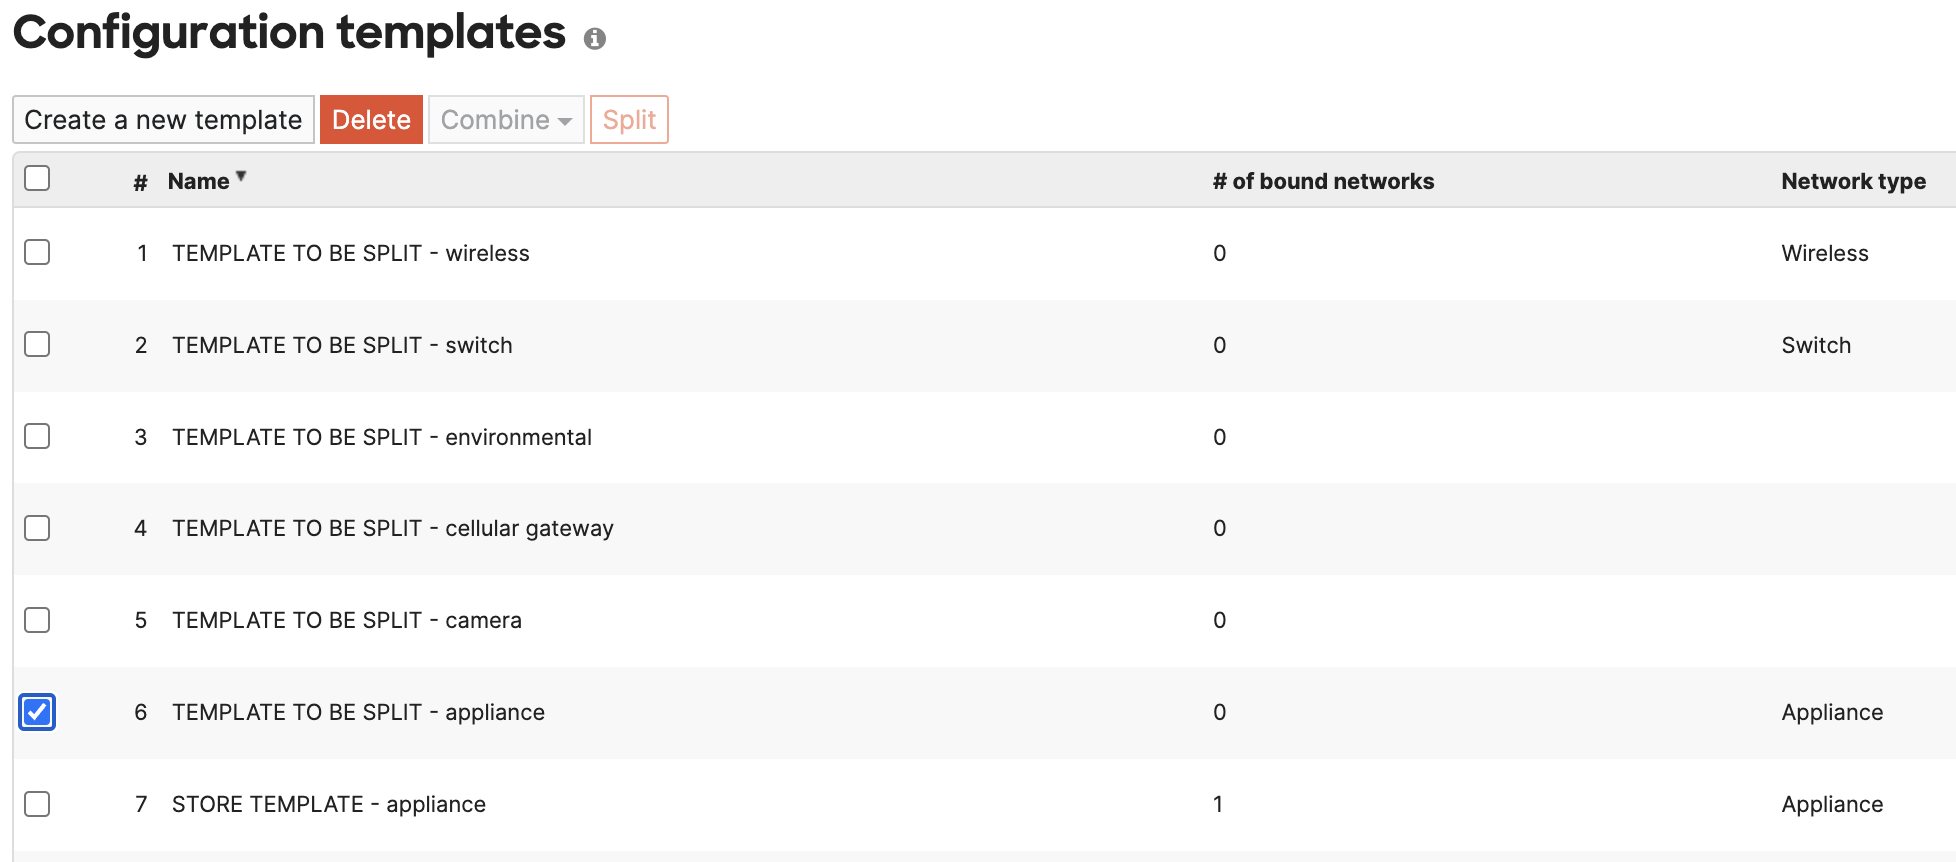
- The Network type of a Template is shown on the Templates page. Here, we're showing an Appliance only template "STORE TEMPLATE".

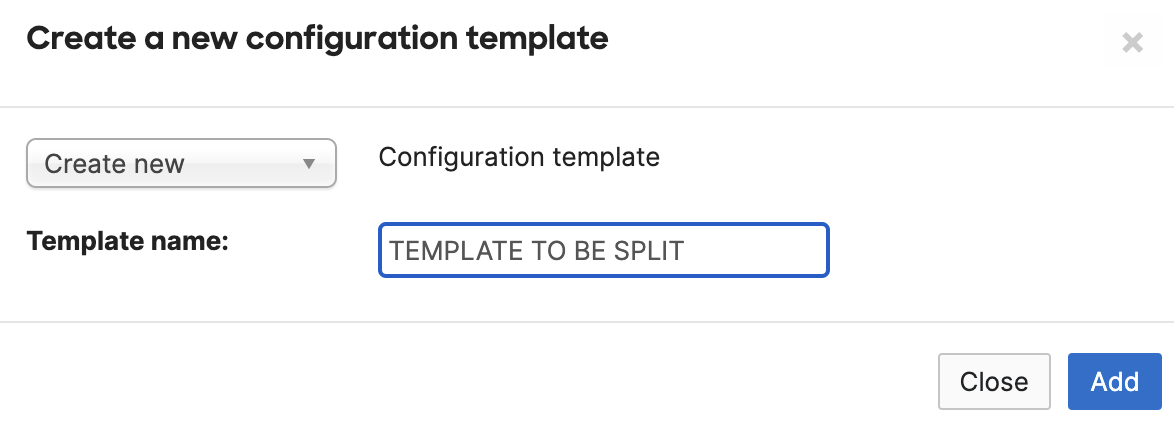
- Create a new Combined template. We'll later combine these templates, so the name will be overwritten. Don't bind any networks yet. Just click Add then Save on the subsequent page without binding any networks.
- Split the newly created template and delete the redundant Network "<template name> - appliance"
- Select the remaining template networks and the original Appliance only template "STORE TEMPLATE", click Combine and edit the name as needed
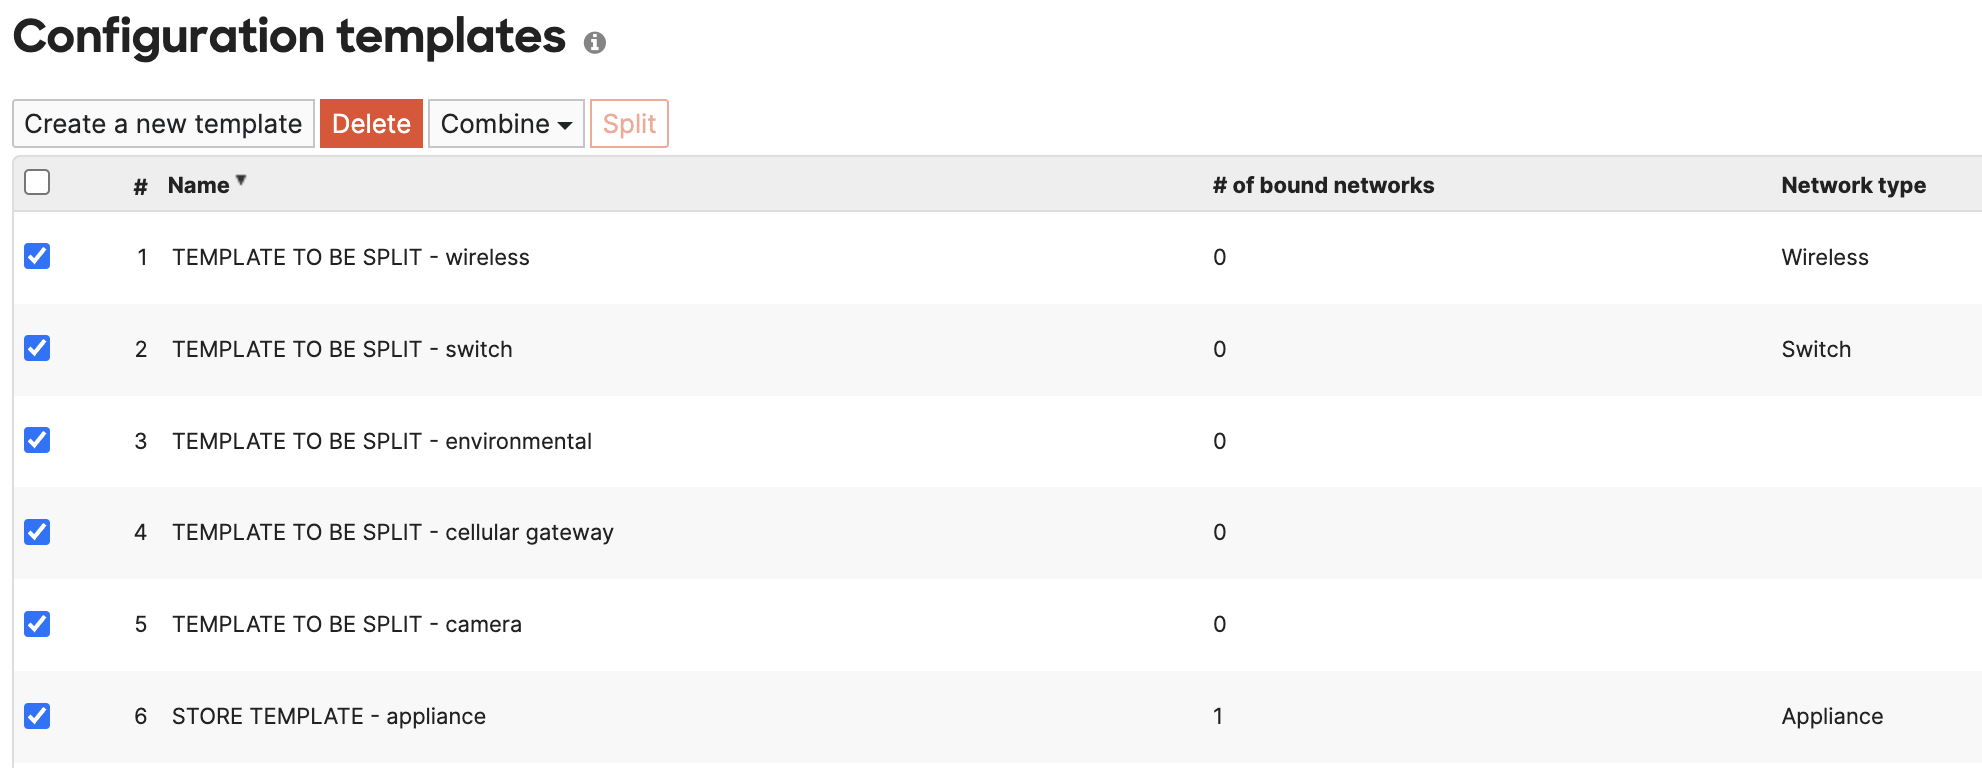
- The result is a newly Combined template "STORE TEMPLATE"

If you also need to modify the Network type to "Combined" follow a similar process as above.
Modifying a single product Network to a Combined Network
The steps below build upon the Template configuration above. However, the same process outlined below could apply to non-template bound networks.
Note, newly created Templates and Networks default to type Combined.
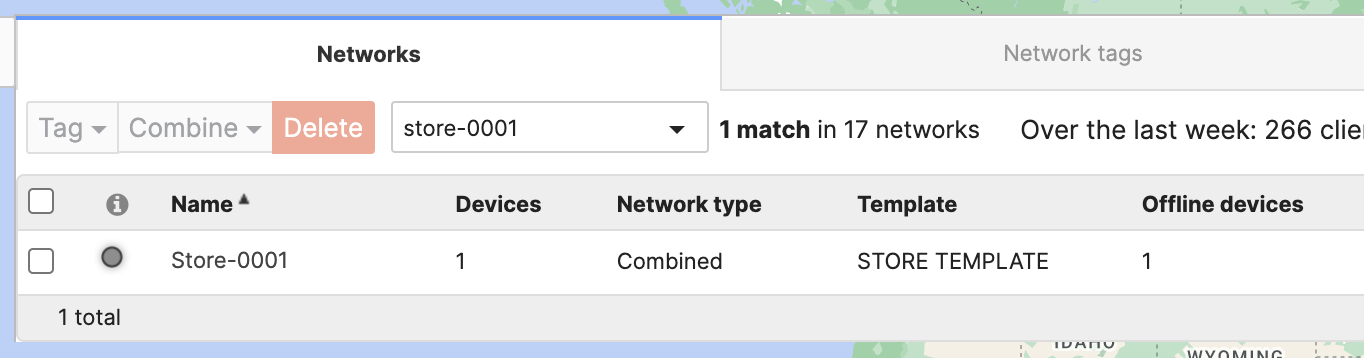
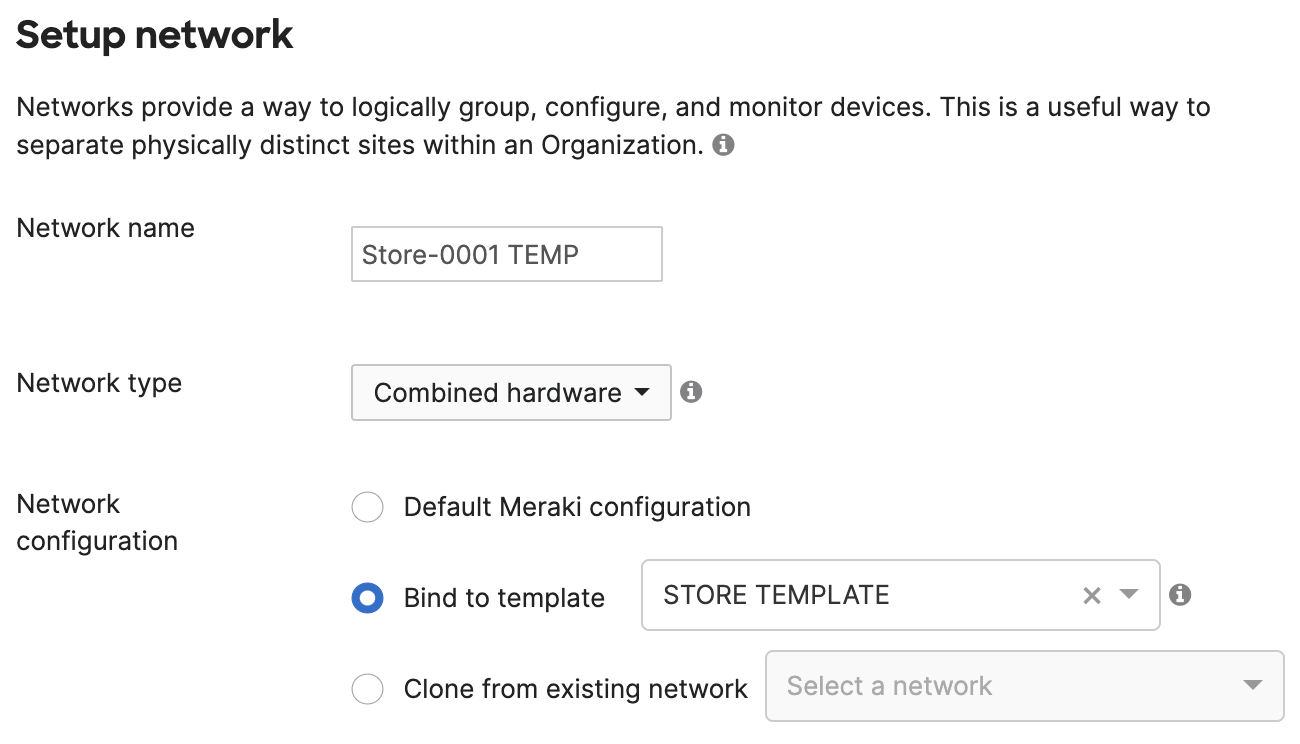
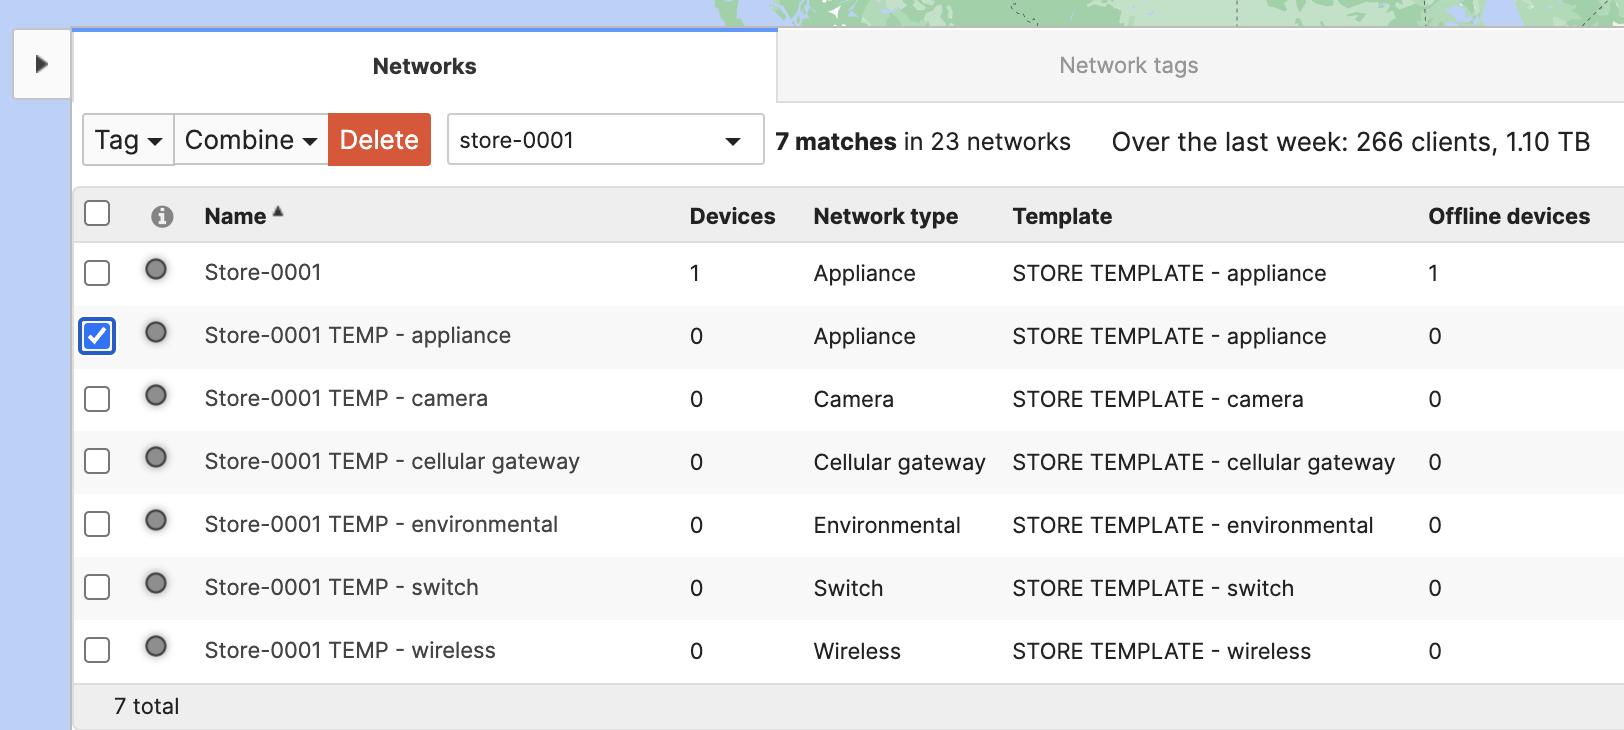
- The original network is an Appliance only network "Store-0001"

- Create a new Combined hardware network for "Store-0001" that will contain other Meraki products and bind it to the "STORE TEMPLATE". You can add devices to the network at this point from the Inventory list at the bottom of the page or leave it empty and add devices later.
- Go to Organization > Overview, split the newly created network "Store-0001 TEMP" and delete the redundant Network "Store-0001 TEMP - appliance"
- Now, combine these new networks with the original "Store-0001" network and edit the same as needed
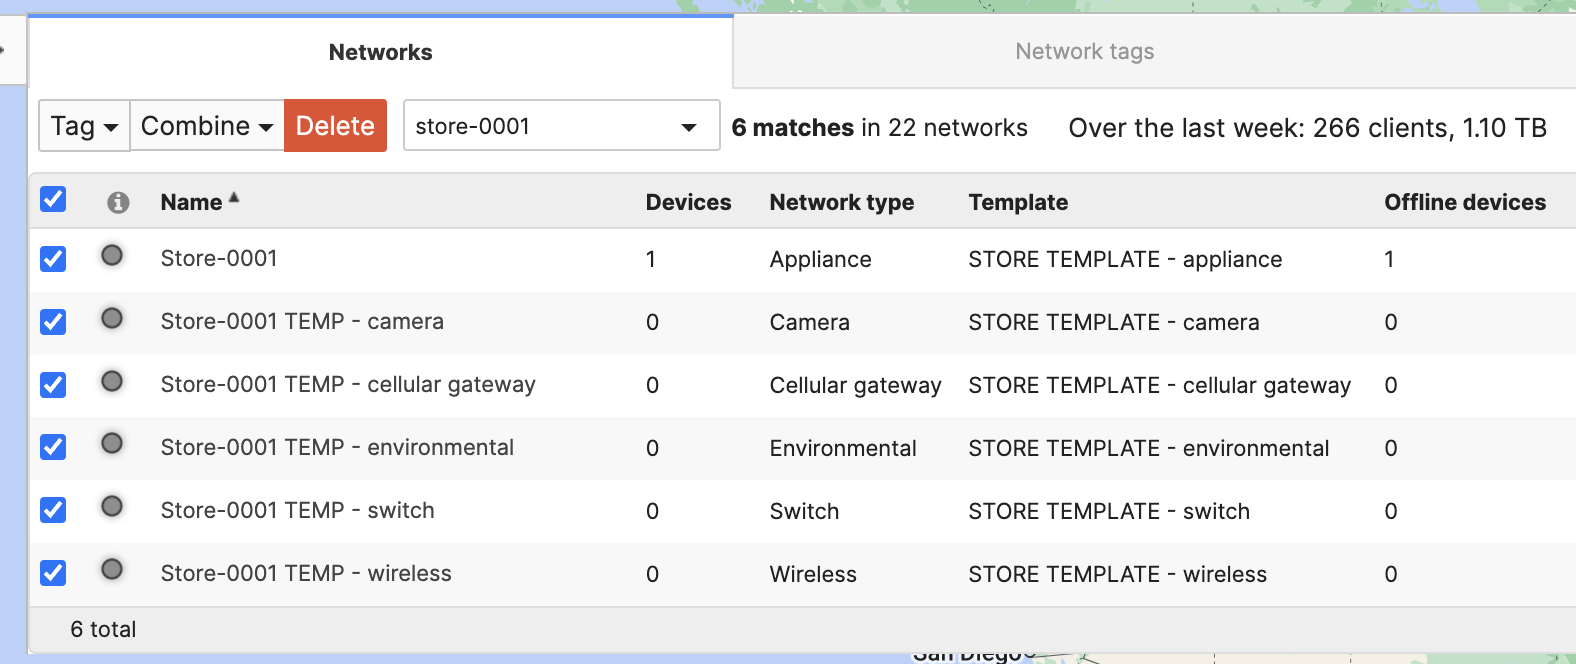
- The result is a newly Combined network "Store-0001"