Troubleshooting Mesh Communication between Access Points
In a mesh wireless network, gateway access points are wired directly to the network, while repeater access points rely on wireless mesh links to get network connectivity. If a repeater AP goes down or has an unreliable connection, it will likely be unreachable from Dashboard. However, helpful troubleshooting information can be gathered both on-site and from nearby nodes in Dashboard.
This document outlines steps to troubleshoot repeater connectivity from the perspective of its online mesh neighbors.
The Mesh Networking and Mesh Deployment Guide discuss important concepts which should be taken into account before using this troubleshooting guide. Therefore, review those articles prior to using this guide.
The following steps are recommended to troubleshoot problems with mesh connectivity:
- Determining Dashboard status
- Check for Mesh Neighbors
- Check Mesh Routes
- Check radio settings
- Physical inspection
- Packet captures
Determining Dashboard Status
During normal operation a repeater will appear as a green icon in Dashboard. In this state, a repeater will:
- Advertise SSIDs configured in Dashboard
- Allow clients to associate and pass traffic.
- Update Dashboard with statistics and download its configuration.
- Allow for full use of supported Live tools
Note: Dashboard mesh stats are not updated in real-time. There can be considerable delay between what is happening in real-time and what is reported in Dashboard. Furthermore, if a repeater cannot communicate with Dashboard, the information on its details page is likely stale.
Normal Operation
A working mesh connection is shown below. Repeater “Roberta” has a 1-hop route to reach the “Rosehill Pole” gateway AP. In this instance, both APs are mesh neighbors because they share a common channel (channel 44 highlighted in yellow) and are within range of each other and are located in the same Dashboard network.
Figure 1: Meshing APs operating on channel 44.

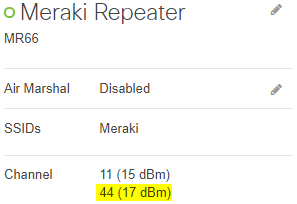
Figure 2: The repeater as listed in the mesh neighbors table of the gateway.
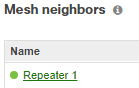
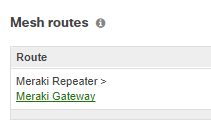
Figure 3: The repeater listing its 1-hop route to the gateway, showing the gateway in its mesh neighbors table.
Connectivity Problems
There are three common Dashboard connectivity warning messages:
- Unreachable
- Unable to find a gateway
- Repeater warning
Unreachable
When a repeater loses connection to the Internet and Dashboard, it will appear as a red icon with a status of “unreachable” on the AP details page.
Unable to Find a Gateway
A repeater can mesh through Meraki APs located outside of its own network/organization if it is unable to find a mesh route to the Internet/Dashboard through APs within its own Dashboard network. In this state, the AP will appear as a yellow icon with an “Unable to find a gateway to the Internet” status on the AP details page.
Note: Repeaters that have a mesh route outside the network will not advertise SSIDs configured in Dashboard or forward client traffic and will reboot every four hours.
Repeater Warning
A repeater can get into a bad connectivity state where there is one-way communication between itself and the cloud. In this state, the cloud receives management traffic from the repeater, but when it replies, it does not receive acknowledgement from the repeater. In this state the repeater will alert "bad connectivity to the controller, possible firewall or NAT issues":
Checking Historical Status of a Repeater
The historical connectivity status of a repeater can be seen by toggling the Connectivity graph on the AP details page. Place the mouse pointer over the colored lines on the graph, to view the timeframe of mesh connectivity status changes.
Check for Mesh Neighbors
If two APs operate on the same channel and are within range of each other, they can become mesh neighbors. Mesh neighbors exchange mesh route information allowing repeaters to discover the best metric route to the gateway. If two APs are in the same Dashboard network and mesh neighbors, they may establish a mesh routing relationship where they send and receive client traffic of the mesh link.
This information can be immensely helpful in narrowing down bad mesh links and determining next steps.
Check the Mesh Neighbors table
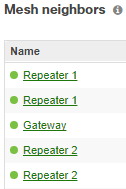
APs that are mesh neighbors will appear in each other’s mesh neighbors table (on the AP details page, under Wireless > Monitor > Access points > The repeater experiencing issues). When a repeater is offline, the first step is to confirm whether it shows up in the mesh neighbors table of other APs it should route through.
Figure 6: A repeater "Repeater 1" is a mesh neighbor of the "Gateway" AP, as it appears in Roof's mesh neighbors table.
Check the Local Status Page
The Neighbors page of the Local Status Page shows all of the neighbors of a given Meraki AP. Access this page on an online AP and check the to see if the offline repeater MAC address appears in the table. If it does, the offline repeater is active and within range of the online AP.
Check Mesh Routes
Once a mesh neighbor relationship is confirmed between an offline repeater and its mesh neighbor, the next step is to confirm a mesh route exists. A repeater’s mesh route table shows the path traffic must take to reach a specific gateway. This path can include multiple hops, meaning there may be intermediate repeaters which traffic must pass through to reach the gateway. The route from the gateway back to the repeater might not follow the same path, Dashboard only shows the repeater’s mesh route table.
If a repeater is having mesh connectivity issues, check the mesh route table on that AP's details page (under Wireless > Monitor > Access points > The repeater experiencing issues) in Dashboard. For each route reported, there should be a mesh neighbor one hop away. Since the repeater will communicate directly with those APs to get online, it is important to ensure that those routes are healthy. After determining which AP is the repeater's first hop, confirm that the reported mesh neighbor is online, because it is not possible to gather Dashboard data from an offline node.
Repeaters have logic to determine which route to the gateway is best. It is calculated into a metric using a combination of hop count, data rates, RSSI, and loss rate (FWD and REV rates). A perfect metric has a score of 1179, and APs can dynamically change to use a route with a better metric (if one is available).
Checking the Mesh Routes Table
Below is an example of a Dashboard mesh route table for repeater “Meraki Repeater”.
Figure 7: The route table on Meraki Repeater can be used to show which network segments are closest.
Check Radio Settings
After confirming a mesh route exists between an offline repeater and its mesh neighbor, the next step is to check for radio configurations or environmental factors which adversely affect mesh. These factors are:
- Channel selection and transmit power
- DFS
- RF spectrum
Channel Selection and Transmit Power
For any two APs to become mesh neighbors, they must be able to hear each other. This requires that APs on each side of the link operate on at least one common channel and have enough transmit power for transmissions to be received by its neighbor. Simply put, the distance between nodes should not exceed the distance the radio signals can travel. You will need to confirm the channel selection and transmit power configured on each AP in a mesh link will meet this requirement.
The first section of this document provides an example of how to compare the channel information using the details page of both APs. Additionally, the channel and transmit power configuration on the Radio settings page should be also be verified.
Figure 8: Two APs, each AP is set to a different 2.4GHz channel and the transmit power is off. These devices will not mesh.

Figure 9: Two APs manually configured to use channel 36 with a transmit power of 5dBm. The transmit power level could be an issue if the nodes are too far apart, but if they are close enough they should become mesh neighbors.

Note: Dashboard will calculate the distance between neighboring APs when placed on Google map. The distance is based on the lat/long (from Dashboard) of a mesh repeater and the neighbors it sees.This distance is then reported in the Dashboard mesh neighbors table.
Dynamic Frequency Selection (DFS)
In certain regulatory domains, 5GHz WiFi channels are shared with radar. DFS regulation in these environments require that an AP change it's channel whenever it detects a radar pulse.
Channel changes, including those due to DFS, will bring down a mesh link. Therefore if 5GHz is being used for mesh, non-DFS channels are preferred. However, this may not be an option depending on the country of operation (regulatory domain). Therefore, always check for DFS as a possible cause of mesh link instability.
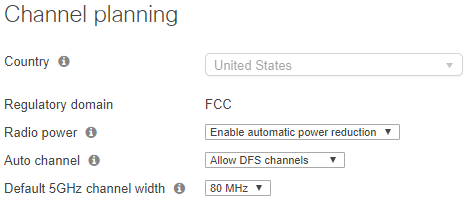
The Channel planning section of the Radio settings page has the regulatory domain of the network, which is based on the selected Country, and an option to allow DFS channels.
Figure 10: A network that allows DFS channels. APs in this network could be subject to automatic channel switching.
DFS channel change events are reported in the Dashboard Event log. If you suspect DFS could be causing the mesh link to drop, the Event log is a good place to check.
RF spectrum
If an AP has a dedicated Air Marshal radio, it can report real-time RF information in Dashbord under Wireless > Monitor > RF spectrum. Check this page to find any indications of high channel utilization. If there is high utilization on certain channels, a manual channel adjustment may be necessary.
Physical Inspection
If an offline repeater is not showing up as a mesh neighbor of nearby APs, there may be a physical issue that requires on-site troubleshooting. In particular, it may be necessary to spot check mesh APs for signs that something in the deployment has changed or was installed incorrectly.
Check the LED
Monitor the LED of the offline node and note the color and activity patterns. The MR installation guide has the LED code definitions.
- If there are no LED, does the AP have a working power source?
- If there are no LED, try resetting the offline unit. After a reset, if there is still no LED activity, verify the offline AP has a working power source and check the cabling and hardware for damage.
- If the LED shows the offline node in a scanning state, it may be unable to find a path to the gateway AP. This could be attributed to antenna placement or orientation which should be checked on both ends of the link.
Check the Antenna (outdoor APs)
Outdoor MR units use an externally attached antenna. If installed incorrectly, this could be the cause of poor/unreliable mesh links.
- Confirm the antenna type and radio band being used is correct on both ends of the link.
- Confirm antennas are attached securely to the correct radios, i.e. the 5GHz antenna is connected to the 5GHz radio posts or that an antenna is installed at all.
- Confirm antennas are oriented correctly based on their coverage patterns. Meraki antenna coverage patterns are in the datasheets for each antenna model. For example, if a directional antenna is being used, make sure it is aiming at its target with direct line of sight. If an omni antenna is used, verify it is at the correct elevation.
Do not attempt to establish a mesh link between outdoor APs without external antennas installed, even if they are a few feet apart, the communication may not be reliable.
Packet Captures
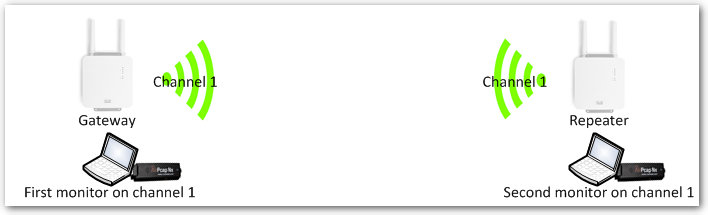
When troubleshooting a mesh link, packet captures may be required in order to analyze traffic between APs. These promiscuous-mode packet captures must be taken using external monitoring stations to effectively capture all nearby wireless traffic.
A monitor should be placed near each AP, and configured to capture packets on the channels being used for the mesh link. Once the packet captures been gathered, they can be used to identify the issue, or provide helpful troubleshooting information for Cisco Meraki Support.
Figure 11: In this example, the gateway and repeater on are channel 1. Therefore, a monitor is placed near each AP and configured to capture on channel 1.