
Using the MS Live Tools
Click 日本語 for Japanese
Overview
One of the major benefits of using the Cisco Meraki Dashboard is an admin's ability to monitor the status of any network device, without the use of 3rd party management tools or solutions. A device's status page contains a lot of useful, up-to-date information about the device and connected hosts, including a number of "Live Tools" that can be used to see current information about the device. Live Tools include real-time usage statistics, client visibility, ping, throughput, and the ability to blink the LEDs on a switch. This article details the features and functions of the Live Tools available for the MS switch series.
Note: The information generated via the Live Tools will only be accurate if the device is online and communicating with Dashboard. For more information about troubleshooting a bad connection to the Cisco Meraki Cloud Controller, please refer to the following KB article - Connection Loss to Cisco Meraki Cloud Controller
Learn more with these free online training courses on the Meraki Learning Hub:
Accessing the MS Live Tools
The MS Live Tools provide information relevant to a specific switch, therefore the Live Tools are available on a switch's overview page. The following instructions describe how to reach a switch's overview page and find the Live Tools for that device:
- In Dashboard, navigate to Switch > Monitor > Switches.
- Select the switch you would like to use (by clicking on the switch's name, not the checkbox).
- Click on the Tools tab, which should look like the image below:

Using the MS Live Tools
Each of the Live Tools can be used to perform remote troubleshooting on the device. This section details each tool that is available, as well as some use cases for each.
Cable Test Live Tool
This tool is intended for testing copper twisted-pair cabling as designated under the ANSI/TIA-568 cabling standard. It is not intended for use with fiber-optic cabling, as this requires the use of Digital Optical Monitoring (DOM).
DOM is supported on MS120, MS125, MS130, MS210, MS225, MS250, MS350, MS355, MS410, and MS425. Switches must be running firmware MS 17 or higher. Refer to the Digital Optical Monitoring documentation for more details.
This tool allows an admin to test the wire connected to ports on the switch. In the box, enter a port number, multiple port numbers (separated by commas), or a range of port numbers (e.g. 1-24). If there is a cable plugged into the port(s), this test will determine the link speed/duplex, cable length, and twisted pair status of cable(s) connected. This test can be a quick way to determine if a faulty cable needs to be replaced, therefore narrowing down possible causes of a network issue.
For more detailed information on this test, please refer to the following KB article - Using the Cable test Live Tool

Cycle Port
This tool allows an admin to quickly disable and re-enable a switch port, multiple port numbers (separated by commas), or a range of port numbers (e.g. 1-24). PoE powered devices will be temporarily powered down. This can be useful to remotely reboot a connected PoE powered device such as a VoIP phone, or an Access Point.

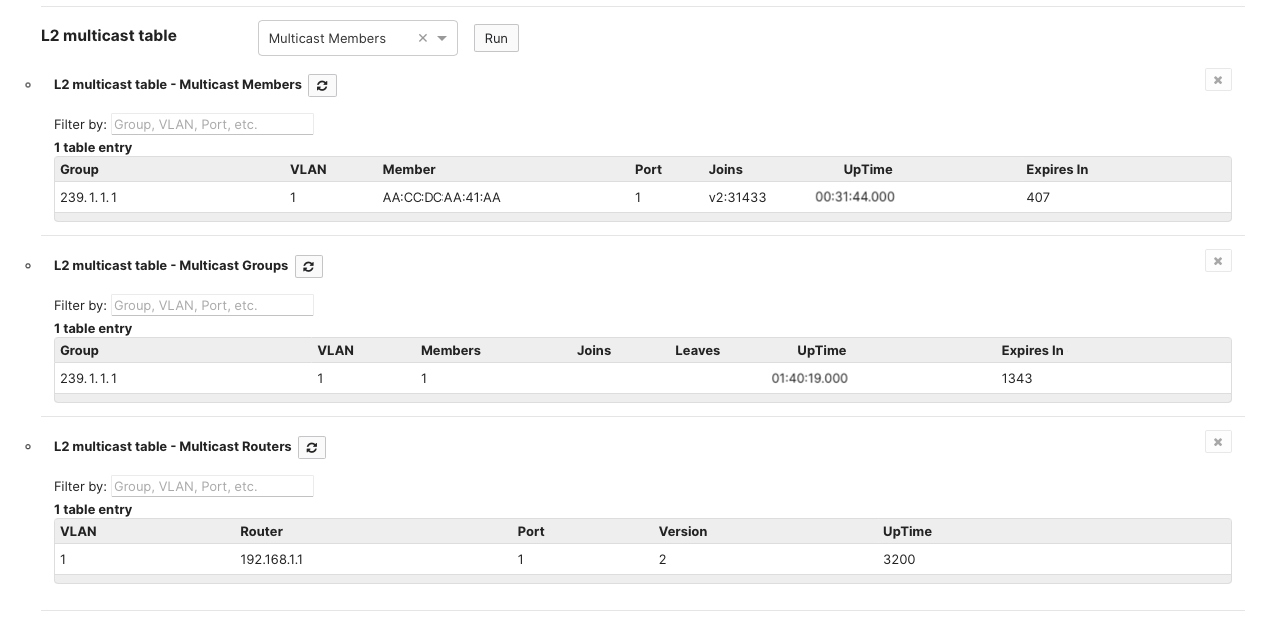
Layer 2 Multicast Table
The layer 2 multicast table live tool can be used to gather information on the multicast "Members," "Groups," and "Routers" detected by the switch if IGMP snooping is enabled. Each of these options appears separately as a dropdown option and runs independently to look up L2 multicast data in a tabular format.
Note: The Multicast Router table only lists the IGMP Queriers that the switch has detected. Information regarding L3 multicast is available under the "Multicast routing" live tool.
Multicast Routing
The Multicast Routing table provides a unified view of PIM interfaces and multicast routes for switches with multicast enabled:
- PIM Interfaces Table:
The first table displays information such as multicast interface IP addresses, subnets, and interface flags (like DR, PIM, NO_NBR). It closely matches the output of theshow ip pim interfacecommand on the device CLI.
- Mroute Table:
The second table displays multicast routing details - including multicast groups, Rendezvous Point (RP), incoming and outgoing interfaces, and various flags (e.g., S, J, P, C, L). This mirrors the output of theshow ip mroutecommand on the device CLI.
For Cloud Managed devices running IOS-XE, note that the flags are shown using terms such as Sparse, Join-SPT, Pruned, and Local.
Minimum firmware requirement for Multicast Routing Live Tool on Cloud Managed devices with IOS-XE is 17.18.2

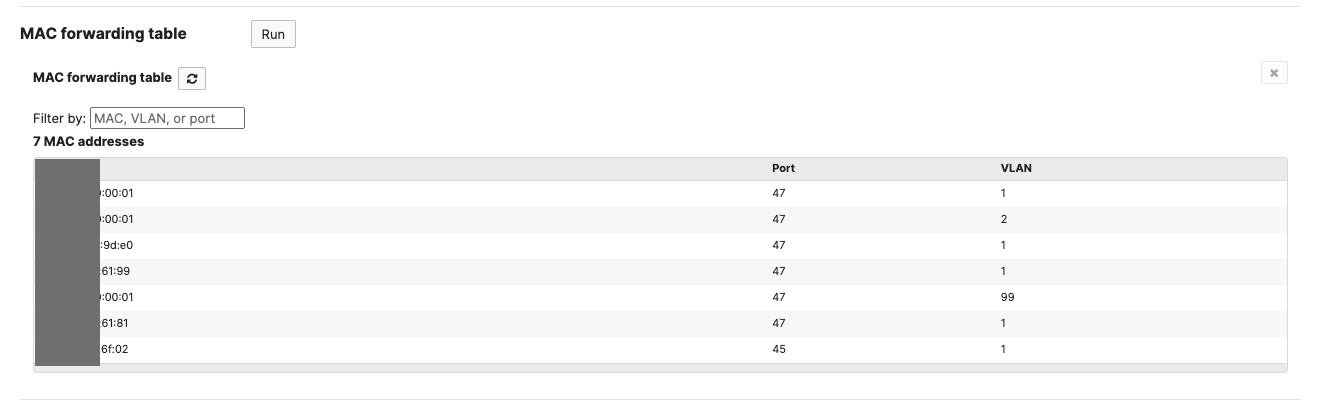
Forwarding Table
This table shows MAC addresses that the switch is currently aware of, and which port/VLAN their traffic is being forwarded through. There is also a search bar, which can be used to filter for a specific mapping. If traffic from a particular MAC does not appear to be tagged with the appropriate VLAN, this table can be used to quickly determine if a switch port configuration are misconfigured.
Wake Client
If a client machine has been configured with Wake-on-LAN enabled, an admin can specify that host's MAC address to send a magic packet and wake the host machine. An admin can also specify a VLAN, and broadcast a magic packet out on that VLAN. This tool can be useful in a network environment that utilizes Wake-on-LAN for remote power management.

Ping
Ping will initiate a series of ICMP Echo requests to the designated IP or domain name. Based on the responses, it will graph the round trip time (RTT) latency. Click the X to remove a ping test.
- If the MS Switch/Stack is only configured for Layer 2 switching, then pings will be sourced from the MS management interface.
-
If the MS Switch/Stack has a Layer 3 routing configuration, then pings will be sourced from the Layer 3 interface specified in the drop down.
For more information on the Ping live tool in Dashboard, please refer to the following KB article - Using the Ping Tool on dashboard

MTR
A MTR test combines ICMP and Traceroute functionalities to perform a more detailed reachability test. This test performs a hop by hop analysis of reachability. This is commonly utilized for identifying potential causes for loss or delays to a destination from the MS' LAN IP. This destination may be a FQDN or IP address.

Traditional Traceroute tool is only available when L3 interfaces have been configured on the switch.
Throughput
This tool will determine the approximate throughput between this device and the Cisco Meraki Cloud Controller. To use this tool, click on the play button and wait approximately 10 seconds. The device will send traffic to the cloud controller and report the approximate calculated speed on the tool. This can be used to get a general idea of throughput for upstream traffic from this device, which can be helpful in the event of a suspected bandwidth issue.
Note: Reported speeds may be less than actual speeds, as the test will be affected by other switch behaviors and functions. For a more accurate throughput test between two nodes, please use iperf or another throughput test.
For more information on using the Dashboard throughput test, please refer to the following KB article - Throughput Test to the Web from Cisco Meraki Devices

Blink LEDs
By clicking the run button, this tool will cause all LEDs on this switch to blink. This can be a quick way to identify an unlabeled switch in a rack.

Reboot Switch
This tool can be used to soft reboot a switch. This tool will temporarily disconnect all clients, so it is advised only to reboot the device during scheduled maintenance hours or in the event of an emergency. Because this reboot is only a soft reboot, it will retain its current configuration upon rebooting. For information on returning a Cisco Meraki device to factory settings, please refer to the following KB article - Resetting Cisco Meraki Devices to Factory Defaults.
