MT30 Installation Guide - Smart Automation Button
Overview
The Cisco Meraki MT30 is a cloud managed Smart Button that is exceptionally simple to deploy and configure due to its integration into the Meraki dashboard and the use of BLE technology. The MT family eliminates the complex and costly setups required by traditional solutions which removes the limitations of placement of these sensors.
Product Overview
Physical Specifications
|
Dimensions |
117.1x65.7x23.3mm (LxWxH) |
|
Power |
|
|
Operating Environment |
|
|
Hardware |
|
LED Indicators
Device Status Indicators
%25404x.png?revision=1&size=bestfit&width=684&height=456)
-
Rainbow - MT is initializing or looking for a gateway.
-
Solid Green (for n seconds) - Connected to a gateway.
-
Solid Amber (for n seconds) - MT could not find a gateway to connect.
-
Flashing Green - MT is upgrading its firmware
-
Flashing Amber - MT is running on a low battery.
NOTE: To conserve battery life, the LEDs on the MT30 are not always on.
Action Button Status Indicator
The MT30 Smart Automation Button has 2 types of Action Trigger
1. Short Press - When the Action Button is pressed for less than 1 second, a short press action is triggered. On trigger, the LED will start with Orange, and transition to a pulsing Blue LED. The flashing Blue LED sequence will end with a Green color if a connection is successful and Orange if the connection is unsuccessful. The pulses times out at 30 seconds.
2. Long Press - When the Action Button is pressed for more than 1 second, a long press action is triggered. On trigger, the LED will start with Orange, with a pulsing Blue LED. The flashing Blue LED sequence will end with a Green color if a connection is successful and Orange if the connection is unsuccessful. The pulses times out at 30 seconds.
Factory Reset Button
Inside the battery compartment, there is a pinhole button to factory reset the sensor. If the button is pressed and held for at least five seconds and then released, the sensor will reboot and it will be restored to its original factory settings by deleting all configuration information stored on the unit.
USB-C Port
The MT30 sensors have a USB-C Port on the bottom that can be used to provide an alternate source of power using a compatible accessory.
Package Contents

|
Unit |
MT30-HW |
|
Guides |
QIGs |
|
Battery |
1 AA Batteries |
|
Mounting equipment |
2x Mounting Screws 2x Drywall anchors 1xMagnet Sponge 1xVHB Tape |
Installation Instructions
Choosing Your Mounting Location
For most mounting scenarios, the MT30 has flexible options to provide quick and simple stationary mounting. The instructions are as follows:
Start by removing the battery compartment cap and inserting the 1 AA battery into the battery compartment. The battery compartment has a self retaining screws as well. Please ensure the cap is securely fastened.

Wall Mount Install
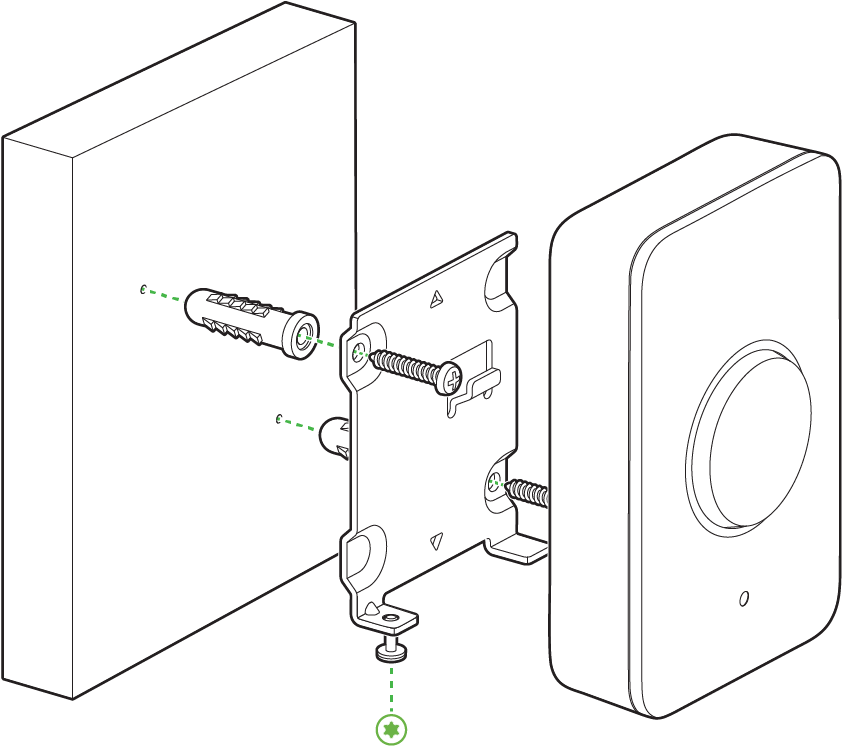
For a permanent installs, we recommend to use the included screws and drywall anchors to directly fix the mount plate on a flat surface.
Once the mount plate is installed, the MT30 sensor can be mounted on the plate. Make sure the security screw(T6 torx) on the bottom of the sensor is fastened in order to prevent removal of the sensor.

Peel and Stick Install
For a less permanent install, there are two options provided
%25404x.png?revision=1&size=bestfit&width=602&height=477)
-
VHB Tape - Double-sided VHB tape can be used to stick the mounting plate on any type of surface.
-
Magnet - Stick the magnet on any surface and the mounting plate can be stuck to the Magnet.
Once the mounting plate is on the desired surface, slide the MT30 sensor onto the plate and use the self retained Torx screw to secure the sensor.
Support and Additional Information
If issues are encountered with device installation or additional help is required, contact Meraki Support by logging in to dashboard.meraki.com and opening a case by visiting the Get Help section.
For additional information on Meraki hardware and for other installation guides, please refer to documentation.meraki.com.


