Gen2 MV Mounting Options and Guidelines
The MV13, MV33, MV63, and MV93 cameras are part of the Generation 3 MV series. These Gen3 cameras use a new set of mounting plates and accessories. Detailed information is available in the Gen3 Meraki MV Mounting Options and Guidelines article.
How MV Mounting Works
- Each MV camera includes a mounting plate inside the box, that can be installed on a flat surface such as a wall, ceiling, or, for some models, a junction box. The mounting plate also helps cool the camera.
-
For the indoor MV22, the box includes a junction box adapter plate for the 4-inch junction box.
-
For the outdoor MV72, the box includes a conduit adapter that helps ensure your entire electrical wiring is protected.
-
-
Optional mounting accessories, such as arm or a bracket are also available for the MV cameras. (Datasheets on the Cisco Meraki website. Specific dimensions attached to this document.)
-
You would use this for the following reasons:
- When direct mounting on a flat surface is not feasible.
- When direct surface mounting does not offer the best field of view.
- To prevent water droplets from obstructing the lens by isolating the camera from the wall.
-
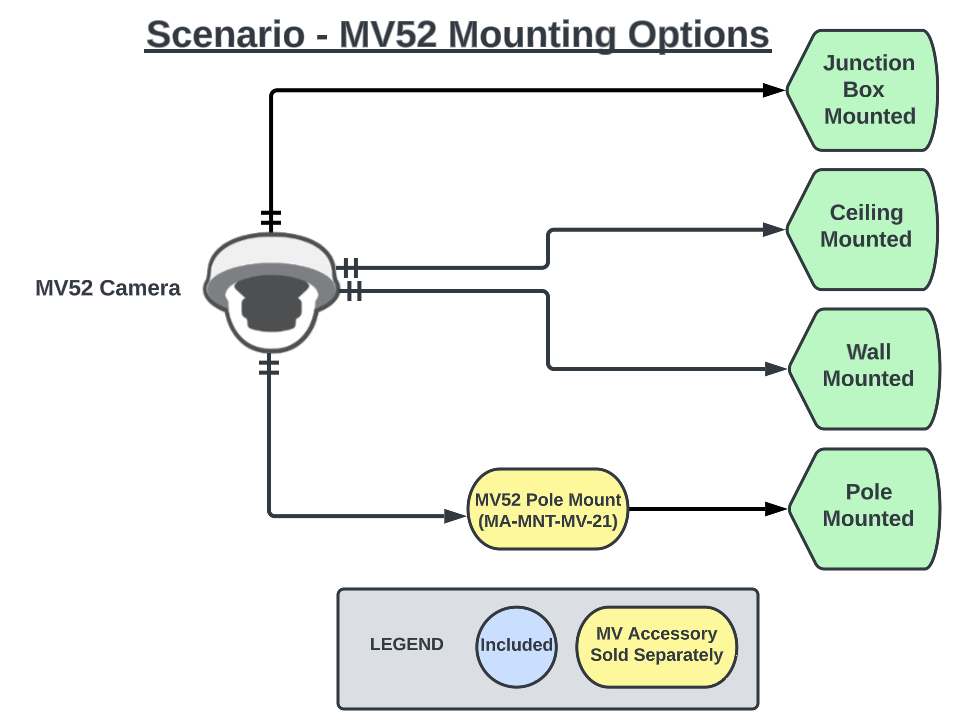
Summary of Mounting Options
MV cameras are compatible with the following mounting options, as well as the MV Low Voltage Power Adapter (LVPA). For these mounting options, if an accessory is available, it is linked in the table. The specific dimensions for these accessories are attached in this article. There is also a flowchart that illustrates all the different mounting options.
|
MV LVPA |
MV12 |
MV22**** |
MV72**** |
MV32 |
MV52 |
|
|---|---|---|---|---|---|---|
|
Wall |
Yes |
Yes |
Yes |
Yes |
Yes, but not recommended* |
Yes |
|
Ceiling |
Yes |
Yes |
Yes |
Yes |
Yes |
Yes |
|
T-Rail Ceiling Grids |
No |
Yes, but not recommended** |
Yes |
No |
Yes, but not recommended** |
No
|
|
Junction Box |
No |
No |
Yes** (adapter plate included) |
Yes** |
No |
Yes |
|
Conduit - compatible |
No |
No |
No |
Yes (conduit adapter included) |
No |
No |
|
Pole |
Yes (stainless steel cable ties included) |
No |
No |
- Refer to MV32 Installation Guide for more information.
- Refer to T-Rail Ceiling Grids mounting guidelines in the section below for more information.
Supported junction box types are outlined in the section below.
All mounting options supported by MV22 or MV72 are also supported for their MV22X and MV72X variants.
.png?revision=1&size=bestfit&width=438&height=292)
.png?revision=1&size=bestfit&width=391&height=286)
.png?revision=1&size=bestfit&width=414&height=340)
.png?revision=1&size=bestfit&width=458&height=340)
Mounting Dimensions
For the precise dimensions of the mounting accessories, refer to the attachments provided below.
| MV12 and MV32 Mounting Plate |
| MV12 and MV32 Telescoping Pendant |
| MV12 and MV32 Wall Arm |
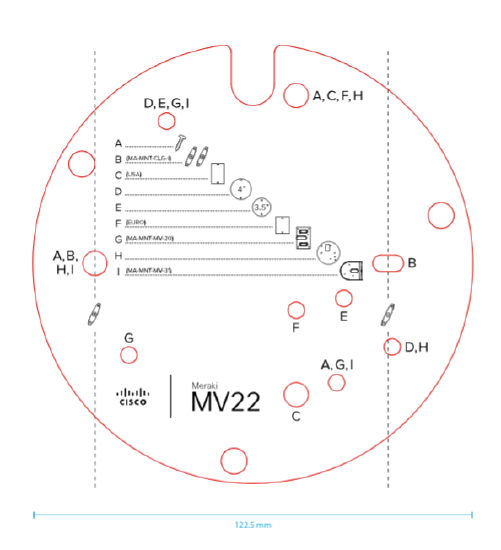
| MV22 Mounting Plate |
| MV22 and MV72 Pole Mount |
| MV22 Junction Box Adapter |
| MV22 L-Bracket |
| MV72 Conduit Adapter |
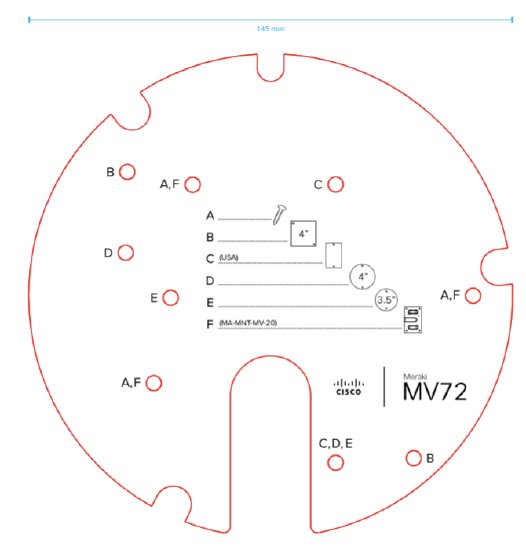
| MV72 Mounting Plate |
| MV72 Wall Arm |
| MV52 Pole Mount |
Note that the mounting accessories are made of aluminum, while the mounting plates are made of steel.
Mounting Guidelines
General Steps
-
Decide on your camera placement and identify the accessories you need using the table above.
-
If you are using the MV LVPA, choose a secure location near the camera for installation. Set up the camera with a wired connection before configuring it for wireless use. Refer to MV LVPA Installation Guide for more information.
-
For each type of mounting, read the guidelines below.
-
Refer the installation guides on Meraki Documentation for specific steps on mounting the camera. Remember to refer the MV72 Waterproof Gland Installation Guide.
-
If you need an arm or a bracket, use the instructions in the box to install it.
-
-
If you need to connect conduit to the camera, use the conduit adapter included in the MV72 box.
Specific Recommendations
A complete set of drawings with dimensions on all the mount plates and mounts are attached in this article. Ordering information and other technical specifications are on the Cisco Meraki website.
Mounting Orientation Setting for Fisheye Cameras
When mounted on a wall, half of the camera's field of view will face the ceiling or sky, which does not fully utilize its 360-degree field of view. Fisheye cameras perform better when installed on a ceiling or a Wall Arm mount, providing a broader and more useful field of view. Additionally, the camera's computer vision analytics rely on training algorithms designed for a top-down view. Mounting the camera in other orientations can reduce the effectiveness of its analytics. Therefore, avoid installing fisheye cameras perpendicular to the ground.
Mounting the fisheye camera on a ceiling maximizes the 360-degree view with dewarp capability. However, mounting it vertically on a wall limits the dewarp capability, leading to a less effective zoom experience.
Use the "Mounting" setting on the "Video Settings" tab to specify whether the camera is mounted on a wall or ceiling. This setting adjusts the dewarp behavior in both the Meraki Dashboard and the Meraki Vision portal. Cameras configured as "Ceiling" will have dewarp and DPTZ aligned with the X-axis, while those set as "Wall" will align dewarp and DPTZ with the Y-axis.

These mounting options will provide greater flexibility to view in appropriate orientations. Additional presets based on this selection will be provided during the video wall creation process on the Vision Portal.
Wall Mounting
Key considerations for electrical wiring on a wall:
-
The simplest way to mount on a wall is to run the Ethernet cable through it.
-
If this is not possible, determine if you can run conduit to the camera.
-
If not, the electrical wiring may remain unprotected, which could be acceptable for indoor installations.
-
Check if you can mount the MV72 to a junction box or conduit back box.
-
If not, use the conduit adapter included with the MV72 to connect to the camera. The MV22 does not include an adapter and must connect directly to the camera.
-
Check the junction box mounting section of this document to ensure the junction box size is supported.
- Verify that the junction box size is supported by checking the junction box mounting section of this document.
-
If not, install a compatible junction box in that location.
-
-
-
Available Accessories
MV12 and MV32 (Wall Mount Arm)
Both cameras can be mounted directly on a wall, but this is not recommended for the MV32 due to its wide field of view. The MV32 is better suited for ceiling mounting.
A wall mount arm (MA-MNT-MV-30) is available for these cameras, allowing wall mounting with the camera facing downward. Note that the screw placements differ for the MV12 and MV32.

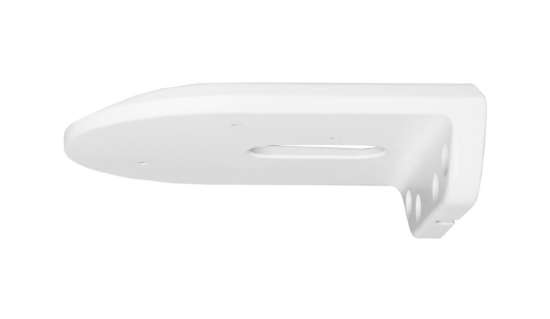
MV22 (L-Shape Wall Mount Bracket)
The MV22 uses a compact L-Shape Wall Mount Bracket (MA-MNT-MV-31).
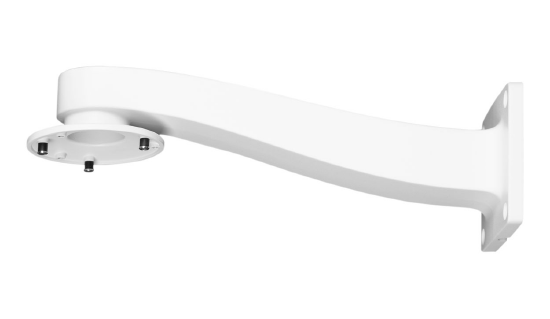
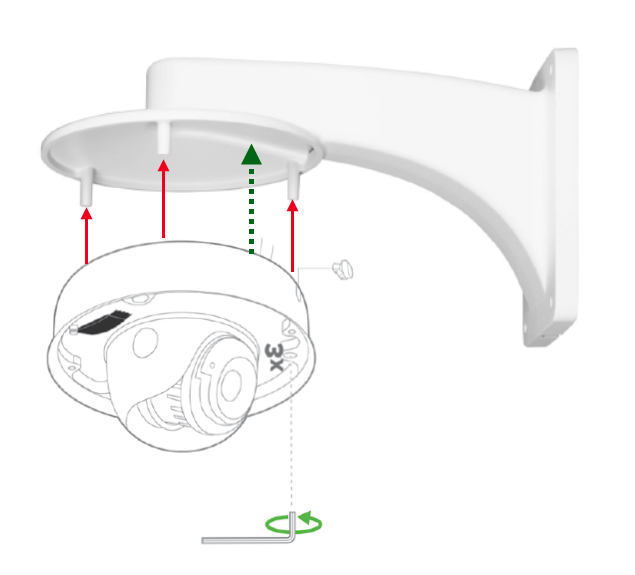
MV72 (Wall Mount Arm)
You can mount the MV72 directly onto a wall, with an optional conduit adapter that is included in the box.
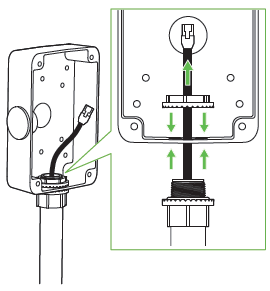
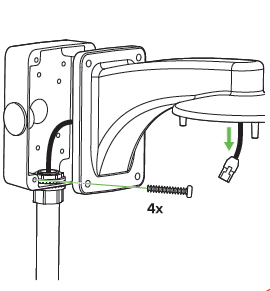
A wall mount arm (MA-MNT-MV-10), similar to the MV12 arm, is also available for the MV72. This configuration does not require a mount plate. Align the notches and feed the cable through the hole, as shown in green in the image below.
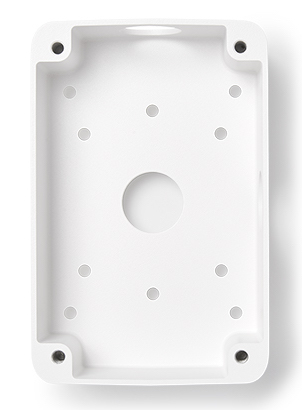
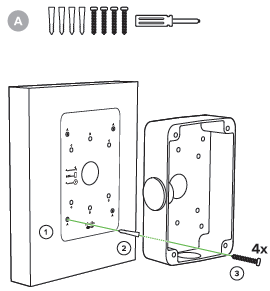
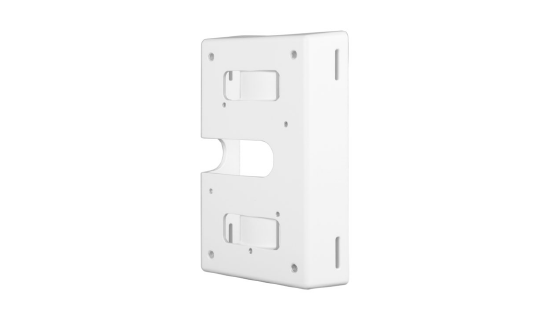
MV72 (Conduit Back Box + Wall Mount Arm)
You can optionally mount a conduit back box to the wall for simpler installation of MV72 outdoor cameras, and is compatible with the Wall Arm Mount for MV72 Series. The side, top, bottom, or rear ¾” conduit entry allows Ethernet to be securely routed to the camera.
The package contains a rubber plug to cover the entry that is not being used (on either side, or at the bottom). If more plugs are needed, you can find common ¾” plugs at home improvement stores.
Ceiling Mounting
MV cameras can also be mounted directly on the ceiling using the standard mount plate included in the box. Apply the same electrical wiring considerations as for wall mounting. The MV32 and MV22 offer additional ceiling mounting options, detailed below.
Available Accessories
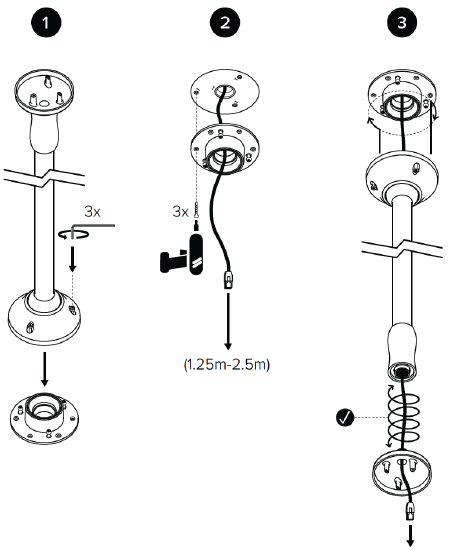
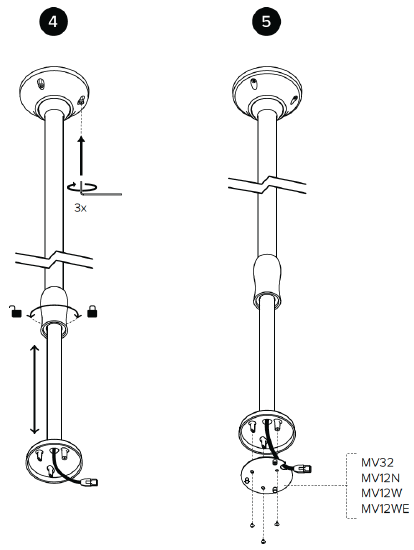
MV12 and MV32 (Telescoping Pendant Mount)
To mount the MV32 on a very high ceiling, we provide the telescoping mount (MA-MNT-MV-40).

MV12, MV22 and MV32 (T-Rail Mount Clip)
To mount the MV12/22/32 onto a recessed T-Rail and flush T-Rail ceiling, you can use a separate T-Rail Mount Clip (MA-MNT-CLG-1). This clip is also used for Meraki Wireless Access Points.
-
The MV22 mount plate has 2 screw holes for each of the t-rail mount clips.
-
The MV12 and MV32 mount plates have a screw hole in the middle for a single mount clip. This configuration is not recommended since this allows rotation of the camera and will not be completely secure.
Junction Box Mounting
With the provided mount plate, you can attach the MV22 and MV72 cameras to various types of junction boxes. The MV12 and MV32 cannot be mounted directly on a junction box due to their smaller size.
MV22
The standard mount plate for MV22 supports the following junction boxes. A guide is provided in the box for screw locations. It is also shown below.
Supported Junction Box Types
-
USA single gang box
-
4-inch circular junction box
-
3.5-inch circular junction box
-
EURO single gang box
-
4-inch junction box*
-
For the 4x4-inch square junction box, the MV22 comes with a junction box adapter plate that you can use to mount the camera.
-
MV72
The standard mount plate for MV72 supports the following junction boxes. A guide is provided in the box for screw locations. It is also shown below.
Supported Junction Box Types
-
4-inch junction box
-
USA single gang box
-
4-inch circular junction box
-
3.5-inch circular junction box
MV12 and MV32
The MV12 and MV32 are too small to mount directly on many larger junction boxes. If this mounting solution is required, use a mud ring with holes spaced no more than 2.75 inches apart and drill new screw holes into the MV12/MV32 mount plate to secure it.

Pole Mounting
The MV LVPA can also be mounted to a pole.
Available Accessories: MV22 and MV72 (Pole Mount)
Use the pole mount (MA-MNT-MV-20) to attach a camera to a pole. It can also connect to the MV72 wall mount arm for extended field of view. Two strap sizes are available: the smaller fits poles with diameters of 40-80mm, and the larger fits poles with diameters of 85-145mm.
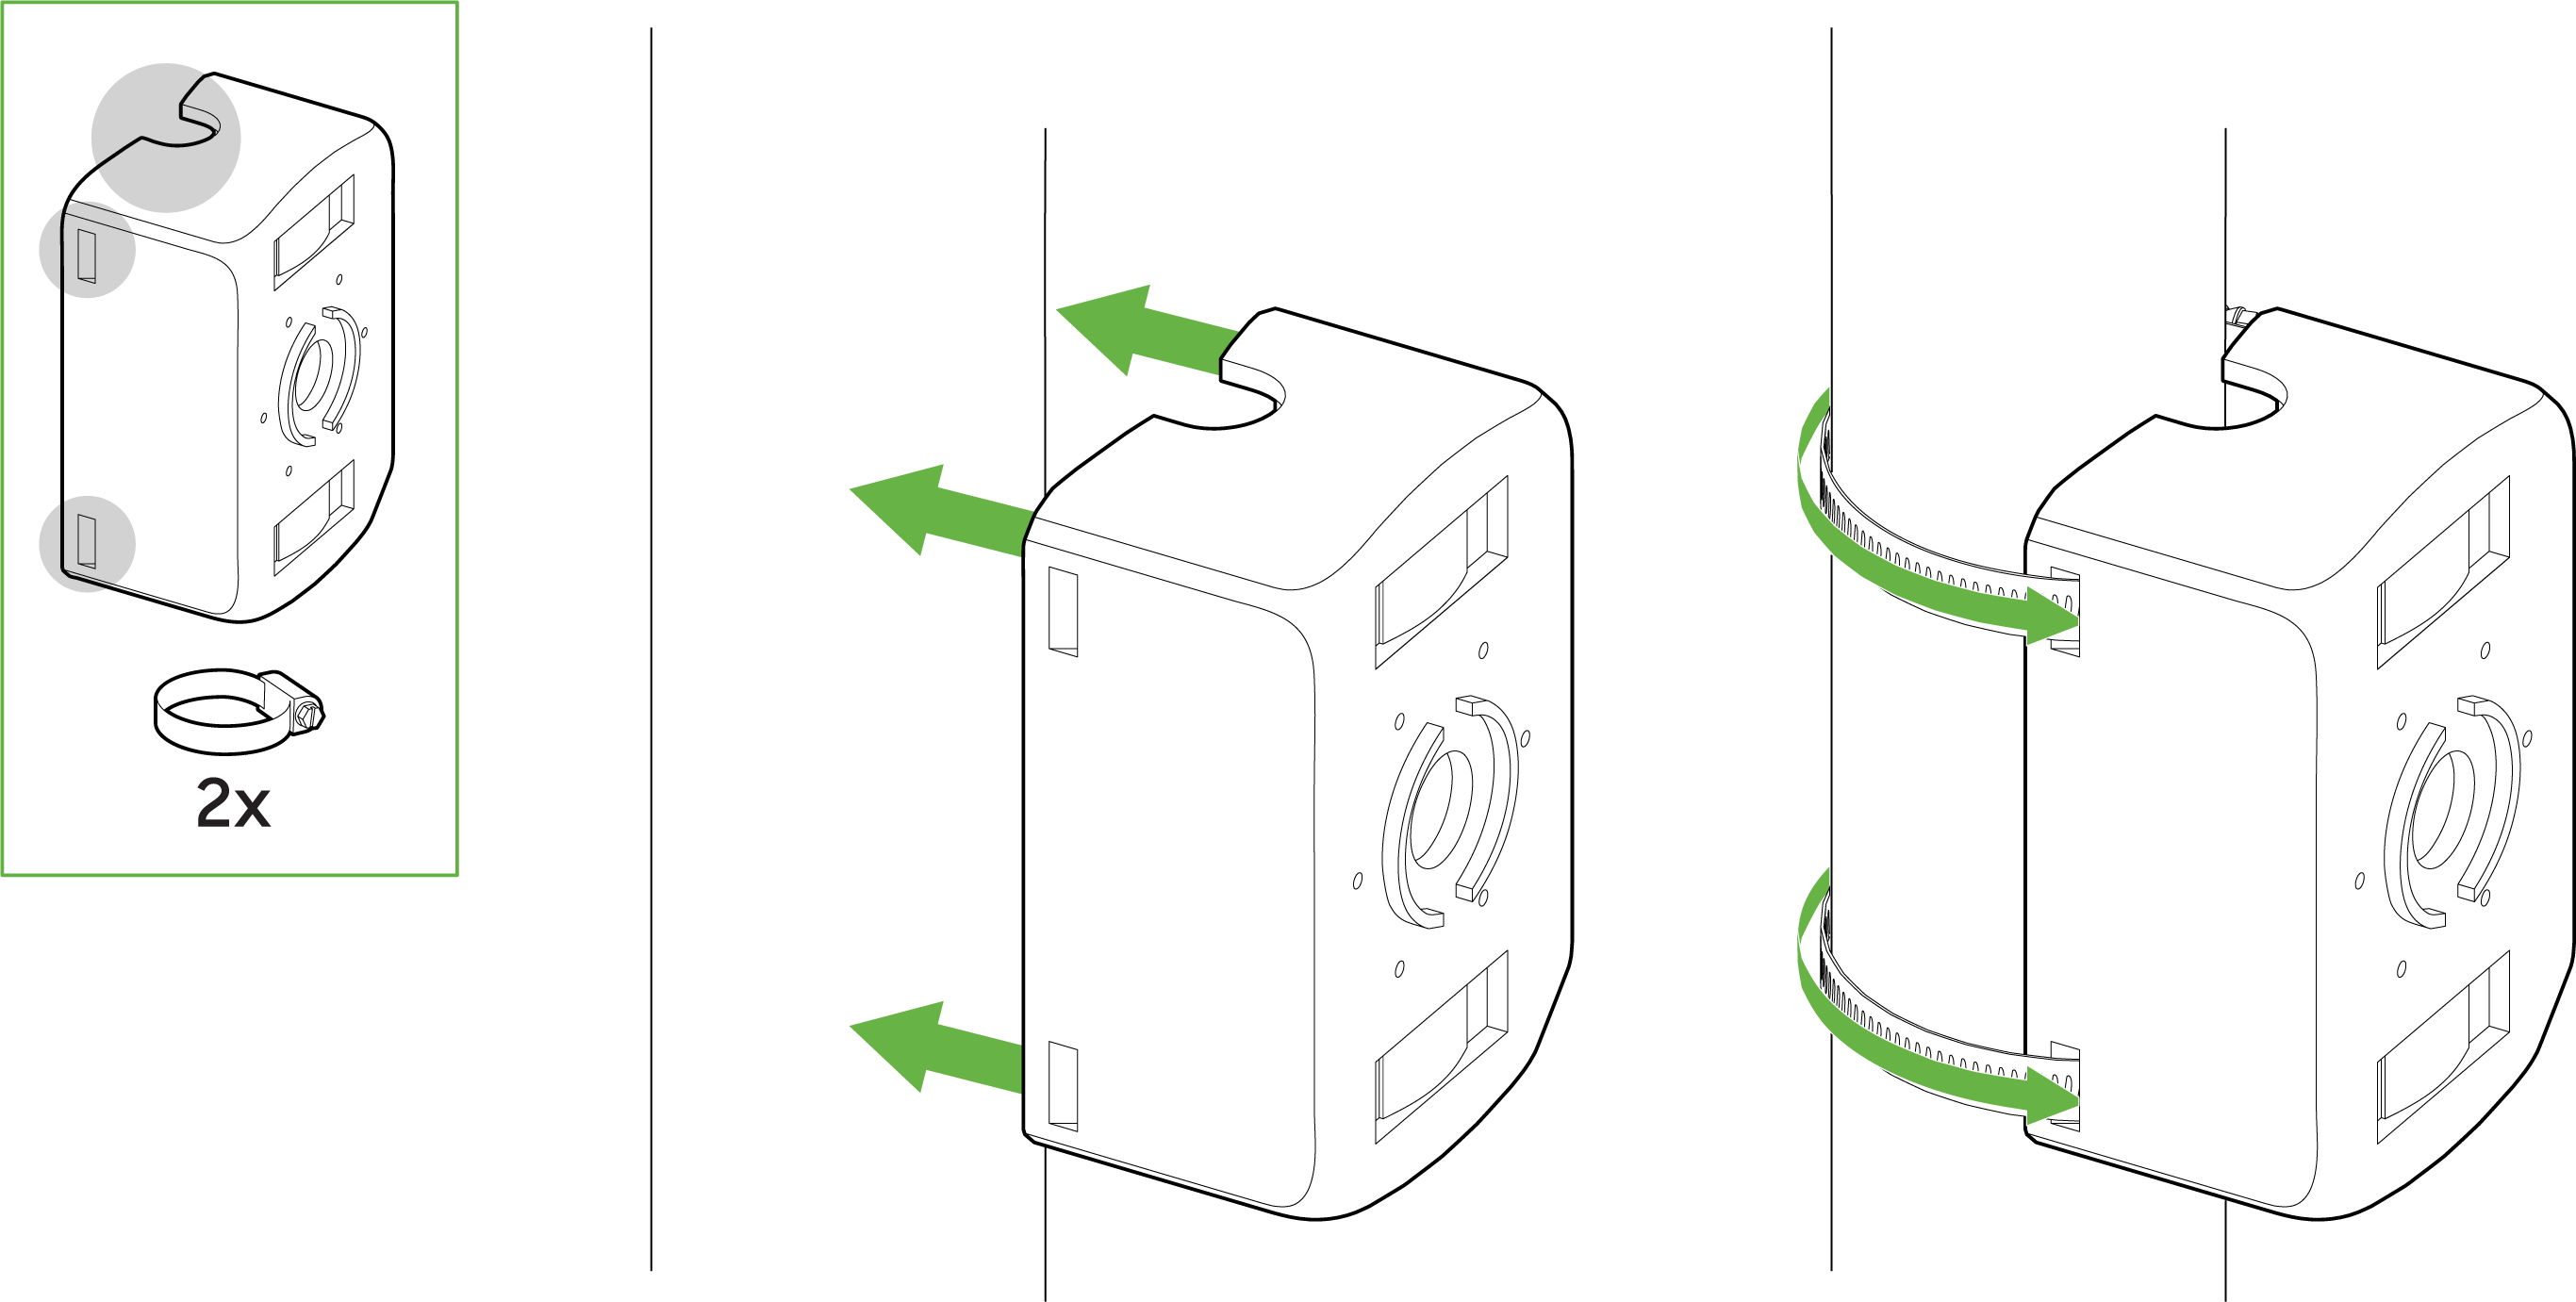
MV52 (Pole Mount)
The MA-MNT-MV-21 can be mounted on a pole (>40 mm currently supported) as below:
- Attach the pole mount to hug the pole
- Drag a metal cable tie around the top/bottom of this mount
Considering the weight of this camera, it is recommended to use safety cable wires.