MV Object Detection
Overview
Meraki MV cameras, starting from the second generation, can process advanced analytics directly on the camera and transmit metadata to the Meraki cloud. This revolutionary architecture simplifies and lowers the cost of gathering detailed analytics in any environment.
MV cameras can transmit motion metadata to the Meraki cloud when Motion Search is enabled. This tool helps retrieve video and generate Motion Heatmaps, which are part of MV analytics.
Smart cameras on this platform can perform machine learning-based analytics, including object detection for people and vehicles. This feature helps track how objects move through and interact with physical spaces.
This article will guide you through the various features available for interacting with MV object detection, exploring each one in detail.
Supported detection features per camera model
| MV model (includes variants) | People Detection | Vehicle Detection | Attribute Search |
|---|---|---|---|
| MV2, MV12, MV22, MV32, MV33, MV93 | Supported | - | - |
| MV52, MV72, MV84 | Supported | Supported | - |
| MV13, MV23 | Supported | - | Supported |
| MV53, MV63, MV73 | Supported | Supported | Supported |
Object detection
This feature lets you focus your search on detecting people and vehicles, such as bikes, cars, and trucks, within the camera's view.

You can view MV object detection by accessing historical video and selecting "Show Objects" on a single camera's video page. Detected people are marked with yellow boxes, while vehicles are marked with purple boxes.

MV Analytics tab
Object detection and motion metadata are aggregated for you to analyze in the Meraki Dashboard, under the Analytics tab for each camera. Here, Meraki uses object detection analytics to help create histograms of objects detected by object type - person or vehicle. For example, in object detection, you will be able to choose person or vehicle and analyze data to provide information about how many people/vehicles entered or were present at a specific time. The dashboard can show you this data at a minute, hourly, or daily scale, which allows you to identify time-based trends and anomalies in the usage of your space. This tab’s information also serves as a tool to quickly find relevant video clips with histograms and time links. Motion heatmaps are provided at the bottom of the Analytics page to correlate the people detection data with motion data.

Object detection features
-
Time Resolution, Date, Start Hour and End Hour
-
Configure the scale for the slices of your histogram and the time range for your analytics.
-
- Most Utilized Hour
- This value represents the hour that had the highest average occupancy.
- Estimated Peak Occupancy
-
This value takes the maximum of the estimated occupancy of the scene across the selected time range. The estimated occupancy of a scene is calculated every minute and is an average of the number of objects detected for every second of the minute.
-
Example 1: 10 people are in a camera's field of view (FoV) for 5 seconds, followed by 0 people for the remaining 55 seconds of that minute
-
The estimated occupancy for that minute would be rounded to 1 person.
-
-
Example 2: 10 people are in a camera's FoV for 55 seconds, followed by 0 people for the remaining 5 seconds of that minute
-
The estimated occupancy for that minute would be rounded to 9 people
-
-
-
-
Entrances (bar chart/histogram)
-
Presents the total number of entrances per hour/day for the hour/date range specified. This can be up to 24 hrs, 7 days or 1 hour - depending on the selected time resolution.
-
Example: A single person may be detected as multiple entrances within the period that they are within the frame.
-
If a person walks into a camera’s FoV, walks across the frame, and then walks out unobstructed by other people or objects, the person will likely be counted as one entrance.
-
If a person walks into a camera's FoV with a column in the middle, stands behind a column for a short while, and then reappears from behind the column before exiting the frame, this person will likely be counted as two entrances to this total.
-
If a person bends down and is for a moment not detected as a person due to his/her crouched shape, and then stands up again, this person will likely be counted as two entrances as well.
-
-
-
-
Total Entrances
-
This value represents the number of entrances of objects detected within the scene.
-
MV Sense API
The final way to interact with MV object detection analytics is to use the API endpoints provided with MV Sense to build intelligent business solutions. Read the MV Sense article for more information.
Example use cases
Here are examples of how you can use object detection analytics.
Example 1: Find anomalies
If your histogram shows people detected at an unexpected time, like 4 a.m. on a weekday, you can click on that hour to see what happened. For example, someone might be grabbing coffee before an early meeting.
Example 2: Find when space was most occupied
Click on the number under "Peak Occupancy" to view the video clip showing the highest occupancy and gain more insights.
Refer to Technical FAQs for more information.
Deployment guidelines for MV object detection
This document details guidelines for the installation of cameras with onboard object detection in retail and security use cases.
Cameras should be installed wherever there is a need to gather enhanced consumer behavior insights and information about activity that has occurred or is occurring at a given location.
Common deployment locations
People detection
MV people detection is commonly used in areas with high foot traffic and will work well in areas with little obstruction. Some examples include:
-
Entrances, exits leading inside and outside of a building
-
Staircases and other walkway intersections
-
Areas where people stand (e.g. clothing racks, promotional stands)
-
Queues (e.g. checkout lines)
Vehicle detection
MV vehicle detection can be most useful in some of the following scenarios
-
Vehicle entrances, exits leading inside and outside of a building/warehouse
-
Parking lots/garages
-
Drive-in restaurants
Common deployment challenges
When deploying your MV for object detection, consider these following challenges in detecting people and vehicles.
-
Install the camera away from areas where glare from objects (like glass) can occur during the day. This helps prevent backlighting and lens flare.
-
Avoid aiming the camera at highly reflective surfaces (like mirrors).
People detection
-
Avoid pointing the camera out towards a street or walkway outside of the location of interest. This deployment might incorrectly capture people walking outside the store or into another store.
-
Avoid angling the camera such that many people occlude/obscure others. For example, a camera will have more trouble if it is looking at a queue straight on as opposed to from the side.
- When placing the camera by entrances or exits, try to place the camera indoors where consistent, even lighting can be better controlled.
-
If a camera is capturing an area where multiple walkways intersect (such as the end of an aisle), the camera should capture as much of the whole intersection as possible to maximize the duration of time that a single person is seen on the screen.
-
Avoid deploying the camera in a scenario with objects that appear human-like (e.g. displays showing video of people walking, posters depicting people, mannequins).
Vehicle detection
-
For outdoor cameras, bright light such as sunlight, spotlights, fluorescent lighting, and street light may cause the image to be whitewashed or very dark.
-
MV72s are designed to operate between -40°C - 50°C (-40°F - 122°F) but the image quality may be affected depending on various climatic conditions like fog or smog.
- Moisture in the surrounding region can also reflect IR light into the lens.
Installation guidelines
-
Before installing any cameras, identify the best deployment locations given the guidelines above to ensure the camera is viewing the best scene for object detection.
-
Now that you have optimized your deployment locations for object detection, read this chapter of Designing Meraki MV Security Camera Solutions for how to conduct a proper site survey. The site survey will help determine the best locations to install your cameras.
-
Before permanent installation, it is highly recommended to temporarily affix the camera or camera-mount assembly, turn on the camera, and view the video stream for the best results. Adjust according to the guidelines below.
-
Ensure your line of sight distance to expected foot traffic is at least 5 feet.
-
For the MV12 fixed lens, ensure that this line of sight also does not exceed 40 feet. The maximum distance for varifocal lenses will be different and should first be tested based on the optical zoom applied.
-
-
Ensure that the camera is mounted at a height of at least 6 feet above the ground. Performance typically improves when mounting at or above 10 feet.
-
Ensure that the camera is angled such that the desired scene is free of or mitigates obstructions.
-
Ensure that the camera’s optical zoom (if applicable), sensor crop and focus are set optimally. Follow these articles on Adjusting the Field of View of MV22 and MV72 cameras and Focusing MV22/72 and MV21/71 Cameras
-
Double-check that you have proper lighting in the area and a high dynamic range (if needed) and night mode are set according to your needs.
-
-
Have someone walk around to verify that object detection is functioning correctly. If it is not, repeat step 3 until the desired results are achieved. Use the analytics debug mode and carefully review the output to identify any immediate issues.
-
Once satisfied with the performance of object detection, permanently install the cameras.
If the deployment is consistent with these deployment guidelines, the MV is expected to be able to detect objects accurately and provide detection results that can be used to make informed decisions. If deployed well, the MV analytics are much more reflective of the ground truth and should be used quantitatively over an extended period of time with a high enough volume of people and vehicles to observe trends and anomalies.
Model selection guidelines
Ensure the camera is properly deployed. Review and follow the deployment guidelines before switching the model type.
-
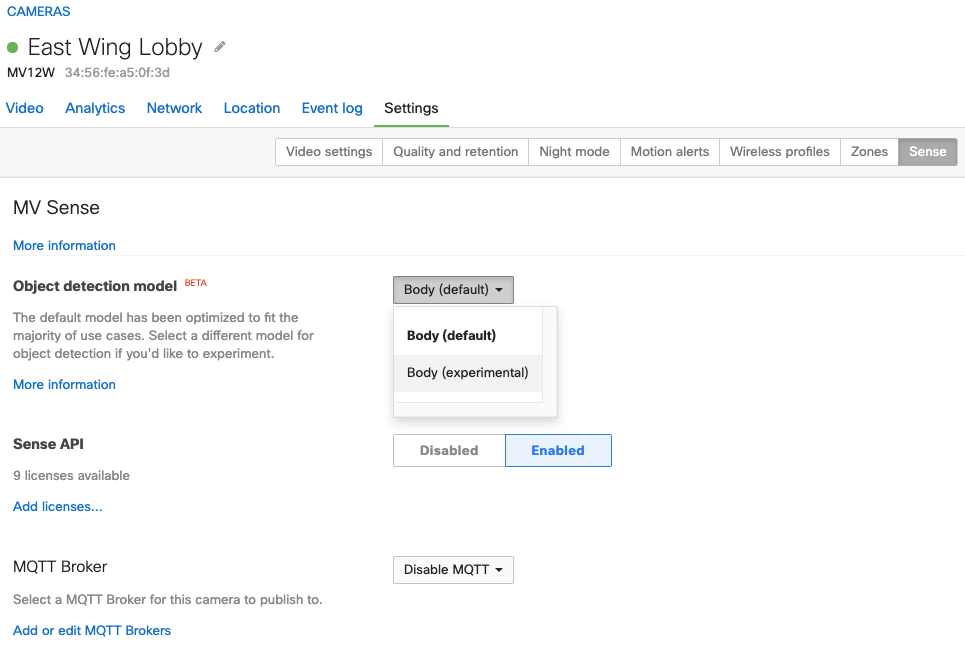
First, identify the analytics use case or application that the camera is expected to achieve. The default object detection model on each camera hardware is designed and optimized for most general use cases, such as detecting people or vehicles.
-
If your general use case is not being met with the current default object detection model, try switching to the experimental object detection model.
-
Navigate to a camera's Settings > MV Sense tab, select from the drop-down which model version you wish to run, and save your configuration.
-
Have someone walk around and observe that object detection is working as expected. Make use of the analytics debug mode and pay close attention to the output to determine if you are seeing any immediate problems stand out.
-
Focus on object IDs over a sufficient sample period, typically 1-2 hours during the busiest scene activity. This approach helps evaluate the model's performance under the most challenging conditions for the camera's environment.
-
As mentioned previously, objects that are occluded or leave and re-enter the scene will likely be counted as separate objects and increment the unique object ID. Reposition your camera if possible to mitigate this impact.
-