
MX84 Datasheet
By Jonathan Roszkowski
Note - The MX18.1 firmware release will be the maximum running build for MX64, MX64W, MX65, MX65W, MX84, MX100, and vMX100 platforms. These platforms will not run MX 18.2 and above firmware builds. We recommend you stay up to date with all the latest features with the next-generation hardware platforms. Please consult your sales representative for more information on the latest hardware and software releases. Thank you
Overview
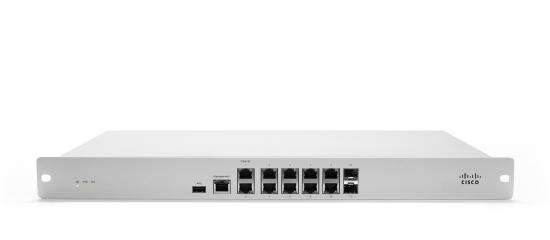
The Meraki MX84 is an enterprise security appliance designed for distributed deployments that require remote administration across Medium branch environments. It is ideal for network administrators who demand both ease of deployment and a state-of-the-art feature set. The Meraki Dashboard allows for simple and easy deployment of the MX84 with minimal pre-configuration in almost any location. Providing 2 dedicated WAN uplinks, 8 GbE RJ45 ports, and 2 SFP ports, the MX84 is ready for deployment in a variety of enterprise environments.
Features
|
|
Hardware Features
-
Dual Dedicated WAN uplinks
-
A built-in USB port for failover cellular support
-
2 SFP ports
Configuration
The basic initial configuration of the MX84 is just as simple as any other MX models. The links below provide additional information and instructions relating to each step in getting the device setup and configured for the first time.
- Claim the device to an Organization on the Meraki Dashboard
- If a Dashboard Organization does not yet exist, Create one
- Add the device to a Dashboard Network
- If a Network does not yet exist, Create one first
- Physically connect the device to the local network
- Ensure the wireless antennas are connected correctly (Wireless models only)
- Power on the device and let it check in to the Dashboard
- If necessary, configure a Static IP on the WAN interface through the Local Status Page to allow it to check in.
- Finish configuring the device from the Meraki Dashboard
Context and Comparisons
| Description | MX65 | MX84 |
|---|---|---|
| Dual WAN Uplinks | Yes | Yes |
| Backup Cellular Uplink | Via 3rd Party USB Modem | Via 3rd Party USB Modem |
| Stateful Firewall Throughput | 250 Mbps | 500 Mbps |
| Maximum VPN Throughput | 100 Mbps | 250 Mbps |
| Advanced Security Throughput | 200 Mbps | 320 Mbps |
| Maximum Concurrent VPN Tunnels | 50 | 100 |
| PoE Capabilities | Yes, 2x GbE RJ45 LAN Ports | - |
| Recommended Device Count | 50 | 200 |
Technical Breakdown
Physical Interfaces
| WAN interface | 2x Dedicated GbE RJ45 |
| Cellular interface | 1x Cellular uplink via 3rd party USB Modem |
| LAN Interface | 8x Dedicated GbE RJ45 ports, 2x Dedicated GbE SFP ports |
| Management Interface | 1x Dedicated management port. |
Throughput and Capabilities
| Description | MX84 |
| Recommended Device Count | 200 |
| Max Stateful Firewall Throughput in NAT mode | 500 Mbps |
| Max VPN Throughput | 250 Mbps |
|
Max Concurrent VPN Tunnels (Site-to-Site or Client VPN) |
100 |
Physical
| Description | MX84 |
| Mount Type | 1U Rack |
|
Dimensions (h x d x w) |
1.75in x 10in x 19in (44mm x 254mm x 483mm) |
| Weight | 9 lb (4.1kg) |
| Power Supply | Internal 100-220V |
| Power Load (idle/max) | 26W / 32W |
| Operating Temperature |
32°F - 104 °F 0°C - 40°C |
| Humidity | 5% to 95% |
Accessories
| Accessory | Description |
| MA-SFP-1GB-SX | Cisco Meraki 1 GbE SFP SX Fiber Module (1000BASE-SX, range: 550m) |
| MA-SFP-1GB-TX | Cisco Meraki 1 GbE RJ45 Copper Module (1000BASE-T for twisted pair) |
| MA-PWR-CORD-US | 1x AC Power Cable, US plug |
| MA-PWR-CORD-EU | 1x AC Power Cable, EU plug |
| MA-PWR-CORD-UK | 1x AC Power Cable, UK plug |
| MA-PWR-CORD-AU | 1x AC Power Cable, AU plug |
Warranty
Common Event Log Messages
There are currently no MX84 specific Event Log entries, for more general information about navigating the Event Log and the types of Events that could be expected please check out our Event Log documentation.