

Cisco Access Manager Deployment Guide
You may access this document using the shortcut URL: cs.co/am-deploy
Overview
This is a step-by-step configuration and deployment guide for both proof-of-concept (PoC) and production deployments of supported network access control scenarios with Cisco Access Manager.

Components
Implementing network access control (NAC) is a solution - not a product - that combines many different products with different capabilities. Access Manager your AAA (authentication, authorization, and accounting) service in the Cisco Meraki Dashboard that implements network access security policy using the RADIUS protocol for users and devices with these components.

| What | Why |
|---|---|
| Cisco Meraki Organization | use your existing organization or a new one |
| Access Manager licenses | required to enable CAM functionality within your chosen organization - get Trial Licenses |
| Devices | at least one switch or access point (AP) is required to test access control scenarios |
| Clients/Endpoints | users, computers, and I/OT devices accessing your network and requiring authentication against access rules |
| Certificate Authority (CA) | optional server or service to generate user and/or machine certificates |
| Identity Provider (IdP) | optional provider of authoritative user credentials and group context, such as Microsoft Entra ID |
| Unified Endpoint Manager (UEM) | highly recommended to configure workstations and mobile devices with EAP protocols and certificates |
Trial Licensing
An Access Manager license is required to enable Access Manager in your Meraki dashboard organization. Customers may request a free, 90-day trial license to conduct a proof of concept.
Proof of Concepts (POCs)
A proof of concept (POC) with Cisco Access Manager (CAM) is very easy to conduct using your existing Meraki organization and starting with only a single wireless SSID or switch port. You do not need to deploy zero trust access on every port and SSID in every location to prove that Access Manager can solve your segmentation problems. Prove on a small scale that it works for your biggest problems then incrementally expand it to cover more locations, devices, scenarios, security methods, and endpoint types. Configuring each scenario can be done in minutes to hours, based on the number of dependencies to coordinate.
Scope
This guide will show you how to validate Cisco Access Manager's ability to deliver consistent access control and segmentation using:
- Campus and Branch environments with Wired and Wireless access methods
- Cisco Meraki and Catalyst cloud-configured network devices
-
- Authorization with one or more segmentation options:
- VLAN ID/Name : assign a VLAN name or number (dynamic VLAN assignment)
- Voice Domain : send the Cisco Vendor-Specific Attribute to use the Voice VLAN Domain
- Adaptive Policy : classify this session's traffic with this Adaptive Policy (TrustSec) Security Group Tag (SGT)
- Identity PSK : require a specific pre-shared key (PSK) value for this endpoint to associate wirelessly
- Group Policy : apply the named Meraki Network Group Policy to this session
- Access Rules based on Authentication methods for consistent enforcement of the permissions into your network:
- MAC Authentication Bypass (MAB) for Wired I/OT Endpoints including profiling for automatic classification
- Guest Wireless with Optional Acceptable Usage Policy (AUP)
- iPSK (Identity Pre-shared Key) for Wireless I/OT Endpoints
- Machine Certificate Authentication (EAP-TLS)
- User Certificate Authentication Auth (EAP-TLS) with optional Entra ID Lookup
- Username/Password Authentication (EAP-TTLS+PAP) with Entra ID Lookup
- Operations : manage and maintain the segmentation and security of your users and devices
- License Usage : verification and estimation in preparation of your production deployment
Depth vs Breadth
When deploying access control across your entire network, there are typically two methodologies:
- depth-first : implement all authentication and authorization scenarios in a single device or location before moving to the next one
- breadth-first : implement a single scenario on every device in every location consistently before tackling the next one
Realistically, every deployment is somewhere between these two. We advise against the "Big Bang" methodology - deploying full access control (discovery, enforcement, remediation) across the entire enterprise simultaneously. There are many exceptional scenarios you will discover and snowflake client configuration drifts that you will encounter so try not to experience them all on the same day. Even when you have secured every port and SSID, there will always be new network device hardware or branch offices or new endpoint types requiring a unique authorization. This is the nature of network security.
Timeline
The overall time to complete a proof of concept or production deployment can range from a few hours to a few weeks depending the number of scenarios and the scale of your networks and devices. The configurations of scenarios within Access Manager are relatively fast and simple to implement. However, your ability to coordinate the required process and policy changes with your peers across your inventory of devices and clients outside of Access Manager will be the limiting factor. You cannot go from completely open network access to fully secured and segmented overnight.
Objectives
Before you begin configuration and testing, you will want to make a list of the network access scenarios you want Access Manager to enforce with policy. Assess which scenarios are representative of your biggest access control risks and prioritize those.
Below are some example objectives by scenario that you should copy, paste, and customize for your PoC or deployment goals. Some scenarios like MAB and Wireless Guest are much easier to test than others due to fewer configuration dependencies on the clients. It is recommended to start with those to make initial progress, especially if you are waiting for user or machine certificates to test EAP-TLS or credentials to integrate an Entra ID identity provider.
| Scenario | Where | Authentication | Authorization | ☑ Done | Notes |
|---|---|---|---|---|---|
| Wired IOT Scenarios | |||||
| Printers | Wired | MAB | VLAN: PRINTERS | ||
| Cameras | Wired | MAB | VLAN: 21 | ||
| IP Phones | Wired | MAB | VLAN: VOICE, Voice Domain | ||
| IP Phones | Wired | EAP-TLS | VLAN: VOICE, Voice Domain | ||
| Wireless Guest Scenarios | |||||
| Guest+computer | SSID:Guest | MAB | SGT: Guests, Group Policy: Guests | ||
| Guest+phone | SSID:Guest | MAB | SGT: Guests, Group Policy: Guests | ||
| Guest+tablet | SSID:Guest | MAB | SGT: Guests, Group Policy: Guests | ||
| Wireless IOT/iPSK Scenarios | |||||
| Scanners | SSID:IOT | MAB | SGT: Scanners, iPSK: Client | ||
| Machine Certificate Scenarios | |||||
| Workstation+dongle | Wired | EAP-TLS | SGT: Workstations | ||
| Workstation+docked | Wired | EAP-TLS | SGT: Workstations | ||
| Workstation+wireless | SSID:Corp | EAP-TLS | SGT: Workstations | ||
| Employee Certificate Scenarios | |||||
| Employee+dongle | Wired | EAP-TLS | SGT: Employees | ||
| Employee+docked | Wired | EAP-TLS | SGT: Employees | ||
| Employee+wireless | SSID:Corp | EAP-TLS | SGT: Employees | ||
| Employee Entra ID Scenarios | |||||
| Employee+docked | Wired | EAP-TTLS | SGT: Employees | ||
| Employee+wireless | SSID:Corp | EAP-TTLS | SGT: Employees |
Access Rules
The access control policy in Access Manager works by evaluating the access rule conditions against the available attributes from the RADIUS authentication request, network device, client, and authentication methods. These rules in Access Manager > Configuration > Access Rules are :
- evaluated from top-to-bottom
- with a first-match-wins priority
- matched only if all conditions (logical AND) in the "What's Matched" section are satisfied (true)
- if no access rules are matched, then the final, catch-all, default rule authorization is applied
To optimize the performance of your access rules, both the rule order and condition order are extremely important to increase efficiency in terms of latency (average response time) and capacity (more requests in the same time). Recommendations for your rules:
- Rule ordering:
- Frequency: put the most frequent scenario near the top to minimize the average number of rule checks
- Specificity: more specific scenario rules should be above similar, more general scenarios rules
- Exceptions: put exceptions, blocklists, allowlists above rules you don't want them to match
- Condition ordering :
- Static attributes: use static session attribute sources in your conditions first: Network Access, RADIUS, and Meraki
- Dynamic attributes : requiring a lookup or query to resolve and should be the last conditions: Entra ID attributes, Client Group, Certificate attributes
- Attribute operations : boolean and number comparisons are faster (respectfully) than string comparisons
Authorization
When creating an Access Rule, after defining the matching conditions you may define how you would like to authorize the user or client to enforce the principle of least privilege in your network.
When creating or editing an Acces Rule, under the Authorization section, click on the Access permission dropdown to choose your desired option(s):
- Deny Access : Access Manager returns a RADIUS Access-Reject so there is no session started for this request and it should not receive an IP address
- Allow Access : Access Manager returns a RADIUS Access-Accept and the network permissions are whatever the network device has configured on the port or SSID
- Allow restricted access : Access Manager returns a RADIUS Access-Accept and sends whatever combination of network segmentation options you choose below to override the network device's default settings :
- VLAN ID/name: dynamically assign a VLAN name or number - the VLAN identity must be defined in the network where the endpoint is authenticating
- Voice domain: enable this option to put the client into the local voice VLAN
- Adaptive policy: assign an Adaptive Policy Group (TrustSec SGT). Refer to the Adaptive Policy documentation for further details.
- Identity PSK: require the assigned PSK - based on the 3 options below - to match the endpoint's PSK to complete the 4-way handshake for authentication :
- Client iPSK only: use the client's iPSK passphrase configured in the Clients table to enforce per-MAC iPSK
- Client iPSK with fallback: use the client's iPSK passphrase configured in the Clients table or if it is undefined, fall back to the passphrase set below. Use this when transitioning a group of clients sharing a single PSK to the more secure per-MAC Client iPSK only policy.
- Override client iPSK: all clients matching this rule must use the same specified passphrase, regardless of any per-client iPSK setting. Use this for a client groups that share a PSK. This was the previous Access Manager setting before the per-MAC iPSK option.
- Group policy: Assigns a Meraki Group Policy by name. Refer to the Group policy documentation for details.
Default Rule Authorization
Access Rules are evaluated top-down like any firewall policy by trying to match the device, session, client and authentication attributes against conditions. If no rules match, there is a final, catch-all, default rule and authorization. Before implementing any security policies in Access Manager, it's good to choose your default Access Rule.
- Navigate to Access Manager > Policies > Access Rules and review the Default Rule's Authorization value which should be Deny Access for a secure default setting.
- Select the Default Rule name to edit it's Authorization access permissions and choose your desired default:
- Deny Access : the secure default for a closed network. All endpoints must match an explicit Access Rule so nothing may sneak in. Access Manager returns a RADIUS Access-Reject so there is no session started for this request.
- Allow Access : the permissive default for an open network which is very useful for getting initial client visibility in production networks to prevent disrupting their network access when creating initial Access Rules. Access Manager returns a RADIUS Access-Accept and settings are whatever the network device has configured on the port.
- Allow restricted access : customize it to allow some minimal access that you define (Guest or Quarantine) Access Manager to return with a RADIUS Access-Accept to override the network device's settings for the session. Which options you choose and why depends on your security requirements.
If an authentication request fails (Status = Failure) then it cannot complete access rule evaluation and the RADIUS response will always be Access-Reject, regardless of how you configure the Default Rule.
Monitored vs Enforced
There are two approaches to deploying any kind of network access control for the first time:
- Monitored : allow all access by default in order to first gain visibility into all of the endpoints connecting to your network and assess how to match and authorize them for proper segmentation. This allows you to begin an incremental process of identifying and securing different populations of endpoints and users without disruption until you can notify them about any impending enforcement deadlines.
- Enforced : deny all access by default and only allow things that match your explicitly configured rules so that nothing sneaks into your network without the expected authentication method. This is often done in highly secure government and financial networks where security is the top priority.
If you will be testing access manager in a lab environment or on a very limited set of switch ports and SSIDs, you should use the secure default of Deny Access for your Default Rule. If you are trying to deploy on a live production network for the first time you should consider using the Allow Access default since you probably don't have any existing access control policies or segmentation in place anyway.
Adaptive Policy
Adaptive Policy is the Meraki Dashboard name for Cisco TrustSec with security group tags (SGTs) and security group access control lists (SGACLs). While Adaptive Policy is not required for enforcement with Access Manager, we believe it provides superior microsegmentation over VLANs and without the complexity of traditional L3/L4 access control lists. Adaptive Policy capabilities are included with Access Manager but does require Meraki Advanced device licenses.
Even if you do not use Adaptive Policy to enforce segmentation initially, you are encouraged to configure it to begin thinking in terms of group-based policies. Adaptive Policy is not enforced until you enable it on specific networks which means you may also deploy it incrementally within specific networks when you are ready.
- Navigate to Access Manager > Policies > Adaptive Policy > Groups
- + Add Group for each of these tag names or whatever you think will apply in your network :
- Unknown
- Infrastructure
- NetServices
- Quarantined
- Workstations
- IOT
- Employees
- Guests
- Cameras
- VOIP
- Navigate to Access Manager > Policies > Adaptive Policy > Custom ACLs
- Select + Add custom ACL and create this example security group ACL :
- Name: BlockMalwareExample
- Description: Block typical malware attack vectors or services that should not be running on desktop computers
- IP Version: Any
- Rules: complete the table below
| # | Policy | Protocol | Src port | Dst port | Log | TCP Established |
|---|---|---|---|---|---|---|
| 1 | Deny | TCP | any | 21 | Enabled | Disabled |
| 2 | Deny | TCP | any | 22 | Enabled | Disabled |
| 3 | Deny | UDP | any | 53 | Enabled | Disabled |
| 4 | Deny | TCP | any | 80 | Enabled | Disabled |
| 5 | Deny | TCP | any | 443 | Enabled | Disabled |
| 6 | Deny | TCP | any | 445 | Enabled | Disabled |
| 7 | Deny | TCP | any | 3389 | Enabled | Disabled |
| 8 | Allow | any | any | any | Enabled | Disabled |
-
Go to Access Manager > Policies > Adaptive Policy > Policies to view the matrix of source and destination tags.
- The default value in each cell is Allow All.
- The cells where the source and destination groups intersect is where you may Allow, Deny or apply a Custom ACL on the traffic between them.
-
When you are ready to enforce the group policies, go to Access Manager > Policies > Adaptive Policy > Networks
- Select the network(s) to you want to apply the group policies
- Select Enable to apply them and Disable to remove them
- Wait a few minutes while the Meraki Dashboard pushes the changes to network devices
Session Log
The Session Log page is where you may see all the details of each authentication request received and processed by Access Manager. There are several possible states that will be encountered for each log entry:
| Status | Reason |
|---|---|
| Success | Matched an Access Rule with authorization Allow or Allow Restricted Access (RADIUS Access-Accept) |
| Rejected | Matched an Access Rule with authorization Deny (RADIUS Access-Reject)
|
| Failed | Cannot match any Access Rule due to a problem with authentication due to a client or server problem:
|
| In Progress | This is a transient state that you may see while the authentication request is being processed. |
Below are some example session logs:
| Time | Status | Details | Username | Endpoint MAC Address | Classification Type | Authentication Protocol | Authorization Results | SSID |
|---|---|---|---|---|---|---|---|---|
| Oct 01 22:21:58 | ✅ Success | TTLS_Entra_Employees | cam.wong@pseudoco.com | d6:01:73:34:93:99 | Tablet | EAP-TTLS | PERMIT | pseudoco |
| Oct 01 22:21:43 | ✅ Success | Cameras | 9c8ecd2d2c17 | 9c:8e:cd:2d:2c:17 | IP Camera | MAB | PERMIT | |
| Oct 01 22:20:57 | ✅ Success | TLS_Entra_Employees | kit.patel@pseudoco.com | ca:7d:07:87:2f:8b | Mobile | EAP-TLS | PERMIT | pseudoco |
| Oct 01 22:20:49 | 🛑 Failed | Supplicant stopped responding. | ca:7d:07:87:2f:8b | - | EAP | pseudoco | ||
| Oct 01 22:20:47 | ✅ Success | IOT_iPSK_Client | b43a458a1d9c | b4:3a:45:8a:1d:9c | Smart Device | MAB | PERMIT | pseudoco-ipsk |
| Oct 01 22:20:34 | 🛑 Failed | Session failed due to a timeout. | ca:7d:07:87:2f:8b | - | EAP | pseudoco | ||
| Oct 01 22:17:06 | ⚠ Rejected | Default rule | 9c8ecd37da13 | 9c:8e:cd:37:da:13 | - | MAB | DENY | |
| Oct 01 22:08:30 | ✅ Success | Guests | fecb0a3f323f | fe:cb:0a:3f:32:3f | Mobile | MAB | PERMIT | pseudoco-guest |
| Oct 01 21:47:23 | ✅ Success | TLS_APs | scep.114665195004320.meraki.direct | 68:49:92:37:61:a0 | Access Point | EAP-TLS | PERMIT |
Selecting the Status value of an individual row will open a Network Access Details slideout where you may review all of the authentication and authorization attributes sent and returned between the network device and Access Manager. This is extremely helpful when troubleshooting or trying to customize an Access Rule for a particular scenario with a user or endpoint.
Clients
Access Manager allows you to track every Client that has been provisioned (manually configured imported) and discovered (dynamically authenticated via RADIUS request). You may group clients into Client Groups for easier control and segmentation in Access Rules.
By default, Access Manager will show no clients in the Clients page - even if you have been using your Meraki organization for years with thousands of clients. Access Manager maintains a completely separate list of clients from what you see in Network-wide > Monitor > Clients because not all the switches and access points (APs) may have enabled access control security via Access Manager.
- Navigate to Access Manager > Configure > Clients
- ⛭ in the Clients table and enable all columns if they are not already visible :
- Type
- Manufacturer
- Model
- OS
- iPSK
- You may now review all attributes of every client seen by Access Manager
- Select a client MAC address to change any of it's editable attributes in a slideout panel
If you need to create or edit many clients and/or groups it is highly recommended to use CSV imports or REST APIs for more than 10,000 clients to avoid entering MAC addresses and attributes manually.
Client Management
There are several different options to manage clients in Access Manager depending on the scale and requirements.
There is no bulk Client Export (CSV, etc.) capability currently from the UI - you must use the /nac/clients REST API. See Client Export.
Client Groups
- Navigate to Access Manager > Configure > Clients
- Select the Client Groups tab at the top
- Select Add Group and enter
- Group Name: MyGroup (Examples: APs, Blocked, Exceptions, Cameras, Printers, Scanners, etc.)
- Description (optional): Group Description
- Optionally add clients to this group by selecting Manage Clients and choose:
- Manage existing clients
- Add new client
- Save
- Repeat this process for as many groups as you need
- See MAB Access Rules to create a policy
Importing Network-wide Clients
Access Manager maintains a completely separate list list of clients from what you see in Network-wide > Monitor > Clients because not all the switches and access points (APs) may have access controlled by it's Access Rules. If you want to begin authenticating and segmenting these existing clients with Access Rules, you should add them using the network-wide client CSV export or REST APIs.
If you have more than a few networks, you will want to consider automating the network-wide client export. Look at the github repository github.com/1homas/cam for helpful automation scripts including cam-network-clients.py that does this exactly.
-
Navigate to Network-wide > Monitor > Clients
-
Select Download v and choose CSV
-
Edit the downloaded CSV by reordering and editing the following columns to match the required CSV import template for Access Manager:
MAC address: move to the first columnEndpoint device group: create/insert this new column and optionally assign;-delimited group namesDescription: move to the third columnIPSK: (optional) add as the fourth column if you want to add/update any iPSK valuesAny additional CSV columns will be ignored by Access Manager on CSV import
-
Save the updated CSV
-
Repeat these steps for each network in your organization
-
See Clients CSV Import section for how to import into Access Manager
Clients CSV Import
If you already have an inventory of your clients by MAC address, then using comma-separated values (CSV) imports is probably the fastest way to add, group, and use them in Access Manager. Additionally, any new Endpoint Device groups will be automatically created for you and the specified clients added to them.
The CSV template is very simple to generate via scripts or to edit in Excel or any other program supporting CSVs:
| MAC address | Endpoint device group | Description | IPSK |
|---|---|---|---|
| 00:0a:95:9d:68:16 | Android; Kiosks | Kiosk | |
| 00:0a:95:a4:d2:05 | Android; Scanner | Scanner | MyScannerIPSKValue |
The MAC address must be formatted with : separators
The Endpoint device group may be a semi-colon (;) separated list of group names if you want the client to be a member of more than one group
- Navigate to Access Manager > Configure > Clients
- Select + Add Clients ⌵ and choose Upload CSV
- Select Download template and follow the column names and order when entering your clients
- Add your CSV into the upload area
- Select Upload
- Review your uploaded Clients and Client Groups
- See MAC Access Rules to create a policy
REST APIs
See the instructions for how to use the Access Manager REST APIs and see the the Cisco Meraki Dashboard APIs under Early API Access and Products > nac for the complete reference.
Client 802.1X Supplicant Configuration
Refer to the separate, dedicated documents for OS-specific instructions to configure your clients for Certificate-based authentication with Access Manager.
Manual configuration of EAP settings is fine for testing individual computers, but to do this consistently for all your endpoints at scale, you will need a unified endpoint manager (UEM) application, also known as a mobile device manager (MDM) platform. There are many available UEM/MDM products available including the Cisco Meraki Systems Manager. Configuration of these products is beyond the scope of this document.
Devices
Access Manager supports any cloud-configured access point and switch in the Meraki Dashboard. See the Access Manager > Devices section for details.
Switch Port Access Policies
Access Policies are defined per Network so you will need to replicate these settings in each network that you want to use them.
Authentication Mode Open and Pre-Authentication Access Control Lists (pre-auth ACLs) capabilities are switching features independent of Access Manager.
- Go to Switching > Configure > Access Policies
- + Add Policy to create a new one with the following best practice defaults :
- Name: AM_Hybrid_MultiAuth
- Authentication method: Access Manager
- Connection:
- Policy Type: Hybrid Authentication
- Host mode: Multi-Auth
- 802.1X control direction: Both
- Re-authentication interval: 28800 (8 hours, in seconds)
- Options
- ☑ Voice Auth
- □ Disable port bounce
- Configure all other settings at your discretion
- Save

- Assign Access Policies to Switch Ports
Assign Access Policies to Switch Ports
After assigning an access policy to ports with live endpoints, they will be immediately subject to Access Manager Access Rules for their network connectivity! Avoid rejecting live clients by applying an open default or only assign these to specific lab ports or switches at first.
- Go to Switching > Monitor > Switch Ports
- Select one or more switch ports that you want to assign your Access Policy using Access Manager
- Select Edit and use the following values:
- Port Status: Enabled
- Type: Access
- Access Policy: AM_Hybrid_MultiAuth (or whichever name you gave your policy with Access Manager)
- Update to save and wait for the network devices to update

- Connect one or more endpoints to the assigned ports to verify they are challenged for 802.1X or failover to MAB based on the policy configuration
- Review the authentication events in Access Manager > Monitor > Session Log
Wireless SSID Security
There are 3 different SSID Security options that Access Manager supports in the Meraki Dashboard :
- MAC-based access control : MAB for MAC filtering with open Hotspot or Acceptable Usage Policy (AUP). See Guest Wireless SSID for configuration details.
- Identity PSK with RADIUS : the client's association PSK must match the PSK returned by Access Manager. See iPSK Wireless SSID for configuration details.
- Enterprise: uses 802.1X and EAP (Extensible Authentication Protocol) to authenticate users and machines. See Enterprise Wireless SSID for configuration details.
You must configure an SSID in the Meraki Dashboard before you are able to use it in Access Manager Access Rules.
These three different security methods mean that you will different SSIDs to accommodate each of these access methods.
Enterprise Wireless Authentication
The Enterprise security option for wireless SSIDs means that it requires IEEE 802.1X with an EAP-based protocol to be configured on your clients to connect as discussed in Client 802.1X Supplicant Configuration.
- In the Cisco Meraki Dashboard, choose your network to configure
- Go to Wireless > Configure > Access Control
- Use the dropdown to choose the SSID name you want to use for Enterprise (802.1X) access
- SSID (name): my-org (or whatever you want)
- SSID status: Enabled
- Under Security
- Choose Enterprise with
- Choose Access Manager from the dropdown
- Enable Extended Local Authentication : optional
Enabling downloads the certificate chain to all Meraki MR access points configured with an SSID that uses Access Manager. This allows authentication from the MR's local RADIUS server if the Meraki Cloud becomes unreachable. In this case, rule evaluation won't work and the VLAN configured on the SSID will be applied after successful authentication.
You must also enable this feature on both this the SSID Access Control page and the Access Manager Certificate.
- Splash page must be set to None since IOT devices cannot perform any of the other Splash interactions
- Configure any other settings according to your network design
- Save your changes
- Within a few minutes your SSID should be broadcasting on your network
- Repeat this process for any other networks you want to secure with Access Manager
Scenarios
MAC Auth Bypass (MAB) for Wired IOT
MAC authentication bypass - or MAB - is a non-standard RADIUS authentication request type used to identify and authenticate a client by MAC address instead of using the 802.1X and EAP protocols. This is a very common scenario especially for headless IOT devices, not necessarily due lack of operating systems support of the 802.1X protocol, but because network security is simply not a priority for the team that owns and manages the clients.
There are two ways to identify and group clients for authorization and segmentation that rely on MAB authentication:
- Static Clients Groups : the administrator manually enters and assigns client MAC addresses to Client Groups which are then matched in Access Rules for authorization
- Dynamic Profiling Classifications : every client that attempts authentication with Access Manager is automatically profiled using DHCP, CDP, and LLDP protocol attributes and classification labels are assigned for their device Type, Manufacturer, Model and OS. These classification labels may then be used in access rules to authorize them without needing to maintain static inventories of Client Groups by MAC address.
See the section Client Management for how to quickly create Client Groups and assign known client MAC addresses to them with Client CSV Import from your existing Network-Wide Clients.
_for_IOT.png?revision=3)
The following sequence is typical for a MAB authentication and authorization flow:
- The client initiates the connection with the SSID or switch port.
- The network device will challenge the client with an IEEE 802.1X authentication request
- The client will not respond to the challenge because it does not support or have 802.1X configured
- The network device will timeout the 802.1X challenge process
- At some point, the endpoint will have sent Ethernet frames identifying it's MAC addres
- The network device will send a RADIUS MAB request containing the client MAC to Access Manager for authorization
- Access Manager evaluates the MAC, network device, and session attributes against the access rules for a match on their conditions
- The authorization permissions (SGT, VLAN, etc.) from the first matched access rule will be sent to the network device for enforcement
- The network permissions for the client's session will be enforced by the network device based on it's security capabilities
MAB Access Rules
Below are example of access rules to match various clients by their profiled endpoint types or Client Group memberships :
| Type | Status | Name | What's Matched | Authorization |
|---|---|---|---|---|
| └Rule | ☑ | Phones | Auth Method=MAB, Endpoints:Type = Phones | VLAN = VOICE, Voice domain |
| └Rule | ☑ | Printers | Auth Method=MAB, Endpoints:Type = Printers | Adaptive policy = Printers |
| └Rule | ☑ | Cameras | Auth Method=MAB, Endpoints:Client group = Cameras | Adaptive policy = Cameras |
| └Rule | ☑ | APs | Auth Method=MAB, Endpoints:Client group = APs | Adaptive policy = Infrastructure |
| └Rule | … | … | … | … |
| └Rule | ☑ | Profiling | Auth Method=MAB, Endpoints:Source = Discovered | Adaptive policy = Unknown |
To profile new, previously unknown endpoints, it is recommended to add permissive default Access Rule authorization that Allows Restricted Access to an "Unknown" or "Quarantine" Adaptive Policy group or Group Policy that allows minimal access for CDP, DHCP, and LLDP but nothing else. When the endpoint is re-authenticated, it should match any Access Rules using the discovered profiling attributes.
Access Manager does not currently support RADIUS Change of Authorization (COA) to re-authenticate endpoints after being profiled.
Guest Wireless
There are two types of Guest access supported by Access Manager:
- Open, hotspot for simple, direct access without interruption
- Click-through with Acceptable Usage Policy (AUP) for branding, time, traffic, or legal disclaimers you want to communicate to guest users
There are advantages to using Access Manager for your guest access scenarios over the basic wireless security without it :
- visibility of all guest sessions in a centralized Session Log to understand the location, frequency, scale, and profiles of the guest access service
- automatic profiling of your guest endpoints to give you insights about their device types
- optional filtering of any guest endpoints by MAC or Profile
All guest sessions will consume an Access Manager license for the duration of their session.
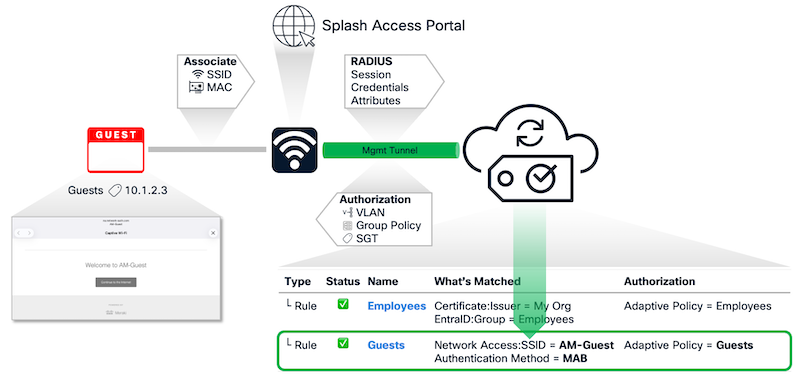
In the example guest flow above:
- A guest user associates to an Open, unencrypted SSID ("AM-Guest") that is configured to use Splash Access with an Acceptable User Policy (AUP)
- The AP sends a RADIUS MAB request to Access Manager
- Access Manager verifies there are no Access Rules blocking (MAC filtering) the MAC address then matches the Guests rule
- Access Manager returns an authorization to the AP with a security group tag (SGT), 'Guests'
- The guest computer gets a DHCP IP address
- The guest computer operating system detects that a captive portal (Splash Access) is preventing Internet access and opens a browser window to the portal
- After the guest user completes the AUP process, Splash Access allows the guest out to the Internet
Guest Wireless SSID
- In the Cisco Meraki Dashboard, choose your network to configure
- Go to Wireless > Configure > Access Control
- Use the dropdown to choose the SSID name you want to use for Guest access
- SSID (name): guest (or whatever you want)
- SSID status: Enabled
- Under Security
- Choose MAC-based access control : this allows potential filtering of the guest clients by the RADIUS server
- Choose Access Manager from the dropdown
- Splash page and choose one :
- None for open, hotspot access
- Click-through if you require guests to accept an Acceptable Usage Policy (AUP)
- Configure any other settings according to your network design including any AUP text, logo, or other theme
- Save your changes
- Within a few minutes your SSID should be broadcasting on your network
- Repeat this process for any other networks you want to secure with Access Manager
Guest Wireless Access Rule
Since guest wireless services are per SSID, it makes sense to filter by the guest SSID name in the conditions and MAB should be the only authentication method used.
- Go to Access Manager > Policies > Access Rules
- + Add a rule :
| Type | Status | Name | What's Matched | Authorization |
|---|---|---|---|---|
| └Rule | ☑ | Guests | Network Access: SSID = guest, Auth Method=MAB | VLAN = guest, Adaptive policy = Guests |
- Connect a guest client to the Guest SSID
- Review the session status in Access Manager > Monitor > Session Log
iPSK for Wireless IOT
Wireless I/OT endpoints often do not have sophisticated interfaces enterprise authentication with 802.1X or certificate management. Many do support basic wireless pre-shared keys (PSKs) but it is not a good security practice to use the same PSK for all endpoints in your network in case it is leaked. It is much better to use a unique, identity pre-shared key (iPSK) tied to an endpoint (client) group or even endpoint MAC address.
Access Manager has 3 different options for assigning an identity pre-shared key (iPSK) for a client in the Access Rule authorization:
- Client iPSK only: Only clients with a configured iPSK passphrase can authenticate against this rule. Use this to require and enforce per-MAC iPSK. Configure the per-client MAC in the Clients page.
- Client iPSK with fallback: Clients with a configured iPSK passphrase use it to authenticate; all other clients fall back to the passphrase set below. Use this when transitioning from a shared PSK for all clients to the more secure Client iPSK Only policy. Configure the per-client MAC in the Clients page.
- Override client iPSK: All clients authenticate using the passphrase set below, regardless of any per-client iPSK. Use this when all clients matching a rule all use the same PSK. This was the previous behavior where all clients matching a rule must have the rule's assigned PSK.
__for_Wireless_IOT.png?revision=3)
The typical authentication flow for an iPSK authentication and authorization is :
- The handheld scanner attempts to associate to the wireless access point (AP) with it's configured pre-shared key (PSK)
- The AP performs a new RADIUS MAB request to Cisco Access Manager
- Access Manager verifies the MAC belongs to the Client Group named Scanners
- Access Manager checks the Access Rules and matches the Scanners rule for all members of the Scanners client group
- Access Manager returns an authorization to the AP with a security group tag (SGT) and the iPSK assigned for the Scanners client group
- The AP compares the scanner's iPSK with the assigned PSK from Access Manager and since they match, it is authorizedasdf
- The scanner gets a DHCP IP address and all it's traffic is tagged with a Scanner SGT
iPSK Wireless SSID
- In the Cisco Meraki Dashboard, choose your network to configure
- Go to Wireless > Configure > Access Control
- Use the dropdown to choose the SSID name you want to use for Guest access
- SSID (name): ipsk (or whatever you want)
- SSID status: Enabled
- Under Security
- Choose Identity PSK with RADIUS
- Choose Access Manager from the dropdown
- Splash page must be set to None since IOT devices cannot perform any of the other Splash interactions
- Configure any other settings according to your network design
- Save your changes
- Within a few minutes your SSID should be broadcasting on your network
- Repeat this process for any other networks you want to secure with Access Manager
iPSK Access Rule
- Go to Access Manager > Policies > Access Rules
- + Add a rule and create one or more Access Rules like these based on how you want to differentiate and authorize your variety of iPSK clients:
| Type | Status | Name | What's Matched | Authorization |
|---|---|---|---|---|
| └Rule | ☑ | iPSK-IOT-Group | Network Access: SSID = ipsk, Endpoints: Client group = IOT | Adaptive policy = IOT, Policy based IPSK |
| └Rule | ☑ | iPSK-Client | Network Access: SSID = ipsk | Adaptive policy = IOT, Policy based IPSK |
- Connect one or more iPSK wireless endpoints to the iPSK SSID
- Review Access Manager > Monitor > Session Log for the authentications
iPSK clients that match an iPSK rule will have Successful authentications in Access Manager > Monitor > Session Log even if the client PSK does not match the PSK assigned by Access Manager! This happens because Access Manager is successfully authorizing the client based on matching an Access Rule's conditions but the client's iPSK is never seen by Access Manager. This mismatch typically results in frequent reauthentication attempts (every 5-10 seconds) by the iPSK client.
Client iPSK Configuration
If you ever need to change a client iPSK value, you may only reset it - you cannot view the existing iPSK value to ensure security.
- Navigate to Access Manager > Configure > Clients
- ⛭ in the Clients table and enable the iPSK column if it is not already visible
- Assign an iPSK to an existing client by selecting the MAC address of the client
- iPSK: my-client-ipsk (must be 8–63 characters)
- Save.
- Assign an iPSK to a new client by selecting + Add Clients > Add a Client
- MAC address: xx:xx:xx:xx:xx:xx
- Description: optional
- iPSK: my-client-ipsk (must be 8–63 characters)
- Client Groups: optional
- Save
Certificate Authentication (EAP-TLS)
Traditional Pre-shared Key and username/password based authentication have become increasingly vulnerable to attacks. The EAP-TLS authentication allows administrators to control network access for managed users and endpoints using digital certificates. The Access Manager access rules will evaluate the authentication request based on the client (subject/user/machine) certificate's attributes to differentiate their network access.
A certificate is considered authentic if :
- it has been signed by a trusted certificate authority (CA) configured in Access Manager's Certificates page
- the client certificate is within the validity period specified in the certificate
- the certificate has not been revoked by the CA using a certificate revocation list (CRL)
Currently EAP-TLS authentication requires users and machines to use the same identity attribute for authentication. If you must use the Subject-SAN-RFC822 field for the user identity, then you will not be able to perform machine authentication since they typically use the Subject-SAN-DNS attribute instead.
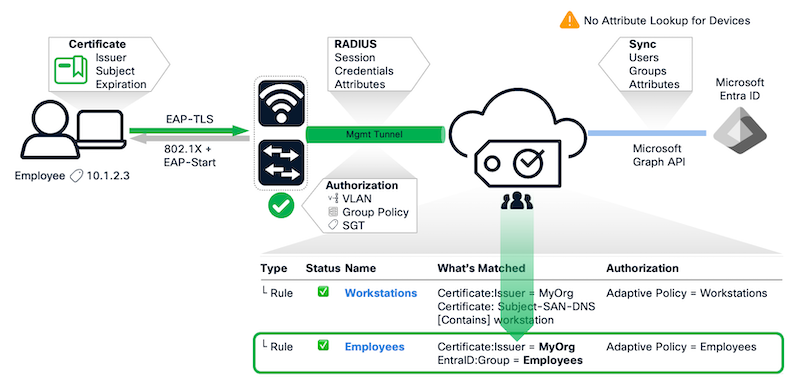
In the EAP-TLS authentication flow above:
- A user's workstation is has been configured to use 802.1X with a user or machine certificate
- The user connects their computer workstation to a network device (a switch or access point AP
- The network devices challenges the workstation with an 802.1X authentication request
- The workstation sends it's configured client certificate as it's authentication credential through encrypted EAP tunnel to Access Manager
- Access Manager authenticates the certificate if the Certificate Issuer CN matches one of Access Manager's Trusted Certificate Authorities (CAs)
- If an access rule contains an Entra ID user (not device) group lookup in a condition, the groups are retrieved for the user identity using the certificate attribute configured in the Certificates page for the respective CA:
- Subject common name
- Subject serial number
- Subject alternate name: DNS
- Subject alternate name: RFC822 (typical)
- Access Manager returns an authorization for the workstation's session to the network device containing an Employees security group tag (SGT) assignment
- The workstation gets a DHCP-assigned IP address and all it's traffic is tagged with a Employees SGT
Client EAP-TLS Configuration
See our separate EAP-TLS Client Configuration guide for configuring different operating systems for certificate authentication.
Certificate Authorizations
You may use any attributes from any available Attribute Source, but with a client certificate, the Endpoint certificate attribute source is also available. You may create access rule conditions using any of the issuer or subject attributes in the client certificate to differentiate access for your various users and machines.
If you do not have a way to view your user or client certificates before creating the respective access rule(s) for them, simply connect your client and view their certificate attributes in Access Manager's Session Log Details. Even if the authentication fails, you will be able to view all of the client certificate's subject attributes to match them in your access rule(s) for proper authorization.

Machine Certificate Access Rules
Access rules for machine authorization typically should filter on the EAP-TLS authentication protocol then check any of the available certificate subject attributes you need to differentiate it from other groups of clients using certificates. This may involve components of the Common Name or a custom string in a subject alternative name (SAN) attribute depending on how your organization issues certificates. Here is a simple example:
| Type | Status | Name | What's Matched | Authorization |
|---|---|---|---|---|
| └Rule | ☑ | Workstations | Network Access: EAP Protocol = EAP-TLS, Subject-SAN-DNS=workstation | Adaptive policy = workstations |
User Certificate Access Rules
Access rules for user authentication should check for the EAP-TLS authentication protocol then any of the certificate subject attributes to differentiate groups of user certificates. This may involve Common Name components like the Department or Organization Unit (OU) or simply checking the domain of a SAN RFC822 attribute - a very technical way to say an email address - based on how you issue certificates. Here is a simple example:
| Type | Status | Name | What's Matched | Authorization |
|---|---|---|---|---|
| └Rule | ☑ | Workstations | Network Access: EAP Protocol = EAP-TLS, Subject-SAN-RFC822 [endswith] @my-org.org | Adaptive policy = employees |
User Certificate Access Rules with Entra ID Lookup (optional)
You must integrate Microsoft Entra ID with group synchronization to the Meraki Dashboard before you can configure these access rules.
This scenario requires your Access Manager Certificates Identity attribute configuration to match whichever attribute in your certificate contains the user principal name (UPN) in Microsoft Entra ID. Typically this is the subject certificate's SAN RFC822 attribute. Access Manager will use the specified attribute to perform a query against your Entra ID tenant to obtain the specified user's group memberships and other attributes in Entra ID. These attributes will then be available as an Access Rule Attribute Source to match for differentiated authorization. Here is a typical example:
| Type | Status | Name | What's Matched | Authorization |
|---|---|---|---|---|
| └Rule | ☑ | Employees | Network Access: EAP Protocol = EAP-TLS, my-org:Account Enabled: true, Group = Employees |
Adaptive policy = employees |
Client Certificate Testing
Ensure your clients have been configured for 802.1X and EAP-TLS as discussed in Client 802.1X Supplicant Configuration.
- Connect one or more clients to :
- switch port(s) assigned a Switching Access Policy with Access Manager
- wireless SSID(s) configured with Enterprise security with Access Manager
- Review Access Manager > Monitor > Session Log for the authentication Status:
- Status = Failed - typically because of a mutual certificate trust problem :
- Client:
- Verify the Access Manager certificate is installed in the endpoint's trusted root certificate store
- Verify that the client has a user or machine certificate installed and is configured to use it for 802.1X with EAP-TLS
- Access Manager
- Verify that the certificate authority (your PKI certificate chain) is uploaded to Access Manager > Configure > Certificates and enabled
- Client:
- Status = Rejected - typically there was not a matching access rule and the default rule is Deny All (Reject)
- Review the Network Access Details of your rejected authentication for all available attributes from the client certificate, device, session, and client
- Compare the attributes of the rejected authentication to your existing (and enabled) access rules for any mismatches
- Modify an existing access rule or create a new one as needed to accommodate your certificate authentication scenarios
- For the optional Entra ID lookup:
- Choose the CA identity attribute containing the UPN on the Entra ID. Verify the client certificate
- Verify the following API permissions on the Entra ID app registration for the Meraki Dashboard integration when testing for the first time
- Status = Failed - typically because of a mutual certificate trust problem :
Username+Password Authentication (EAP-TTLS) with Entra ID Group Lookup
You may perform username+password authentication of users to the Entra ID identity provider (IdP) and match their group memberships or other attributes. With username/password based authentication (EAP-TTLS/PAP) against Entra ID, you can control network access to managed endpoints without the need for deploying a public key infrastructure (PKI) with a certificate authority (CA).
You must first connect and synchronize your Entra ID tenant to the Meraki Dashboard as described in Microsoft Entra ID Integration

In the EAP-TTLS authentication flow above:
- A user connects their computer workstation to a switch or access point (AP) which initiates an EAP-Start (extensible authentication protocol) over 802.1X
- The user enters their Microsoft Entra ID user principle name (UPN, username@domain.onmicrosoft.com) as the username and their password
- Cisco Access Manager receives the authentication response and proxies it to Entra ID using OAuth
- After Entra ID authenticates the user successfully, Access Manager obtains the user's group memberships for evaluation against it's Access Rules
- Access Manager finds a match for the user in the Access Rule named Employees
- Access Manager returns a successful authorization to the network device allowing access and assigning a security group tag (SGT) to the endpoint's traffic
- The user's workstation gets a DHCP-assigned IP address and all it's traffic is tagged with a Employees SGT
Client EAP-TTLS Configuration
See our separate EAP-TTLS Client Configuration guide for configuring different operating systems for EAP-TTLS authentication.
Entra ID Group Authorization Access Rules
You must integrate Microsoft Entra ID with group synchronization to the Meraki Dashboard before you can configure these access rules.
Typical access rules conditions with EAP-TTLS will:
- filter by the EAP-TTLS protocol first to avoid performing any unnecessary lookups against Entra ID
- verify the user's account is still enabled which requires an attribute lookup to Entra ID
- perform any group membership checks as the last step
| Type | Status | Name | What's Matched | Authorization |
|---|---|---|---|---|
| └Rule | ☑ | Employees | Network Access: EAP Protocol = EAP-TTLS, my-org:Account Enabled: true, Group = Employees |
Adaptive policy = employees |
EAP-TTLS User Authentication Testing
Ensure your clients have been configured for 802.1X and EAP-TTLS as discussed in EAP-TTLS Client Configuration.
- Connect one or more clients to :
- a switch port assigned a Switchport Access Policy with Access Manager
- a wireless SSID configured with Enterprise security with Access Manager
- Review the authentication events in Access Manager > Monitor > Session Log
- If the Status is Success, verify it matches the Access Rule and authorization you were expecting
- A Status of Failed means the client refused to talk to Access Manager using the EAP-TTLS+PAP protocol - verify the client is configured as described in EAP-TTLS Client Configuration
- A Status of Rejected means the client did not match one of your configured Access Rules
- Select the Status value to review the device, session, and client details and their respective attributes
- Verify one or more of your Access Rule conditions match these attributes to authorize it as you expect
Certificates
Digital certificates are required to establish trust between Access Manager - the trusted enterprise RADIUS server - and any clients that use the enterprise-class, EAP-based protocols for authentication. They are not required for the MAB, Guest, or iPSK authentication methods.
Import and Enable PKI Certificate Chain
- Navigate to Access Manager > Configure > Certificates
- Select Upload CA certificate and choose the full chain of your PKI's root CA
- Ensure you upload a full trusted certificate chain by compiling all intermediate and root certificates into a single
.ceror.crtfile. - Begin by exporting each certificate in the chain as a Base64 encoded
.cerfile. Open each exported file with a text editor, and copy the entire contents. Paste them sequentially into a new text file, ensuring there are no extra spaces or lines between certificates. Save this file with either a.ceror.crtextension to create the complete certificate chain. - Refer to Microsoft - Export a trusted client CA certificate chain for detailed guidance.
- Ensure you upload a full trusted certificate chain by compiling all intermediate and root certificates into a single
- Configure the certificate features for the uploaded CA certificate :
- Identity: Subject Alternative Name RFC822
This is the certificate subject's identity and for Entra ID group lookup it must contain the user principal name (UPN) which is usually the Subject Alternative Name RFC822 field (email address) - Status: Enabled
Enable for all certificate authorities you want to trust - Use for Extended Local Authentication: (optional)
When enabled, wireless APs will cache certificates from this CA for fallback authentication if the connection to the Meraki Dashboard and Access Manager is unavailable for any reason. During fallback, Access Manager rule evaluation will not work and the VLAN configured on the SSID will be applied after successful authentication. it must be enabled for both the Access Manager certificate and the SSID Access Control page. - Trusted Anchor: Enabled
Must be enabled on at least one certificate in the chain
- Identity: Subject Alternative Name RFC822
- Select Save.
Identity Providers
Microsoft Entra ID Integration
You may configure Microsoft Entra ID integration to synchronize all users, user groups, and attributes and store these in the Cisco Meraki Dashboard database. A proactive synchronization may be enabled to occur every 6 hours and you may initiate a manual synchronization at any time.
Synchronizing Entra ID data (users, groups, attributes) eliminates the need for API requests for each session, reduces latency, and avoids Microsoft's service limits. After successful certificate authentication, Access Manager uses the endpoint certificate's username to query the synchronized Entra ID database. Access rules are then applied to the session to determine authorization (such as SGT or VLAN) based on user groups like HR, Finance, or other Entra ID attributes.
- In the Cisco Meraki Dashboard, go to Access Manager > Configure > Users
- + Create IdP and connect your Microsoft Entra ID tenant following the Organization End Users instructions
- Review the Synced Users & User Groups to ensure you have all the users and representative group
The sync will pull all users and groups from the Entra ID tenant - there currently is no group filter to sync only specific groups
⤒ For user and group maximums see Access Manager > Scale
Microsoft Entra ID Conditional Access Policies
EAP-TTLS/PAP does not support MFA authentication. You must exclude the Access Manager App Registration in Entra ID from MFA authentication using Conditional Access Policies. Conditional Access Policies requires a paid subscription for Entra ID.
Warning: Proceed with caution as these changes may severely impact your security settings. Following steps are for information purposes only. Many organizations may have different settings that may require changes accordingly.
Refer to following resources for more details on security defaults and conditional access:
Security defaults in Microsoft Entra ID
Conditional Access in Microsoft Entra ID
Sign in to the Microsoft Entra admin center as at least a Conditional Access Administrator.
- Browse to Protection > Conditional access.
- Select Create a new policy.
- Enter the Name and select All users under Users
- Select Target resources > Exclude > Select resources > Select > Select "app registration" created in Entra ID integration step
- Select Grant > Grant access > Require multifactor authentication.
- Select On under Enable Policy.
- Select Create.
- Verify you are not applying MFA to all users
Operations
Availability
You may find details about Cisco Meraki Dashboard services status at status.meraki.net where Access Manager services currently fall under the Dashboard and API categories.
Cloud Security
To help with service availability and general attack surface reduction, you may want to add specific IP subnets from the Cisco Meraki Dashboard to your other cloud tenant firewalls that you integrate with Accesss Manager. Always refer to the Meraki Dashboard > (?) Help > Firewall Info page for the latest, authoritative subnet information.
| Cisco Meraki Cloud Source Subnets | Destination Service |
|
|
REST APIs
Cisco Access Manager has many application programming interfaces (APIs) available for use in the Cisco Meraki Dashboard APIs under Early API Access and Products > nac or you may download the entire Meraki Dashboard OpenAPI specification.
Dashboard API GET Requests
You may run simple API GET requests directly from your browser:
- Login to your Cisco Meraki Dashboard account to be authenticated and authorized
- Enable Early API Access under Organization > Configure > Early Access if you haven't already
- Open a Meraki Dashboard API GET request within your browser, replacing $MERAKI_ORG_ID with your organization ID (available in the footer of any Dashboard page) and YYYY-MM-DD with the starting date (2026-01-01) you want to begin with:
https://api.meraki.com/api/v1/organi...age?startDate=YYYY-MM-DD - You should see the respective JSON (JavaScript Object Notation) output returned for either type of request
Dashboard API Keys
Most scripting tools require an API key for authorization to run API requests. To create your Meraki Dashboard API Key:
- In the Cisco Meraki Dashboard, create your API key under Organization > Configure > API & Webhooks
- Save your API key in a safe place and avoid saving, sharing, or exposing to anyone else or they will have all your permissions!
- Use curl or another tool to GET / POST / PUT / DELETE requests using environment variables with your MERAKI_DASHBOARD_API_KEY and MERAKI_ORG_ID
- An easy example is to export your license usage by replacing YYYY-MM-DD with the starting date (2026-01-01) you want to begin with:
export MERAKI_DASHBOARD_API_KEY=1234567890123456789012345678901234567890
export MERAKI_ORG_ID=1234567
curl --header "Accept: application/json" \
     --header "Authorization: Bearer $MERAKI_DASHBOARD_API_KEY" \
     --request GET "https://api.meraki.com/api/v1/organizations/$MERAKI_ORG_ID/nac/license/usage?startDate=YYYY-MM-DD"
License Usage
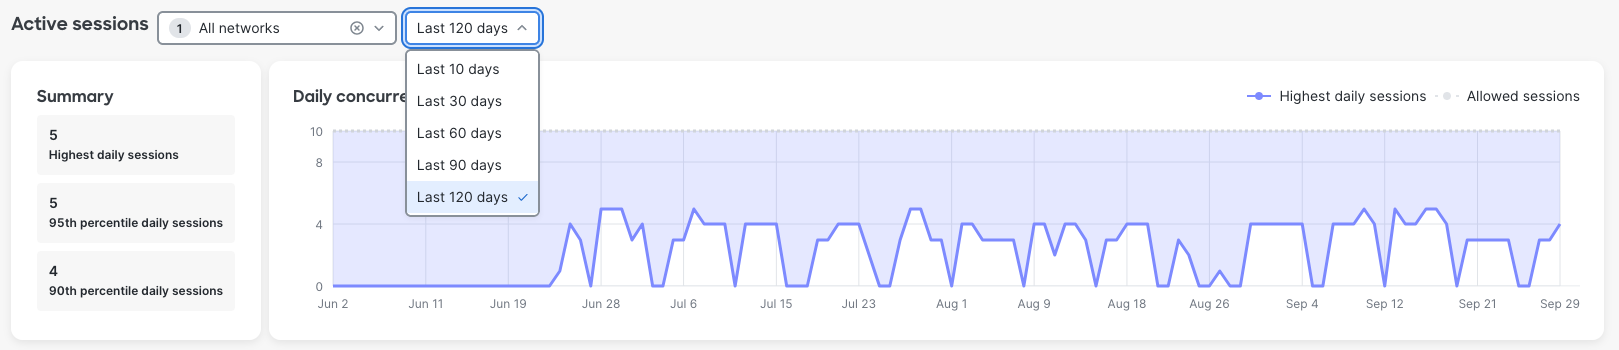
Your license consumption for all concurrently active sessions is tracked in Access Manager > Monitor > Session Logs > Active Sessions and offers filters by networks. It also includes a metric panels for the 90th percentile daily sessions which is the value used for tracking compliance.
Alternatively, for an export of your license usage, consider using the /nac/license/usage REST API. After logging into your Me
Session Log Archiving
Access Manager saves a maximum of 31 days of sessions via API and 30 days in the Dashboard. Export of Session Logs via the Dashboard is not supported, either. Your only option for exporting Session Logs for metrics or audit beyond 31 days is to download them using the /nac/sessions/history REST API.
Clients Export
The Access Manager > Configure > Clients page has no client export option and you must use use the /nac/clients REST API. You may create your own or consider using an existing free, open source script, cam-clients.py, that can get, create, update, and delete Access Manager clients.
Guest Client Purge
The Access Manager > Configure > Clients page is where you see and manage all clients that have been provisioned via Dashboard, CSV, or REST API or discovered from RADIUS authentication requests. They all will be collected there for visibility until you explicitly delete them. In the case of guest clients which are quite transient and typically use randomized MAC addresses, you will probably want to purge them from your Clients page regularly to remove clients no longer of interest and to keep searches fast.
Since Access Manager does not have a specific Guest Purge feature, you must use the Clients > Filters option (match on your guest SSID) and manually select and delete by the Last Seen date. A much faster approach is to use a script with the /nac/clients/bulkDelete REST API. You may create your own or consider using an existing free, open source script for this purpose : cam-guest-purge.py
Troubleshooting
For troubleshooting individual scenarios, see the respective scenarios and their client testing sections.