
Starting your Systems Manager Trial
Setting up your Network
When your sales representative creates your Systems Manager trial, you receive an email that links to the trial setup page. Navigate to this page to complete the following steps:
Initiate your Trial with Order Number [5 min*]
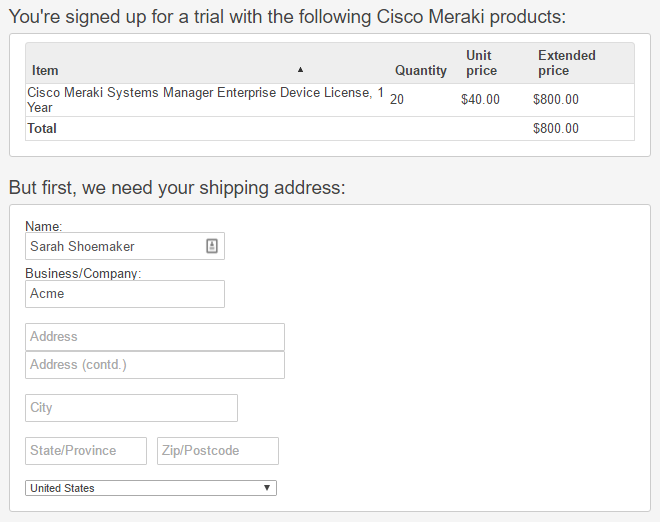
Enter your shipping and billing information to initiate your trial.
* Complete this step in advance when possible. Your trial order may take up to three hours after initiation before it can be claimed.
Create your EMM Network [10 min]
To create your EMM network after confirming your address information:
- Click Create a Network.

- Sign into your Dashboard account at dashboard.meraki.com.
- If you’re an existing Meraki customer, enter your account information to sign in, then click Finish claim.
- If you don’t have a Dashboard account already, click Create an account and follow the registration process. You’ll use this account to manage your Systems Manager enrolled devices, as well as any other Meraki equipment you own.
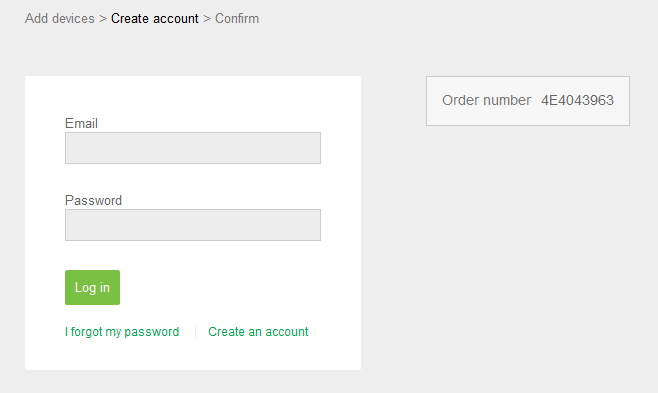
- Navigate to Organization > License info and confirm your trial license has been claimed.
You can also claim your license into an existing Dashboard by navigating to Organization > Inventory, clicking the Claim button, and entering the trial order (beginning in 4E). If your billing/shipping information was only just confirmed, you may see “Order not found” or a similar error. If the issue persists, check back later and contact support to confirm your order is valid.
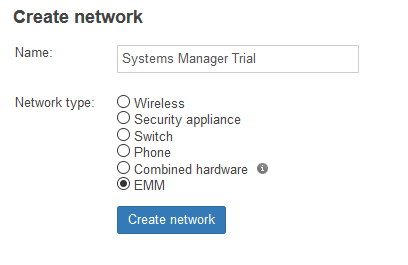
- After signing into your Dashboard account, you will need a Systems Manager network to manage your devices. Navigate to Organization > Configure > Create network.
Name your network and select EMM for the network type:
If you are not managing any Apple or Android devices, your pre-setup steps are complete! Feel free to jump ahead to the Next Steps section.
Customer Initiated SM Trials [5 min]
- Navigate to Dashboard > Organization > Configure (tab) > Create Network.
- Type in the desired Network Name, and select 'EMM (Systems Manager)' as Network Type.
- Before selecting 'Create Network' - click the 'Start Trial' option:
- Once created, navigate to Organization > Configure (tab) > License Info to confirm the 30 day trial period and maximum devices supported (125 trials).


Apple-Specific Setup
If you intend to manage any iOS or OSX devices, you will need to set up an Apple Push Certificate. If your organization participates in Apple DEP or VPP, you will also need to link those Apple accounts to Dashboard.
All of this configuration can be done in Dashboard under Organization > Configure > MDM.
Apple Push Notification Service (APNS) [10 mins]
A push certificate is required for Dashboard to securely send and receive updates from your Apple devices.
Follow the steps described on the MDM page, shown below, to link the Meraki Dashboard with APNS:
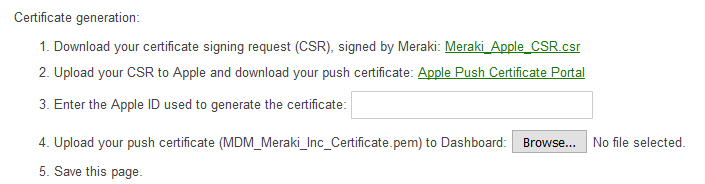
Best practice is to use an Apple ID that belongs to your organization rather than a personal account, if possible. The push cert needs to be renewed every year, which requires a Dashboard admin to log into the same Apple account to generate a new token.
(Optional) Apple Volume Purchase Program (VPP) and Device Enrollment Program (DEP)
The following two steps are only necessary if you are participating in Apple’s Volume Purchase Program or Device Enrollment Program. Your accounts for these programs should be set up prior to completing the following steps.
Contact an Apple representative if you are interested in registering for these programs, or need assistance setting them up.
Connect your VPP Account [5 mins]
If you are managing application licensing through VPP, follow the steps here to link your VPP Apple account to Dashboard.

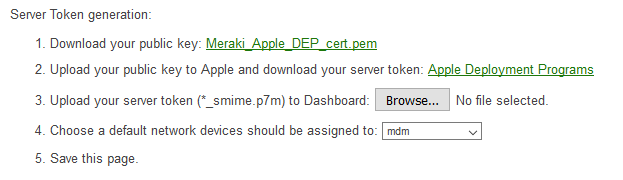
Connect your DEP Account [10 mins]
If you are participating in DEP, be sure to set up your deploy.apple.com or school.apple.com account and add your devices to an MDM server.
If you are unable to add your devices on Apple’s site, contact Apple support or your reseller to ensure your devices are properly enrolled in DEP. Apple’s DEP guide can be found here.
Then follow the steps here to link your DEP account to Dashboard.
For more information on integrating Systems Manager with DEP, please see our guide here.
Android-Specific Setup
If you're planning on managing devices through Android for Work, please follow this guide to bind an AfW work domain (either Google managed or Meraki managed) prior to your call.
Next Steps
Thank you for completing these pre-onboarding steps! To prepare for the rest of your deployment, think over the following points prior to the call:
- How many devices am I managing, and how many do I anticipate onboarding in the future?
- Do I have ASM, AD servers, or Meraki hardware I’d like to integrate with?
- What kind of restrictions and settings do I want to assign for devices my organization owns?
- Do I need to allow for BYOD?
Communicating these details will let us better assist during your configuration call.
For more information on setting up Systems Manager, see our Deployment Guides.
If you would like to begin enrolling devices prior to the call, see our documentation regarding Enrolling Devices.