How to Create and Apply Group Policies
Overview
Group policies define a list of rules, restrictions, and other settings applied to devices to change how the network treats those devices. You can use group policies on wireless and security appliance networks and you can apply group policies through several manual and automated methods. This article describes the available options, how to create policies, and how policies are applied to clients.
Learn more with these free online training courses on the Meraki Learning Hub:
Best practices and limitations:
- Best Practice: Limit your configuration to a maximum of 100 group policies per network.
- Manually applied: You can manually assign a group policy to a maximum of 3,000 clients per network. This limitation does not apply to manually-applied SSID policies.
- Automatically applied: the 3,000 client-limit does not apply to automatically applied policies, including:
- Device-type group policies
- Systems Manager (SM) Sentry group policies
- RADIUS/802.1X login group policies
- Identity PSK (iPSK) group policies
Prerequisites
The table outlines which features, restrictions, or settings (controlled via group policy) are available on each Cisco Meraki platform. When you configure a group policy, the Meraki dashboard displays only the features supported by your network.
|
Feature |
MR Access Points |
MX or Z Appliance with Enterprise License |
MX with Advanced Security License |
MS Switches |
|---|---|---|---|---|
| Scheduling |
Yes |
Yes |
Yes |
No |
| Per-client bandwidth limit |
Yes |
Yes |
Yes |
No |
| VLAN tagging |
Yes |
No |
No |
No |
| Splash page authorization |
Yes |
No |
No |
No |
| Layer 3 firewall rules |
Yes |
Yes |
Yes |
Yes |
| Layer 7 firewall rules |
Yes |
Yes |
Yes |
No |
| Traffic shaping rules |
Yes |
Yes |
Yes |
No |
| Security filtering |
No |
No |
Yes |
No |
| Content filtering |
No |
No |
Yes |
No |
- Additional dependencies: If you use a group policy with content filtering, refer to the content filtering rule priority documentation to understand how certain filtering rules supersede each other.
- Source IP addresses on layer 3 firewall rules are only configurable on MX WAN appliances when Active Directory integration is enabled.
- If you use group policy on MS switches, refer to the MS Group Policy Access Control Lists for additional details, including supported hardware and software.
You can apply group policies to client devices in several ways, depending on the platform. The table below shows which options are available for each platform.
- Only one policy can be active on a client at a time.
- If you perform a Configuration Sync to multiple target SSIDs, disable group policy assignment by device type before performing the sync.
| Method | MR access point | MX WAN appliance with Enterprise License | MX with Advanced Security License | MS switch |
|---|---|---|---|---|
| By client | Yes | Yes | Yes | No |
| By device type | Yes | No | No | No |
| By VLAN | No | Yes | Yes | No |
| By sentry policy | Yes | Yes | Yes | No |
| By active directory group | No | No | Yes | No |
| By RADIUS attribute | Yes | No | No | Yes |
| By identity PSK | Yes | No | No | No |
Step-by-step instructions
Creating a group policy
- Navigate to Network-wide > Configure > Group policies.
- Click Add a group to create a new policy.

- Provide a Name for the group policy. Generally, the name describes its purpose or the users it applies to (for example, Guests, Throttled users, or Executives).
- Modify the available options as desired. Unless changed, all options will use the existing network settings.
- Click Save Changes.
The group policy now displays on the Group policies page and is available for use. A group policy has no effect until it is applied.
Create a group policy for Catalyst switches
To use group policies on MS390 or Catalyst 9300 Series switches, follow these steps:
- Navigate to Network-wide > Configure > Group Policies.
- Under the Firewall and Traffic shaping dropdown, select Custom network firewall & shaping rules. This setting ensures the necessary group policy settings are applied on Catalyst switches.
For more information, refer to the Create a User Group and ACL rules documentation
Example group policies
The following examples outline two common use cases and how group policies provide a custom network experience.
Guests on a WAN appliance
This example demonstrates how to configure a group policy on a security appliance network to limit the access and speed of guest clients. This policy does the following:
- Bandwidth: Select Use custom bandwidth limit to set client bandwidth to 2 Mbps up and down
- Layer 3 firewall: Denies access to the internal network, which uses the 10.0.0.0/8 address space
- Layer 7 firewall: Blocks all peer-to-peer sharing applications
- Inherits all other settings from network defaults, such as security and content filtering settings

- Bandwidth limit cannot be set lower than 20 kbps
-
Ports in custom layer 3 firewall rules must be in the range of 1–65535, or "any." Multiple comma-separated ports are not supported
Executive users on wireless
This example demonstrates how a group policy on a wireless network provides executive users with more freedom and special treatment over other users. This policy does the following:
- Bandwidth: Set to Ignore bandwidth to remove bandwidth restrictions
- Layer 3 firewall and Layer 7 firewall: no rules applied \
- Traffic shaping: Provides Quality of Service (QoS) tagging for voice and video-conferencing traffic
- Splash: Set to Bypass to remove the splash page requirement
- Inherits all other settings from network defaults

Applying group policies
A group policy is only enforced by the appropriate Meraki device on which it has been applied. For example:
- A group policy applied by device type is enforced by the MR access point.
- A group policy applied by VLAN is enforced by the MX WAN appliance.
- A group policy applied by client is enforced by both the MR and MX, depending on the configured settings.
For example:
- If the policy enables bypass splash, the MR enforces the bypass.
- If the policy contains only firewall rules, both the MR and MX enforce those rules.
By client
Group policies can be manually applied to clients from the Network-wide > Monitor > Clients page.
- Check the box next to the desired client(s) in the list.
- Click the Edit Policy button at the top of the list.
- Select Group policy and then choose the specific policy in the drop-down.
- Click Save.
Alternatively, on wireless and combined networks, different group policies can be applied depending on the SSID the client is associated to. This is applied from the same page as the previous steps.
- Check the box next to the desired client(s) in the list.
- Click the Policy button at the top of the list.
- Select Different policies by [connection or] SSID.
- For each SSID, select the desired group policy, built-in policy, or leave as normal.
- Click Apply policy.
Policies can also be applied to individual clients by clicking on the client in the clients list and then choosing a Device policy under the Policy section.
By device type
On wireless networks, group policies can be automatically applied to devices by type when a device first connects to an SSID and makes an HTTP request.
- Navigate to Wireless > Configure > Access control.
- Select the desired SSID.
- Set Assign group policies by device type to "Enabled."
- Click Add group policy for a device type.
- Select the desired Device type and the Group policy that should be applied to it.
- Repeat steps 4-5 as needed to assign policies to all desired devices.
- Click Save changes
- Verify the policy assignment behavior:
- Policy assignment by device type occurs only when a device first connects to the SSID.
- The assigned policy remains in effect until you manually override it.
- Previously connected clients may require manual policy assignment.
- A client can be misclassified based on the initial HTTP request, depending on how the device generates the request.
- If a client is misclassified, manually assign the appropriate group policy.

For more information, refer to the documentation on applying group policies by device type.
By VLAN
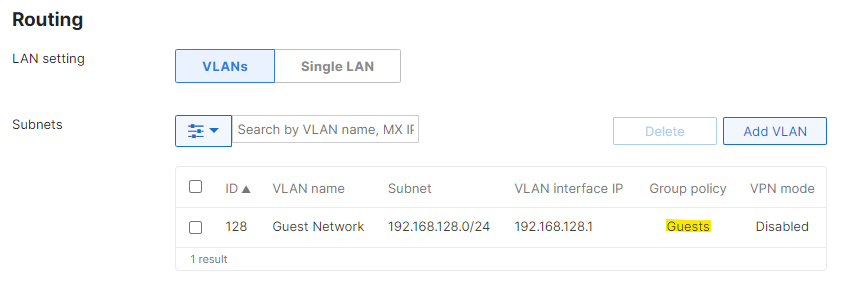
On security appliance networks, group policies can be automatically applied to all devices that connect to a particular VLAN. To apply a group policy by VLAN:
- Navigate to Security & SD-WAN > Configure > Addressing & VLANs.
- Ensure that VLANs is "Enabled."
- Click on the desired Local VLAN.
- Select the desired Group policy.
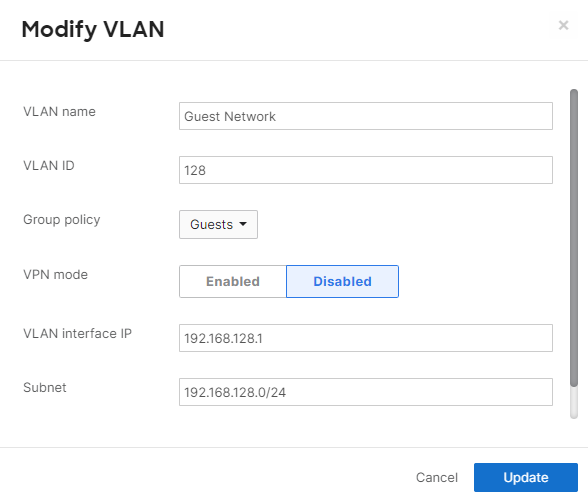
- Click Update.
- Click Save Changes.
Any clients placed in the VLAN receive the assigned Group policy.
After you apply a group policy to a VLAN, the following behavior occurs:
-
Clients affected by the VLAN policy do not contribute to the Affecting counter displayed under Network-wide > Configure > Group policies.
- The VLAN policy becomes the new network default for any other group policies applied to clients in that VLAN.
- Because the VLAN policy acts as the network default, client devices continue to display a Normal policy under Network-wide > Monitor > Clients.
- If multiple group policies are applied, clients inherit network settings from the VLAN policy instead of the network-wide configuration.
For example, consider the following configuration:
- A group policy named Guest Network is applied to the guest VLAN. This policy contains more restrictive Layer 3 firewall rules than the network-wide configuration.
- A second group policy named Low Bandwidth is configured with a custom bandwidth limit and uses Use network firewall & shaping rules.
- If the Low Bandwidth policy is applied to a client on the guest VLAN, the client inherits the Layer 3 firewall rules from the Guest Network policy.
- The client does not use the network-wide Layer 3 firewall rules configured under Security & SD-WAN > Configure > Firewall.
By active directory group
Security appliance networks with Advanced Security licensing can use AD groups to assign policies to clients. Refer to the configuring AD-based group policy for more information.
By RADIUS attribute
Wireless networks using RADIUS to authenticate clients can be configured to assign group policies via RADIUS attributes. Refer to the configuring group policies with RADIUS attributes for more information.
By identity PSK
Identity PSK (iPSK) comes in two variants: iPSK with RADIUS and iPSK without RADIUS.
- iPSK with RADIUS authentication acts as a standard WPA2 PSK SSID to clients while authenticating clients to a central server based on their MAC address.
- iPSK without RADIUS allows a network administrator to use multiple PSKs per SSID without a RADIUS server.
Both variants allow you to assign group policies in the Meraki dashboard based on the PSK the client device uses to authenticate to the Wi-Fi network. Refer to IPSK with RADIUS Authentication and/or IPSK Authentication without RADIUS.
Scheduling group policies
You can schedule group policies to be active only during specified times. Follow these steps:
- Navigate to Network-wide > Configure > Group Policies.
- Select the name of an existing policy, or create a new one by clicking Add a group.
- Under the Schedule option, select Scheduling enabled.
- Adjust the schedule days and times according to your use case.
- Verify the scheduling option is enabled. If so, elements of the policy subject to the schedule display a small clock icon. Options without the clock icon are always in effect, regardless of time.
Warning: When scheduling a policy applied to a VLAN, traffic on the LAN briefly drops as the configuration is applied. This occurs at the start and end of the schedule. To ensure uninterrupted client connectivity, schedule the group policy to start before production begins (for example, if production starts at 08:00, schedule the group policy to start earlier).
Example 1: Business hours (8:00 am–5:00 pm weekdays)
The example above shows a policy scheduled to be active from 8:00 am–5:00 pm on weekdays.

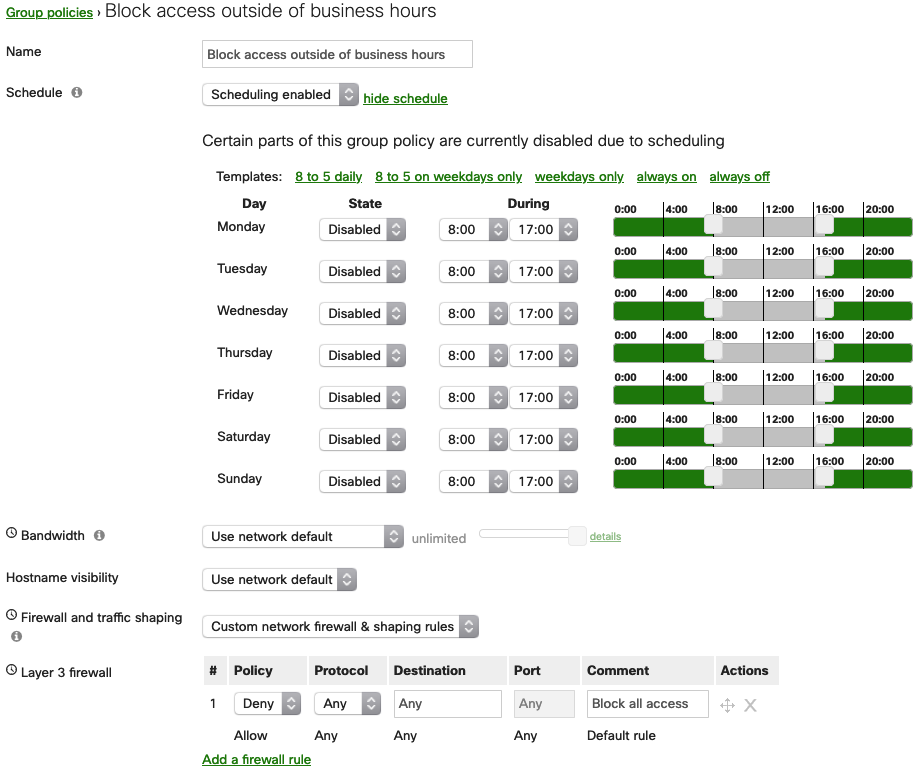
Example 2: Overnight schedule (spanning two days)
To apply a policy from one day to the next, follow the example below. In this configuration, the layer 3 firewall section blocks all traffic, and the schedule is set to disable the policy from 8:00 am–5:00 pm. This means:
- The policy is disabled from 8:00 am–5:00 pm, so the layer 3 firewall is not enforced and traffic is allowed.
- The policy is enabled from 5:00 pm–8:00 am (the next day), so the layer 3 firewall is enforced and traffic is blocked.