
Splash Page Overview
Learn more with these free online training courses on the Meraki Learning Hub:
Click 日本語 for Japanese
A splash page (or "captive portal") can be simply described as a page users would receive on the client device they connect with, which they are obliged to view and interact with, before they get to access the webpage they are actually looking for.
A splash page could prompt for username/password credentials or it could be just a 'view and acknowledge' page before users are allowed access to the network. It can provide a customized branding experience to wired/wireless users. For example, the splash page can display a corporate logo and color scheme. The splash page can also show the terms of service, which might include an acceptable user agreement or a privacy statement.
Note: Client devices that are unable to interact with a splash page are not recommended to use this feature.
For troubleshooting guidance of splash page issues, please use this doc.
Both Meraki WAN appliances and Meraki access points allow administrators to use a splash page. A splash page can be enabled on the access control page for both. On a WAN appliance, you can go to Security & SD-WAN > Configure > Access Control. On an access point, you can go to Wireless > Configure > Access Control.
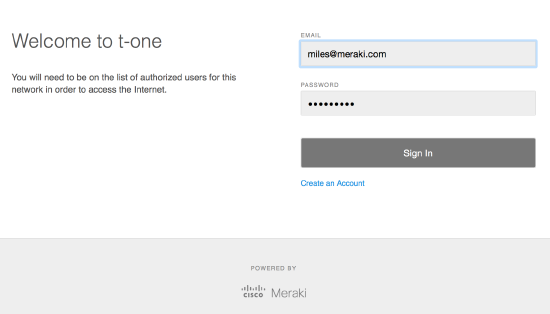
Splash pages can be hosted by Meraki or by an external host. The picture you see below is a basic splash page prompting for username/password credentials using Meraki authentication.
MR Splash Page Options
Once you navigate to Wireless > Configure > Access Control in the dashboard and enable splash page, you will need to choose what type of authentication/network access you would be using for your splash page. A client device is prompted with a splash page after the client is associated to the wireless network. More information on the different association options is found on the Wireless Encryption and Authentication Overview document.
- None (direct access)
Users must view and acknowledge your splash page before being allowed on the network. The appearance of this page can be customized.
You will need to choose Sponsor email domains when you select this option. When guests receive the splash page, they will be asked to enter their own name and email address first, then a valid sponsor email address within the sponsor email domain they chose. The owner of the sponsor email will receive a request from the user for network access and the request should be approved to be allowed on the network.

- Sign-on with Meraki Authentication / My Radius server / My LDAP server / Active Directory / Google Sign-In
Users must enter a username and password before being allowed on the network.
NOTE: Sign-on Splash Pages are incompatible with MAC-based or Enterprise with (any option from the dropdown) association requirements. To use a Sign-on Splash Page you must select either Open or Pre-shared Key association requirements.
- Sign-on with SMS Authentication
Users enter a mobile phone number and receive an authorization code via SMS.After a trial period of 25 texts, you will need to connect with your Twilio account on the Network wide settings page.

- Cisco Identity Services Engine (ISE) Authentication
Users are redirected to the Cisco ISE web portal for device posturing and guest access.
ISE authentication is only compatible with MAC-based access control or Enterprise with my RADIUS server.
Systems Manager Sentry enrollment requires that the connecting device be enrolled within one of the organization's System Manager networks before gaining access to the network. If a device attempts to connect with the network and is not enrolled within a Systems Manager network in the organization, the device will be presented with a prompt to enroll the device into the defined Systems Manager network. (See the picture below)

After selecting Systems Manager Sentry enrollment as a splash page, a new section will appear on the Access Control page, directly below the Splash Page section. This section allows further configuration of Systems Manager Sentry.
-
Enrollment network: This dropdown is used to select the SM network that unenrolled devices will be prompted to enroll in before gaining access.
-
Strength: Each setting allows for adjustment of the scope of devices that will be forced to enroll within a Systems Manager network.
-
Enforce On: Select the checkbox for each device type that should be forced to enroll in a Systems Manager network before gaining network access.
NOTE: Systems Manager Sentry authentication provides a pre-configured splash page, which means you do not get the option to customize the splash page.
- Billing (paid access)
Users choose from various pay-for-access options, or an optional free tier (possibly subject to a bandwidth limit). The splash page will look like the picture below. You can determine the pricing plans for users as you like and if you check the box for Hide bandwidth numbers?, the bandwidth limit you choose for the pricing plan will not be displayed for users on the splash page.

When clients purchase network access, they receive a receipt by email. The Reply-to-address is the email address you want to use for the interaction with the user, or for setting a no-reply for billing emails.
Billing is only compatible with Open (no encryption). Also, billing networks cannot be configured to allow login sharing. The Simultaneous logins setting revokes a device's access if the user logs in to another computer.
MX Splash Page Options
If VLANs are configured on the Security & SD-WAN > Configure > Addressing & VLANs page, splash settings are configured separately for each VLAN. Use the Select VLAN drop-down at the top of the Security & SD-WAN > Configure > Access Control page to choose the VLAN you wish to modify splash settings for.
Splash page network access options for MX devices are limited compared to the options available for Meraki MR. The access control options available for MX devices include:
- None (direct access)
Users can access the network as soon as they associate
- Click-through
Users must view and acknowledge your splash page before being allowed on the network
-
Users must enter a username and password before being allowed on the network
Note: By default, enabling Active Directory integration will cause Access Control / Splash Page not to appear in the menu.
Advanced splash settings
The following options can be configured for the captive portal that users are placed in before they have passed through the splash page:
- Captive portal strength
- Block all access until sign-on is complete: Users who have not yet passed through the splash page have no network access, except to hosts that have been added to the walled garden.
- Allow non-HTTP traffic prior to sign-on: Users who have not yet passed through the splash page cannot send or receive traffic on TCP port 80 (HTTP) except to hosts that have been added to the walled garden, but can pass other types of traffic normally to any destination.
This setting will bypass access firewall rules on Click-through splash-page SSID until the client does a sign-on in the captive portal. The option is disabled by default.
- Walled garden: Enabling the walled garden allows you to specify a list of IP addresses and domains that users can access before passing through the splash page. Items in this list should be separated by spaces or separate lines, and domains can include wildcards in the form of an asterisk ( * ).
- Controller disconnection behavior: Specifies how to treat clients when the Cloud Controller is unreachable. There are three options.
- Open: Splash is disabled when the Cloud Controller is unreachable.
- Restricted: Only white-listed clients and clients who have already passed through the splash page will be able to access the network.
- Default for your settings: Automatically sets the controller disconnection behavior based on the splash mode. If Click-through splash is enabled, the default behavior is Open. If Sign-on splash is enabled, the default behavior is Restricted.
Sign-on with... advance splash settings
- Simultaneous logins: Allows multiple device using the same credentials at the same time or revoke a computer's access if the user logs in to another computer when limiting to one device at a time.
- Self-registration: (Only available with Meraki Cloud Authentication) Configuration to allow or not users to create their own credentials
Captive Portal API
The Captive Portal API extends the power of the built-in Meraki splash page functionality by providing complete control of the content and authentication process. For more details, please check our developer documentation on the Captive Portal API.
Splash Page Customization
After the splash page has been enabled, administrators can customize the content and behavior of the splash portal. For MR, administrators can use Wireless > Configure > Splash Page. Administrators can set up a separate splash page for each SSID on this page. For MX, administrators can use Security & SD-WAN > Configure > Splash page.
Themes
Here you can choose among the Fluid, Classic, or Plain themes for the splash page. You can also create a custom theme using the "Create something new" button, or edit an existing custom theme by clicking on the grey pencil icon next to the theme.
On the right side of the page, you can configure the color palette for the splash page. The Preview section allows you to preview various splash elements to see what they will look like for users. Preview pages are publicly viewable.
For a list of variables that can be used in a custom splash themes to present dynamic information to users, see Cisco Meraki hosted splash page variables
Custom Splash URL
Here you can configure a custom splash URL that users will be redirected to if you do not wish to use the provided Meraki hosted splash pages.
If the walled garden is enabled when using a custom splash URL, the IP and/or the URL of the custom splash page must be added to the walled garden, as mentioned here.
Customizing Splash Content
You can customize several elements of your Meraki hosted splash page.
- Message: Add a custom message that will be displayed on the splash page for users to read.
- Splash logo: Add a custom logo that will be displayed on the splash page for users to see.
- Splash language: English is the default language. To select/change the language the splash page should be displayed in, use the Configure > Splash Page > 'Splash language' option.
Splash Behavior
Here you can configure options related to the user's splash experience. There are two settings:
- Splash frequency: Determines how often a user is presented with the splash page. For more details, see the Splash Page Frequency article.
- Where should users go after the splash page?: Determines whether the user will be sent to the page they originally requested or to a specified landing page upon completing the splash process.
Splash Page Administration
Revoking Splash Authorization
It is possible to reset the splash page authorization and force a client to again be presented with the configured splash page. This may be useful in several situations, such as testing the splash page in a live environment with a specific client. Authorization can be revoked by performing the following:
- In the Meraki dashboard, navigate to Network-wide > Monitor > Clients.
- Locate the client intended to be revoked and select it from the list.
- Next to the Splash: field in the client details page, select revoke; this will clear the splash authorization for the client.

- The client will then be listed as "Not authorized" and will be presented with the splash page.
NOTE: The ability to revoke this authorization is visible for splash pages on MX's, but does not function
Creating a Group Policy to Bypass a Splash Page
Certain types of devices cannot interact with a splash page in order to authenticate against it, such as gaming consoles, VoIP phones, or DVR systems. One way to allow these devices to successfully connect to an SSID configured with a splash page is to create a group policy to be applied to clients that require this bypass:
- In the Meraki dashboard, navigate to Network-wide > Configure > Group policies.
- Select Add a group; on the following page, give the group a name.
- Under the Splash drop-down, select the Bypass option as shown below.

- Select Save changes at the bottom of the page.
- Navigate to Network-wide > Monitor > Clients and tick the checkboxes for one or more clients that the policy should be applied to.
- Choose the Policy button in the client list; from the drop-down, select Group policy and choose the policy created above (in this example, "Bypass Splash Page").
- Select Save changes at the bottom of the page and allow the configuration to update on the dashboard.
This will allow all selected clients to use the newly created policy to bypass the splash page once the latest configuration has been applied to the Meraki devices serving splash pages.
Troubleshooting Splash Page Issues
More information on troubleshooting splash page issues (such as seeing a white page instead of the splash page) can be found in the document on Splash Page Traffic Flow and Troubleshooting.