
Configuring SSIDs and Access Control for Education
Cisco Meraki Access Points (APs) support up to 16 SSIDs (15 user configurable and 1 permanently reserved for mesh), each with its own access controls and firewall rules. Educators may find it necessary to create separate SSIDs for faculty, students, and guests.
The steps below provide examples of education-oriented SSIDs with different tiers of access by using firewall and traffic shaping rules.
Configuration Overview
This article will explain how to enable and configure three SSIDs, one for each type of user:
- Name wireless networks for Faculty, Students, and Guests
- Configure Access Control Configuration for Faculty SSID
- Configure Firewall and Traffic Shaping for Faculty SSID
- Configure Access Control Configuration for Student SSID
- Configure Firewall and Traffic Shaping for Student SSID
- Configure Access Control Configuration for Guest SSID
- Configure Firewall and Traffic Shaping for Guest SSID
- Enable wireless networks for Faculty, Students, and Guests
Adding several SSIDs has a negative impact on capacity and performance. See the article Multi-SSID Deployment Considerations for more detail.
Naming wireless networks for Faculty, Students, and Guests
- Log into Dashboard
- Navigate to Wireless > Configure > SSIDs
- For the Name section, click the rename link for an unused SSID
- Type the name of your SSID in the field. This is the name of the wireless network your faculty, students, or guests will connect to.
- Click the Save changes button

Access Control Configuration for Faculty SSID
- Navigate to Wireless > Configure > Access control
- Select your faculty network from the SSID drop down
Network access:
- Find the section Security
- For Association requirements, choose Password with WPA2 only
- Type the WPA2 key in the field. This is the password internal users will be prompted to enter for when connecting.
Note: To configure an externally hosted RADIUS server for WPA2-Enterprise, go here.

Splash page:
- For Splash page, choose Sign-on with Meraki Authentication
- For the Self-Registration option, select “Allow users to create accounts”
- For the Simultaneous logins option, select “Limit users to one device at a time”
Addressing and traffic:
- Find the section Client IP and VLAN
- For Client IP and VLAN, choose External DHCP server assigned and chose Bridge mode which will make clients part of the LAN
Note: In Bridge mode, Meraki devices operate transparently (no NAT or DHCP). Clients receive DHCP leases from the LAN or use static IPs. - Click the Save changes button

Firewall and traffic shaping for Faculty SSID
- Navigate to Wireless > Configure > Firewall & traffic shaping
- Select your faculty network from the SSID drop down
- Find the section Block IPs and port
- For Outbound rules, select “Allow” for Wireless clients accessing LAN
- For Layer 7 firewall rules, click on Add a layer 7 firewall rule link and select (at least) the following recommended applications:
- Gaming
- Peer-to-peer (P2P)
- Web file sharing
Note: More information on blocking specific applications not listed under Layer 7 firewall rules can be found here.
- Click the Save changes button

Access Control Configuration for Student SSID
- Navigate to Wireless > Configure > Access control
- Select your student network from the SSID drop down
Network access:
- Find the section Security
- For Security, choose Password with WPA2 Only
- Type the WPA2 key in the field. This is the password internal users will be prompted for when connecting.

Splash page:
- For Splash page, choose Click-through
Note: More information about enabling the click-through splash page can be found here. - For the Captive portal strength option, select “Block all access until sign-on is complete”
- Find the section Client IP and VLAN
- For Client IP and VLAN, choose External DHCP server assigned and chose Bridge mode which will make clients part of the LAN
Note: In Bridge mode, Meraki devices operate transparently (no NAT or DHCP). Clients receive DHCP leases from the LAN or use static IPs. - Click the Save changes button
Firewall and traffic shaping for Student SSID
- Navigate to Wireless > Configure > Firewall & traffic shaping
- Select your student network from the SSID drop down
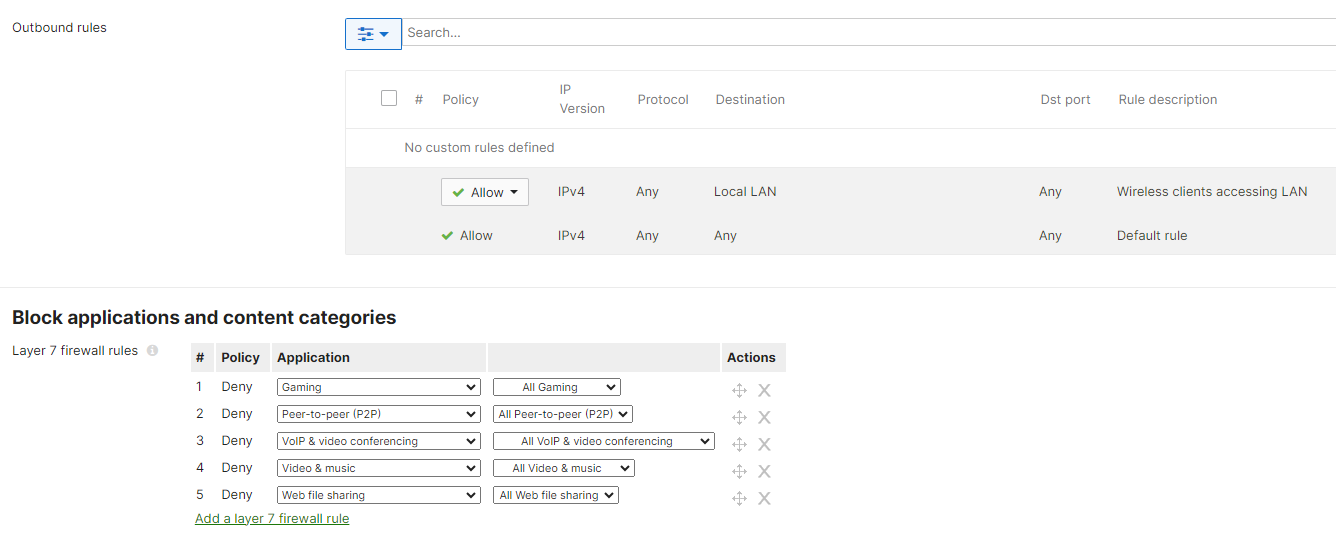
- Find the section Block IPs and port
- For Outbond rules, select “Allow” for Wireless clients accessing LAN
- For Layer 7 firewall rules, click on Add a layer 7 firewall rule link and select at least the following recommended applications:
- Gaming
- Peer-to-peer (P2P)
- VoiP & video conferencing
- Video & music
- Web file sharing
Note: More information on blocking specific applications not listed under Layer 7 firewall rules can be found here.
- Find the section Traffic shaping rules
- Set the Per-client bandwidth limit to “2 Mbps” and Enable speedburst
- Click the Save changes button

Access Control Configuration for Guest SSID
- Navigate to Wireless > Configure > Access control
- Select your guest network from the SSID drop down
Network access:
- Find the section Security
- For Security, choose Open (no encryption)

Splash page:
- For Splash page, choose None (direct access)
- Find the section Client IP and VLAN
- For Client IP and VLAN, choose Meraki AP assigned (NAT Mode)
Note: In NAT mode, Clients receive IP addresses in an isolated 10.0.0.0/8 network. Clients cannot communicate with each other. - Click the Save changes button


Firewall and traffic shaping for Guest SSID
- Navigate to Configure > Firewall & traffic shaping
- Select your guest network from the SSID drop down
- Find the section Block IPs and port
- For Outbound rules, select “Deny” for Wireless clients accessing LAN
- For Layer 7 firewall rules, click on Add a layer 7 firewall rule link and select the following applications:
- File sharing
- Gaming
- Peer-to-peer (P2P)
- VoiP & video conferencing
- Video & music
- Web file sharing
Note: More information on blocking specific applications not listed under Layer 7 firewall rules can be found here.
- Find the section Traffic shaping rules
- Set the Per-client bandwidth limit to “1 Mbps” and Enable speedburst
- Set the Per-SSID bandwidth limit to “5 Mbps”
- Click the Save changes button


Enabling wireless networks for Faculty, Students, and Guests
- Navigate to Wireless> Configure > SSIDs
- Enable the faculty, student, and guest networks
- Click the Save changes button
Now that these steps are completed, the AP's in your network will broadcast three separate SSIDs (Faculty, Students, and Guests). Each has its own set of access controls, firewall and traffic shaping rules.
Additional Resources
Please use the following links for help with configuring other aspects of your SSIDs: