
AnyConnect Authentication Methods
AnyConnect supports authentication with any of the following:
SAML
Certificate based authentication + Username & Password
RADIUS
Meraki Cloud
Active Directory
In beta:
Systems Manager Sentry authentication - Request access to join beta here
For more details on AnyConnect configuration, refer to the AnyConnect configuration guide.
SAML Authentication
SAML is an XML-based framework for exchanging authentication and authorization data between security domains. It creates a circle of trust between the user, a Service Provider (SP), and an Identity Provider (IdP) which allows the user to sign in a single time for multiple services. SAML can be used to authenticate with Identity Providers and MFA solutions such as, DUO, Okta, Onelogin, Entra ID.
SAML authentication requires MX firmware version 16.16+ or 17.5+. For troubleshooting, see the SAML Troubleshooting guide
AnyConnect with SAML only supports SP initiated SSO flow and uses Redirect & POST during the exchange with the IdP
Setting up AnyConnect Authentication with DUO
Setting up AnyConnect Authentication with Okta
Setting up AnyConnect Authentication with Onelogin
Setting up AnyConnect Authentication with Azure AD
To configure AnyConnect on the MX Appliance to authenticate with DUO via SAML, see below. The directions below do not include configuration of an authentication source, which is a requirement if using DUO as an Identity Provider.
To set up SAML authentication, you need a Service Provider (e.g. MX running AnyConnect), Identity Provider - DUO and a User.
-
Configure your Identity Provider - IdP (DUO)
-
Select configuration of a new Generic/Custom Application, (do not use AnyConnect presets in DUO for MX configuration)
-
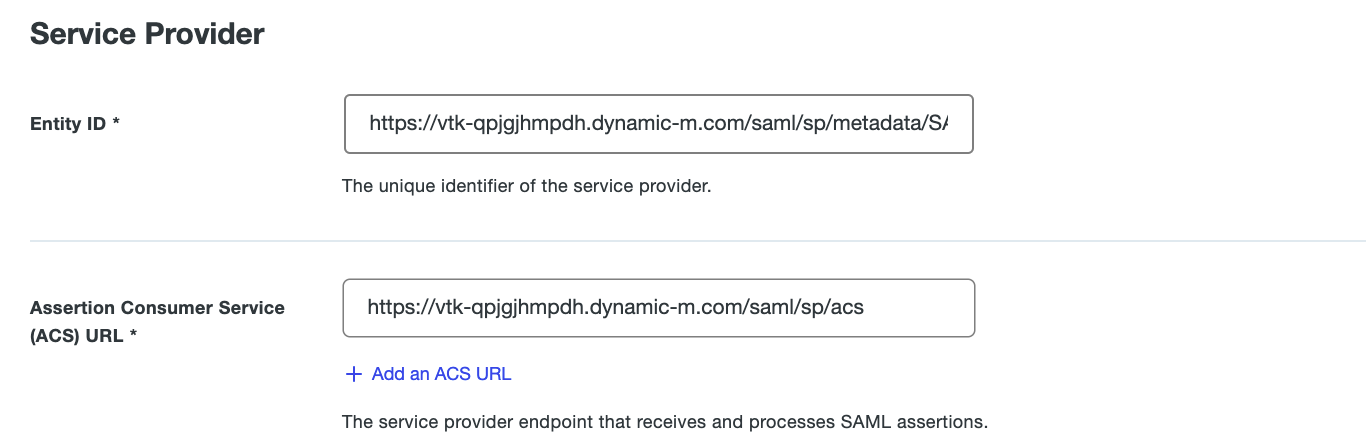
Configure only the Entity ID and ACS URL as follows:
-
e.g., If my AnyConnect Server hostname is "https://vtk-qpjgjhmpdh.dynamic-m.com", my DUO configuration for Entity ID and ACS URL will be configured as seen below:
SP Entity ID: https://vtk-qpjgjhmpdh.dynamic-m.com/saml/sp/metadata/SAML
ACS URL: https://vtk-qpjgjhmpdh.dynamic-m.com/saml/sp/acs
-
Ensure to add “:port” to the hostname when using any port other than the default 443, e.g https://vtk-qpjgjhmpdh.dynamic-m.com:8443, when referencing the AnyConnect Server in your configuration
After configuration, your Identity Provider will provide you with a SAML metadata file. e.g., seen from DUO IdP below.

-
Configure your AnyConnect Server on the MX
-
Set authentication method to SAML

-
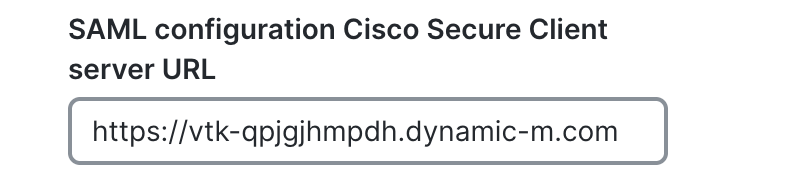
Configure your AnyConnect URL - https://vtk-qpjgjhmpdh.dynamic-m.com (add “:port” to the end of the hostname if using a port other than 443)
Please ensure your AnyConnect URL starts with https://
-
Upload the SAML metadata XML file provided by your Identity Provider to the MX.

Save your configuration and attempt to connect to the VPN to verify configuration.
Certificate-based authentication with Username & password

The AnyConnect server on the MX supports client certificate authentication as an authentication factor. If certificate authentication is enabled, the AnyConnect server will use the uploaded trusted CA certificate to validate authenticating clients before requesting for the users' credentials.
With certificate authentication, the administrator uploads a .pem or .crt file of the issuing CA certificate to the MX, and uploads a certificate signed by the same issuing CA to the end user's device.
On a Windows machine, run MMC, add Certificates Snap-in, navigate to Personal > Certificates folder, and import or request a new certificate.
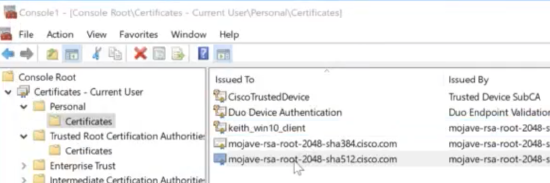
This will enable only devices that have a certificate signed by the Root CA to successfully authenticate to VPN. A common use case is for filtering non-corporate devices from authenticating to the VPN.
Once certificate authentication succeeds, users must input credentials. If certificate authentication fails, the AnyConnect client will report certificate validation failure.
Certificate-only authentication is currently in beta, and Meraki Support is not currently able to assist with any issues related to it. Please request access here or please await the general availability release.
Certificate Store Override: Allows an administrator to direct AnyConnect to utilize certificates in the Windows machine's Local System certificate store for client certificate authentication. Certificate Store Override only applies to SSL, where the connection is initiated, by default, by the UI process. When using IPsec/IKEv2, this feature in the AnyConnect Profile is not applicable.
You must have a predeployed profile with this option enabled in order to connect with Windows using a machine certificate. If this profile does not exist on a Windows device prior to connection, the certificate is not accessible in the machine store, and the connection fails.
Note: Wildcard certificates are not supported.
Meraki Cloud Authentication
Use this option if an Active Directory or RADIUS server is not available, or if VPN users should be managed via the Meraki Cloud. To add or remove users, use the User Management section at the bottom of the page. Add a user by clicking "Add new user" and entering the following information:
-
Name: Enter the user's name.
-
Email: Enter the user's email address.
-
Password: Enter a password for the user or click "Generate" to automatically generate a password.
-
Authorized: Select whether this user is authorized to use the client VPN.
To edit an existing user, click on the user under the User Management section. To delete a user, click the X next to the user on the right side of the user list.
When using Meraki-hosted authentication, the user's email address is the username that is used for authentication.

RADIUS Authentication
Use this option to authenticate users on a RADIUS server. Click "+RADIUS server" to configure the server(s) to use. Enter the IP address of the RADIUS server, the port to be used for RADIUS communication, and the shared secret for the RADIUS server.

Add MX security appliance as a RADIUS client on the NPS server.
In order for the MX to act as an authenticator for RADIUS, it must be added as a client on NPS.
-
Open the NPS server console by going to Start > Programs > Administrative Tools > Network Policy Server.
-
In the left-side pane, expand the RADIUS Clients and Servers option.
-
Right-click the RADIUS Clients option and select New.
-
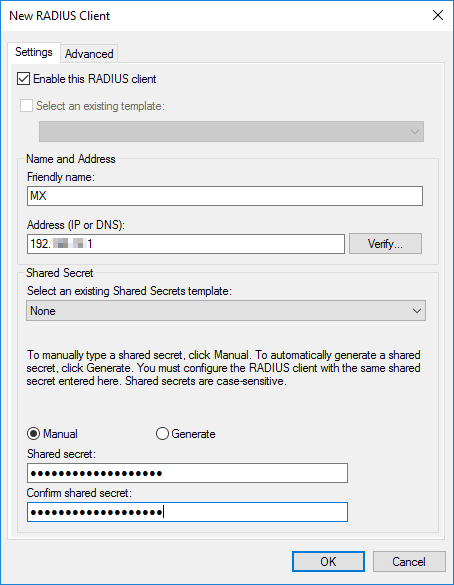
Enter a Friendly Name for the MX security appliance or Z teleworker gateway RADIUS client.
-
Enter the IP address of your MX security appliance or Z teleworker gateway. This IP will differ depending on where the RADIUS server is located:
-
On a local subnet: use the IP address of the MX/Z on the subnet shared with the RADIUS server
-
Over a static route: use the IP address of the MX/Z on the subnet shared with the next hop
-
Over VPN: use the IP address of the MX/Z on the highest-numbered VLAN in VPN
-
-
Create and enter a RADIUS Shared Secret (make note of this secret, you will need to add this to the dashboard).
Note: Currently only ASCII characters are supported for RADIUS shared secrets, Unicode characters are not supported.
-
Press OK when finished.
For additional information or troubleshooting assistance, please refer to Microsoft documentation on RADIUS clients.
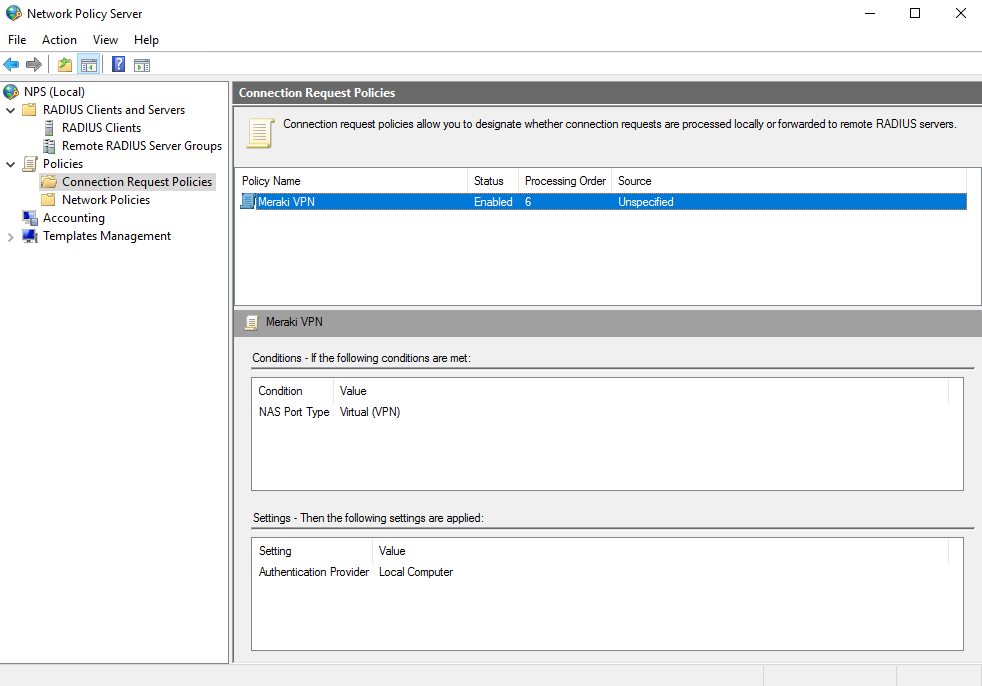
Configure a RADIUS Connection Request
-
In the NPS server console, navigate to Policies > Connection Request Policies. Right-click the Connection Request Policies folder and select New.
-
In the Connection Request Policy Wizard, enter a policy name and select the network access server type Unspecified, then press Next.
-
Click Add to add conditions to your policy. Access request messages will need to meet these conditions to be allowed access.
-
From the list of conditions, select the option for NAS-Port-Type. Select VPN Virtual, and then press Next
-
Press Next on the next three pages of the wizard to leave the default settings intact.
-
Review the settings, then press Finish.
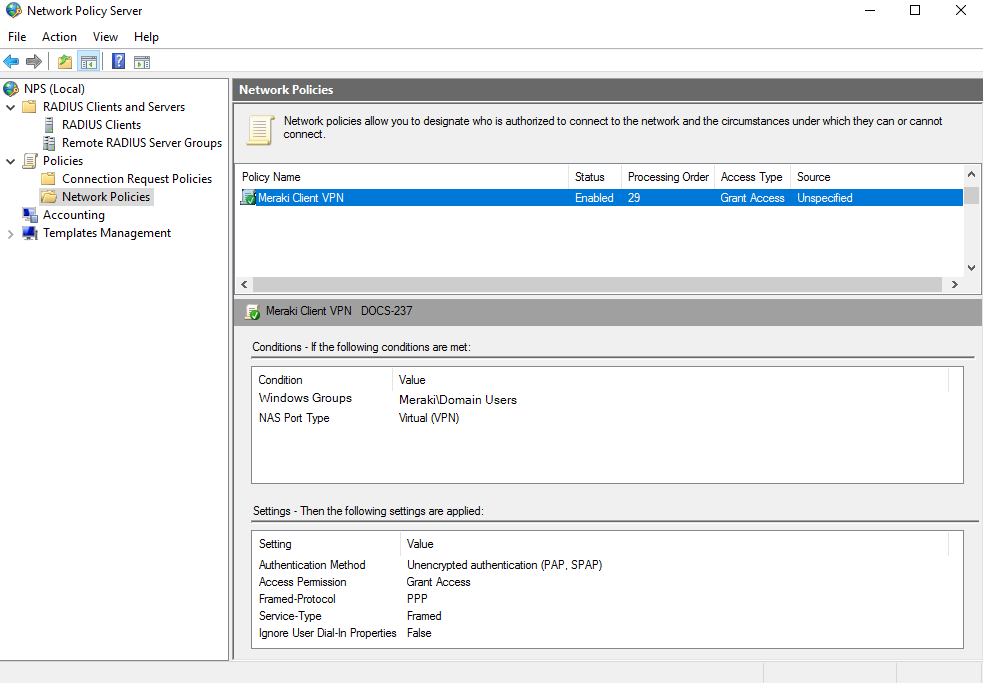
Configure a RADIUS Network Policy.
-
In the left-side pane of the NPS server console, right-click the Network Policies option and select New.
-
In the Network Policy Wizard, enter a policy name and select the network access server type Unspecified, then press Next.
-
Click Add to add conditions to your policy.
-
From the list of conditions, select the option for Windows Groups. Click Add Groups and enter the name you would like to grant client VPN permission to.
-
From the list of conditions, select the option for NAS-Port-Type. Select VPN Virtual and press Next.
-
Leave the default settings on the Specify Access Permission page and press Next.
-
Deselect all checkboxes and select Unencrypted authentication (PAP, SPAP). An informational box will be displayed, press No to continue, and press Next.
-
Press Next on the next two pages of the wizard to leave the default settings intact.
-
Review the settings, then press Finish.
Active Directory Authentication
Use this option if user authentication should be done with Active Directory domain credentials. You will need to provide the following information:
-
Short domain: The short name of the Active Directory domain.
-
Server IP: The IP address of an Active Directory server on the MX LAN.
-
Domain admin: The domain administrator account the MX should use to query the server.
-
Password: Password for the domain administrator account.
For example, considering the following scenario: Users in the domain test.company.com should be authenticated using an Active Directory server with IP 172.16.1.10. Users normally log in to the domain using the format "test/username" and you have created a domain administrator account with username "vpnadmin" and password "vpnpassword".
-
The Short domain would be "test"
-
The Server IP would be 172.16.1.10.
-
The Domain admin would be "vpnadmin"
-
The Password would be "vpnpassword"

Note: Only one AD server can be specified for authentication with AnyConnect at the moment. The MX does not support mapping group policies via Active Directory for users connecting through the client VPN. Refer to this document for more information on integrating with client VPN.
Note: TLS is required to communicate with the Domain Controller. For more details regarding TLS requirements please review our Certificate Requirements for TLS documentation.
Multi-Factor Authentication with RADIUS or Active Directory as a Proxy
MFA can be configured with your RADIUS or Active Directory server. The MFA challenge takes place between the RADIUS/Active Directory/IdP and the user. The MX will not pass any OTP or PINs between the user and RADIUS. When a user connects to the MX, they are prompted for a username and password. The MX passes these credentials to the RADIUS or AD server, which then challenges the user directly (not through the MX). The user responds to the RADIUS or AD server, possibly via push notification or other means. The RADIUS or AD server then informs the MX that the user has successfully authenticated. Only then is the user allowed access to the network. Refer to this document for more information on authentication.
RADIUS Timeout
The default RADIUS timeout is three seconds. This is how long the AnyConnect server will wait for a response from the RADIUS server before failing over to a different RADIUS server or ignoring the response entirely. To support two-factor authentication, you can increase the RADIUS timeout by modifying the RADIUS timeout field on the Cisco Secure Client Settings page. The configurable timeout range is 1 - 300 seconds.

Systems Manager Sentry Authentication
Sentry AnyConnect VPN is a special Cisco Meraki integration between MX and Systems Manager (SM) enrolled devices. This allows secure and automatic certificate-based Always-On AnyConnect VPN for SM managed devices. SM managed devices will be sent all the necessary configurations, certificates, and app settings for an Always-On VPN tunnel back to the MX. For SM enrolled devices, the end users are not interrupted with any authentication/setup steps and the VPN tunnel will open automatically.
Note: SM Sentry AnyConnect Authentication is currently in beta and requires SM or MX product teams to enable it. Please request access here or please await the general availability release.
Systems Manager Sentry Authentication Setup
On the Security & SD WAN > Client VPN > Cisco Secure Client Settings page, find the Authentication & Access section. Set the Authentication Type to Systems Manager Sentry Authentication. Then, click on Add Sentry Network and choose one or more Systems Manager networks and the desired tag scoping to allow all or a subset of the devices enrolled in SM to obtain this configuration.
Firmware requirement: MX 17.10 or higher
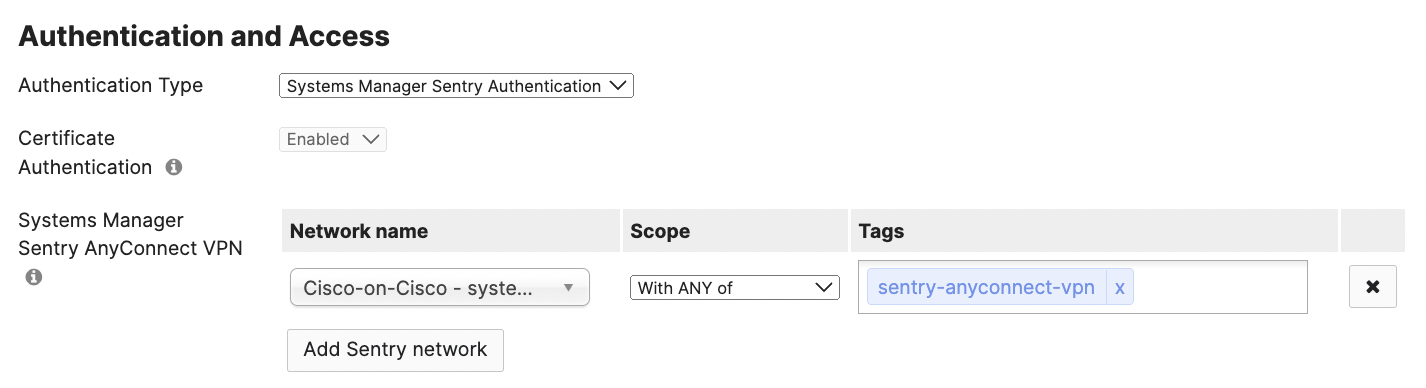
In the above image, all devices tagged with sentry-anyconnect-vpn in the SM network called Cisco-on-Cisco will receive the automatic Systems Manager Sentry AnyConnect VPN configuration.
Note: The SM network and MX network must be part of the same Meraki organization.
SM Sentry Technology
The SM enrolled devices will automatically be delivered the settings necessary to connect via AnyConnect to the MX host. The Meraki Cloud Certificate Authority (CA) handles all the certificate management. Administrators do not need to be burdened with the complexities of certificate management, while also obtaining all of the certificates, security, and authentication benefits. At a high level, the automatic Sentry AnyConnect VPN configuration to managed SM devices contains three main settings:
- SCEP certificate payload used for certificate-only authentication to MX via Meraki Cloud CA.
- VPN payload with AnyConnect Always-On enabled. This will automatically use the host:port configured on the MX Client VPN page.
- Cisco Secure Client application with necessary managed app configurations. This app is necessary to enable the AnyConnect VPN app's networking capabilities on devices.
iOS and iPadOS
Currently, the Sentry AnyConnect VPN beta supports iOS and iPadOS only. To request beta access: fill out this form.
Always-On VPN tunnel requires Supervision.
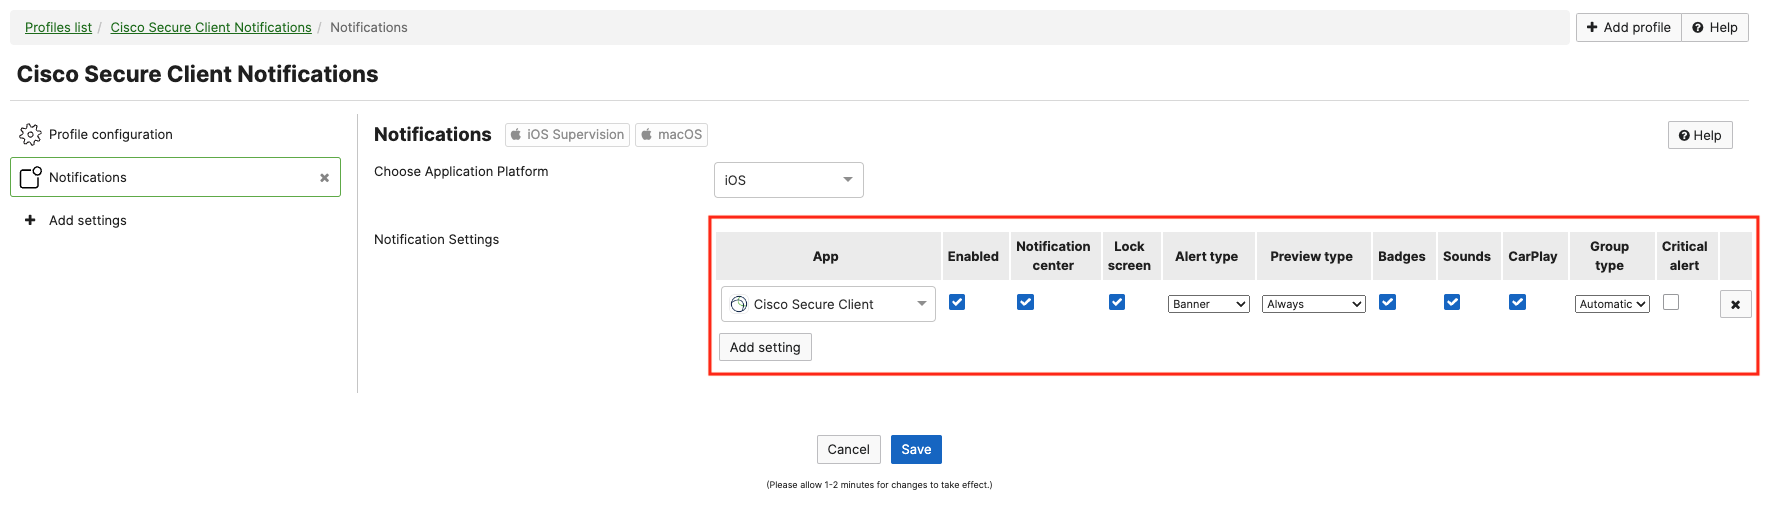
After the Cisco Secure Client app is installed, the device will prompt end users for notifications. This can be suppressed (automatically accepted so end users are not interrupted) by adding an optional Notification profile payload for Cisco Secure Client app in the SM > Settings page:
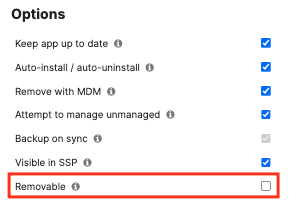
If end users are able to remove the Cisco Secure Client app, they can disable the Always-On VPN tunnel. To prevent end users' ability to remove the app (and thus keep the tunnel enabled), add a Home Screen Layout, set the app to be hidden via Restriction, and/or uncheck the removable option for the Cisco Secure Client app on the SM > Apps page:
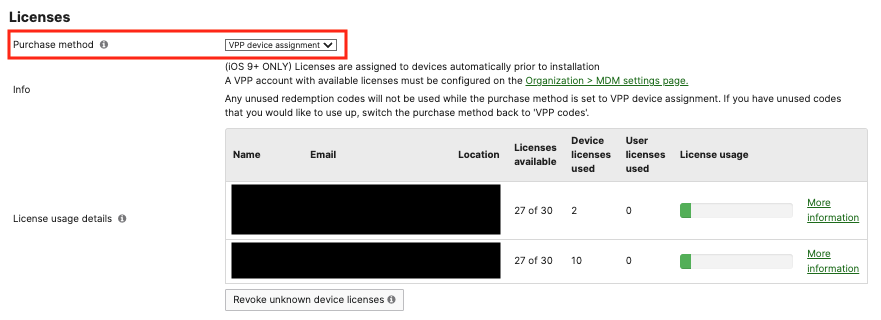
To install the Cisco Secure Client app completely silently, a VPP license will need to be added. It is recommended to use VPP Device Assignment on the SM > Apps page:
Android
Support coming soon.
macOS
Support coming soon.
Windows
Support coming soon.