
Using the Organization Inventory
Click 日本語 for Japanese
Each organization in Dashboard has an inventory that tracks what Cisco Meraki devices have been added to the organization and any networks it contains. This article will discuss the Organization > Configure > Inventory page, and some common actions that can be done there.
Learn more with these free online training courses on the Meraki Learning Hub:
Searching For Devices
The Organization > Configure > Inventory page will provide a comprehensive listing of all devices that are currently added to any networks within the organization, as well as devices that have been claimed, but are not currently in a network.
Use the Search inventory box to search for a device, or group of devices, based on:
- MAC address
- Serial number
- Network name
- Model number
- Order number
- Country code
Note: The country code is reflective of the shipping information on the node's order if it has not been overridden due to regulatory requirements.
For Catalyst devices, the Meraki Serial Number is known as Cloud ID. Use the Cloud ID (or Meraki Serial Number) to claim devices. Catalyst or Cisco Serial Number can not be used to claim the device. If unsure, the 12 digit cloud ID can be located on the device itself.
Co-termination or Subscription Licensing Organizations
The example below demonstrates searching for a serial number:

There are also options to based on Deployment status.
- Deployed - Currently added to a network.
- Available - Claimed, but not in a network.
The displayed list of devices can also be exported to a .CSV or .XML file for easier external processing/tracking. Simply click the Download button to generate and download the desired data file. To download all devices in inventory, ensure all filters are off and all columns are turned on.

Per-Device Licensing Organizations
The example below demonstrates searching for a serial number:

You can also use the filter option to do a more granular search:
- Product type
- Product models
- Device tag
- Network
- Usused / In use
- Order number
- License expiration date
- Days until shutdown

Similar to organizations that are using the Co-termination licensing model, the displayed list of devices can also be exported to a CSV file, by clicking on the Export button.

Claiming Devices
To begin utilizing a device in Dashboard, it must first be claimed. The claim process can be initiated from any page where devices may be added:
- Network-wide > Configure > Add Devices
- Organization > Configure > Inventory (detailed below)
Devices can be individually claimed using the Cloud ID as detailed below, or claimed in bulk by claiming all the devices from an order using the Order Claim Key. For more detailed information on the device and license onboarding process using your order claim key, refer to "Using Your Order Claim Key."
Note: If you are using a claim key to add subscriptions or devices to your organization, please make sure you are using the updated user interface (UI). You can switch to the new UI by using the toggle "Try new version" located in the top right corner of the Organization > Configure > Inventory page.
Note: Network-only administrators cannot claim devices into the organization's Inventory. They may only claim devices via Network-wide > Configure > Add Devices.
If a device was recently removed from a network, please allow up to 60 minutes before attempting to claim the device/order to a different inventory.
Note: Claiming a device to an organization's Inventory does NOT assign ownership. The Inventory is merely for record-keeping and organizing. Administrators must assign the device to a network to actually claim ownership of that device.
If you would like to take ownership of the devices but are not ready to add them to your network in your current organization, you can claim them to a temporary ‘holding organization’. Once you have created the new organization, you will want to create a network. This will assign ownership of the devices to the holding organization. If no licenses are added the organization will shut down and will not allow anyone else to claim the devices or use the devices in any other organization.
Please follow the KB for moving devices between organizations when you are ready to move the devices.
Quickly Scan and Claim Multiple Devices through the Meraki Mobile App
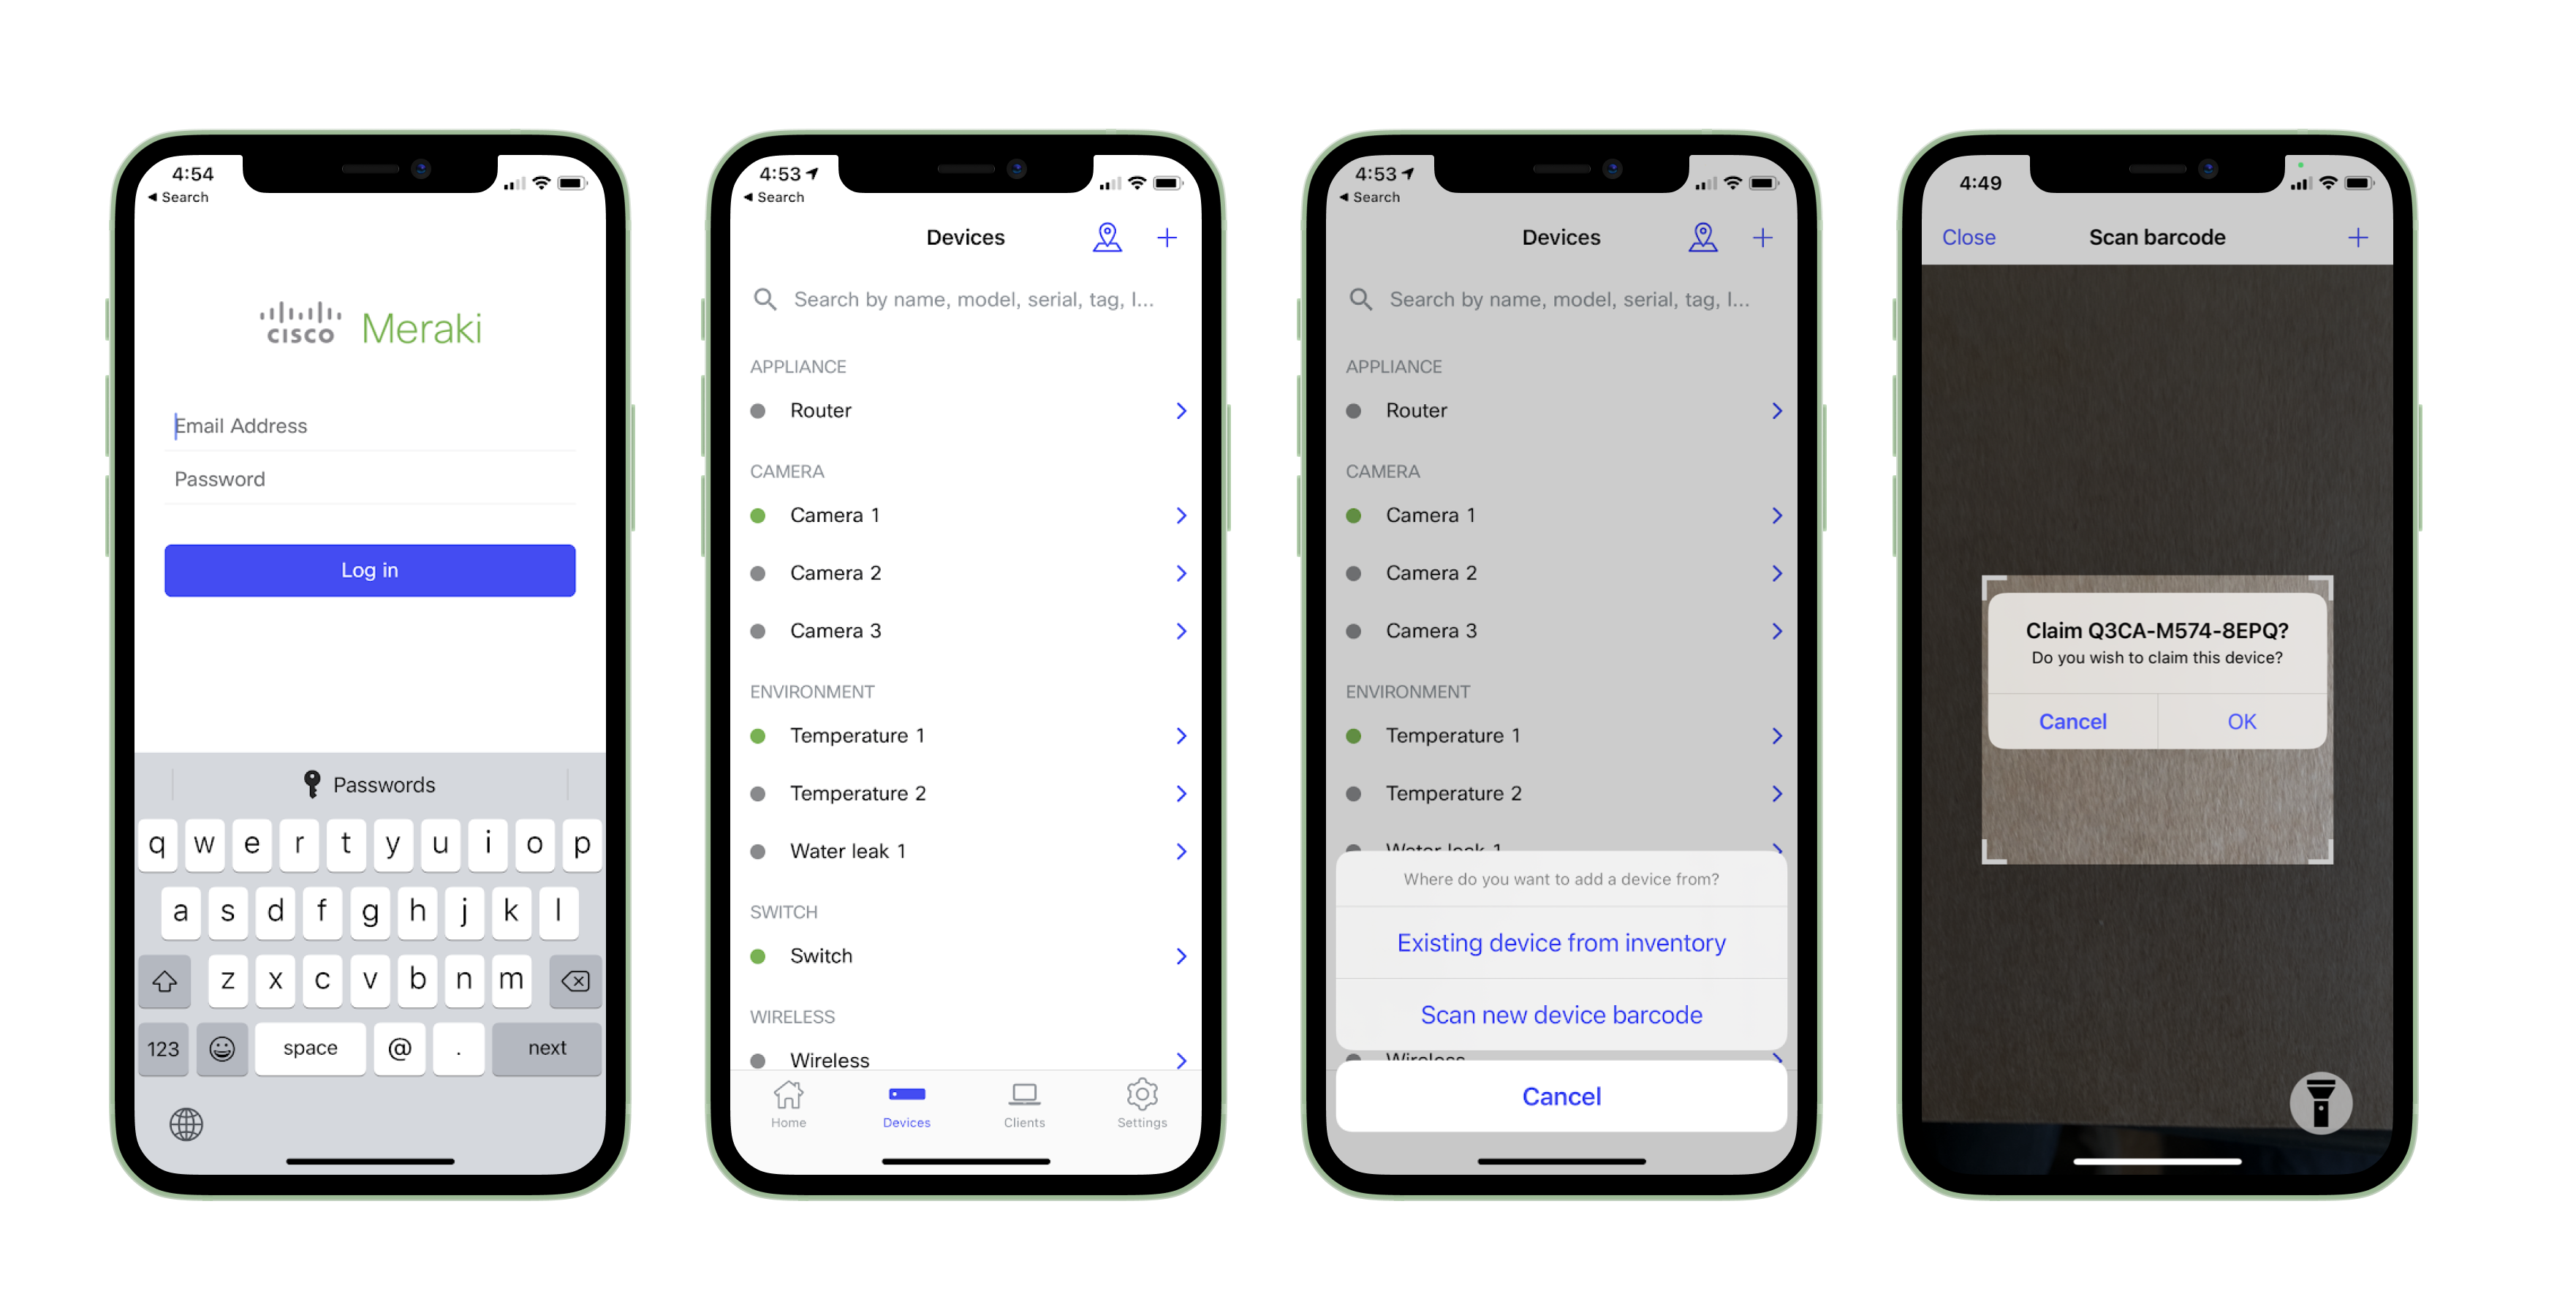
If you have to claim multiple devices, the quickest way is by scanning their barcode using the Meraki app.
- Log in to your Meraki iOS or Android app with your Meraki dashboard account. Create a new account if you do not have one.
- Navigate to the correct network through the left-side bar.
- Go to the Devices tab from the bottom navigation bar.
- Select the + icon on the top right of the screen and pick Scan new device barcode.
- Point your phone camera toward the hardware barcode to claim the device.
- Enter device information and then select Done. Press Add another to claim a new device.
Co-termination & Subscription Licensing Organizations
- Click +Claim devices button on the top right of the inventory page, and then select the Claim individual devices link on the Claim devices modal window.

- Enter either the twelve-digit serial number of the device(s); one per line.

- Click Claim devices.
For data privacy reasons, if a device is claimed to the inventory using the Cloud ID, the order number column will not be populated in the device in the Organization > Inventory page.
If an error message appears indicating "Device is already claimed", verify that the device isn't already active in this organization or another one. If it is in another organization, it will need to be removed.
4. Click Close. The device(s) is now available for adding to a network.
Under the co-termination licensing model, attempting to claim orders that only include licensing may result in an error message. The licensing from these orders can, instead, be claimed by using the licenses Key for more information regarding this please follow these steps.
The ability to claim devices using the Meraki Order Number has has been deprecated. Please claim devices from your order using the Order Claim Key provided in your Product Claim emails. For more information, refer to Using your Order Claim Key.
Once any element of an order has been claimed to a Dashboard organization, the order can no longer be claimed as a whole. The remaining devices will need to be claimed individually and the licensing will need to be claimed following a separate process.
Alternatively, orders may still be claimed if the already claimed devices are first removed from their respective environments.
Per-Device Licensing Organizations
- Click Add..

- Enter either the twelve-digit serial number of the device(s); one per line.

- Click Next

- You should get the following message if the claim was successful (with a list of all the devices that have been assigned to your organization's inventory)

- Click Next
- In the next menu, you will get the option to assign your newly claimed device(s) to specific networks in your organization or you can click on the Assign later button to complete this process later.


- The last menu will provide you with a set of documentation to get you started on configuring your new devices

- Click Done to complete the process.

Claim Error Message: Some of the devices you tried claiming are in use
If you attempt to claim a device that is already claimed in another organization's network, you will receive an error message reading "Some of the devices you tried claiming are in use".

If a device is claimed in a network, it will not be possible to:
- Claim it to another organization
- If any number of devices from an order has already been claimed, it will not be possible to claim the remaining devices using the order number. Claim the rest of the Meraki order that is associated with that device.
In order to add a device to your network, you will need to contact an administrator of the organization that currently owns the device and have them follow the instructions in our documentation to remove the device from their network. Once that has been done, after a brief wait (5-60 minutes), the device should be claimable again.
Due to privacy and security concerns, Cisco Meraki Support cannot assist in moving/removing devices that have already been claimed to another organization
Unclaiming Devices
Co-termination & Subscription Licensing Organizations
Sometimes devices need to be entirely removed from an organization in Dashboard, most often as part of moving the device to another organization. The steps below will unclaim a device and remove it from the organization's inventory.
Note: The device must be removed from any networks before proceeding.
- Navigate to the Organization > Configure > Inventory page.
- Check the box for the device(s) to unclaim.

- Click Unclaim.
- The device(s) will disappear from the list.
Per-Device Licensing Organizations
- Navigate to the Organization > Configure > Inventory page.
- Check the box for the device(s) to unclaim.

- Click on Actions, select the option Remove from Organization.
Note: If the device is currently in a network, you will first need to remove the device from the network following the steps in the Adding and Removing Devices from Dashboard Networks article.
- A confirmation menu will pop up, click on Remove.

- The device(s) will disappear from the list.
Adding Devices to Networks
While there are multiple ways devices can be added to a network, this section will outline the process to add devices from the Inventory page.
For more information, please review the article on Adding and Removing Devices from Dashboard Networks.
Before beginning, create a network if one doesn't already exist.
Co-Termination & Subscription Licensing Organizations
- Navigate to the Organization > Configure > Inventory page
- Check the box next to any device(s) to add.

- Click Add to network
- To add to an existing network:
- Select Existing network

Choose the desired network from the dropdown
Note: Only one MX or Z1 can be in a network.
Note: Adding more than one device type to a network will automatically convert that network to a combined network.
- Click Add to network.
5. To add to a new network:
- Select New network.

- Enter a Name for the network.
- Choose a Configuration. Leave as "Default" unless cloning another network, or tying to a template is desired.
- Click Add to new network.
6. The device(s) will be added to the desired network.
Per-Device Licensing Organizations
- Navigate to the Organization > Configure > Inventory page
- Check the box next to any device(s) that are being added to a network

- Click on Actions, select the option Change network assignment

- Select Move devices to network and pick the network from the drop down menu. Afterwards, click on Review changes.

- Review the changes and then click on Move to network.

- After the devices have been successfully moved to their network, you will get the following message. Click on Done to finalize the process.

- The device(s) will be added to the desired network.
We highly recommend having the total switch count in any dashboard network to be less than or equal to 400 switches. If switch count exceeds 400 switches, it is likely to slow down the loading of the network topology/ switch ports page or result in display of inconsistent output.
Device End of Life (EoL) Milestones
For enhanced inventory and device lifecycle management, device End of Life milestones are now displayed directly on the Inventory page. This visibility includes key EoL dates such as End of Sale and End of Support within the inventory table, alongside summary alert messages and quick-export options for impacted devices.

End of Life Visibility
Important End of Life (EoL) milestones can now be displayed as columns in the inventory table. To add these, use the gear icon at the top right of the inventory table and select End of Sale date and End of Support date. These fields can also be exported for planning purposes.
Note: In the End of Sale or End of Support date column, a '—' indicates that no End of Life milestones have been found for this particular device.
End of Life Alerts
End-of-Life alerts are now displayed at the top of the Inventory page. When devices in your inventory reach an EoL milestone, alerts will be provided for the following:
- End of Sale
- End of Support in the next year
- End of Support
Each alert includes device counts and a detailed view to easily export impacted devices.
Alerts for devices with published End of Sale dates and those reaching End of Support within the next year are dismissible (and will reappear after 30 days). Alerts for devices that have reached End of Support are not dismissible and will remain visible until the affected devices are removed from inventory.
For more information on device end-of-life and a comprehensive list of devices, please refer to Meraki End-of-Life (EOL) Products and Dates article.
Note: To use this feature, please make sure you are using the updated user interface (UI). You can switch to the new UI by using the toggle "Try new version" located in the top right corner of the Organization > Configure > Inventory page.
Note: End of Life milestones are only visible in co-termination or subscription licensing organizations. Per-device licensing-based organizations do not show end of life milestones.
Country Code
By default, the country/region shown on the Inventory page for a node is reflective of the ship-to address from its order. Once the node is added to a wireless network, the country code will update to reflect the network's country code configured under the Network-wide > Configure > General page.
If a non-wireless device, such as an MS or MX, have their network combined with a wireless network, its country code on the Inventory page will also be updated to the same country code of the combined network based on the Network-wide > Configure > General page.
Note: If the country code of the combined network was updated before prior to combining a non-wireless and a wireless network (and they had different country codes), the non-wireless device will not have its country code updated in the Inventory page until the Network-wide > Configure > General page is saved.
Bulk Switch Replacement
This section explains the steps necessary to replace switches. The Organization > Configure > Inventory page enables users to replace switches while maintaining configuration continuity via a straightforward workflow. Some common use cases for switch replacement are:
-
Return Material Authorization (RMA) process
-
Replacing a switch of the same port density but with a different feature set. Eg: MS355-48 with MS355-48P for PoE
-
Replacing a switch that is not part of RMA. Eg: when consolidating networks and not necessarily replacing a faulty switch
Prerequisites: To successfully replace switches using this workflow, the following expectations must be met:
-
You can replace switches that are currently assigned to a network. Unassigned switches cannot be replaced.
-
The replacement switch must not be assigned to a network. Assigned switches cannot be used as replacements.
Guide: To replace one or more existing switches:
-
Go to Organization > Configure > Inventory and select switch device which is assigned to a network and click Replace (make sure that there are replacement devices available)

-
Select newly claimed switches that aren’t part of any network in the new device dropdown selector. The dropdown selector displays a list of all the switch devices that are available, not associated with any network, and share the same model and port density.

-
It is important to note that replacement is permitted on various subset models of a specific switch model, for example: MS390-48P can be replaced with an MS390-48 /MS390-48U/MS390-48UX. Below are a few examples of different subset models:
-
Model
Model Subset
MS120-24
MS120-24P
MS120-48
MS120-48FP, MS120-48LP
MS120-8
MS120-8FP, MS120-8LP
MS125-24
MS125-24P
MS125-48
MS125-48FP, MS125-48LP
- *For more information on models and subsets, please refer to the family datasheet here.
-
- Choose an action for the existing device
- Users can select one of the two actions - they can return device to inventory or unclaim the device
- The bulk replace action on the Organization > Configure > Inventory page scales the current switch cloning feature and is designed to copy over all the port-level and some switch-level configuration settings from the source switch to another. All configurations that are copied over are described in this switch cloning KB.
- After initiating the replacement action, it will take a few minutes to complete. The following are the statuses during this process:
- In Progress
- Completed
- Failed

APIs: We have APIs to support switch replacement programmatically.
POST /organizations/{organizationId}/inventory/devices/swaps/bulk and GET /organizations/{organizationId}/inventory/devices/swaps/bulk/{id} are used by this feature to create the switch replacement request, and poll the status.
Known Limitations
-
Replacement does not allow copying over the L3 config settings because two switches in the same network cannot have the same L3 configurations as it can lead to conflicts and service disruptions.
-
With the exception of replacement of an MS210/225 configuration to an MS250, replacement requires the source and destination switches to be the same model.
-
Replacement requires the source and destination switches to have the same port density.
-
Stacked switches cannot be replaced with this workflow.
-
Switches that are part of networks bound to config or switches bound to switch templates cannot be replaced with this workflow.
Additional Resources
For information on related topics, refer to the following articles:
Adding & Removing Devices from Dashboard Networks
Licensing Guidelines & Limitations
Moving a Device Between Organizations