
Cisco Secure Connect - Remote Access v2
Overview
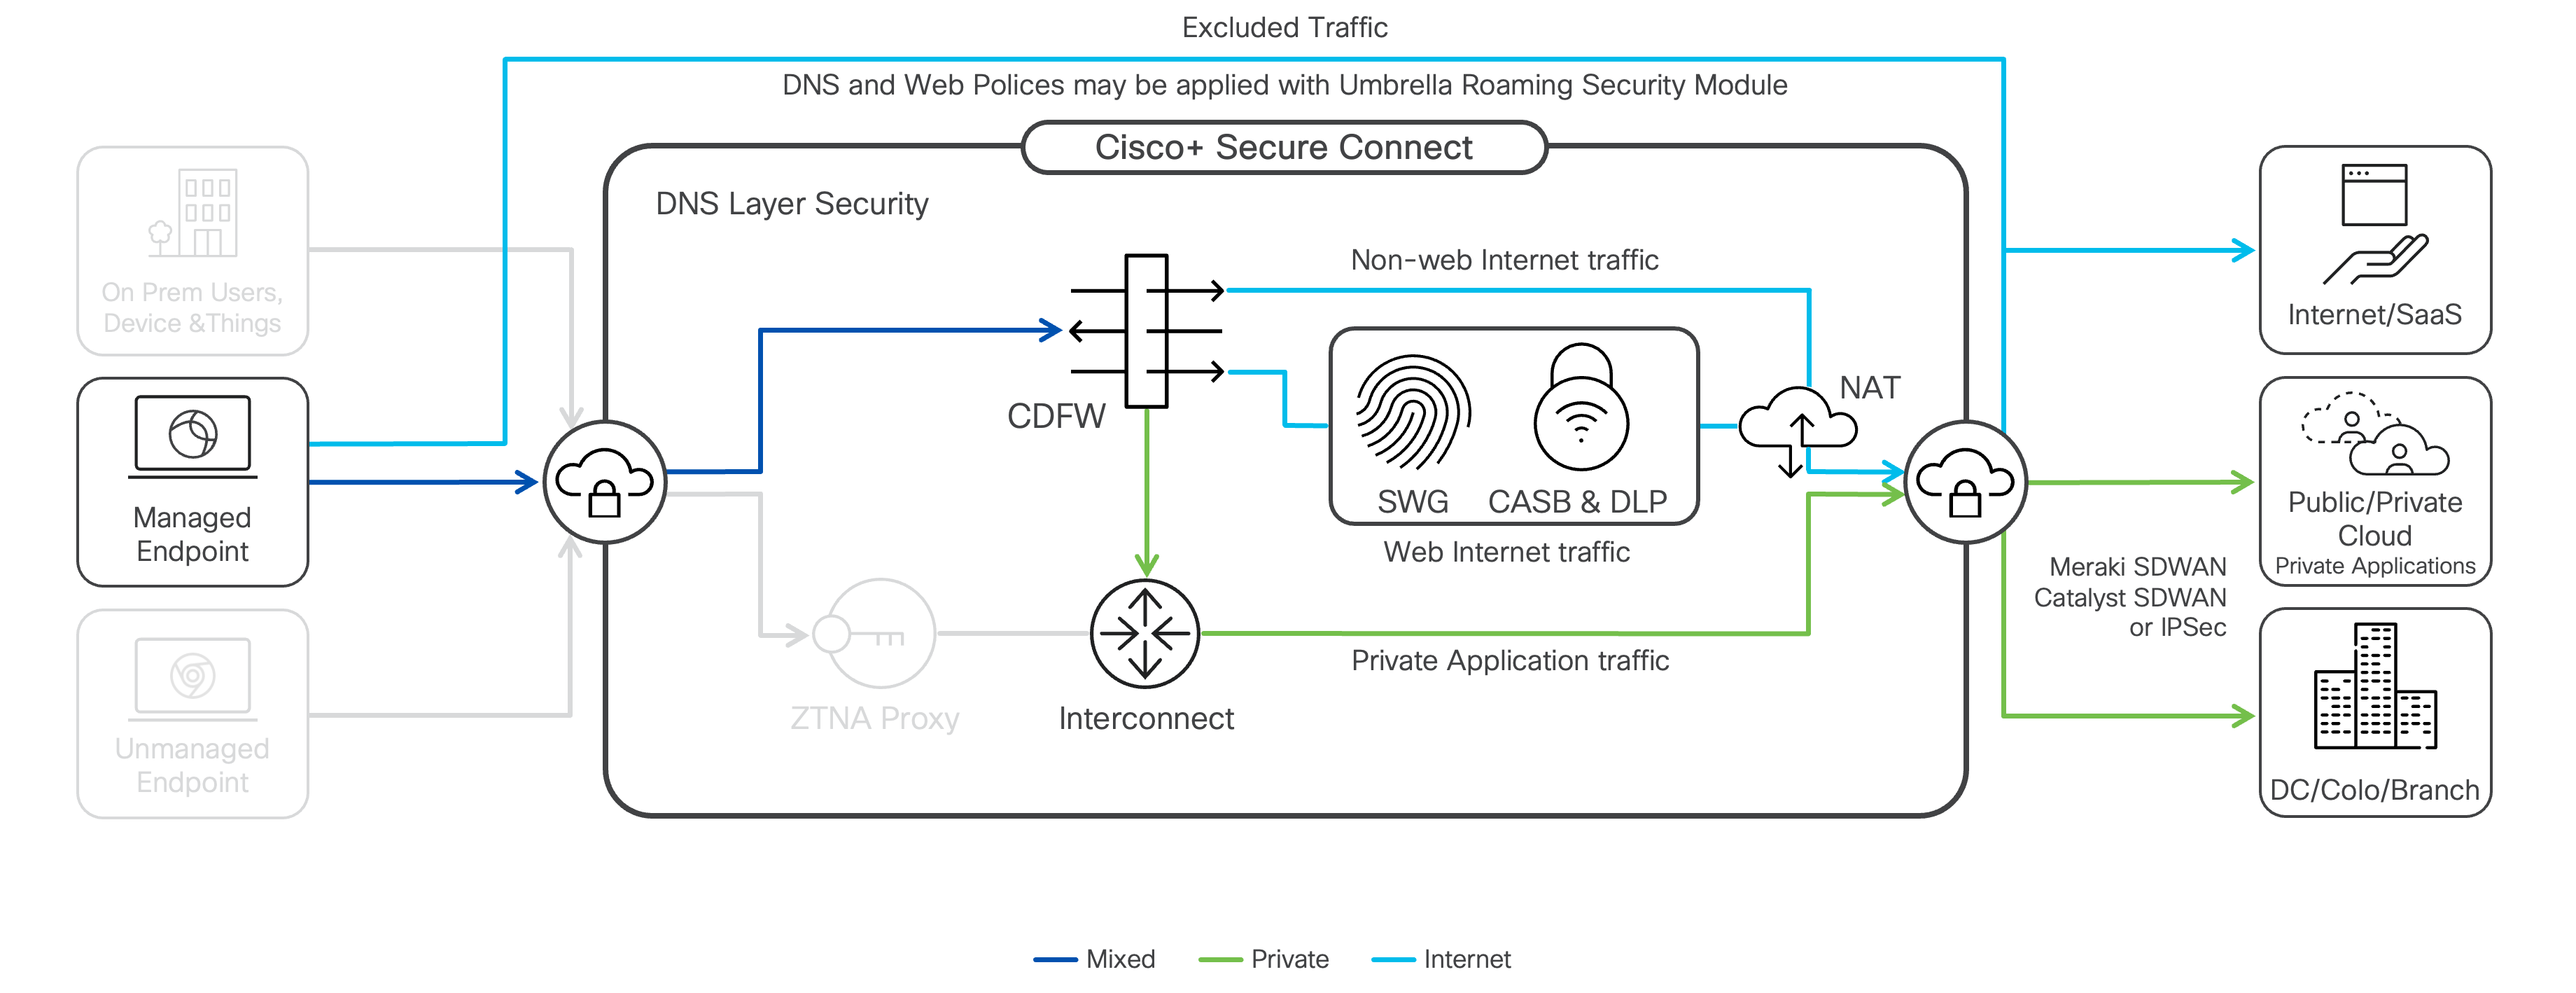
Cisco Secure Connect enables remote users to access private applications from anywhere through the Secure Connect fabric using a Cisco Secure Client (formerly the Cisco AnyConnect client). Identity-based access control is possible using SAML authentication through the customer’s IdP. Endpoint Compliance, as known as Endpoint Posture, is also evaluated, enabling granular access control to private resources.
Prerequisites
|
Requirement |
Details |
|---|---|
| Private DNS server IP addresses | Servers used to resolve private application names |
| Corporate domain name | Domains that must be resolved to access private applications |
| Client IP address pools |
Each region specified must have a minimum of two locations each configured with private address pools. (Notice: we recommend to use contiguous private address pools to make it easy to summarize for routing and rule updates.) These pools cannot overlap with existing internal addresses/subnets in use on the internal customer network. One region is required, a second region is optional For a complete list of supported regions and data center locations check here. |
| Any subnets that require tunnel bypass | You may want to direct specific traffic, such as DNS, to bypass (route outside of) the tunnel |
Remote Access Setup
In order to begin, you'll first need to connect your Cisco Meraki and Cisco Umbrella accounts together for a seamless experience. For further instructions, see Cisco Secure Connect Onboarding.
Getting Started
- Get started with navigate to Secure Connect -> CONNECTIONS -> Remote Access to begin the setup process

- Remote access service wizard will guide you through Configure regions and DNS Servers.

- Configure regions will allow you to choose your locations under Asia Pacific, Europe and North America. Select the Secure Connect data center Location where you client VPN tunnels will terminate. You can choose single or multiple regions based on your requirements.
A location is added by entering an IP address range in the Remote Client IP Address Range field. Leave the space blank if you do not want to use that location, which may be the case if you are using Reserved IP.
There are a few things to note when configuring locations.- A minimum of two locations must be added per region.
- The IP address ranges must be in the private address space defined in RFC1918.
- The IP address ranges you choose for your Remote Client IP Address Range must not overlapped with other address ranges in your internal network.
- Changing the Display Name is an optional step.


- Add the IP address(es) of the DNS Server(s). Secure Client will use these servers to resolve applications accessed through the tunnel.
Add a Default domain for DNS resolution and additional DNS Names (optional) in the respective fields and Click Save. After saving, Secure Client
and traffic steering will be available in the next view.


Secure Client configuration (optional)
For Secure Client configuration, you are able to:
- Define the timer for Session Timeout
- Enable Auto-Connect remote users on Start
- Enable Auto-Reconnect remote users on Start.
- Customize a Post-authentication-banner
- Allow users to manual input host
- Customize Logon enforcement for RDP

Traffic Steering (optional)
Traffic Steering, also known as split tunneling, enables you will be able to decide what traffic you want to encrypt and transit over the Secure Client connection (inside the tunnel), and which traffic (if any), you want to go directly to internet resources (outside the tunnel).
By default, all traffic will be sent through Secure Connect tunnel. Users will not have access to local resources while connected.

If you want to enable Traffic Steering, select Customize traffic steering, you can
- Enable LAN access for remote users to designate LAN access outside secure tunnel if access to local resources, e.g. local printers, is required while connected.

- Only send traffic going to these destinations with exceptions . For example, whatever you specifiy under destinations, only those destinations will be sent through Secure Connect tunnel. You can add Exceptions to exclude a certain subset of destinations under this rule.
To be notified: All exceptions must match the format used for the DESTINATION (CIDR or domain).

- Send all traffic except traffic going to these destinations with exceptions. For example, when you choose this selection, traffic will by default send through Secure Connect tunnel except the destinations you specify. The destinations you added will be steered outside the tunnel. You can add Exceptions under this rule such that a subset of destinations will still be sent through Secure Connect tunnel.
To be notified: All exceptions must match the format used for the DESTINATION (CIDR or domain).

DNS resolution mode
A secondary DNS server can be configured for a failover purposes. A client will failover to the secondary DNS server IP in case the primary is either not responding or taking longer than expected to respond to DNS queries.
There are still DNS resolution modes available:
- Standard DNS (Default)
In the default DNS mode, how queries are sent depend on the operating system.
- Modern Windows OS will send DNS queries to the VPN interface and LAN/physical interface at the same time and just uses the fastest response.
- Older Windows OS and some other operating systems may try the VPN first and “failover” to the LAN/physical interface. - Tunnel All DNS
With Tunnel All DNS, all queries must be sent via the VPN interface. This mode is only really advisable if you wanted to ensure no DNS leaked outside the VPN for security reasons. The performance of the tunnel and private access will directly impact the performance of DNS.
In this mode, Secure Client blocks all DNS traffic except via the VPN interface, and the Primary DNS server must be able to resolve ALL internal and external queries (eg. Recursion enabled). - Split DNS
With Split DNS, Secure Client only allows internal DNS queries via the VPN interface, and only allows external DNS queries via the LAN/physical interface. It will be beneficial that:
- May offer better DNS performance for external DNS queries, whilst still maintaining internal DNS resolution
- Prevents DNS query information for your internal domains “leaking” outside the VPN
- Allows you to control the behavior when you have an external and internal copy of the same zone.

Please NOTE that:
- Split DNS is only available when you enable "Only send traffic going to these destinations"
- At least two DNS domain names are needed (separate by comma)

Split DNS mode is only available when "Only send traffic going to these destinations" is selected.
More on behaviour of DNS queries with Secure Client can be found here.
Provision
- Once you complete above steps and click Save, it will re-direct you to the Remote Access overview page and start provisioning on the backend.

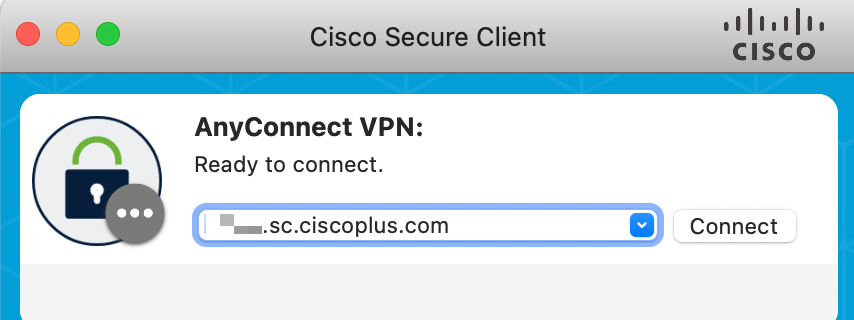
Once provisioning is complete, an auto-selecting URL is provided that will automatically select the closest data center to the remote endpoint. This URL is visible in the Secure Connect and Umbrella dashboard and follows the format; <system generated id>.sc.ciscoplus.com.
Alternately, location-specific FQDNs are provided with the following format: <system generated id>.location.sc.ciscoplus.com. Using the above example, the 4 FQDNs generated could be:
123d.pao1.sc.ciscoplus.com
123d.nyc1.sc.ciscoplus.com
123d.lax1.sc.ciscoplus.com
123d.ash1.sc.ciscoplus.com
The VPN profiles for each location, per the above example, will appear as "Palo Alto, CA", "New York, NY", etc.
Remote Access users may choose to connect to the auto-selecting URL or a specific location via the Secure Client dropdown. Note the drop downs will populate after first connecting to the service.
This may take up to five minutes to complete. It is ok to start the next section while waiting.
- You can verify Remote Access has been provisioned successfully under Secure Connect -> CONNECTIONS -> Remote Access. To make any changes or verify configuration, select each tab or click Configure Regions to edit regions/locations head-end.
- To complete the whole experience of Remote Access. You need to configure your remote users, please check Configure and provision users to complete deployments.
- (Optional) If IdP was configured prior to Remote Access, we would need to go to Umbrella dashboard add users to Remote Access from the Settings page.
In Umbrella dashboard navigate to Deployments > Remote Access, click on Settings at the top right corner of the page and navigate to Assign Users & Groups.
Select users or AD groups that will be allowed to use remote VPN access to connect to the network. For Meraki Auth IdP make sure RemoteAccess group is selected.

Flexible Location Deployment (optional)
With flexible location deployment, you have the flexibility to choose whichever locations you want to deploy the remote access headend (a minimum requirement of two locations). If organization uses Reserved IPs, then you would enable VPN remote access only for data centers that have your Resrved IP address provisioned (more about Reserved IP address here).
For example, at the beginning, you choose Palo Alto and Los Angeles as the two locations provisioned with remote access.
If you want to make changes on location within the same region, click Configure Regions on the top right corner of the Regions section. Then you can update or add Regions/Locations in the new page, click Save once you are done with configurations.

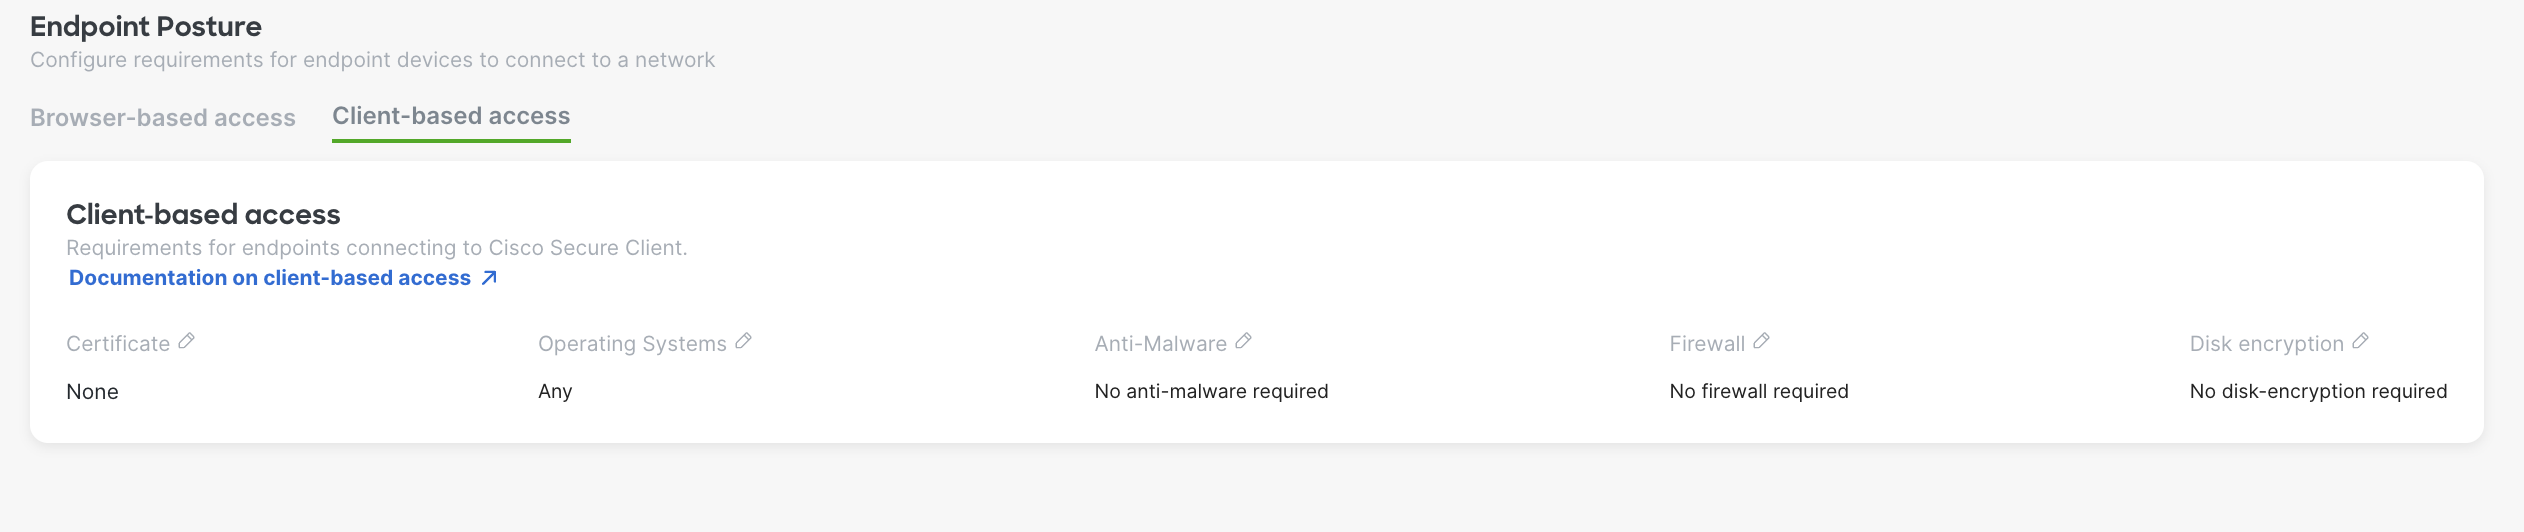
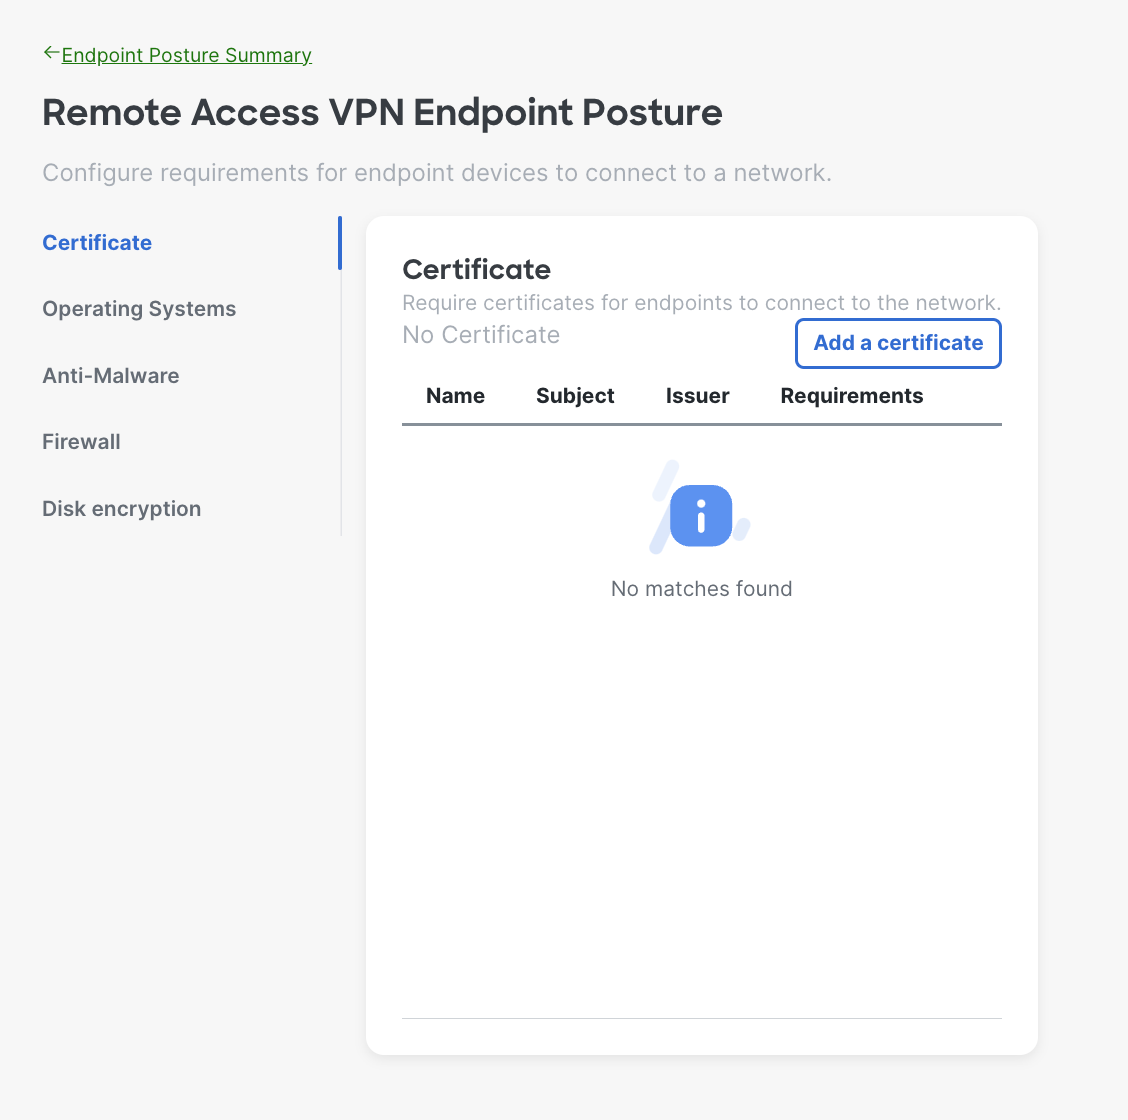
Endpoint Posture
Endpoint Posture, will verify any combination of the following requirements on the endpoint before allowing that endpoint to connect to the Secure Connect cloud.
- Certificate
- Operating System type and version
- Anti-Malware
- Firewall
- Disk encryption
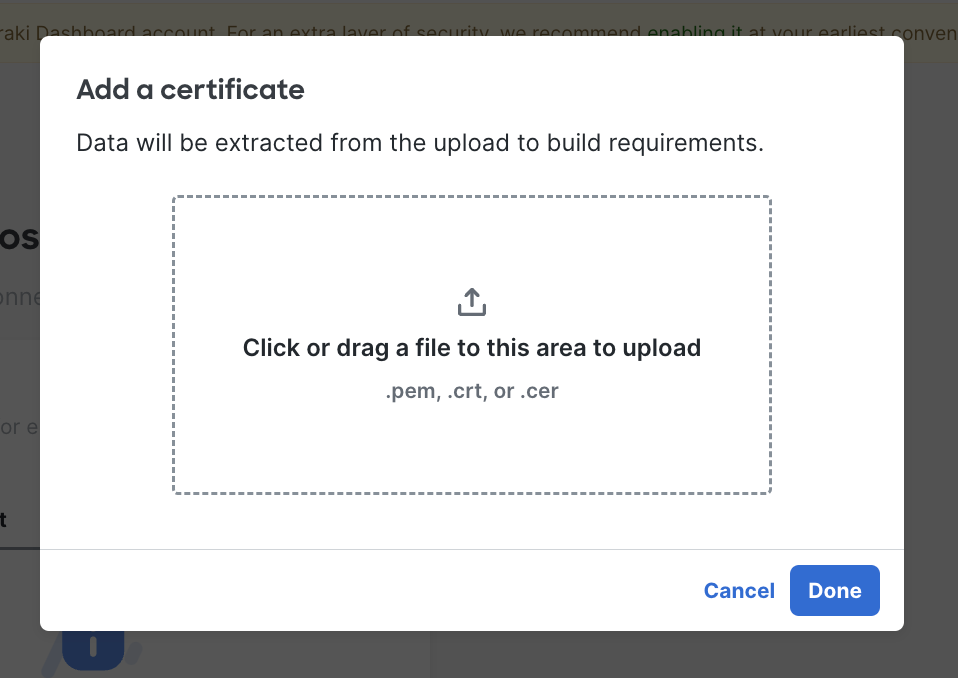
Posture check utilizes the AnyConnect/Cisco Secure Client Secure Firewall Posture module (formally known as hostscan). Certificates on the client device need to be a 1 to 1 match to what is uploaded into the dashboard and should be placed in either the Trusted People, Trusted Publisher, Enterprise Trust, or Personal certificate stores (either local user or local machine as both are checked).
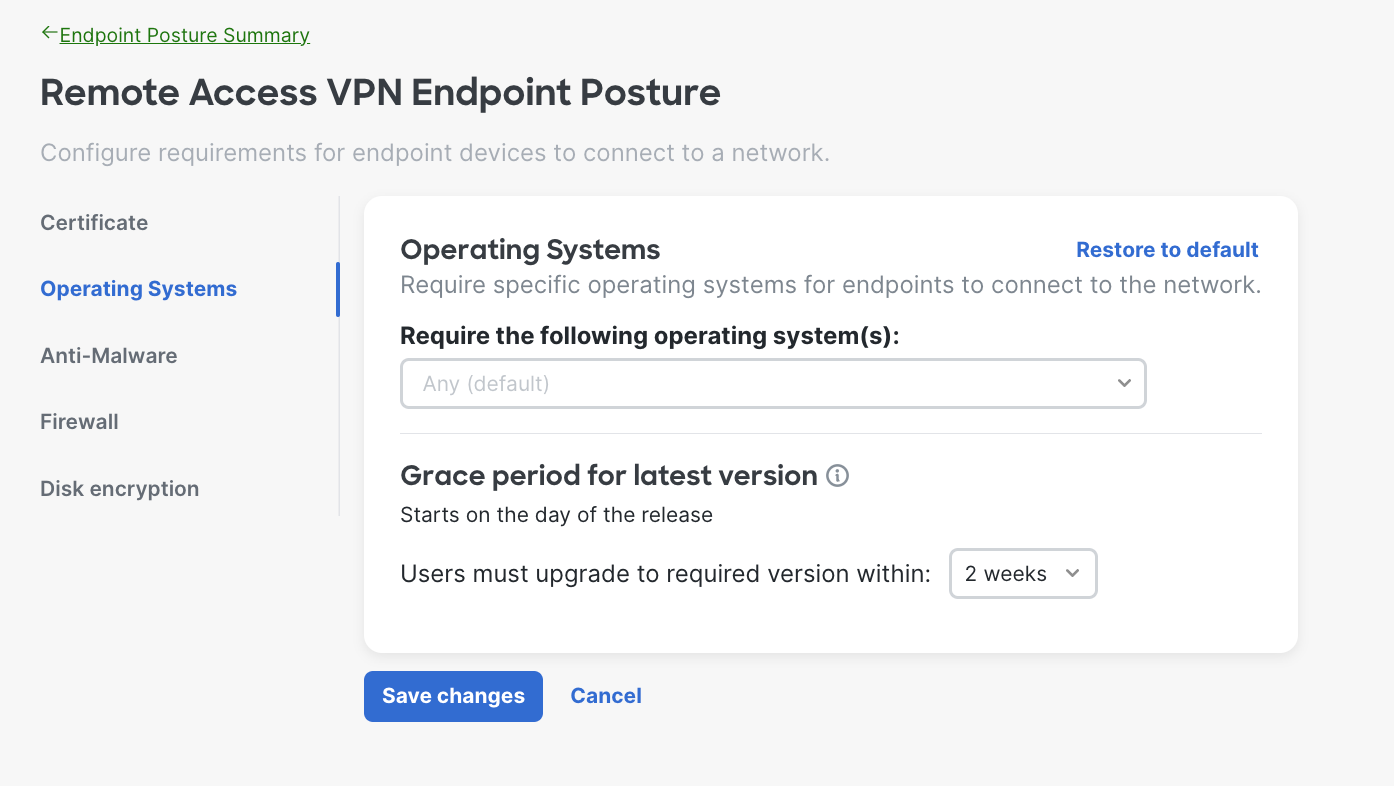
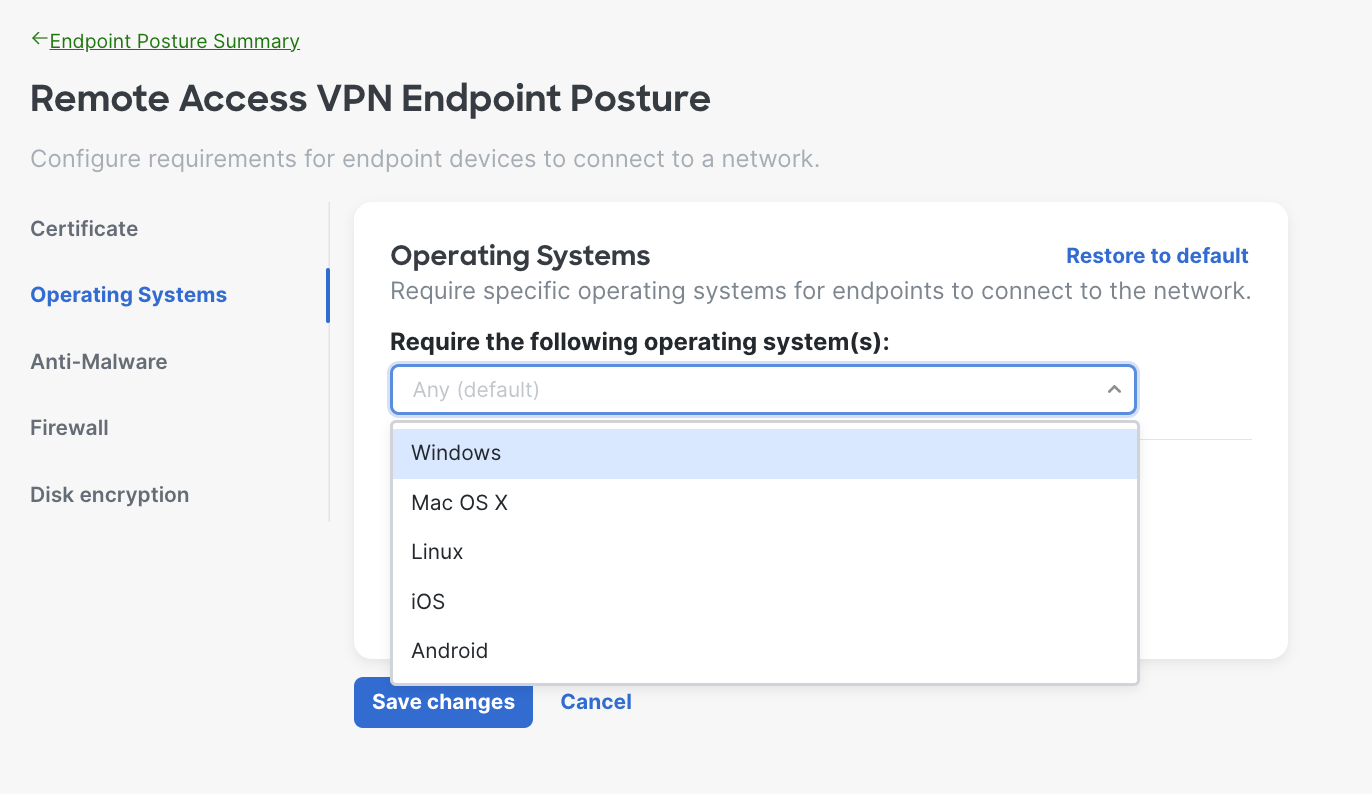
To enable Endpoint Posture for Client-based access, go to Secure Connect -> Endpoint Posture -> Client-based access , and click the pencil icon to edit each type of postures you want to enable.
- Certificate Requirements - The system will verify the endpoint has a specific certificate(s) before allowing it to connect to the network.
- Operating System Requirements - The system will verify the endpoint is running the specified operating systems (OS) and OS versions before allowing it to connect to the network. You can define timeframe for users to upgrade to required version as well.
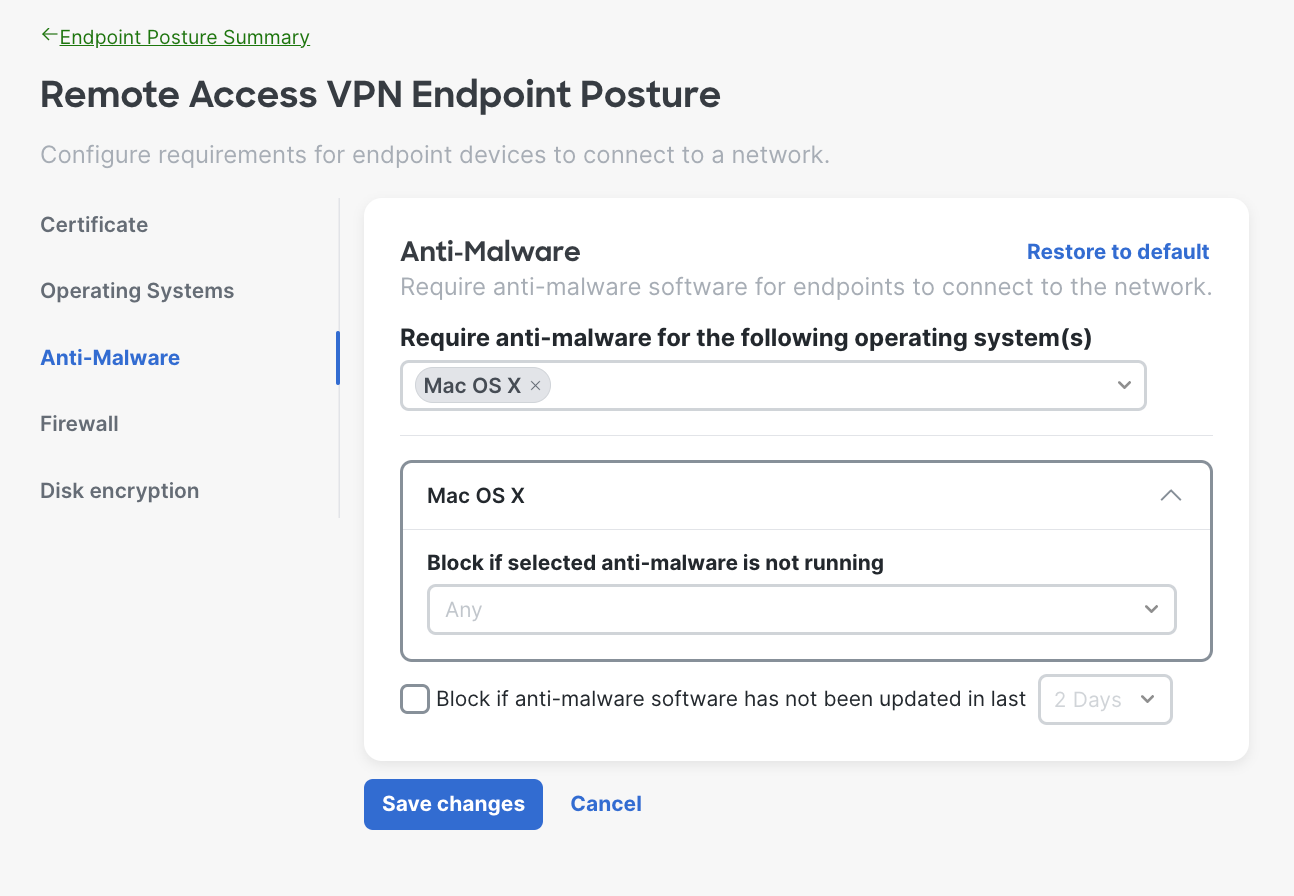
- Anti-Malware Requirements - The system will verify the endpoint is running the specified anti-malware software before allowing it to connect to the network. Choose the operating system(s) and select the anti-malware software from the drop down.
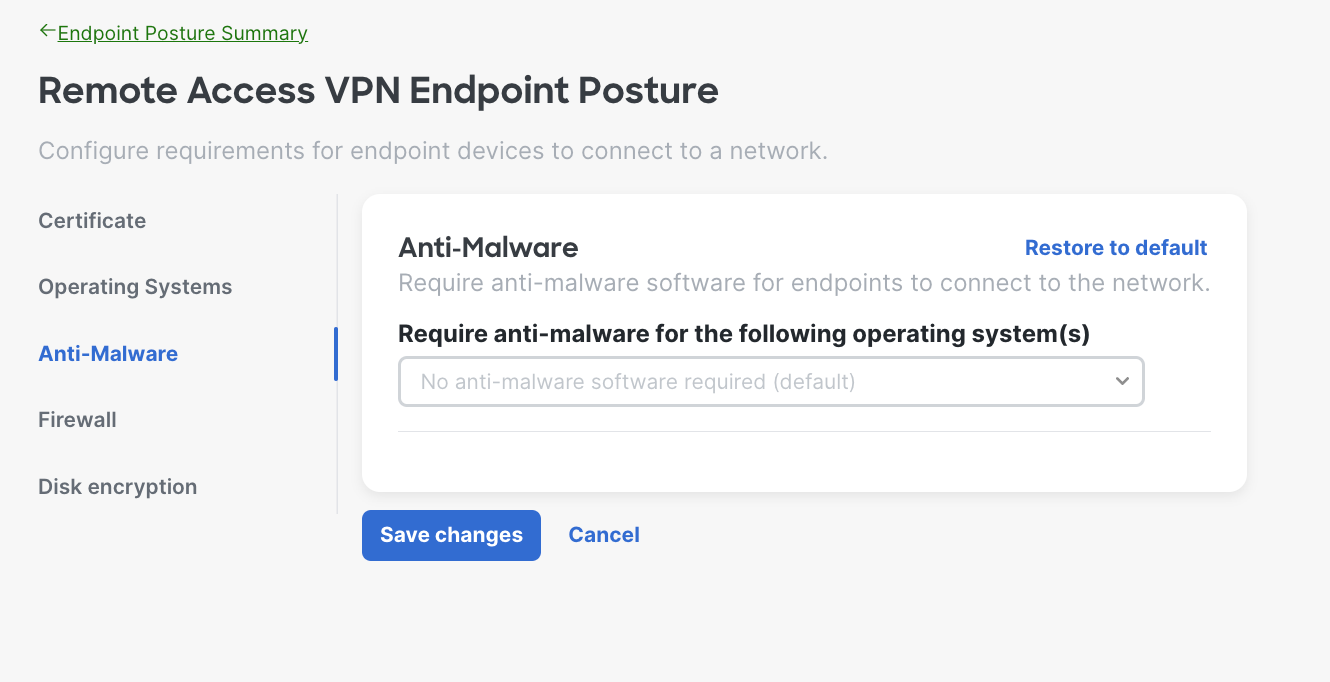
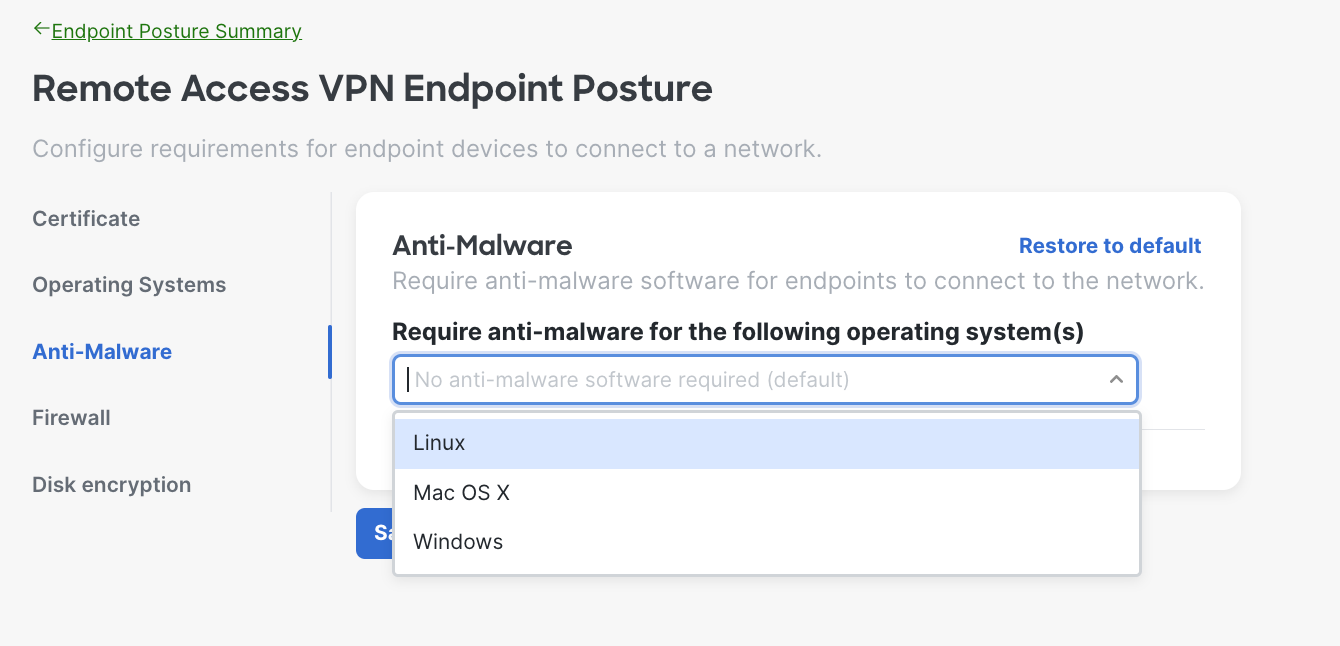
Here is an example of when the admin choose Mac OS X, you can select multiple operating systems based on your needs. You can also define timeframe for users to upgrade to required version as well.
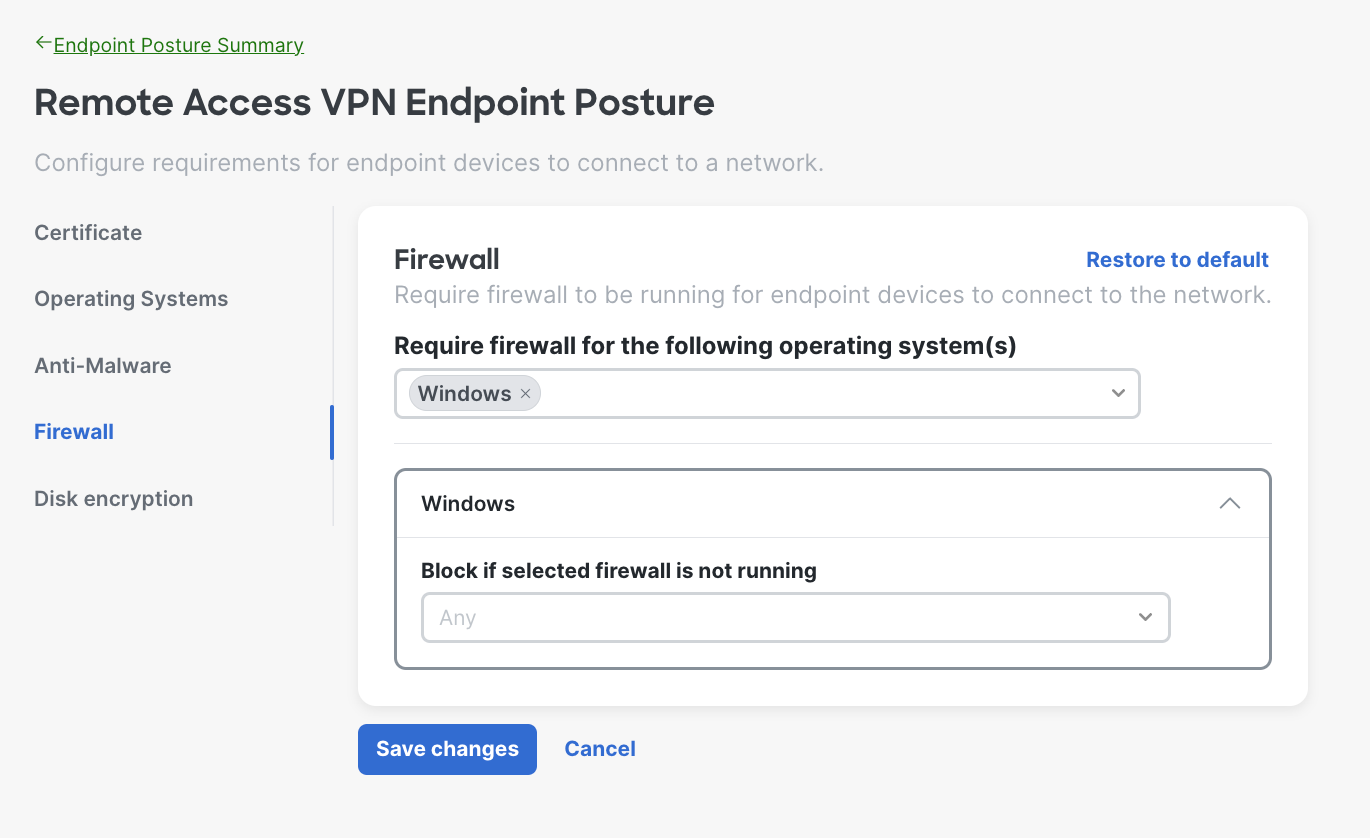
- Firewall Requirements - The system will verify the endpoint is running a local firewall application before allowing it to connect to the network. Choose the firewall software provider from the dropdown.
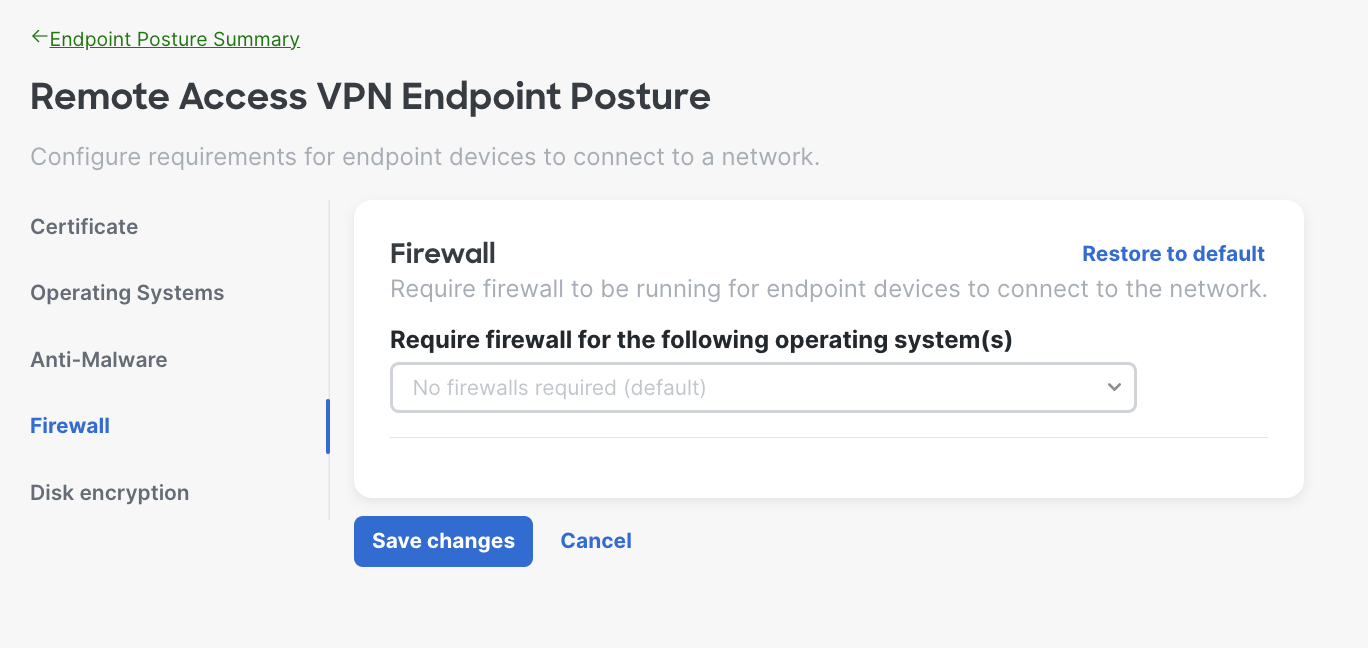
Here is an example of when the admin choose Windows, you can select multiple operating systems based on your needs.
- Disk Encryption Requirements - The system will verify the endpoint has disk encryption enabled before allowing it to connect to the network. Choose the disk encryption software provider from the dropdown.
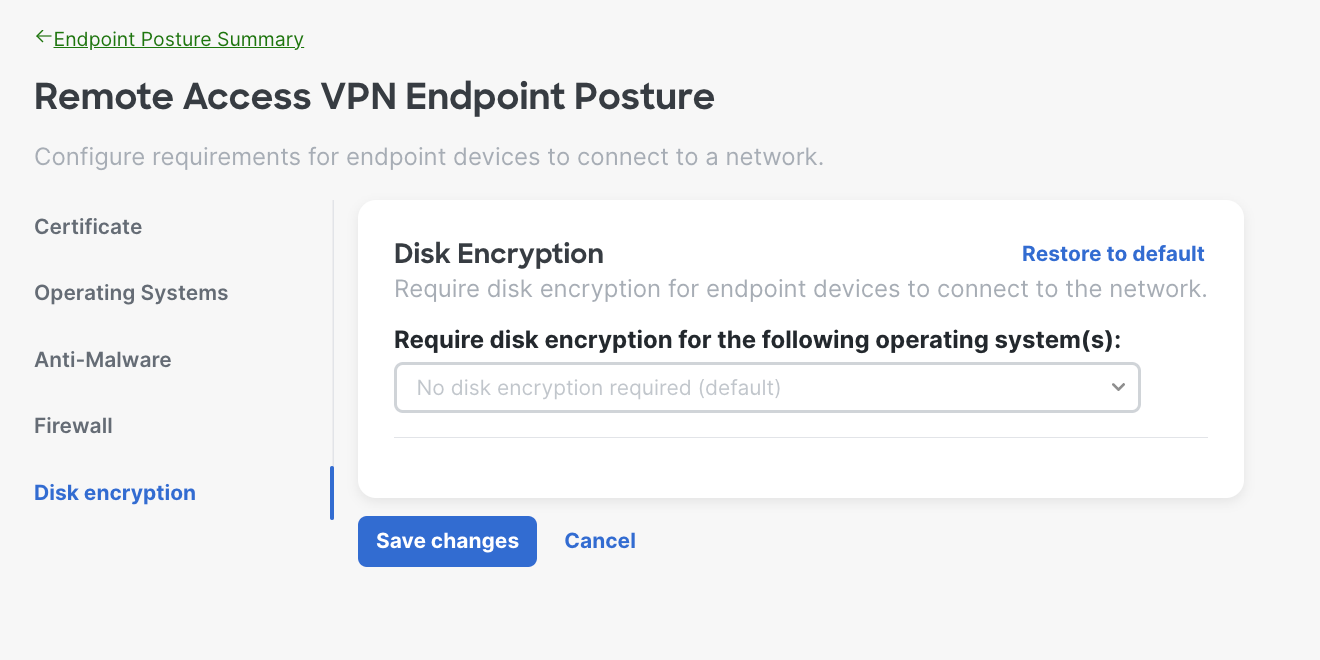
Here is an example of when the admin choose Linux, you can select multiple operating systems based on your needs.
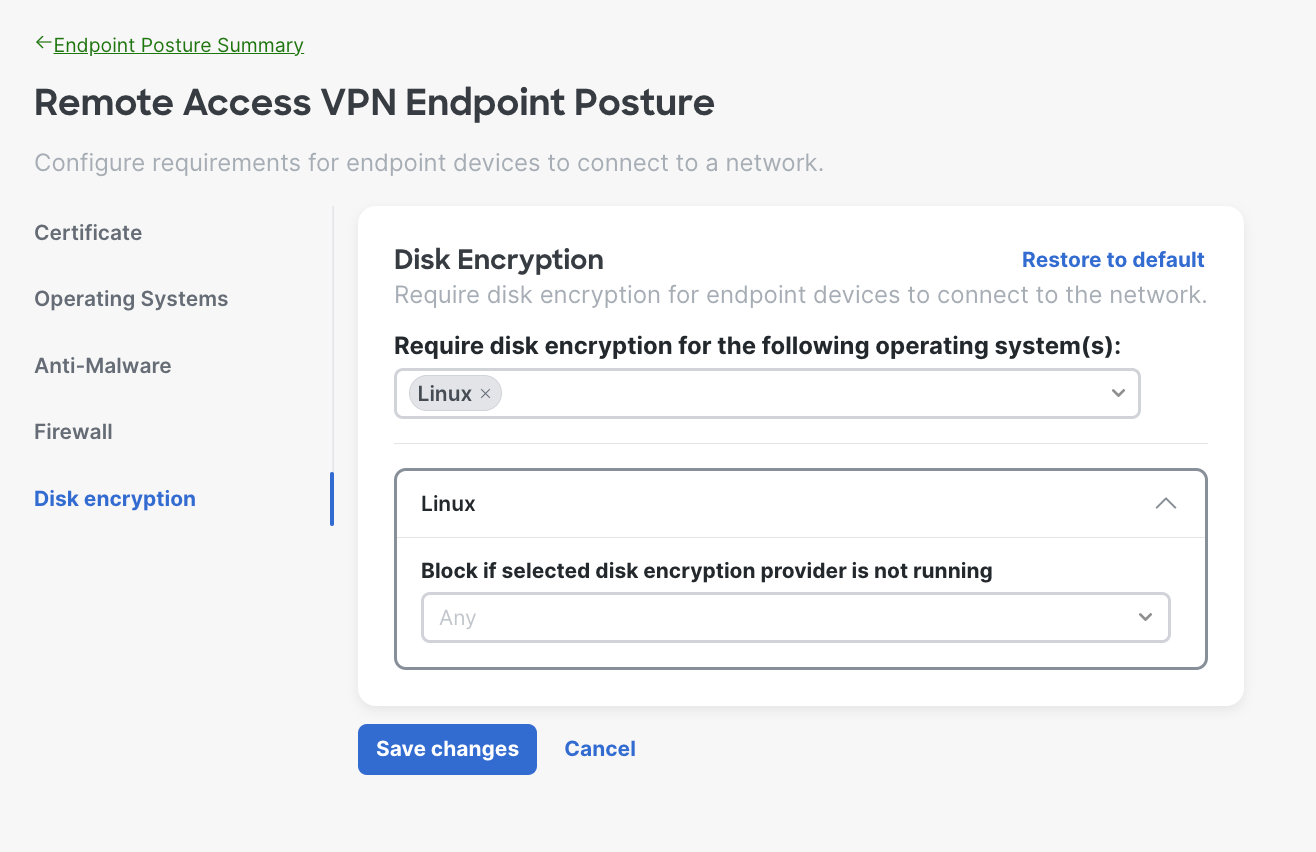
Once you are done, click Save changes to save the configurations.
Next Steps - Network and Policy Setup
After completing the Remote Access setup, the rest of checklist can be complete depending on your situation.
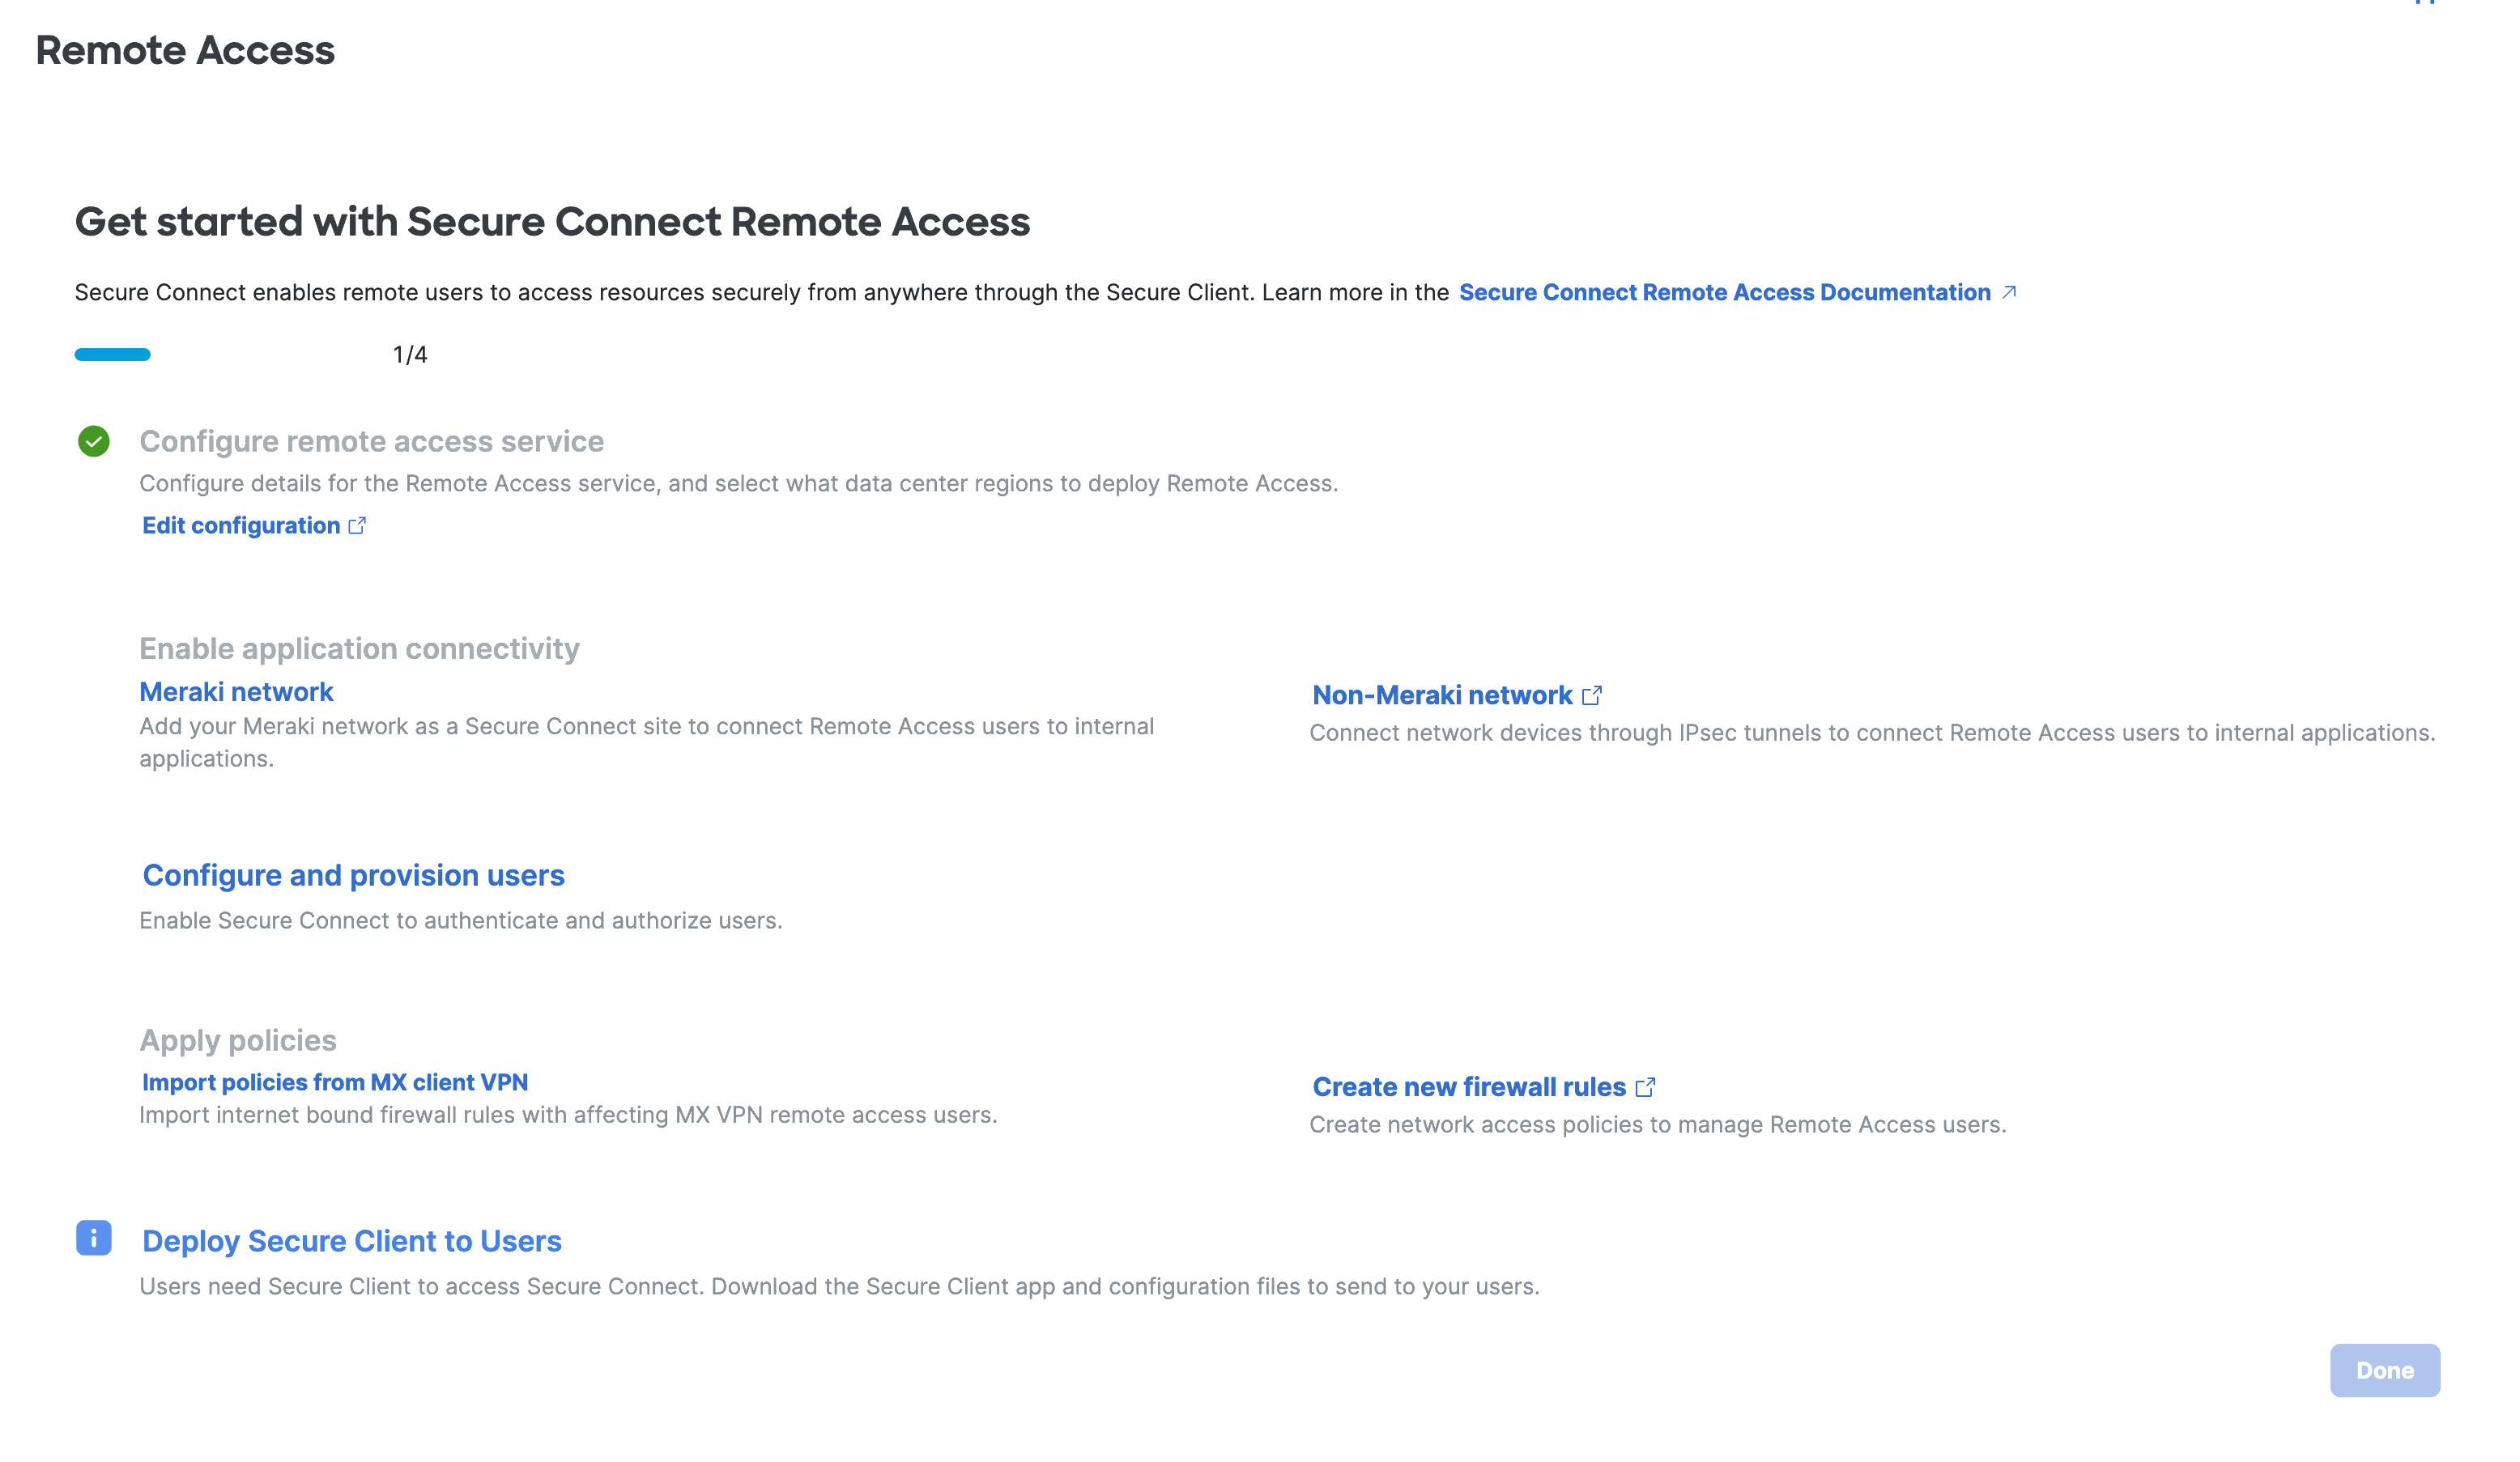
- Step 2 - Enable application connectivity
- Setup a Meraki Network
- Setup a Non-Meraki Network
- Be sure to select tunnel type of Private Access
- Add all internal networks (routes) behind the private tunnel as client prefixes to the tunnel
- Add routes to the IPSec termination device for all remote access client subnets provisioned previously
- Step 3 - Configure and provision users
- Step 4 - Apply policies
- Step 5 - Import policy (Optional)
- Step 6 - Create new firewall rule
Deploying Cisco Secure Client
The final step is to download and deploy the Cisco Secure Client to endpoints. There are two parts to the Cisco Secure Client download. The first is the is the software itself. The second is an XML file that contains the features and attribute values created during the setup process.
Navigate to Secure Connect > Remote Access and click Downloads under Secure Client.

New popup window will open. Download the Secure Client and Secure Client XML file (optional) via the provided links.

Once Secure Client is installed, you will use AnyConnect VPN module for Remote Access.
Before downloading Cisco Secure client you may want to check for system requirements.
More information on deploying Cisco Secure Client can be found here.
Note: You will be unable to download the Cisco Secure Client software from Cisco Software Central. This is due to how Secure Connect license is setup. If you need a difference version of the Cisco Secure Client that what is posted in the Secure Connect portal, then contact support.
Remote Access Log Export
This feature enables the ability to export Remote Access logs to a CSV or JSON file so that users can perform a manual analysis of connectivity logs for Remote Access users.
It located in the navigation Secure Connect -> CONNECTIONS -> Remote Access.
After completing the Remote Access setup, you will find Remote access logs located on the lower left corner of Remote Access page.

You can pick a Range from the dropdown or click View all RA logs to swivel to the Umbrella dashboard to see UI based Remote Access log information.
Once you pick the Range, you can select either CSV or JSON as your export format. Then click "Export CSV" or "Export JSON" button to download your log report. If you want to generate another report, click Reset and repeat above steps.


