
Access Control
Click 日本語 for Japanese
By: Mike Woolley and Chris Grabski
Overview
The Wireless > Configure > Access Control page is used to configure per-SSID Access Control settings such as association security settings, splash page settings, and client addressing options. This article is designed to mirror the Access Control page and goes into detail about every option available from top to bottom.
Network Access is defined on a per-SSID basis, the currently selected SSID can be verified or changed by checking the SSID dropdown menu under the Access Control header at the top of the page.
Learn more with these free online training courses on the Meraki Learning Hub:
Basic info
In this section, the name of the SSID can be defined as well as if it is enabled or disabled.
Hide SSID refers to the SSID being visible by all clients when broadcasting it.
Security
Each SSID can be configured with specific Security that must be met before a client can associate to that SSID. This is where the authentication settings such as the PSK are configured for the selected SSID. For a more detailed review of each of the following options please refer to our Wireless Encryption and Authentication article.
Open (No Encryption)
An Open SSID has no encryption configured. This means that any wireless client that can see the SSID will be able to associate.
Opportunistic Wireless Encryption (OWE)
An OWE SSID has no input (for example user nor password) in order to associate, however, it is still encrypted and provides more security than an Open SSID.
Please verify the wireless client supports this authentication.
Password
An SSID with a Password (a passphrase) requires an end-user to enter a pre-defined password into the wireless device to associate to the SSID. All wireless devices connecting to the SSID must use the same password.
Two password formats are supported:
-
ASCII (American Standard Code for Information Interchange).
Passwords can include uppercase and lowercase letters (A-Z, a-z), numbers (0-9), and special characters and must be between 8 and 63 characters. For example: Secure_Tree@2023

-
Hex (hexadecimal)
When using a hexadecimal number for a password, the input is case-insensitive, and must be exactly 64 digits long.
For example: 1234123412341234123412341234123412341234123412341234123412341234

Note: There is no need to add 0x to indicate that the password is hexadecimal. Meraki Dashboard automatically detects the password format. If the password is between 8 and 63 characters, the format is assumed to be ASCII. The format is considered hex if a password is exactly 64 characters (with valid hex characters - A-F, a-f, 0-9).
MAC-based Access Control
Selecting MAC-based Access Control will query a configured RADIUS server during client association. If the MAC address of the associating client is configured on the RADIUS server to be allowed than the client will be allowed to associate to the SSID. If the RADIUS server rejects the authentication request then the client will not be allowed to associate to the SSID. For more information about configuring MAC-based Access Control please refer to our Enabling MAC-based Access Control and MAC-Based Access Control Using Microsoft NPS articles.
WPA2-Enterprise (802.1X)
WPA2-Enterprise, also referred to as 802.1X, utilizes either a RADIUS server or the Meraki Cloud to authenticate clients trying to associate to an SSID. This requires clients to provide unique authentication information that must be verified against the server before associating to the SSID. For more information about configuring WPA2-Enterprise with a RADIUS server please refer to our RADIUS Auth with WPA2-Enterprise article.
When configured with Meraki Authentication users must have a user account under the Network-wide > Configure > Users page to be able to authenticate. For more information about configuring Meraki Authentication, please refer to our Managing User Accounts article.
Identity PSK with RADIUS
This authentication will query a RADIUS server providing the right PSK to be used according to the MAC address of the client. for more information please refer to this document.
Identity PSK without RADIUS
Provides the ability to configure different PSKs to be used within the same SSID with no need to configure a RADIUS server, different policies can be set to each PSK. Please refer to this document for more information.
WPA Encryption Mode
Warning: WEP is deprecated in MR 30.X and newer firmware. Limited configuration options still exist when using the old Access control page (Wireless > Configure > Access control > View old version > WPA encryption mode) until this page is deprecated.
Please refer to WEP Deprecation on MRs for more information.
When either PSK or WPA2-Enterprise authentication is configured the option to select the WPA Encryption Mode is available. This dropdown allows for two options, 'WPA1 and WPA2' or 'WPA2 Only'
- WPA1 and WPA2: This option allows for devices to choose if they will utilize WPA1 or WPA2 encryption. This option is recommended for SSIDs that need to support Legacy devices that do not support WPA2 encryption.
- WPA2 Only: This option forces all devices that connect to the SSID to utilize WPA2 encryption. This is the recommended option for the majority of networks as almost all modern devices fully support WPA2 encryption.
802.11r
When either 'PSK' or 'WPA2-Enterprise' are selected for Authentication and the Client IP Assignment is set to 'Bridge Mode', 'Layer 3 roaming with a concentrator', or 'VPN: Tunnel data to a concentrator', the option to configure 802.11r will appear under the Network Access section. Currently 802.11r has three options to select from when configuring, Disabled, Adaptive, and Enabled. For a more detailed overview of 802.11r please reference our 802.11r Overview and Roaming Technologies articles.
- Disabled: 802.11r will not be used for any clients on this SSID
- Adaptive: Adaptive 802.11r enables fast roaming for iOS devices while minimizing the possibility of incompatibility issues seen with full 802.11r enabled.
- Enabled: 802.11r will be enabled and used for all clients connecting to this SSID.
802.11w
When Pre-shared Key (PSK) or WPA2-Enterprise authentication is selected a dropdown to enable 802.11w will appear under the Network Access section. 802.11w enables Protected Management Frames (PMF) for management frames such as authentication, de-authentication, association, disassociation, beacon, and probe traffic. This enables Meraki APs to help prevent rogue devices from spoofing management frames from Meraki APs. Selecting 'Enabled' from the dropdown will allow Meraki APs to begin utilizing Protected Management Frames for any clients that support 802.11w. For a more detailed overview of 802.11w, please check out our 802.11w Management Frame Protection article.
Splash Page
None
Selecting None (direct access) will allow users to access the network as soon as they have fulfilled the Network Access Association and Authentication requirements.
Click-through
Selecting the Click-through Splash Page will present clients with a Splash Page that must be acknowledged before the client is fully authorized to access the network. When the Click Through Splash Page is enabled the option to configure a Captive Portal is enabled. For more information about the Captive Portal feature, see the Captive Portal / Walled Garden section of this article.
Sponsored guest login
Selecting Sponsored guest login allows the users to be authenticated by a limited amount of time with a specific email domain. More info here.
Sign-on with...
The Sign-on Splash Page requires users to provide some form of Username/Password combination to complete the Splash Page and fully authenticate to the network. There are several different options available for the Sign-on Splash Page, each with different configuration options.
- Meraki authentication: Users must authenticate with a Username/Password from a configured profile on the Network-wide > Configure > Users page of Dashboard. For more information, check out our Managing User Accounts article.
- my RADIUS server: Users must authenticate to a configured RADIUS server before gaining access to the network. For more information about configuring this option, please check out our article about Configuring RADIUS Authentication with a Sign-on Splash Page as well as RADIUS Failover and Retry Details.
- my LDAP server: Users must authenticate to a configured LDAP server before gaining access to the network. For more information about configuring this option, please check out our article about Configuring Splash Page Authentication with an LDAP Server.
- Active Directory: Users must authenticate to a configured Active Directory server before gaining access to the network. For more information about configuring this option, please check out our article about Integrating Active Directory with Sign-On Splash Page.
- 3rd party credentials: Users must authenticate to a configured 3rd Party authentication service before gaining access to the network. Currently only Google oAuth is supported for 3rd Party Credentials. For more information about configuring this option, please check out our article about configuring Google Sign-In.
Sign-on with SMS Authentication
SMS Authentication: Users must enter a valid phone number and authenticate with an authorization code that will be delivered via SMS before gaining access to the network. For more information about configuring this option, please see the SMS Splash Page section of the Splash Page Overview article.
NOTE: Sign-on Splash Pages are incompatible with MAC-based and WPA2-Enterprise association requirements. To use a Sign-on Splash Page you must select either Open or Pre-shared Key association requirements.
Cisco Identity Services Engine (ISE) Authentication
Cisco Meraki access points can be integrated with Cisco ISE for authentication. For more information on this feature, please see the following documentation.
Configuring WPA2 Enterprise with RADIUS using Cisco ISE
Change of Authorization with RADIUS (CoA) on MR Access Points
Central Web Authentication (CWA) with Cisco ISE
Device Posturing using Cisco ISE
NOTE: Cisco ISE Authentication is only compatible with MAC-based access control or WPA2-Enterprise with my RADIUS server
Endpoint Management Enrollment
Endpoint management enrollment requires that the connecting device be enrolled within one of the Organization's System Manager networks before gaining access to the network. If a device is not enrolled within a Systems Manager network in the Organization it will be presented with a prompt to enroll the device into the defined Systems Manager network. For more information about using Endpoint management enrollment on an SSID please refer to our Endpoint Management Enrollment article.
After selecting Endpoint management enrollment as a splash page a new section will appear on the Access Control page, directly below the Splash Page section. This section allows further configuration of Sentry.
- Enrollment network: This dropdown is used to select the SM network that unenrolled devices will be prompted to enroll in before gaining access.
- Strength: Each Strength setting allows for adjustment of the scope of devices that will be forced to enroll within a Systems Manager network.
- Enforce On: Select the checkbox for each device type that should be forced to enroll in a Systems Manager network before gaining network access.
NOTE: 'Enforce on:' selections will only apply if the 'Focused' or 'Click-through' Strength options are selected.
Billing (Paid Access)
If the Billing (Paid Access) option is selected users will be presented with a Splash Page requesting a prepaid access code before being allowed to access the network. Meraki has partnered with several companies to provide this functionality, for more information about configuring a Billing Splash Page please see our Billing for Wireless Access and Splash Pages with PayPal or Credit Card Billing articles.
NOTE: Billing Splash Pages are incompatible with WEP, WPA2, WPA2-Enterprise, and MAC Based association requirements.
Assign Policies by Device Type
Meraki SSIDs have the option to automatically assign specified group policies to devices based on the detected device type. Each device type can be configured to be automatically assigned to a single policy. For example, iOS devices like iPhones could be set to automatically have a Mobile Devices group policy assigned to them, but other OSX devices like MacBooks could be assigned a different policy upon joining the same SSID.
The following device types can be selected from:
- Android
- Blackberry
- Chrome OS
- iPad
- iPhone
- iPod
- Mac OS X
- Windows
- Windows Phone
- B&N Nook
- Other OS
For more detailed information about assigning policies by device type and device OS detection, please refer to our Applying Policies by Device Type article.
Advanced splash settings
Captive Portal
The Captive Portal is available to select when a Splash Page is enabled on the SSID. Captive Portal allows browsing restrictions / limitations to be configured for clients that have not yet completed the sign-on process through the Splash Page. Clients who have successfully authenticated through the Splash Page will still be subject to the normal network restrictions.
Captive Portal Strength
- Block all access until sign-on is complete: This option will block all traffic not allowed by the Walled Garden for clients who have not completed the Splash Page
- Allow non-HTTP traffic prior to sign-on: This option allows any non-HTTP traffic from clients that have not completed the Splash Page, including HTTPS traffic.
Walled Garden
The Walled Garden allows Administrators to specify IPs or URLs that should be accessible by clients that have not completed the Splash Page. Traffic destined for destinations defined in the Walled Garden will be allowed for all clients, regardless of the Captive Portal Strength setting.
- Walled Garden Ranges: When Walled Garden is enabled this field is used to define the IPs and URLs that should be accessible by unauthenticated clients.
Controller Disconnection Behavior
Most Splash Pages require communication back to the Meraki Cloud Controller to properly serve the Splash Page and track client authentications. If for some reason the Meraki Cloud Controller is unreachable, this section defines the behavior of the SSID for clients that are trying to connect and authenticate.
- Open: Devices can use the network without signing in, unless they are explicitly blocked
- Restricted: Only currently associated clients and whitelisted devices will be able to use the network
- Default for your settings: Select the default controller disconnection behavior, open or restricted, based on the selected Splash page option.
-
None (direct access): Not applicable
-
Click-through: Open
-
Sponsored guest login: Open
-
Sign-on with: Restricted
-
Sign-on with SMS Authentication: Open
-
Cisco Identity Services Engine (ISE) Authentication: Not applicable
-
Endpoint management enrollment: Open
-
Billing (paid access): Not applicable
-
Client IP and VLAN
The client IP and VLAN section determines how clients that associate to each SSID interact with the rest of the network. This includes how clients obtain IP addresses and what happens to the client traffic after arriving at the Access Point.
Client IP Assignment
The Client IP Assignment section has several options for defining how clients associated to the SSID can receive an IP address.
NAT Mode: Meraki DHCP
NAT Mode, also referred to as Meraki DHCP, will have the access point assign clients a random address out of the 10.0.0.0/8 pool of IPs. All client traffic from these clients will get NAT'ed to the management IP of the Access Point before being forwarded on the LAN. When using Meraki DHCP each client is isolated from other wireless clients on the same SSID, but may communicate with wired clients on the LAN if the SSID firewall settings permit it. For more information about the operation of NAT Mode: Meraki DHCP, please refer to our dedicated article.
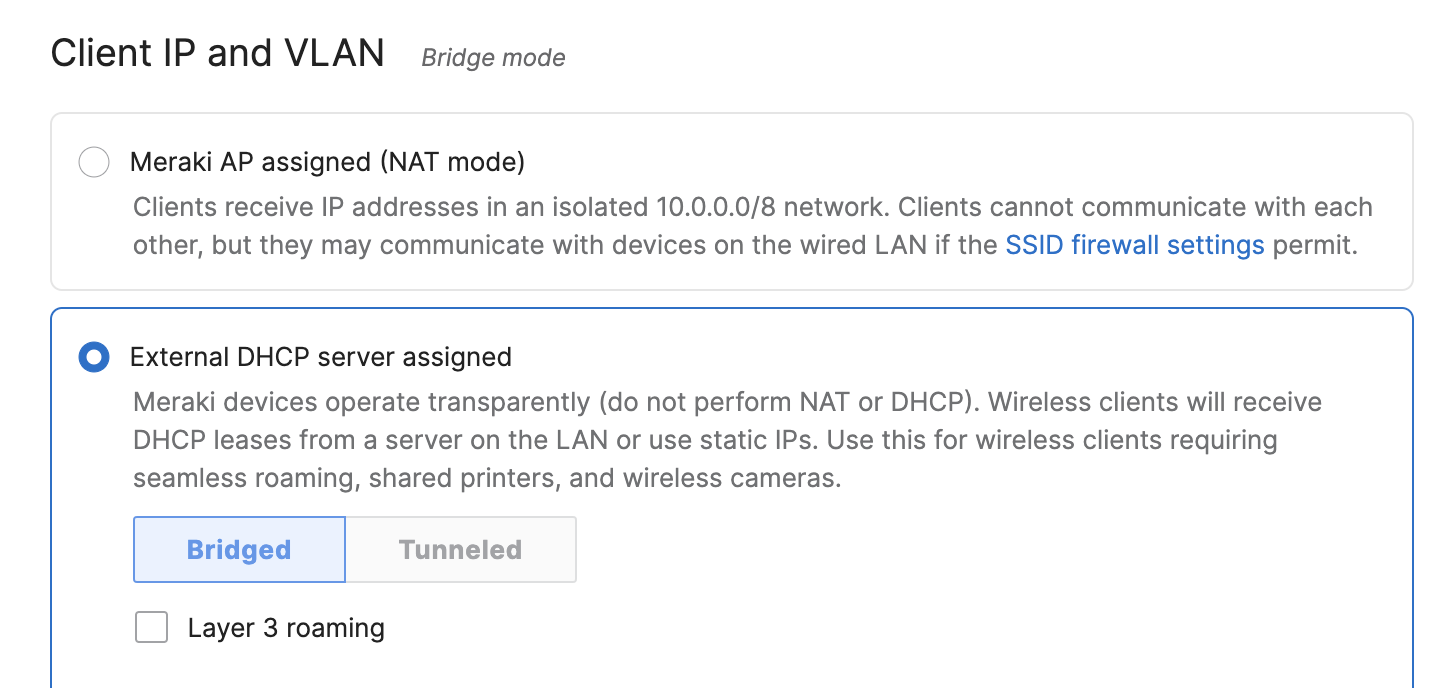
Bridge Mode
Bridge mode makes the access point operate transparently, which allows clients to pull an IP address from the LAN or use a static IP and operate without any NAT from the access point.
In this configuration, the access point simply forwards traffic directly from the wireless network to the wired network. By default, bridge mode allows devices to communicate to both other wireless clients and to wired LAN clients. Bridge mode also allows for VLAN tagging of client traffic based on the SSID a client is connected to. For more information about bridge mode, please refer to our Client IP Assignment article.
Layer 3 Roaming
Clients are tunneled to a specified VLAN at the concentrator. They will keep the same IP address when roaming between APs.
Concentrator
With the Layer 3 Roaming with a Concentrator or VPN: tunnel to a Concentrator client IP assignment options selected, a concentrator must be specified. A concentrator is an MX security appliance within the same dashboard organization. Select the concentrator to which this SSID’s traffic will be tunneled. For more information on tunneling SSIDs to concentrators, check out our SSID Tunneling and Layer 3 Roaming - VPN Concentration Configuration Guide.
VLAN Tagging
VLAN tagging is used to direct traffic to specific VLANs. To use VLAN tagging, all Meraki APs functioning as gateways in the network must be connected to switches that support IEEE 802.1Q. The gateways must be connected to switch ports that are configured to accept 802.1Q tagged Ethernet frames (such ports are sometimes called "trunk ports"). If you are unsure, don't enable this feature.
VLAN tagging cannot be configured with NAT mode client IP assignment. Client traffic on NAT mode SSIDs is translated to the IP address of the individual AP. To learn more about NAT mode SSIDs, check out our NAT Mode with Meraki DHCP document.
With Bridge mode or Layer 3 roaming client IP assignment selected, VLAN tagging can be enabled or disabled for the SSID:
-
Don’t use VLAN tagging: Traffic for this SSID passes to the wired network untagged. This is the default setting.
-
Use VLAN tagging: Traffic on this SSID will be tagged with the configured VLAN ID when forwarded to the wired network. With this option selected, the VLAN ID configuration section appears directly below the VLAN tagging section for you to configure the desired VLAN IDs for this SSID.
With the Layer 3 Roaming with a Concentrator or VPN: tunnel to a Concentrator client IP assignment options selected, the VLAN tagging section presents a dropdown containing a list of VLANs that exist on the selected concentrator. Clients that associate to this SSID will obtain addresses on the selected VLAN.
VLAN ID
With the Bridge mode or Layer 3 roaming client IP assignment options selected, and VLAN Tagging set to Use VLAN tagging, the VLAN ID configuration section appears.
When Add VLAN is selected, additional VLAN rules appear. APs will tag traffic for this SSID using the values in the VLAN ID column. Keywords entered in the AP tags column identify which APs will use which VLAN IDs for this SSID. To learn more about AP tags, check out our Using Tags to Manage MR Access Points document.
When multiple VLAN rules have been added, rules can be re-ordered or deleted with the options in the Actions column.
RADIUS Override
A RADIUS server has the ability to send VLAN information to the AP in RADIUS Access Accept messages. To send VLAN information, three required RADIUS attributes must be configured in your RADIUS policy:
- Tunnel-Type: Choose Attribute value Commonly used for 802.1X and select Virtual LANs (VLANs).
- Tunnel-Medium-Type: Choose 802 (Includes all 802 media plus Ethernet canonical format) for the Attribute value Commonly used for 802.1X.
- Tunnel-Private-Group-ID: Choose String and enter the VLAN desired (ex. "500"). This string will specify the VLAN ID 500.
Sample FreeRADIUS user configuration (/etc/freeradius/3.0/users):
Tunnel-Type = "VLAN",
Tunnel-Medium-Type = "IEEE-802",
Tunnel-Private-Group-ID = "500"
Check your RADIUS vendor-specific documentation for the appropriate values.
Sample FreeRADIUS EAP configuration (/etc/freeradius/3.0/mods-enabled/eap):
use_tunneled_reply = yes
When configuring the Tunnel parameters under the EAP configuration, FreeRADIUS will not inject these parameters into the final Access-Accept unless the EAP configuration is changed from 'use_tunneled_reply = no' (Default) to 'use_tunneled_reply=yes'.
To configure the AP to accept the VLAN information sent from by the RADIUS server, navigate to Wireless > Configure > Access Control and see the Client IP and VLAN section. After selecting "External DHCP server assigned", enable RADIUS override by setting "RADIUS override" to "Override VLAN tag." This setting can override the configured SSID VLAN or apply a VLAN if one is not specified:
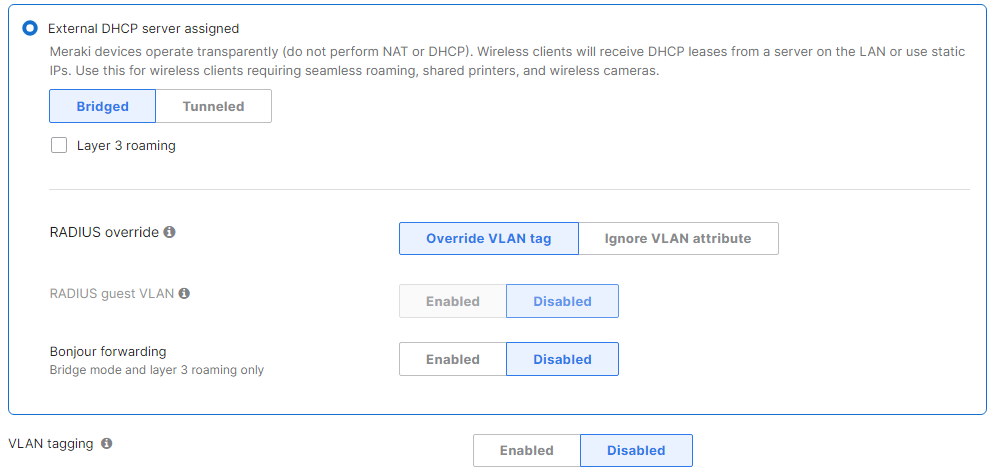
NOTE: RADIUS override can only be used with WPA2-Enterprise or MAC-based access control.
DHCP Option 82
Apart of MR 32.1.X, DHCP Option 82 is a network relay agent which forwards DHCP packets from the client to the DHCP server, which is not local to the L2 network. This ehancement allows for the DHCP server to identify the context of the network from which the client originated the DHCP request (e.g., subnet, AP, SSID, etc.) and use the appropriate IP pool and returned DHCP options.
Configuration:
-
Navigate Wireless > Configure > Access Control page of the selected SSID.
-
Configure the SSID to be either Bridged or Tunneled to a EoGRE concentrator .
-
Enable Add DHCP Option 82

VPN Tunnel Type
With the VPN: tunnel data to a concentrator client IP assignment option selected, the VPN tunnel type section appears. This section has two configuration options:
-
Full tunnel: tunnel all traffic: The default setting. All traffic for this SSID is sent through the VPN to the concentrator.
-
Split tunnel: tunnel only selected traffic: The split tunnel feature can route selected traffic over the VPN and route all other traffic to the local network upstream (and to the Internet).
-
VPN split tunnel: This section appears when the tunnel type is set to split tunnel. Specify what traffic should use the VPN tunnel and what traffic should go directly out from the AP to the Internet. The rules in this table are enforced from top to bottom. For most networks, DNS and traffic to the concentrator subnet should be configured to use the VPN tunnel. Destination can be either Any or an IP subnet, such as 10.1.2.0/24. Port can be either Any or a number.
-
Content Filtering
Content filtering on an MR prevents a wireless client from accessing sites that contain pornographic, sexual, or other objectionable adult material.
This feature is configured on a per-SSID basis and is only available when NAT mode is selected for client IP addressing.
There are three possible options with regard to adult content filtering:
-
Don't filter adult content: This is the default option. No content filtering is performed. Use this option if you do not wish to restrict any traffic for your users.
-
Block adult content: Filtering is performed at the AP level with pre-populated lists of common adult sites. If a user tries to access a blocked site, they will see a splash page stating that the site is blocked by Meraki, and that they should contact their administrator for more details.
This feature provides basic adult content filtering for applications in which advanced filtering techniques are not required (e.g., filtering for guests in the office lobby). If more advanced filtering is required, a separate content filtering solution is recommended, such as content filtering on the Meraki MX product line.
-
Use a custom DNS server: This option allows for the specification of a third party DNS server, if the administrator wishes to leverage solutions such as DNS Redirector or OpenDNS Enterprise. If a DNS IP address is specified, the AP will query the specified DNS server for DNS queries sent by a client. More information on this flow is available in our Configuring Custom DNS for an SSID in NAT Mode article.
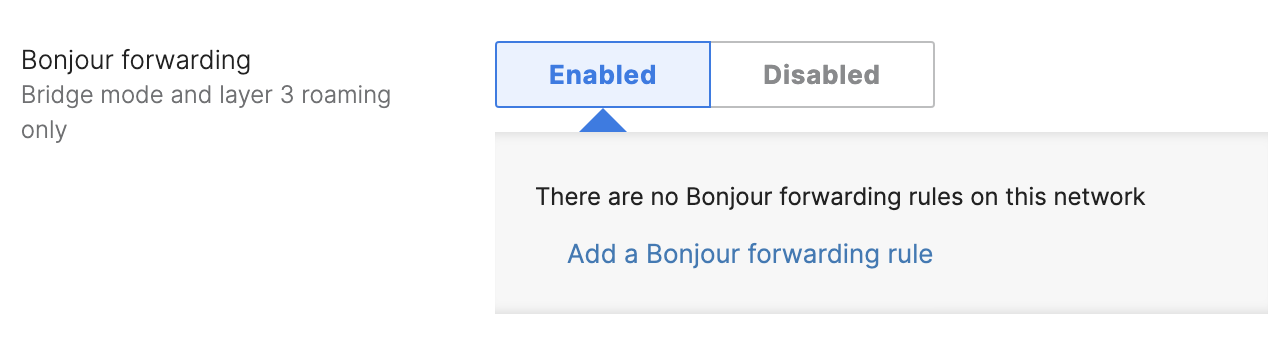
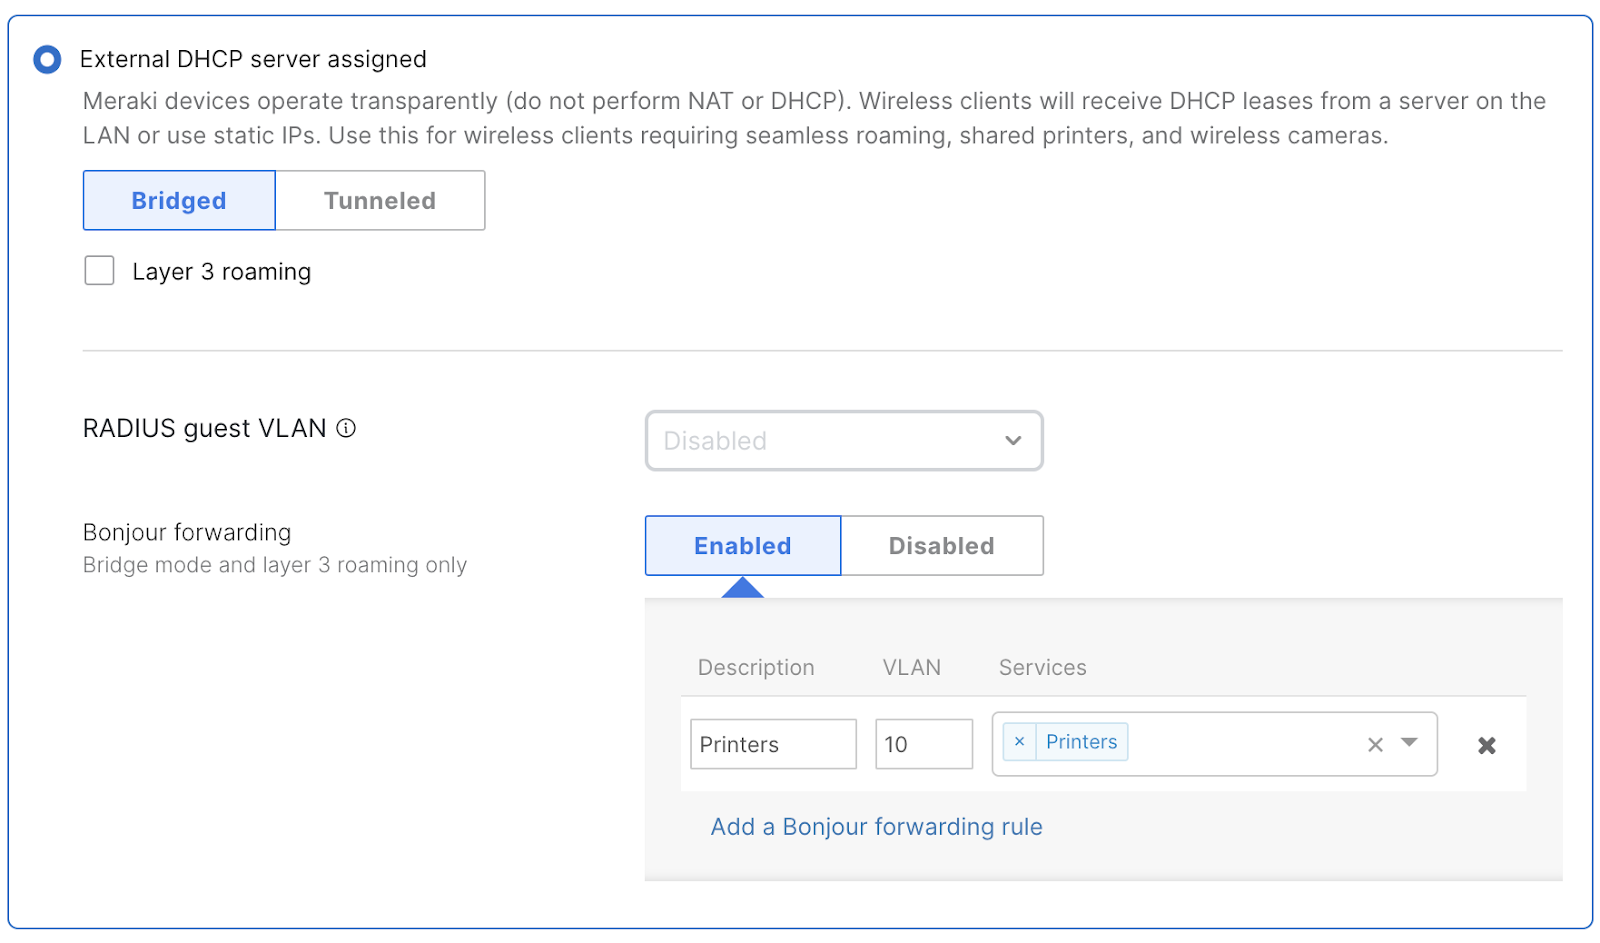
Bonjour Forwarding
Click 日本語 for Japanese
Overview
This feature can be used to allow Bonjour to work across multiple VLANs. When you enable Bonjour forwarding, Bonjour requests from clients on this SSID will be forwarded to the VLAN you define here. You can choose specific services as well to enable Bonjour forwarding for a limited subset of services, e.g. only for AirPlay.
Configuration
To configure Bonjour forwarding, follow these steps:
-
Go to the Wireless > Configure > Access control page and select the External DHCP server assigned option under the Client IP and VLAN section.
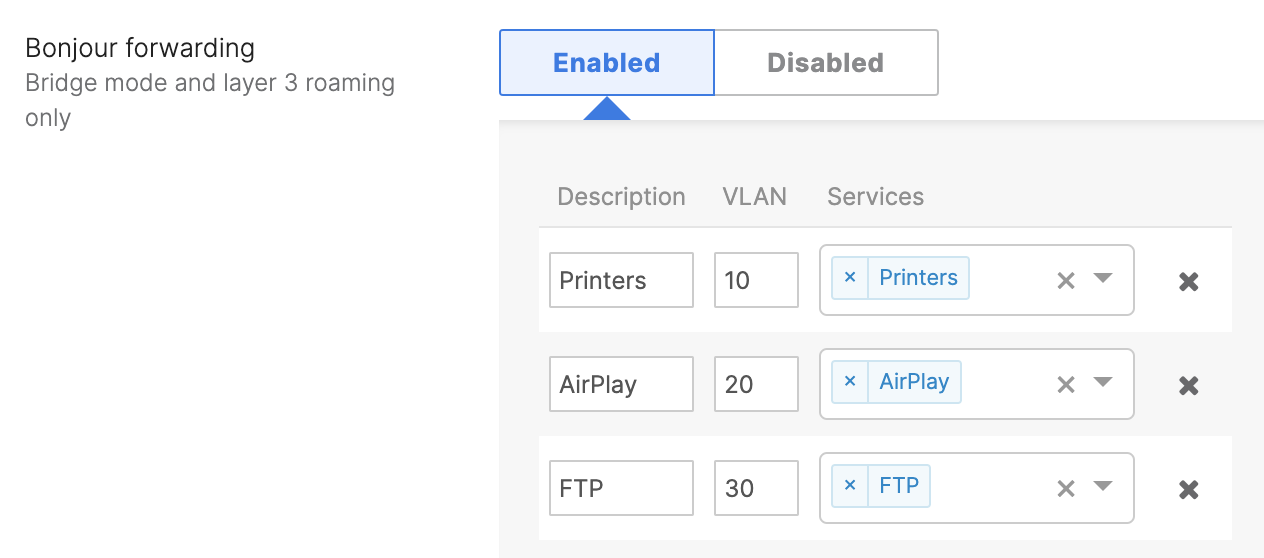
- Set Bonjour forwarding to Enabled and Click Add a Bonjour forwarding rule.
- Add a description, destination VLAN, and specific services that need to be forwarded.
- Description: Specify a name for the rule.
- VLAN: Select one VLAN where network services are running. Bonjour requests will be forwarded to these VLANs. If you want to specify multiple VLANs for one or more services, you must create multiple Bonjour forwarding rules. Please note that the service VLAN cannot be the native untagged VLAN, which is usually 1.
- Services: The list of services that can be forwarded includes:
- All services
- AirPlay
- AFP (Apple File Sharing)
- BitTorrent
- FTP
- iChat
- iTunes
- Printers
- Samba
- Scanners
- SSH
-
Save changes
New Behavior in MR 30.X+ Firmware
Overview
Before MR 30.X, if Layer 2 Client Isolation were enabled, it would prevent Bonjour forwarding from functioning. MR 30.X firmware allows Bonjour to function even when the Layer 2 isolation is enabled on the same SSID.
Learn more about the wireless client isolation here.
When Bonjour forwarding is enabled along with LAN isolation, a client can discover a service if they are located on different VLANs. However, if both the client and the service reside on the same VLAN, the service will not be discoverable by the client.
Configuration
-
Enable Bonjour forwarding on the Wireless > Configure > Access control page for the desired SSID and save changes.
2. Enable Layer 2 LAN isolation for the same SSID on the Wireless > Configure > Firewall and traffic shaping.
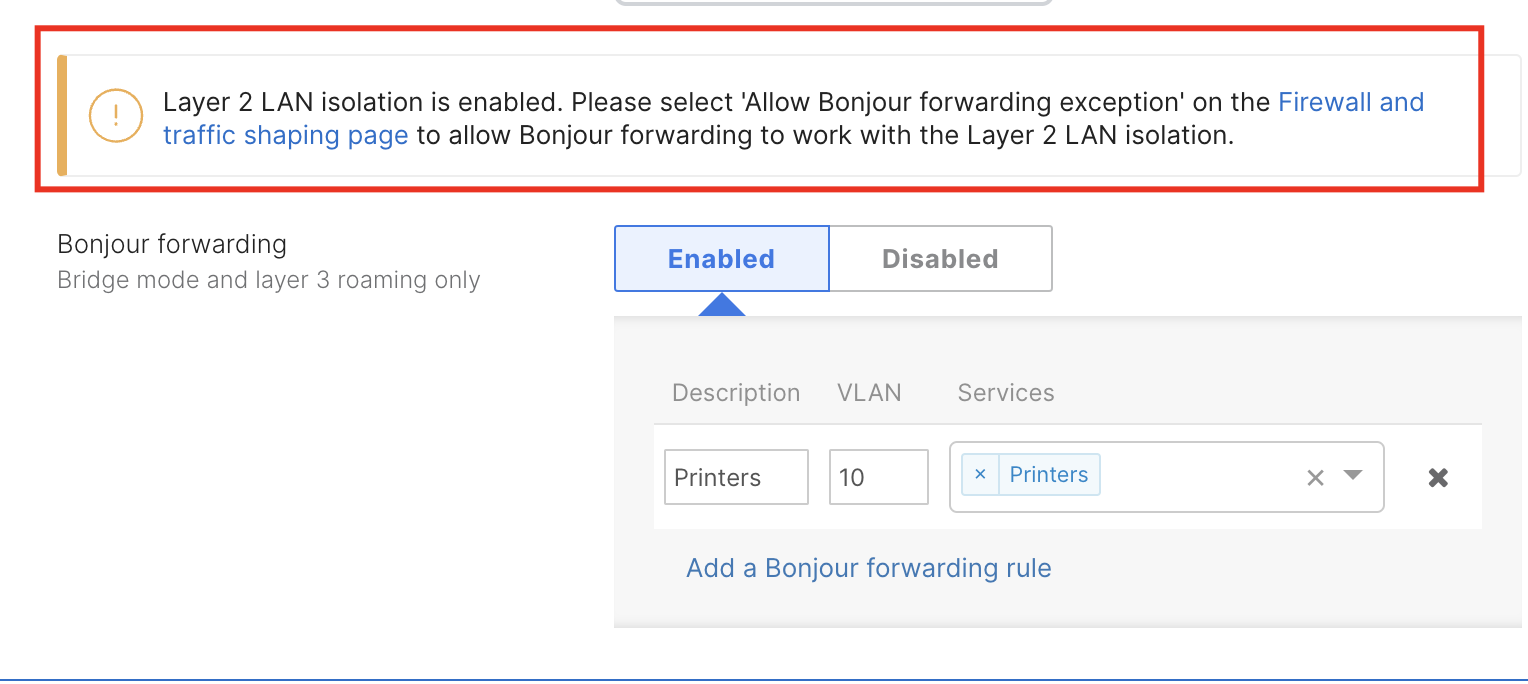
3. Once the Layer 2 LAN isolation is enabled, select the “Allow Bonjour forwarding exception” checkbox and save changes.
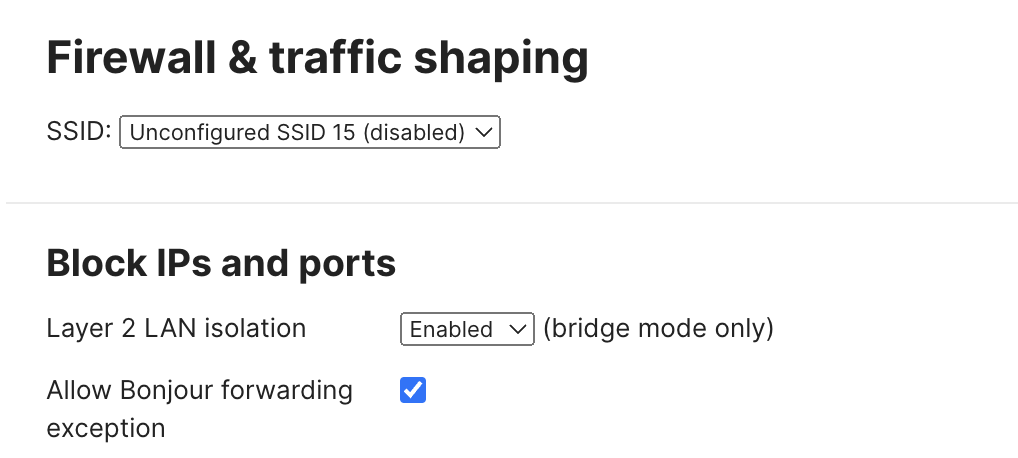
Note: The “Allow Bonjour forwarding exception” option is only available when Bonjour forwarding is enabled on the Wireless > Configure > Access control page.
If Bonjour forwarding and Layer 2 isolation (without Bonjour forwarding exception) is enabled on an SSID, you will see the following warning on the Wireless > Configure > Access control page:
Mandatory DHCP
Mandatory DHCP requires client devices use DHCP for IP assignment. All 802.11ac Wave 2 capable MR access points running MR 26.0 firmware or later support this feature.
Enabled: Wireless clients associated to an AP (either new associations or clients that roamed from another AP) that have not requested a DHCP address are placed in a blocked state and are not able to send any traffic on LAN and WAN.
Disabled: The default setting for this feature. Wireless clients configured with static IPs are not required to request a DHCP address.
Additional Documentation