
Apple Automated Device Enrollment (ADE)
Apple Automated Device Enrollment (ADE) was formerly known as Apple Device Enrollment Program (DEP). ADE and DEP may be used interchangably in documentation, and ADE and DEP should be treated as the same things.
The Apple Automated Device Enrollment (ADE) allows administrators to pre-provision iOS, iPadOS, and macOS devices to automatically self-enroll into Systems Manager before even touching them, and provides an additional level of management control through bulk device supervision. This greatly simplifies adding and deploying iOS, iPadOS, macOS, and tvOS devices with Automatic Device Enrollment into Meraki Systems Manager. This article will cover how to use the Apple Automatic Device Enrollment with Systems Manager.
For additional information on ADE, including how to qualify for the program, please review Apple's official deployment guide. Additional information can be found directly from Apple Business Manager portal or Apple School Manager portal.
Linking Systems Manager to Apple ADE
In order to use the Apple ADE with Systems Manager, a Systems Manager deployment must be linked to an organization within ADE. These steps assume an Apple ID for the organization has already been created, as outlined in the Device Enrollment Program Guide. You can also use Apple Business Manager portal or Apple School Manager portal for the same functionality.
-
In Dashboard, create an EMM network for Systems Manager.
-
Navigate to Organization > Configure > MDM, then scroll down to Apple ADE Servers.
-
Click on + Add new and download the Meraki_Apple_ADE_cert.pem file provided.
-
If someone has downloaded the .pem file previously, and the server token has expired, click clear token in order to download the .pem file again.
-
-
Go to the Apple Business Manager or Apple School Manager portal and sign in with the Apple ID tied to the desired organization.
-
Click on your name at the bottom left of the window, then click Preferences
-
Click the + (plus) icon next to "Your MDM Servers"
-
Enter a Name for the MDM server in ADE, then click Next.
-
Click Choose File... and upload the .pem public key downloaded in step 3, then click Next.
-
Download the server token provided, then click Done.
-
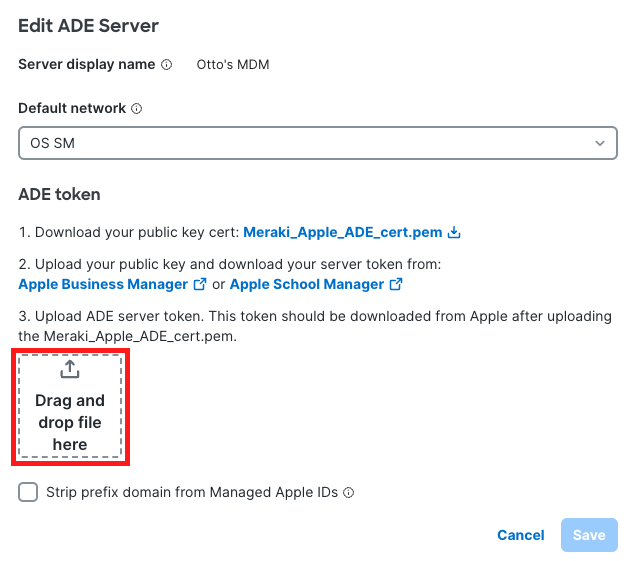
Back in Dashboard, click on the Drag and drop ADE server token here button in the ADE section.
-
Select/upload the server token downloaded in step 9.
-
Choose the default Systems Manager network where devices tied to this MDM server in ADE will be enrolled.
-
Click Save Changes.


If you encounter an error uploading the server token to Dashboard, make sure that the file name ends in 'smime.p7m' without any trailing characters like '(1)' that may appear from downloading multiple copies of the file.
The last downloaded ADE token on the Apple portal is the only one that MDMs can sync with. You may see error "Sync failed: Unable to connect to Apple's servers at this time." or "Sync failed. Please try again later." in the event that the current token is unable to sync. The Apple portal shows the following warning if someone tries to download a token twice:
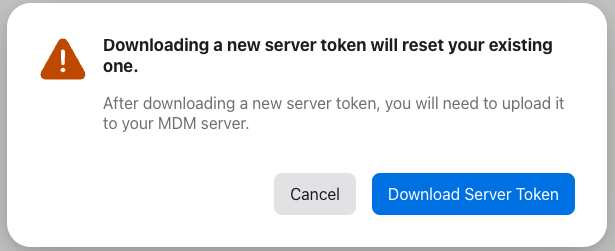
In this case, the token would need to be renewed again in order to continue syncing with Meraki Systems Manager.
Renewing an Automated Device Enrollment (ADE) Token
Apple ADE tokens last for one year by design. To continue enrolling via ADE:
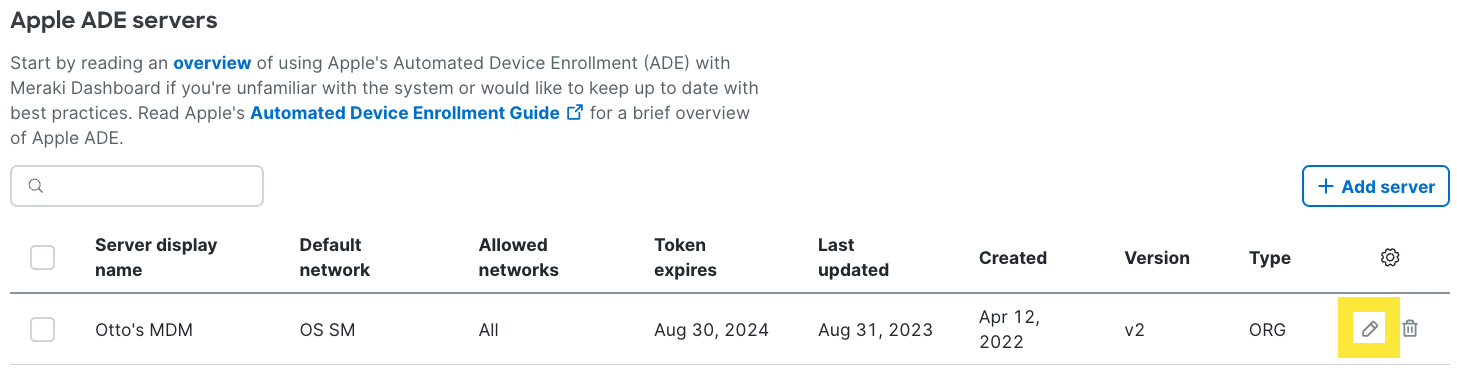
In your Meraki Dashboard navigate to Organization > MDM. In the Apple ADE servers section, select the ADE server you would like to update by clicking on the pencil icon on the far right-hand side. This will pop up the Edit ADE Server window, inside the window press the blue Update Token.
If using Apple Business:
-
Log in to the Apple Business Portal
-
Select Devices from the top banner, then Management from the menu on the left.
 3. Select the device management server linked to Meraki , then ‘…’ > Download Token

-
Return to your Meraki Dashboard (Organization ⇾ Configure ⇾ MDM).
-
Upload the Meraki_Token_smime.p7m file and click Apply to save.
If using Apple School Manager:
- Login to the Apple School Manager Portal
-
Select your account at the bottom left of the window, then Preferences
-
Under Device Management Services, select the server to renew and select Download Token at the top of the page.

-
Return to your Meraki Dashboard (Organization ⇾ Configure ⇾ MDM).
-
Upload the Meraki_Token_smime.p7m file and click Apply to save.
After this process is finished, the token is valid for another 365 days.
If the existing ADE token is cleared or the ADE server is deleted instead of renewing the token, all associated ADE settings profiles will be removed from the Systems Manager > ADE page and will have to be re-created manually.
Importing Devices
Devices purchased with your Apple Customer Number or Reseller Number appear automatically in Apple Business Manager. You can also manually add devices you own using Apple Configurator. Reference to Apple Business Manager User Guide.
To sync the devices from your Apple ADE server into Systems Manager, Navigate to Systems Manager > Manage > ADE and select either “Partial Sync” or “Full Sync” at the top right of the list of devices.
Note: To be eligible, devices must have been purchased directly from Apple within the last three years, or through participating resellers and carriers. This requirement will be changing with iOS 11, which will allow users to add iOS or iPadOS devices from any purchaser into ADE. For more information regarding this and supported countries, please refer to Apple's Device Enrollment Program page.
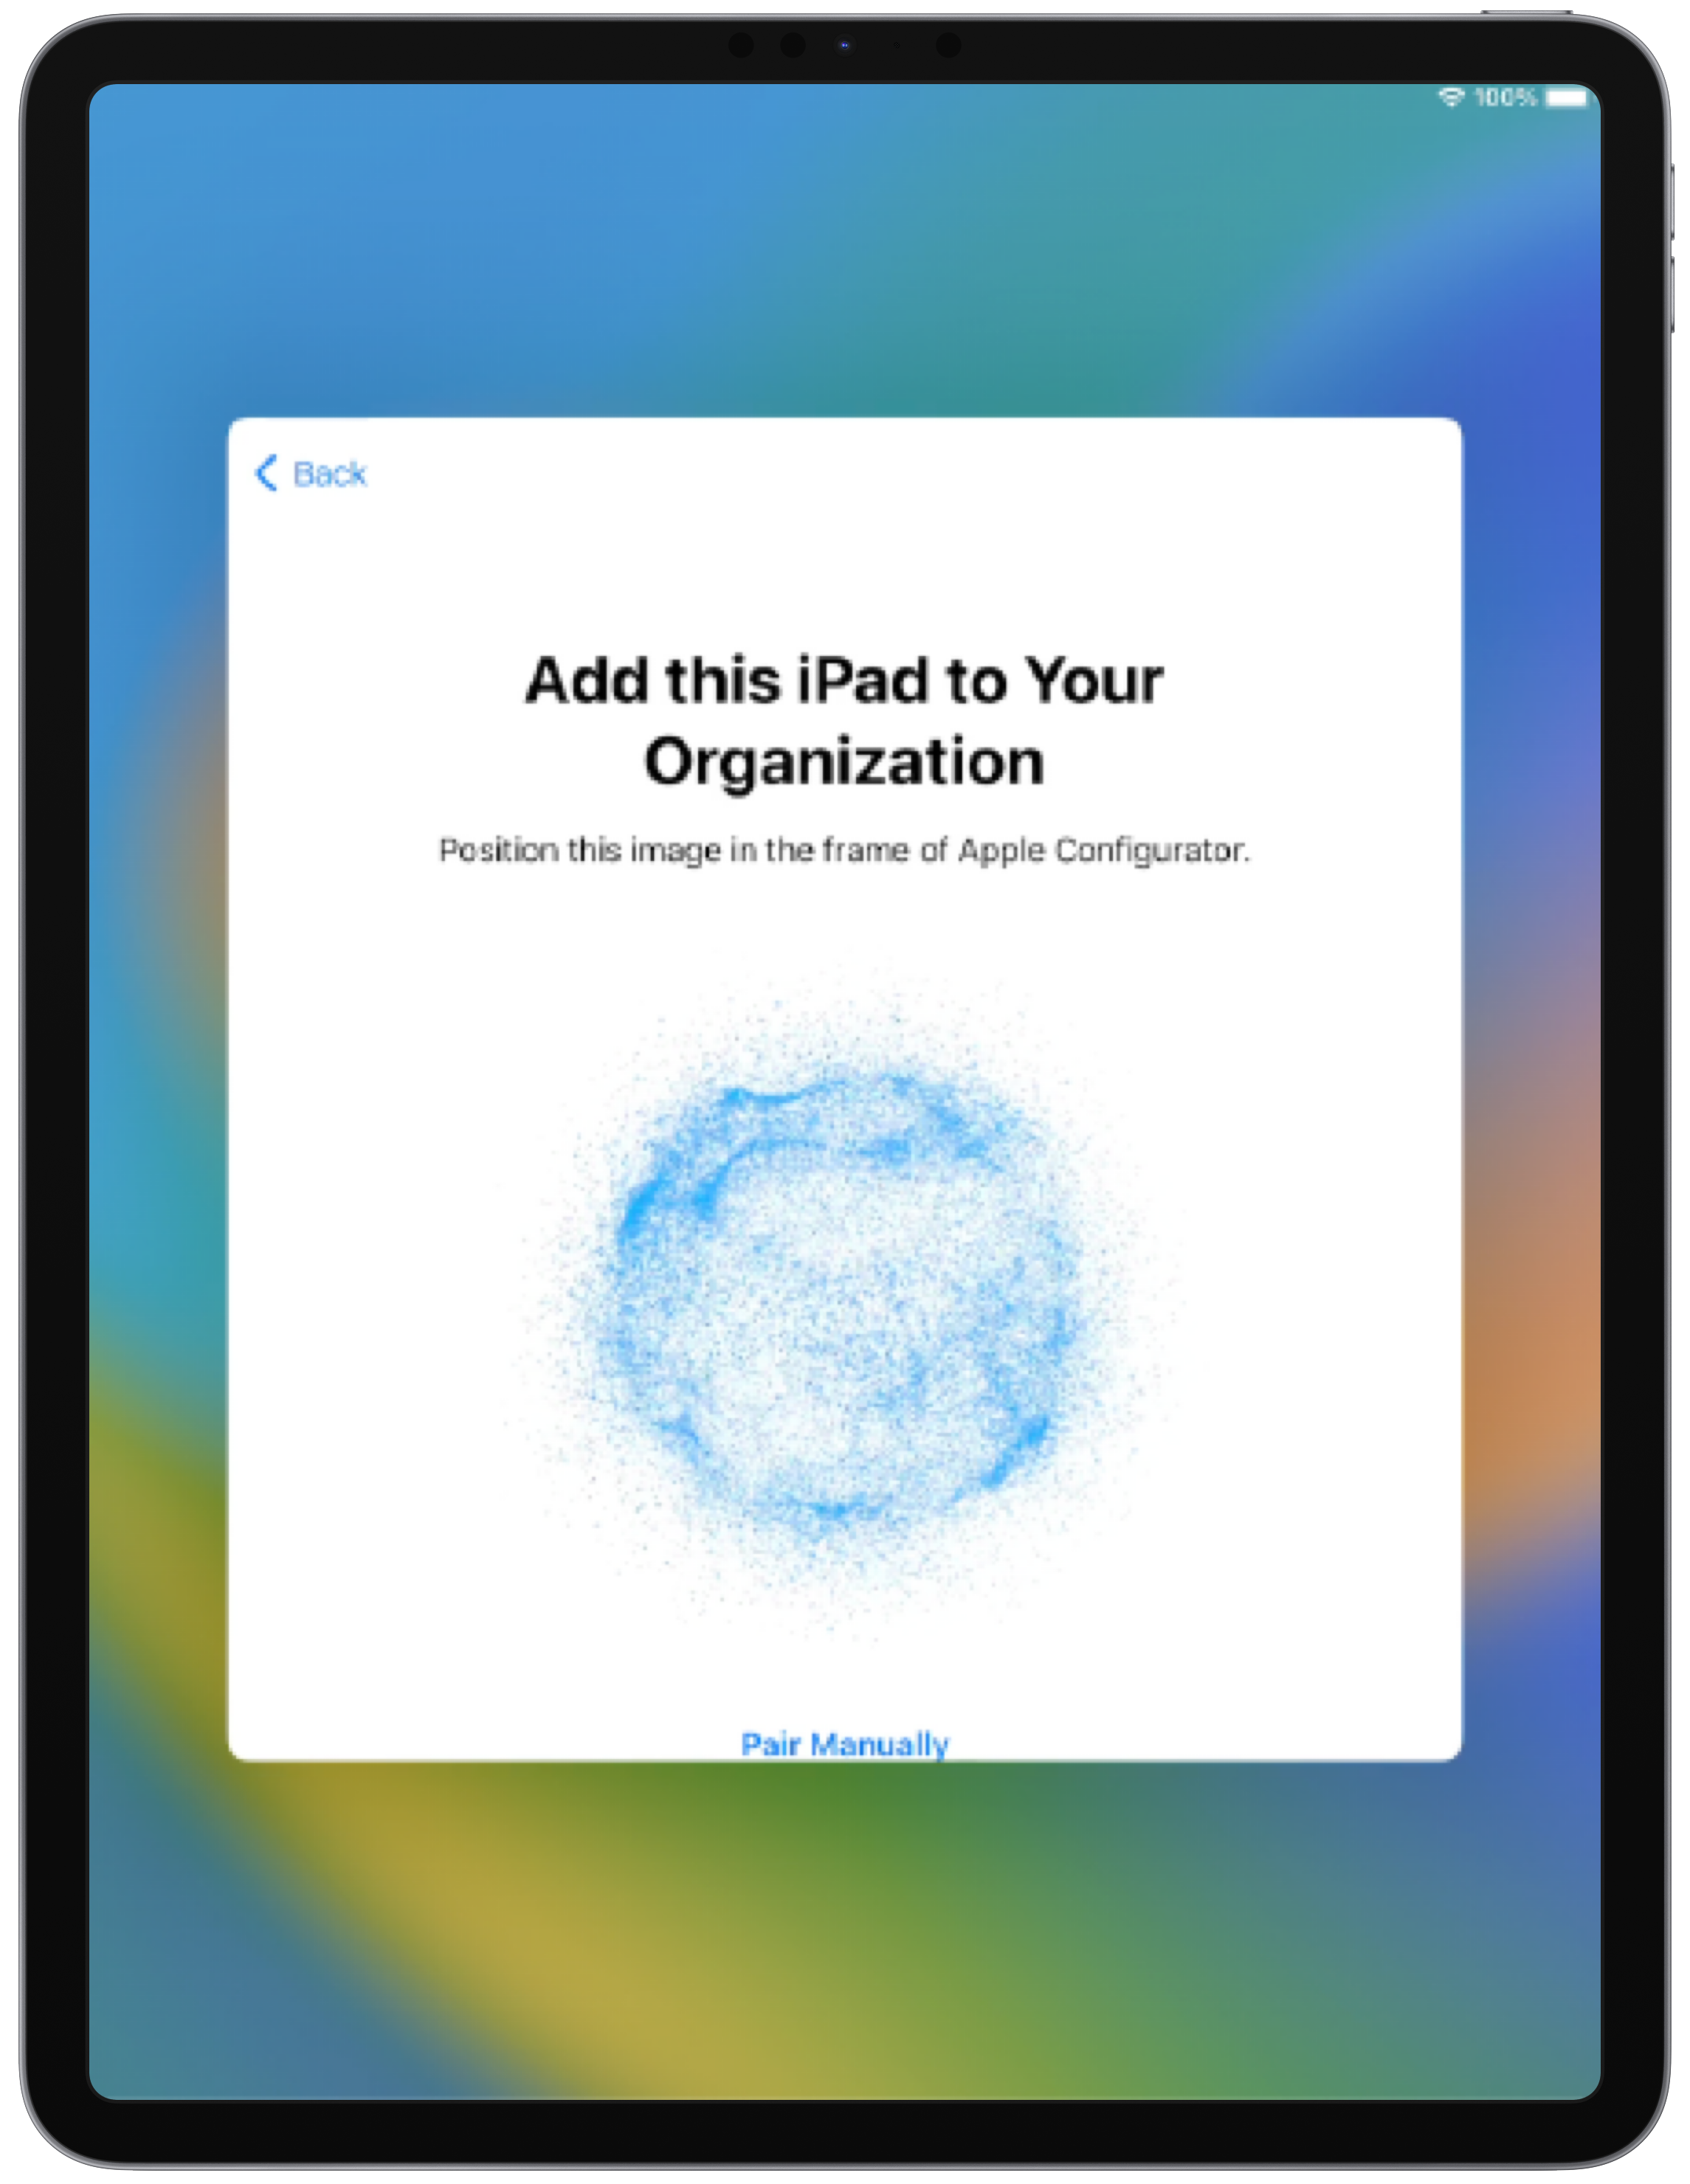
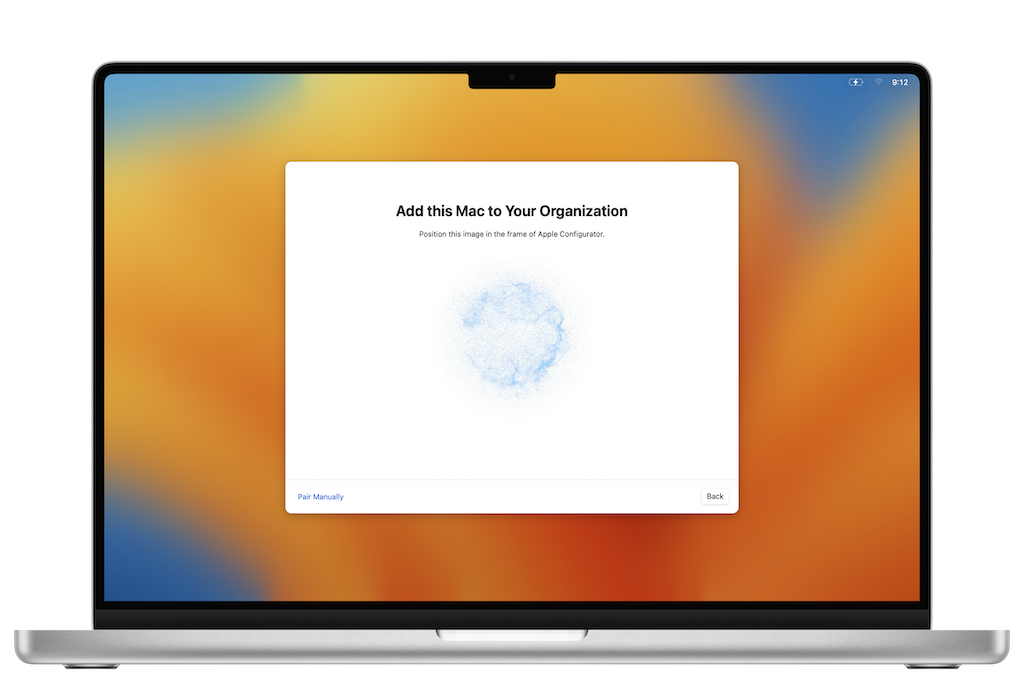
If devices were not aquired through an ADE supported reseller or if devices must be re-added to ADE after being released, Apple Configurator can be used.
The Apple Configurator application for MacOS can be configured using this article to enroll the following device types into ADE:
- iOS/iPadOS
- Apple TV
The Apple Configurator application for iOS can be configured using this article to enroll the following device types into ADE:
- iOS/iPadOS (running iOS/iPadOS 16 or higher)
- MacOS (running macOS 12.0.1 or higher with an Apple Silicon processor or Apple T2 security chip)
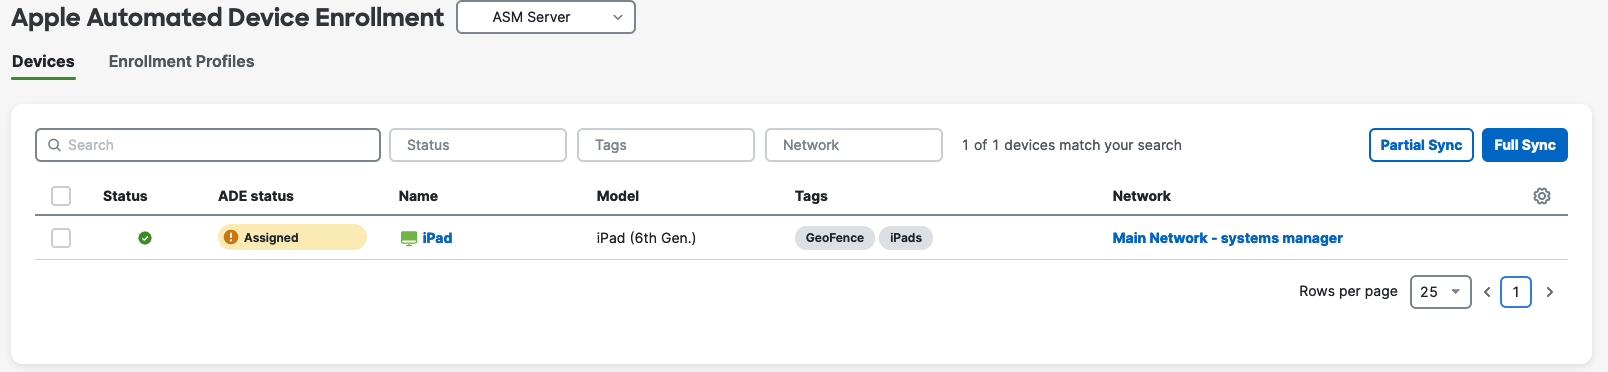
ADE Enrollment Status
There are 3 states for the 'ADE enrollment' status column. If you've just synced your devices from the ADE server into Systems Manager, they will be labeled 'Empty'.
-
Empty: The default state when devices are first synced from ADE into Systems Manager. This means that the device has no ADE settings assigned to them.
-
Assigned: This means new ADE settings have been assigned to the device, but not yet applied. Upon initial setup, or after a factory reset, the applied settings will take effect.
-
Pushed: This means the device has its ADE settings applied. You can see information on what settings were pushed, and when, on the other columns of the table.
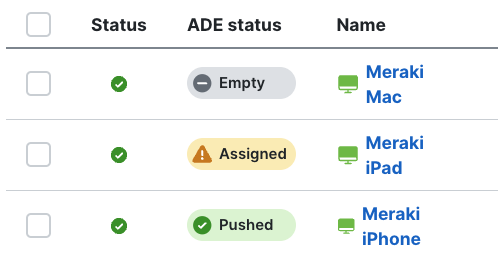
ADE Push status is only related to Device Enrollment status, and does not strictly determine it. This means that you may have devices which show their ADE payloads as 'Empty' which have already been enrolled (and therefore, have a valid link to their Device Details page in the Name column), and devices which show their ADE payloads as 'Pushed' but have yet to complete enrollment (most often because they stopped at the authentication step).
ADE settings are applied during setup assistant, either upon setting up the device for the first time or after a factory reset for devices already in use.
Assigning Settings
ADE setting profiles are bound to the ADE Server token they are created on, if the ADE token is removed the setting profile will be permanently deleted from the dashboard and will need to be manually recreated.
After devices have been assigned to Systems Manager via ADE, they will automatically be enrolled in the default Systems Manager network upon setup. Additional configurations such as supervising the device or skipping setup steps will further customize and streamline your deployment.
-
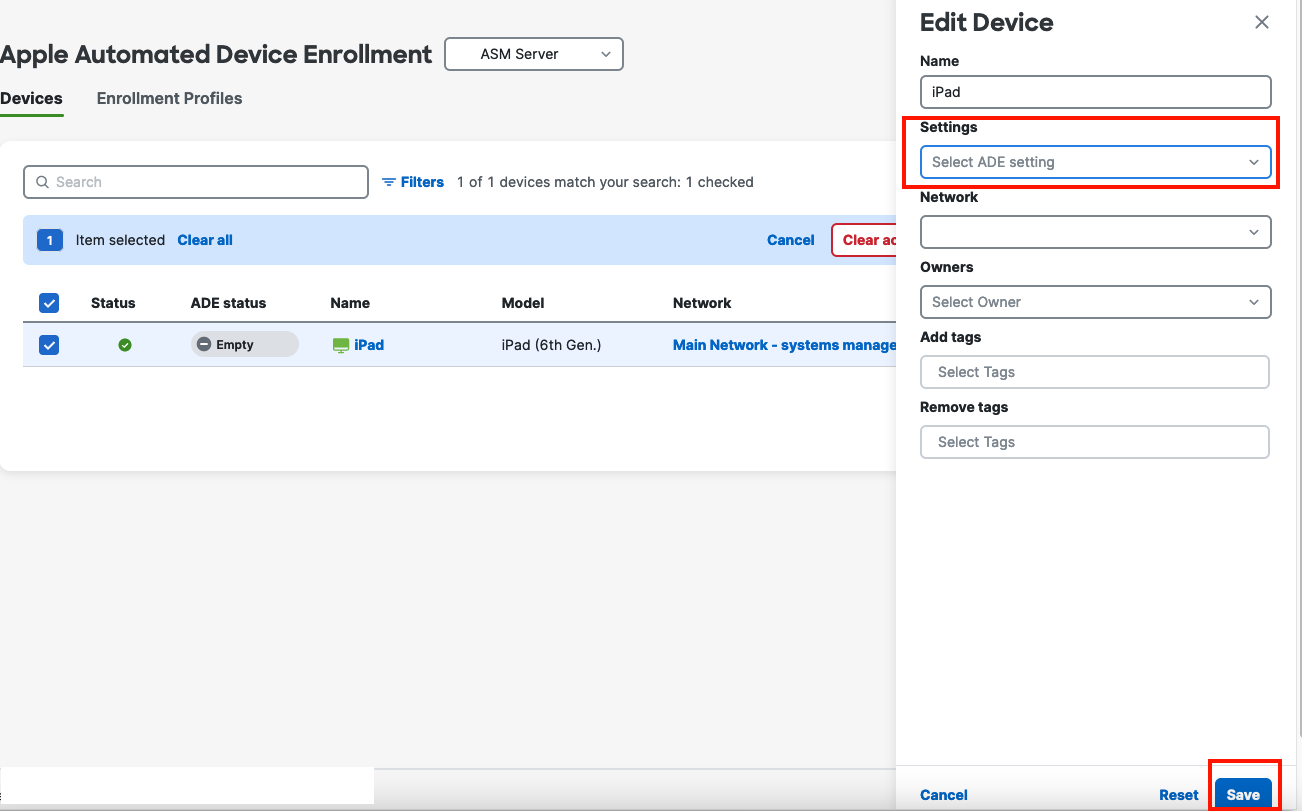
Navigate to Systems Manager > Manage > ADE within the Systems Manager network.
-
Click the checkbox next to any devices that require settings to be applied.
- Click Edit and you will be presented with a side panel with several options.
-
If you have an existing setting profile created, select it from the “Settings” dropdown. Otherwise, create a new Settings Profile as outlined below.
Creating Settings Profile
ADE setting profiles are bound to the ADE Server token they are created on, if the ADE token is removed the setting profile will be permanently deleted from the dashboard and will need to be manually recreated.
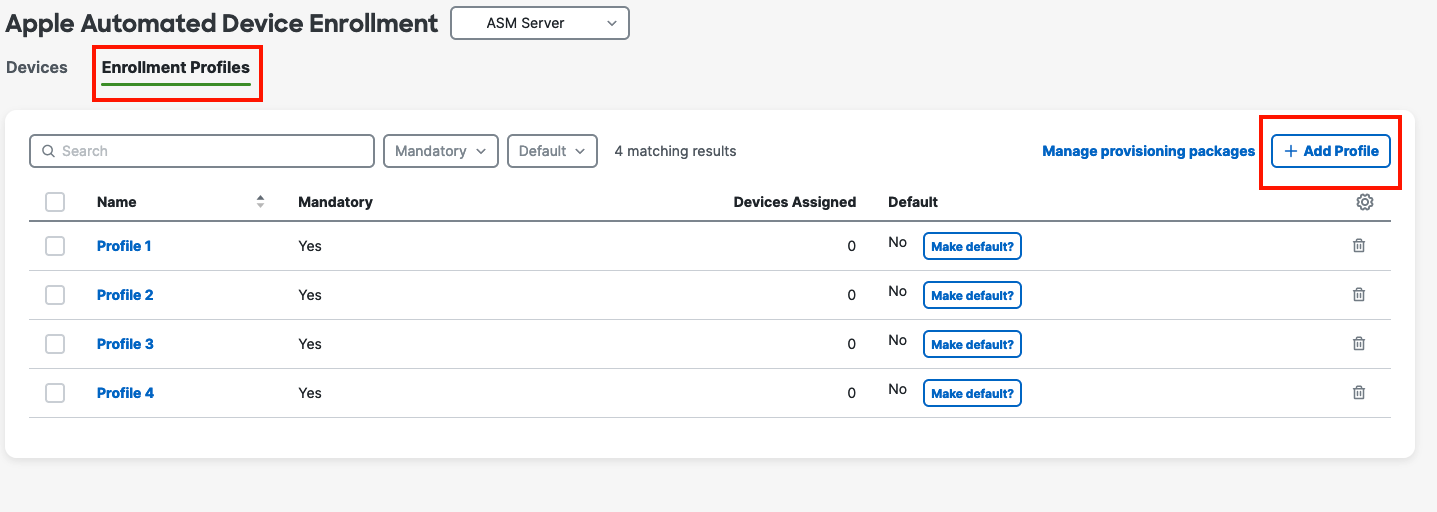
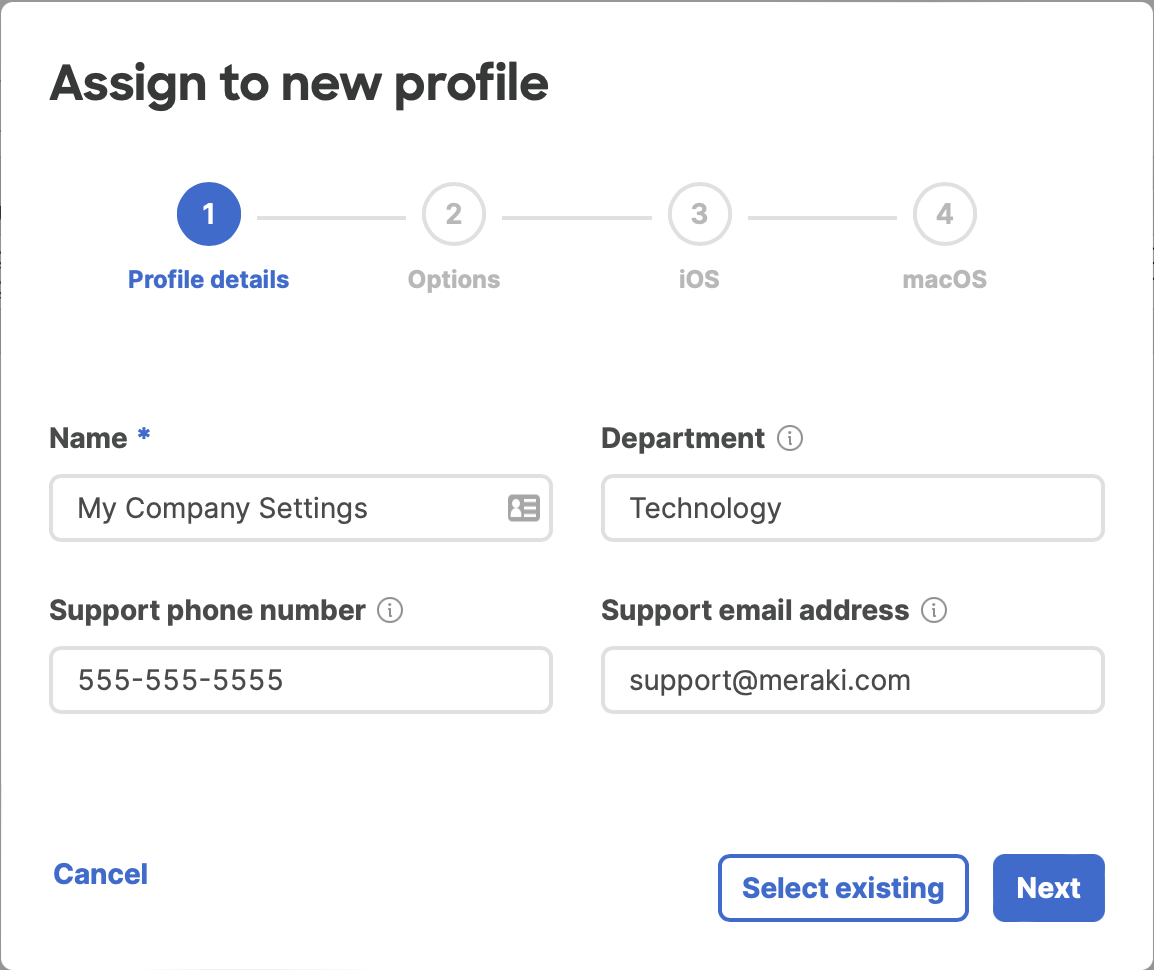
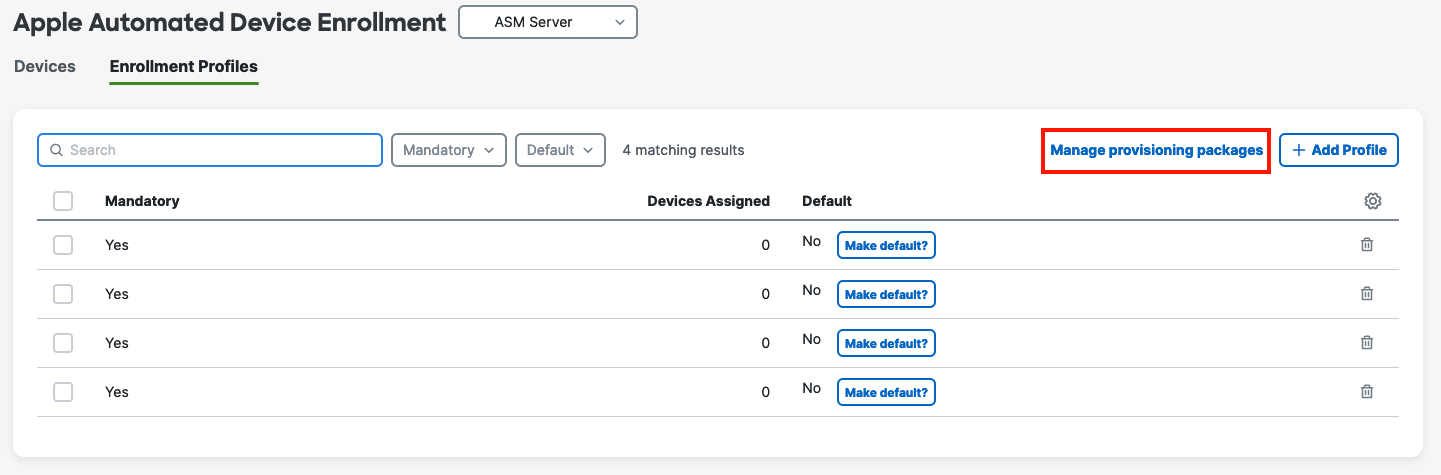
To create a Settings Profile, Navigate to Systems Manager > Manage > ADE > Enrollment Profiles and select “Add Profile”. Complete the fields/selections that appear in the setup:
Profile details
-
Name: A friendly name for the group of settings profile applied.
-
Department: Display the organization department the iPad is assigned to. This is displayed during setup.
-
Support phone number: A number provided to users during setup if help is required.
-
Support email address: An email address provided to users during setup if help is required.
Options
-
Skip: Allows you to specify pages during the setup process to skip, e.g. hiding the prompt to set or sign into an Apple ID.
-
Use network's user authentication: Meraki Authentication: This is enabled by default for security reasons. When enabled, setup assistant will open a web browser that will requre authentication using the network's currently configured enrollment authentication method. To enroll without authentication disable this option and leave the enrollment URL blank.
-
Supervising host certificate: Devices are only allowed to pair with computers that have the matching keypair. Note: If left unconfigured and no pairing restriction payload is assigned, the device will have the ability to pair with any computer.
-
Removable: When checked, the management profile can be removed by the user. When unchecked, the management profile cannot be removed by the user. See here for more info.
-
Auto-advanced Setup Assistant: automatically clicks through the entire Apple Setup Assistant for the user to get to the desktop/homescreen as fast as possible.
.png?revision=1)
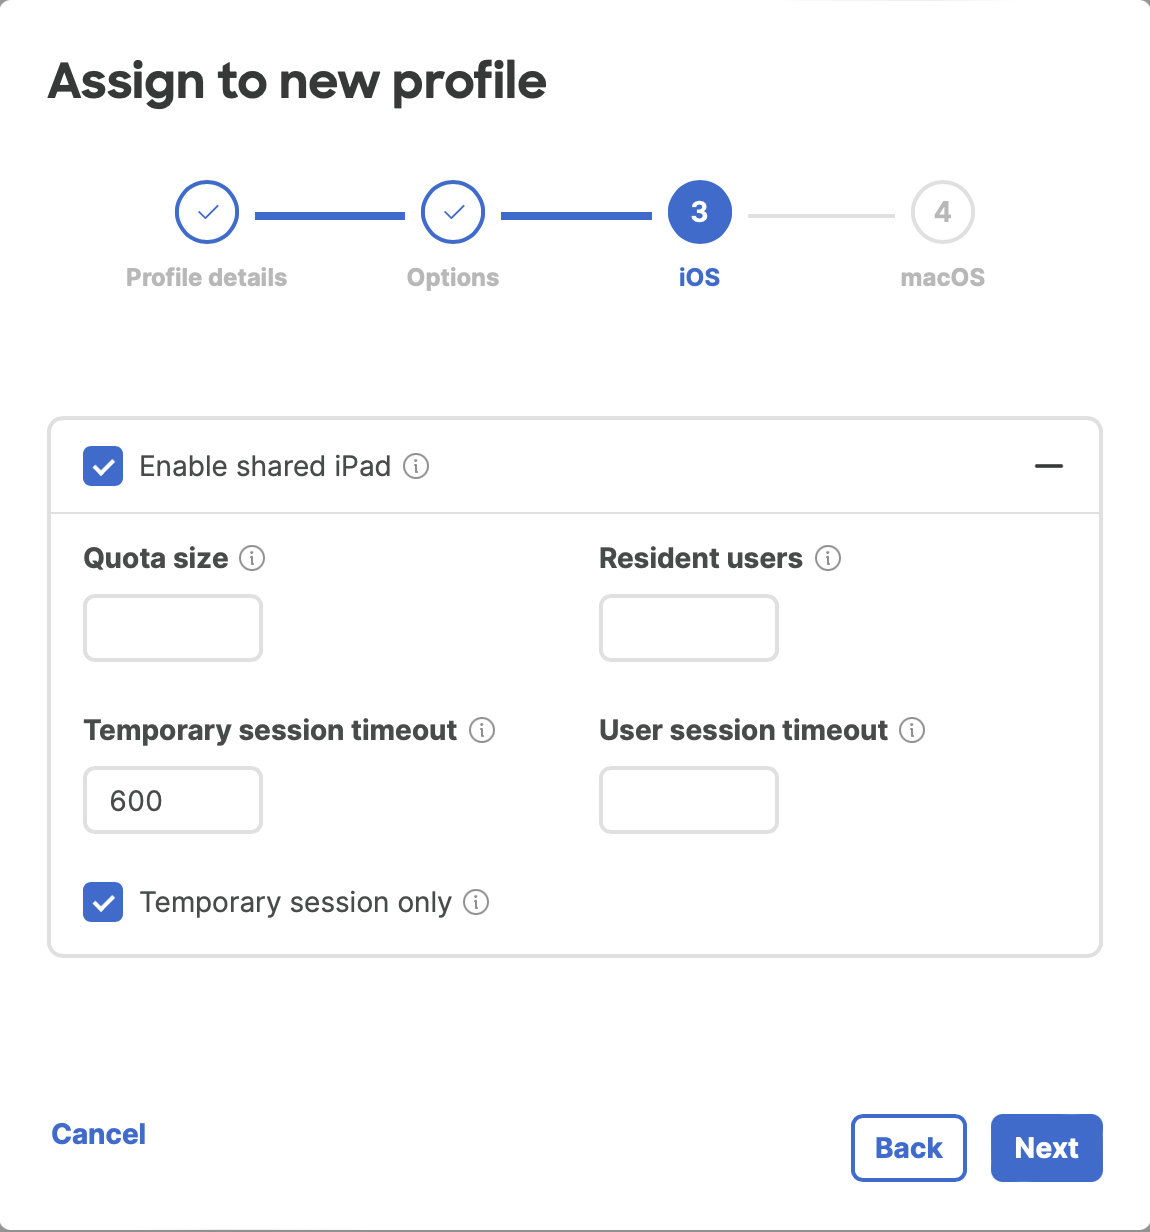
iOS
-
Enable Shared iPad: Used for shared device deployments with Apple School Manager. Do not select this unless you intend to use Temporary Guest Sessions or if you have Apple School Manager provisioned with managed Apple IDs. See official Apple documentation here.
-
Quota size: The quota size, in megabytes (MB), for each user on the shared device, or if the quota size is too small, the minimum quota size. Provide either the QuotaSize or ResidentUsers. If you provide both values, the MDM server uses QuotaSize.
-
Resident Users: The expected number of users. If this value is greater than the value for the maximum possible number of users that the device supports, the MDM server uses that value instead. Provide either the QuotaSize or ResidentUsers. If you provide both values, the MDM server uses QuotaSize.
-
User session timeout: The timeout, in seconds, for the user session. The user session logs out automatically after the specified period of inactivity. The minimum value is 30 seconds. Setting this value to 0 removes the timeout. Available in iOS 14.5 or higher.
-
Temporary sessions timeout: The timeout, in seconds, for the temporary session. The temporary session logs out automatically after the specified period of inactivity. The minimum value is 30 seconds. Setting this value to 0 removes the timeout. Available in iOS 14.5 or higher.
-
Temporary sessions only: If true, the user only sees the Guest Welcome pane and can only log in as a guest user. If false, the user can sign in with a managed Apple ID. Available in iOS 14.5 or higher.
macOS
-
Provisioning package: Installs a signed binary on macOS during the setup assistant.
To add new Provisioning Packages, click on Manage Provisioning Packages in the Systems Manager > Manage > ADE > Enrollment Profiles page, and then click on + Add Package
Create a Name for the provisioning package, and then upload a .pkg, manifest upload .plist, or add a manifest url. This is what will be deployed during macOS Setup Assistant.

The package must be a signed binary. The open-source tool Hancock can be used to assist with .pkg file signatures.
-
Create administrator account: the local admin of the macOS device.
-
Hide admin account: Makes the admin account hidden to non-administrator accounts.
-
Manage admin account: One user account will be managed. By default, the regular user account created during Setup Assistant will be managed. If you want to manage the admin account instead, select this option.
-
Skip creation of primary account: When creating an admin account, you can choose to skip the creation of the primary user account during Setup Assistant.
-
-
Configure primary user account: the user's local account on the device.
-
User account type: either regular or admin. Regular accounts corresponds to a 'Standard' user in macOS > System Preferences > Users & Groups. Admin accounts are local administrators. These options are only available when an administrator account is created.
-
Pre-fill using Systems Manager owner details: Set a Systems Manager Owner for the devices before enrollment, and the Owner's username and name information will be dynamically set for each device.
-
Lock user account information to prevent editing: macOS Setup Assistant disables editing of account name and username fields.
-
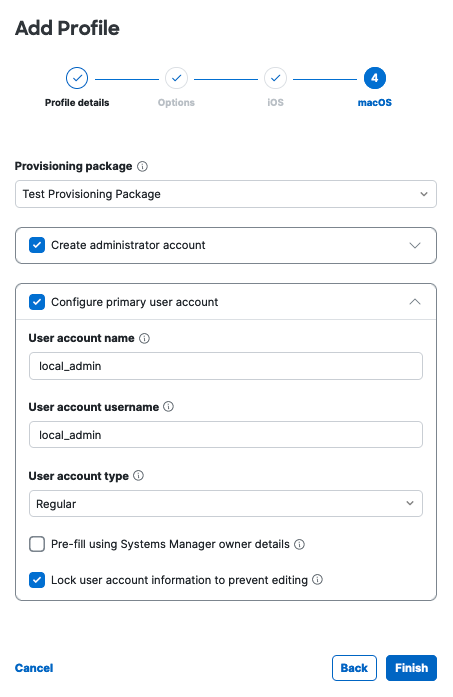
After going through all the Settings Profiles Options, Click Finish. This profile can now be assigned to select devices.
After assigning the Settings Profile to a device, you should see the ADE status change to ‘Assigned’.

The devices can now be drop shipped direct to end-users so they can setup the devices using these settings. Or if the device(s) are already in use, they should be factory reset at this point. This is required to ensure the device is activated and configured with ADE settings, as settings are only applied during the Apple Setup Assistant.
To factory reset to apply the ADE settings to existing devices:
On macOS, restart in Recovery Mode and reinstall the operating system.
On iOS and/or iPadOS, navigate to Settings > General > Reset, then tap Erase All Content and Settings. Confirm by tapping Erase.
In some cases, this may be required for brand-new device as well, if device was activated (connected to Wi-Fi) before ADE settings were assigned in Dashboard. For new deployments, it is important to assign these ADE settings before the devices connect online in their initial Setup Assistant.
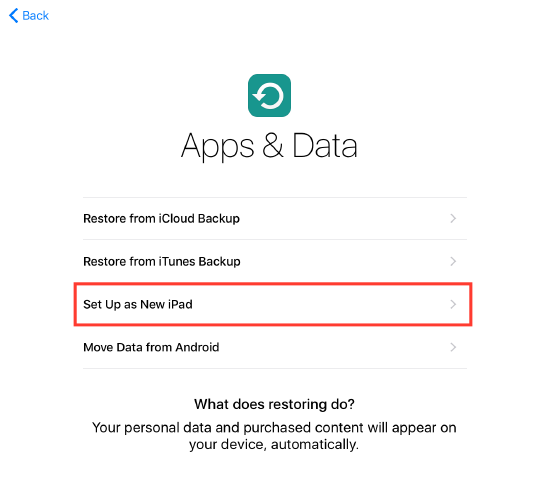
In iOS and iPadOS, please choose Set Up as New Device, or skip the "Restore from Backup" option entirely when assigning the ADE settings. Apple does not recommend restoring from iCloud, iTunes, or Migration Assistance backups if the supervision state of the device is changing. iCloud can be signed into after device setup to sync settings. Apple information related to this can be found here.
Adding and Removing Tags
To apply configuration profiles and settings to devices, the appropriate tags will need to be applied. These can be configured in advance so that once a device enrolls, the tags configured below are automatically applied. Profiles and apps tied to those tags will then be automatically installed upon enrollment for a seamless experience.
-
Navigate to Systems Manager > Manage > ADE.
-
Click the checkbox next to any devices the tag must be applied to.
-
Click Edit and you will be presented with a side panel with several options.
-
Under the "Add tags" section, select the desired tags and save the changes.
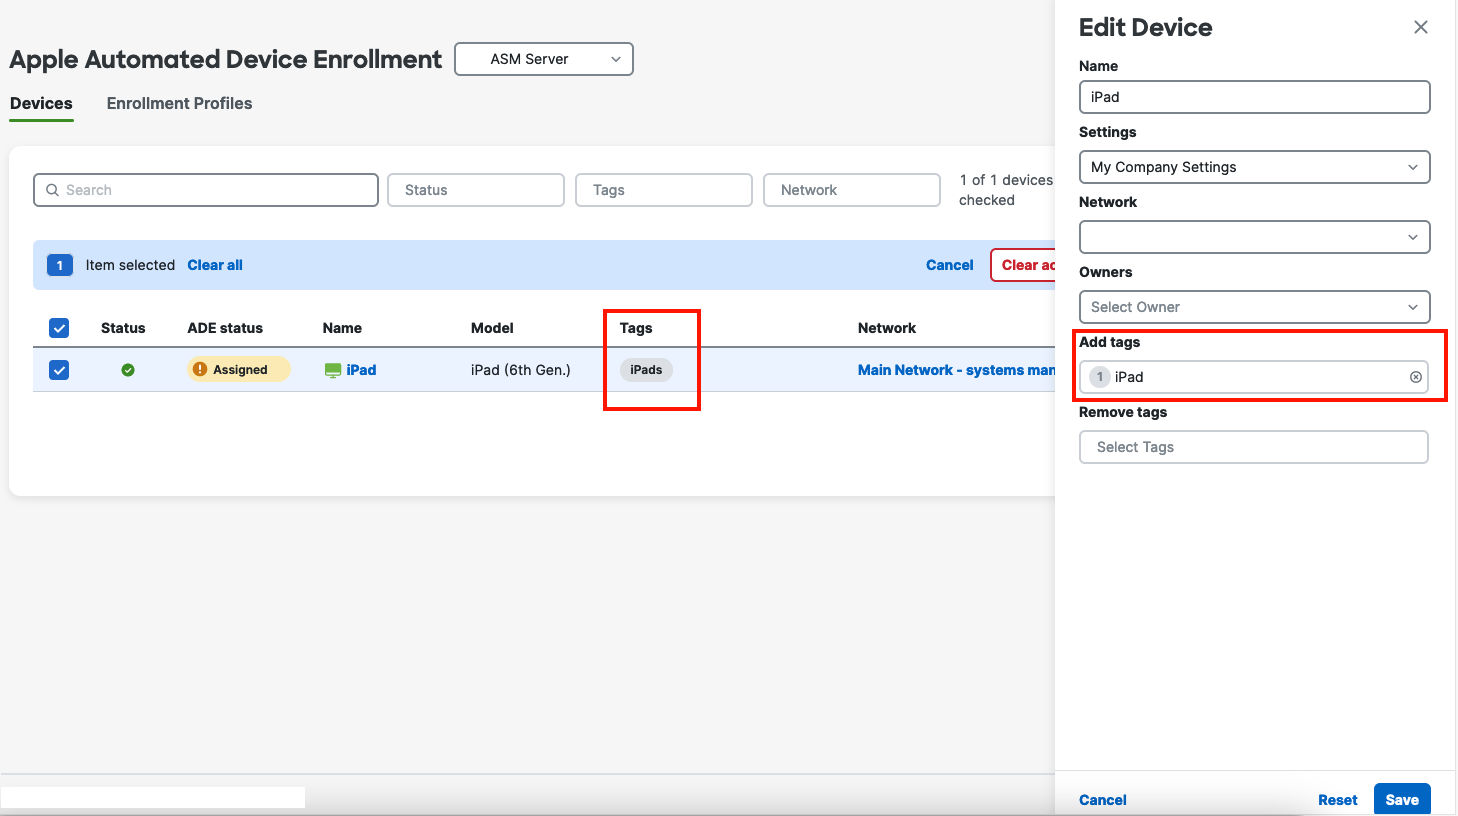
Now, any configuration profiles and apps scoped with this tag in Systems Manager will be applied to the device upon initial setup.
If tags were applied to a device before enrollment, they can also be removed to prevent profiles and apps from associating.
-
Navigate to Systems Manager > Manage > ADE.
-
Click the checkbox next to any devices the tag will be removed from.
-
Click Edit and you will be presented with a side panel with several options.
-
Under the "Remove tags" section, select the tags that will be removed and save the changes
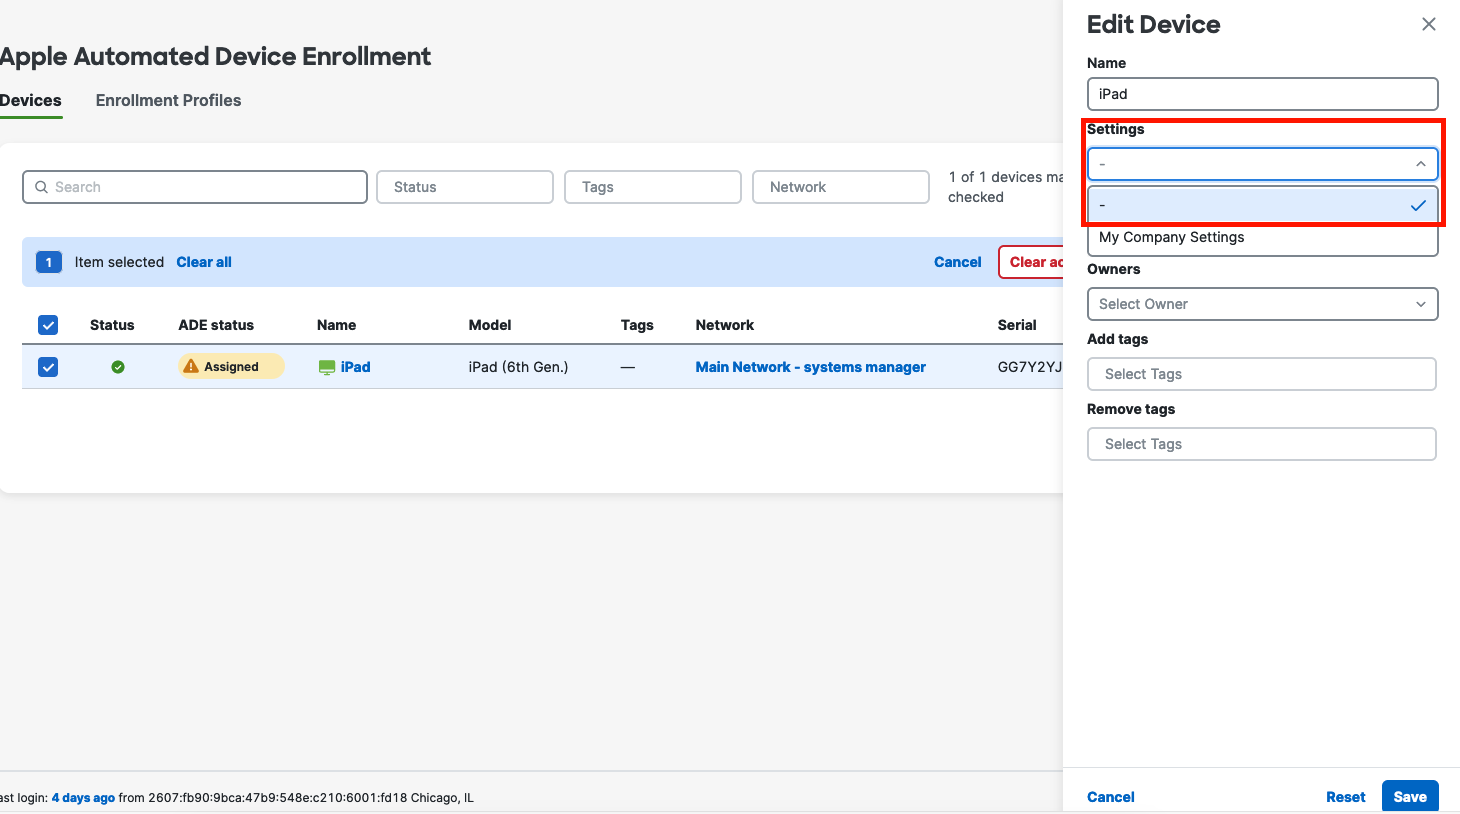
Removing Settings
In the event a device needs to be reset and managed under different conditions, the settings applied via ADE can be removed.
-
Navigate to Systems Manager > Manage > ADE.
-
Click the checkbox next to any devices that Settings Profiles will be removed from.
-
Click Edit and you will be presented with a side panel with several options.
- Under the “Settings” dropdown, select the “-“ option and save the change. This will remove the currently assigned Settings Profile
To overwrite existing settings, follow the previous steps for applying settings. Note that the newly assigned settings will not apply until the device has been factory reset.
Delete Settings
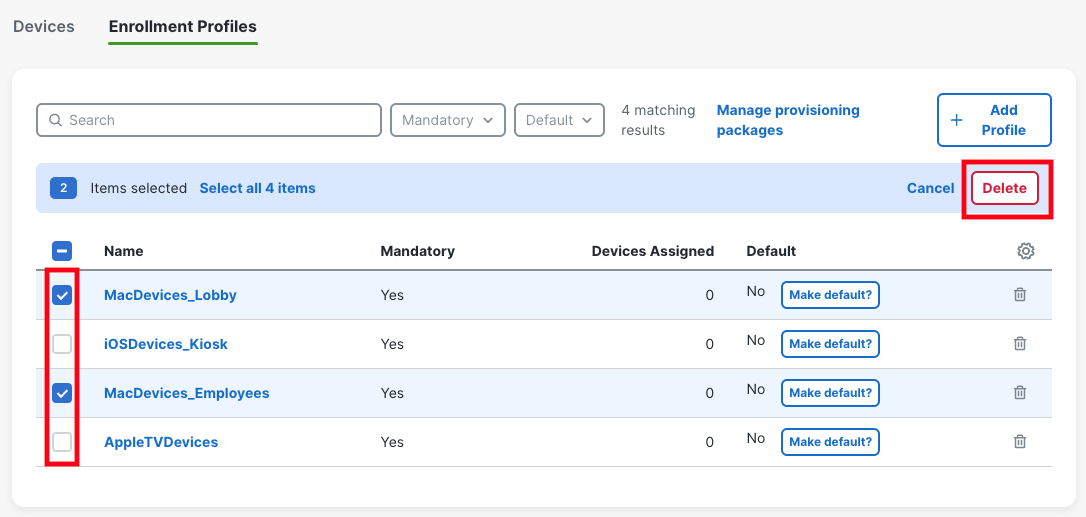
If one or more ADE profiles are no longer needed, they can be removed. Settings can be removed individually using the trash can glyph, or multiple settings can be deleted at once by selecting the desired profiles and clicking the "delete" button.
Recovering ADE Devices
If a ADE-enrolled device is removed from Systems Manager, it will not automatically reappear without taking additional steps to sync Dashboard with Apple ADE.
For specific instructions on ADE device recovery, please refer to our documentation for more info.
Clearing Apple ADE Token
There are some instances where a ADE token needs to be removed to resolve an issue, or to use a different MDM server on the Apple side. To do this, navigate to the Organization > MDM page. Under Apple Automated Device Enrollment, click the Clear Server Token button. This will remove the existing token and allow a new one to be uploaded.
Once the ADE token has been cleared, the client drop-down menu under Systems Manager > Manage > ADE with existing ADE settings will be cleared.
It is important to note that any devices that need to be associated with the organization in Dashboard must also be assigned to the new MDM server within Apple's ADE portal. So if the MDM server is changing, the devices should also be reassigned. Avoid doing this if possible when there are a large number of devices already assigned with settings, as clearing the ADE token will purge these assigned settings in the cloud (but not on devices themselves). It is also recommended that a list of assigned devices be exported to a spreadsheet, within the Apple site, to aid in the reassignment process.