
Meraki Wireless for Enterprise Best Practices - Security
Click 日本語 for Japanese
Overview
This document covers all commonly used security features with Meraki Wireless, from wireless network security to client visibility, and extends to securing the air (Air Marshal). Since security features are everywhere and designed for different use cases, some features might not fit well in your network. Always choose the security features you would need based on the security level your network requires and verify them before applying them to production networks.
This documentation contains three main sections. Secure the Network, which talks about Meraki wireless network security features, including encryption, client authentication, and access control. Secure the Client, which contains application visibility. Secure the Air, known as Air Marshal for Meraki Wireless, offers WIPS, rogue detection and containment.
Secure the Network
Access Control
Wireless Security Protocols
There are four main wireless security protocols. These protocols were developed by the Wi-Fi Alliance, which promotes wireless technologies and interoperability.
The first wireless security protocol is WEP (Wireless Equivalent Privacy). WEP was introduced in the late 1990s and used basic 64/128-bit encryption. WEP is no longer considered a secure wireless security protocol.
Will Meraki still support WEP?
From MR30.X and newer firmware, WEP cannot be configured on the old access control page and will disappear from the latest access control page. If an SSID is configured with WEP, this SSID will be disabled until WEP is changed on the Access Control page.
WPA (Wi-Fi Protected Access) was introduced in 2003, providing more robust encryption (128/256-bits). The first version of WPA uses a security protocol known as TKIP (Temporal Key Integrity Protocol), which generally replaces WEP. WPA2 is a later version of WPA developed in 2004 and is the most used network security protocol today. Configuring and introducing AES (Advanced Encryption Standard) is more accessible, which provides better wireless network security. The newest generation of WPA is WPA3. It is supported throughout Wi-Fi 6 networks and required by Wi-Fi 6E and 6GHz wireless networks, which brings even more robust (192/256/384-bit) encryption, enables more robust authentication and delivers increased cryptographic strength to your wireless network.
What is my option to design a WPA3 SSID with 6GHz enabled and simultaneously allow my non-WPA3 supported clients to join?
With the release of Wi-Fi 6E and the 6 GHz band, stricter WLAN security measures are now required. For an SSID to be broadcast in 6 GHz, it is mandated to configure the following:
WPA3 for the layer 2 security. This can be either:
o OWE
o SAE
o 802.1X SHA256
Protected Management Frame (PMF) enabled.
No non-WPA3 L2 security method is allowed (i.e., no mixed mode is possible)
Because of the above requirements, most current WLAN deployments may not support broadcasting in 6GHz. We have three paths to solve this migration: the “All-In” option, the “Multiple SSIDs” option, and the “One SSID” option. Please go to “Meraki for Enterprise – Architecture- 6GHz WPA3 design” for further details.
Authentication Methods
Authentication type with Wireless Security Compatibility matrix:
|
|
WPA |
WPA2 |
WPA3 |
|
Open |
|
|
|
|
OWE |
|
|
|
|
Enterprise with Meraki Cloud Authentication |
|
|
|
|
Enterprise with RADIUS server |
|
|
|
|
Password (PSK) |
|
|
|
|
IPSK with/without RADIUS |
|
|
|


Enterprise (WPA1+WPA2/WPA2 only/WPA3 only)
Enterprise authentication (802.1X) can authenticate users or end devices in a domain. The STA authenticates against the RADIUS server as an authentication server using an Extensible Authentication Protocol (EAP) method configured on the RADIUS server or Meraki cloud as an authentication server. The gateway AP (authenticator) sends authentication messages between the supplicant and the authentication server. This is the most used authentication method in enterprise networks with large scales. For further details, go to Configuring WPA2-Enterprise with Meraki Authentication and Configuring RADIUS Authentication with WPA2-Enterprise.
Personal (WPA1+WPA2 / WPA2 only / WPA3 only)
A personal or pre-shared key (PSK) authentication allows anyone with the key to use the wireless network. Though it requires some client-side configuration, a PSK is relatively easy to configure.
It can be a good choice when a small number of users or clients need more sophisticated authentication mechanisms, such as enterprise authentication since anyone who has the password will be able to join the network, which gives the risk where the PSK was given to unwanted users. So, an operation to change PSK periodically is recommended; however, as the scale gets more prominent, it becomes more difficult to change the PSK. For further detail go to Access Control
Open (No Encryption)/OWE (WPA3 only)
Open mode allows any device to connect to the wireless network without encryption. Opportunistic Wireless Encryption (OWE) is a security method paired with an open-security wireless network to encrypt wireless traffic in the air to protect the network from attack. The main goal of OWE is to encrypt the data over the air, which uses a cryptographic handshake and provides data encryption. Unlike the open SSID, where every frame can be sniffed and read easily. When OWE SSID is discovered on client devices, the SSID will not include a “lock” symbol on the user side. The behaviour on the user side will be the same as an open-mode SSID.
Since OWE doesn’t require an authentication process with client identity, users will still need alternative authentication with this security method, e.g., Captive Portal Web Auth, to authenticate with user identity. This security only enhances the data security behind the scenes.
Identity PSK (WPA1+WPA2/WPA2 Only)
With the advent of the Internet of Things (IoT), the number of devices that connect to the Internet has increased multifield. Not all these devices support 802.1X supplicant and need an alternate mechanism to connect securely to the internet. One of the security mechanisms, WPA-PSK, could be an alternative.
With the current configuration, the pre-shared key is the same for all clients that connect to the same WLAN. In specific deployments, such as Educational Institutions, the key is shared with unauthorized users, resulting in security breaches. Therefore, it is necessary to provide unique pre-shared keys for clients on a large scale.
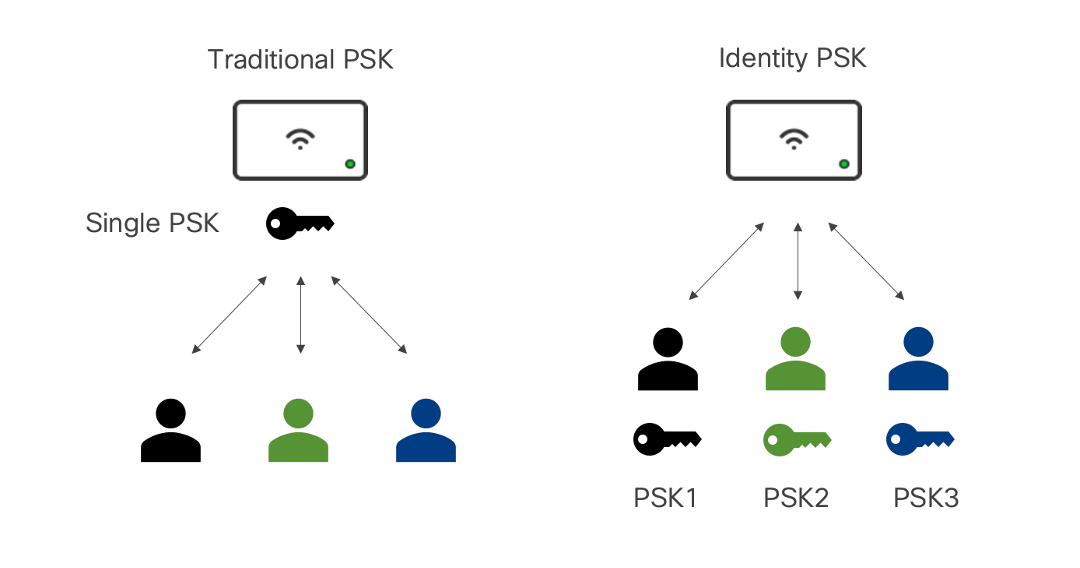
Traditional PSK vs Identity PSK
Identity PSK without RADIUS Authentication
Meraki solves the above use case with an Identity Pre-Shared Key (IPSK) without RADIUS. This feature allows you to configure multiple passwords for a single SSID and assign different Group Policies to each password on the Meraki Dashboard without the added complexity of configuring and maintaining a RADIUS server. Furthermore, devices that cannot use 802.1X authentication (e.g., IoT devices) can also benefit from this feature. Users must know how to configure group policies before configuring Identity PSK without the RADIUS server. For further details, go to IPSK Authentication without RADIUS.
Identity PSK with RADIUS Authentication
Meraki also allows users to integrate RADIUS servers to manage and authenticate IPSK upon user authentications with IPSK. If the MAC address and PSK used by the associating client are configured on the RADIUS server, then only that client can associate with the SSID.

For further detail, go to IPSK with RADIUS Authentication.
WPN (Wi-Fi Personal Network)
In large campus network environments like college dorm rooms and hotels, all the users share the same wireless network to connect their network devices. It will be hard to discover their own devices among the magnitude of other devices on the same network when using discovery protocols like AirPlay, and it will also increase the risk of exposing users’ network devices/traffic to malicious attacks.
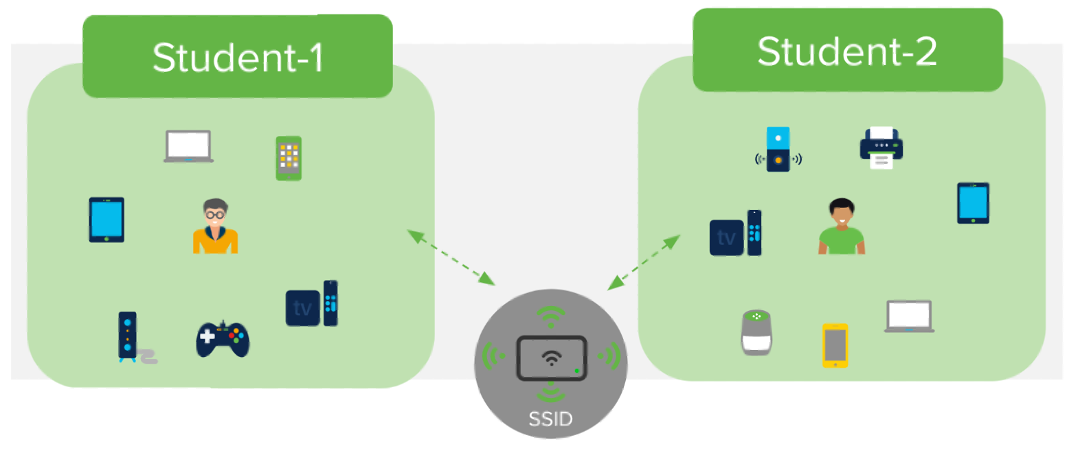 Meraki WPN device segmentation
Meraki provides a Wi-Fi Personal Network (WPN) solution built on top of I Identity PSK authentication without RADIUS, which solves these challenges by segmenting the wireless network on a per-user basis and providing a home-like user experience. In addition, WPN provides a contained environment to each user, which allows users to discover only their own devices with other devices on the identical SSID.
Even better, WPN allows for segmenting discovery protocols and unicast traffic on a single VLAN, thus eliminating the burden of configuring different VLANs per floor, room, or location and simplifying network management.
Meraki also partners with Splash Access to simplify the WPN device’s onboarding process. It allows users to authenticate using an Identity Provider and create unique PSKs synced to the Meraki dashboard via APIs. For further details, please go to Wi-Fi Personal Network (WPN) :
Client IP and VLAN Assignment
There are two client IP assignment options – NAT mode and Bridge mode. In NAT mode, Meraki APs run as DHCP servers to assign IP addresses to wireless clients out of a private 10.x.x.x IP address pool behind a NAT. In this case, a wireless client cannot initiate a connection to another wireless client or use any layer 2 discovery protocols. NAT mode is not recommended for enterprise developments since it will completely isolate your wireless devices, making roaming and mDNS impossible.
In Bridge Mode, the Meraki APs act as bridges, allowing wireless clients to obtain IP addresses from an upstream DHCP server. With bridge mode enabled, users can configure various DHCP options, and Wireless clients can reach other devices (wireless/wired) if the firewall permits. Wireless traffic can be tagged to different VLANs and goes to upstream wired infrastructures. For further details, please go to SSID Modes for Client IP Assignment
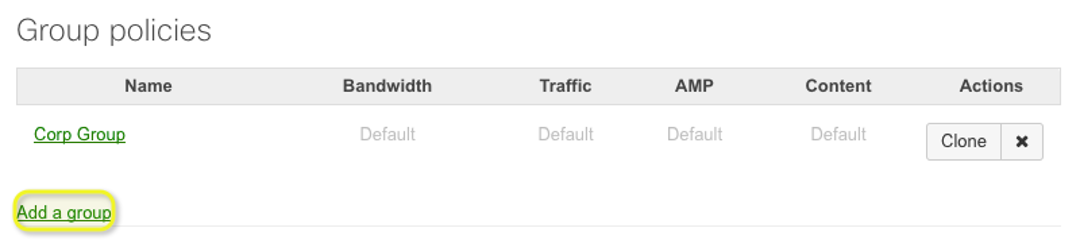
Group Policy
Group policies define a list of rules, restrictions, and other settings that can be applied to a specific group of devices. This feature is supported but not limited to MR devices as it is also supported on MX security appliances and MS switches for all the wireless and wired clients.
Configuring group policy to devices takes two main steps. The first step is configuring a group policy on the Meraki dashboard, which contains the rules for the endpoint client group. Users can create Group Policies in Network-wide -> Configuration. Click on Add a Group.
On the next page, users can configure rules, including Layer 3/7 firewall rules, VLAN, Bandwidth limit, etc., that will be applied to the group of client devices. The detailed group policy types with the Meraki hardware appliance support matrix are shown in the chart below:
|
|
MR Access Points |
MX or Z Appliance with Enterprise License |
MX with Advanced Security License |
MS Switches |
|
Scheduling |
✔ |
✔ |
✔ |
|
|
Per-client bandwidth limit |
✔ |
✔ |
✔ |
|
|
Hostname visibility |
✔ |
✔ |
✔ |
|
|
VLAN tagging |
✔ |
|||
|
Splash page authorization |
✔ |
|||
|
Layer 3 firewall rules |
✔ |
✔ |
✔ |
✔ |
|
Layer 7 firewall rules |
✔ |
✔ |
✔ |
|
|
Traffic shaping rules |
✔ |
✔ |
✔ |
|
|
Security filtering |
✔ |
|||
|
Content filtering |
✔ |
After the group policy is created on the Meraki dashboard, the second step is to apply the policy to the clients. Users can map it manually by clients, VLANs and Identity PSK. The group policy can also be dynamically assigned by device type (wireless only), Active Directory and RADIUS Attributes.
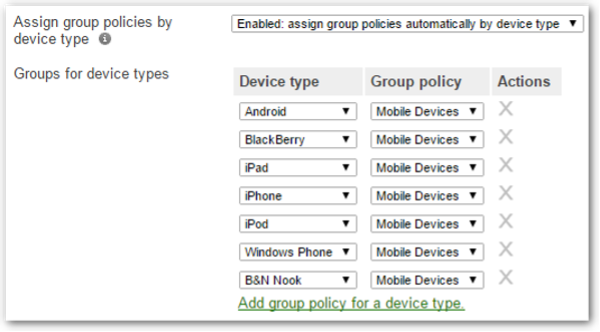
Example: Group policy assigned by device type in Access Control
For further details, please go to Creating and Applying Group Policies.
Firewalls & Traffic Shaping
Firewalls & Traffic Shaping is a set of security configurations per SSID with Meraki Wireless. With each single SSID, users can configure a separate set of security rules, including Layer2/Layer3 Rules (wireless client isolation in Layer2, DHCP/RA Guard, client devices layer3 network ACLs), Layer7 Rules (application-based firewall rules) and traffic shaping. This section will mainly introduce detailed features and capabilities on Firewalls & traffic shaping.
Wireless Client Isolation
Wireless Client Isolation is a security feature that prevents wireless clients from communicating with one another. This feature is helpful for guest and BYOD SSIDs, adding security to limit attacks and threats between devices connected to wireless networks.
This feature can be enabled on SSID on Bridge mode with a single step. By default, this feature is disabled on Bridge mode. NAT mode will have the default client isolation enabled by default and cannot be disabled.
When Wireless Client Isolation is enabled on Bridge mode, clients can only communicate with the default gateway. They will not be able to communicate with any other devices on the same VLAN (or broadcast domain). For the wireless client to communicate with another device, the upstream gateway must enable this communication (e.g. inter-VLAN routing and ACLs). Any traffic bound for an address on the same VLAN as a device in client isolation will be denied. Traffic bound for other VLANs will be forwarded and routed normally. For further details, go to Wireless Client Isolation.
DHCP Guard and RA Guard
Router Advertisement (RA) guard (IPv6) and DHCP guard (IPv4 and IPv6) can be enabled on the Wireless > Firewall and Traffic shaping page. These security features can block clients from issuing RAs and giving DHCPv4 or DHCPv6 leases. Additionally, allowed IPs can be specified if needed.
Layer 3/Layer 7 Firewall Rules
Layer3 and Layer7 firewall rules provide an administrator with more granular access control beyond LAN isolation. An administrator can define a set of firewall rules that are evaluated for every request sent by a wireless user associated with that SSID. Firewall rules are evaluated from top to bottom. The first rule that matches is applied, and subsequent rules are not evaluated. The default rule (allow all traffic) is used if no rules match.

Example of configuring Layer 3 firewall rules
Layer 7 firewall rules will be able to block certain applications entirely without having to specify specific IP addresses or port ranges using Next-gen Network-Based Application Recognition (NBAR).
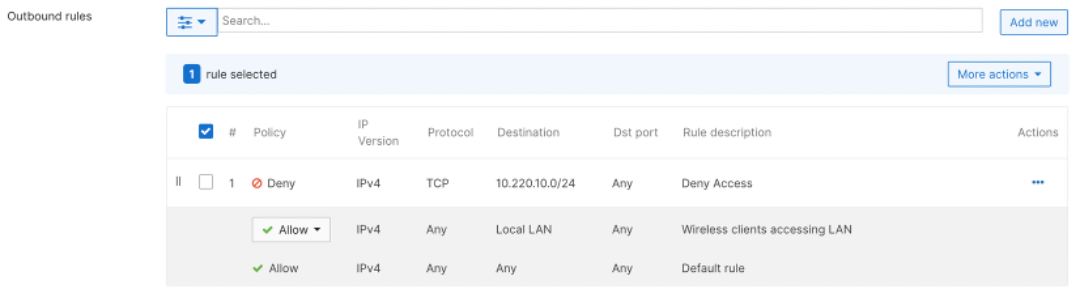
Example of configuring outbound rules per SSID

Example of configuring Layer7 firewall rules with Application Recognition
For further details, please visit MR Firewall Rules.
Traffic Shaping
Cisco Meraki Access Points can set bandwidth limits for users on a wireless network. Administrators may find it helpful to limit the data rate allocated per user to prevent bandwidth hogging.
SpeedBurst can be enabled with traffic shaping rules to allow users to burst up to four times their allotted bandwidth limit for up to five seconds. This ensures users have an improved experience on the network, particularly when downloading small files while preventing individual clients from consistently utilizing large amounts of the available bandwidth.
Administrators can also define custom traffic shaping rules which limit the bandwidth (per client or SSID based on the application/traffic match). Meraki dashboard supports separate upload and download limits. Asymmetric upload and download limits are helpful, for example, when a user only needs to download large images periodically but not upload them. Specific application requirements and available bandwidth should be considered to determine the optimum bandwidth settings.
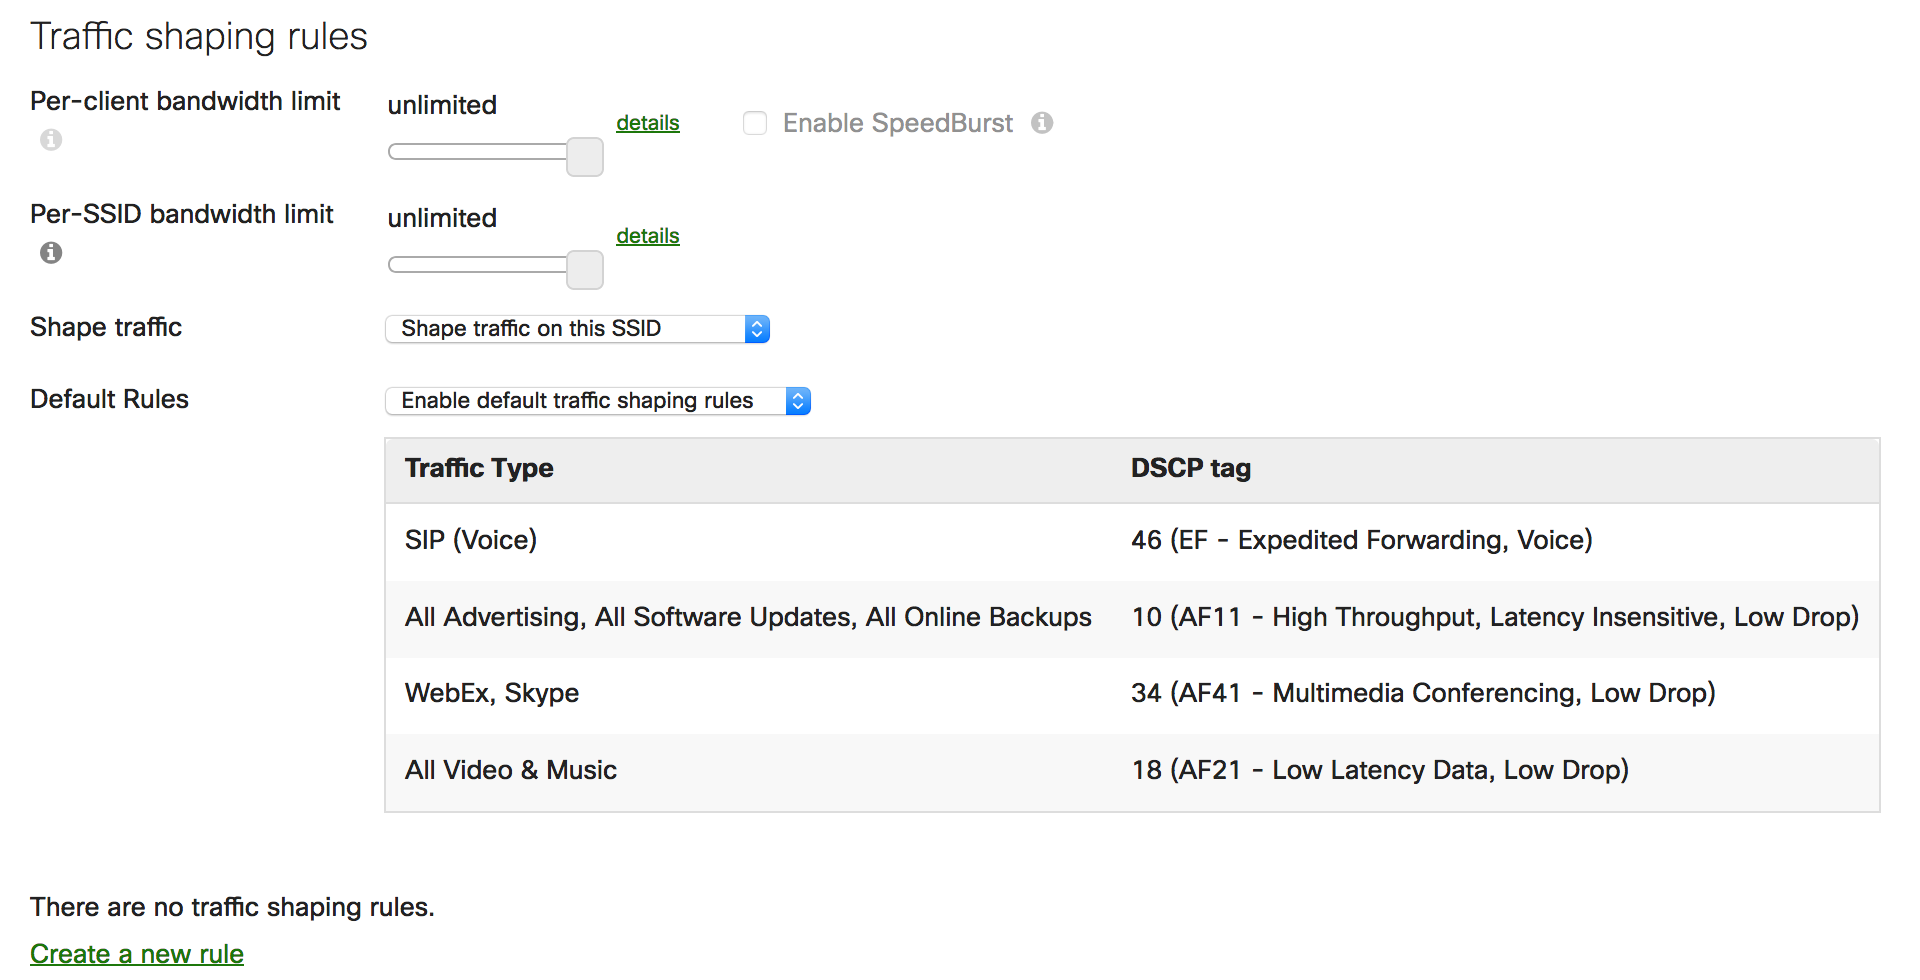
Example of Traffic shaping rule per SSID
For further details, go to Traffic and Bandwidth Shaping.
Adaptive Policy - Micro-segmentation
Introduction
Traditional network security has been founded on the use of IP-based access controls. Network security has never been more critical for maintaining business continuity as businesses evolve to an increasing online presence. Cisco Meraki has always provided a robust approach to securing network access, whether using ACLs and/or through Group Policies. These group policies, however, become difficult to scale with organizations that continue to evolve and expand.
As networks grow and the user base and devices multiply, traditional security policies become cumbersome and often only possible to enforce due to sheer scale. Meraki introduced Adaptive Policy solution to simplify the management of network access control in scale.
Meraki Adaptive Policy simplifies the management and provisioning of network access control using security groups to classify network traffic and enforce security group policies. Traffic classification is based not purely on IP address but endpoint identity and context, enabling policy change without network redesign.
Adaptive Policy technology is embedded within Meraki network device infrastructures and is defined by three primary concepts: classification, propagation, and enforcement.
When users/endpoints connect to the network, during the network authorization, it will entail classifying the user or endpoint’s IP address into a group leveraging rich contextual information such as identity, LDAP group membership, location, and access type, and classified into an SGT group. Network devices enforce traffic flows based on those group assignments directly or propagate the classification information towards another network device assigned as an enforcement point. The Meraki Dashboard will be the centralised management platform that manages adaptive policies and SGTs.
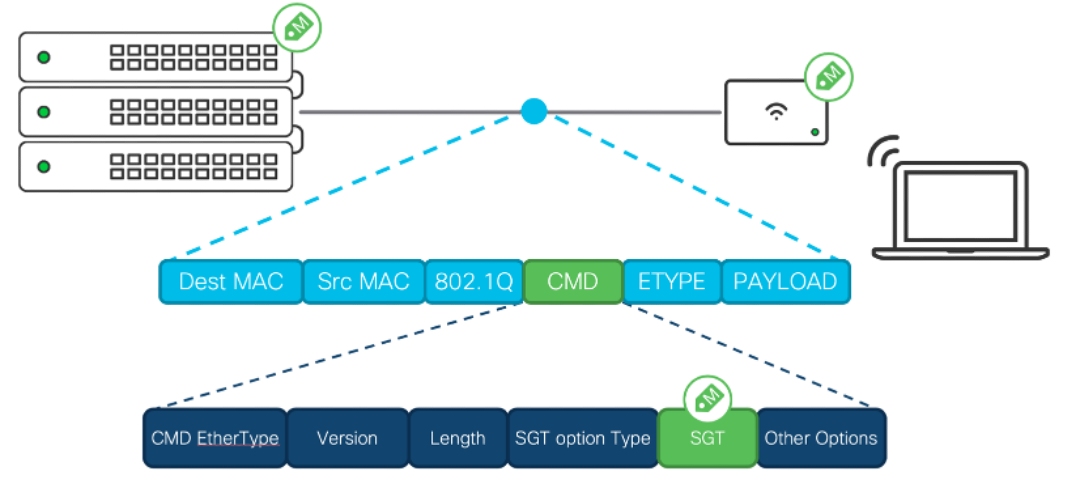
Meraki adaptive policy Inline-tagging frame layout
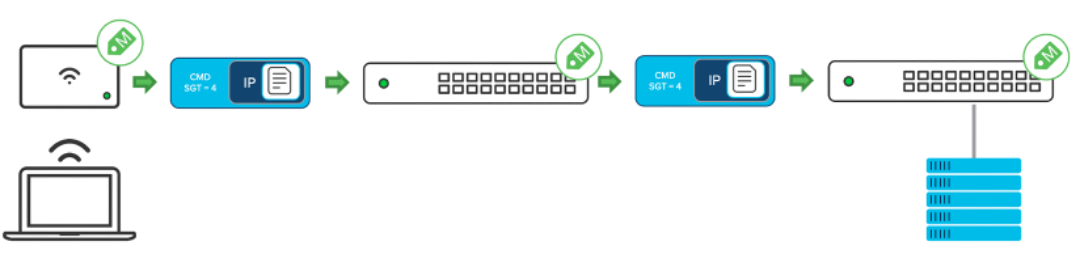
Meraki adaptive policy per hop tag propagation
From ISE release 3.1 Patch 2, Cisco ISE also provides the capability to integrate TrustSec with Meraki Dashboard, where users can configure SGTs and SGACLs on ISE and synchronize these with Meraki Dashboard through Meraki APIs. This integration increases the flexibility where users can add/delete SGT and configure SGACLs on ISE instead of being limited to the Meraki dashboard only.
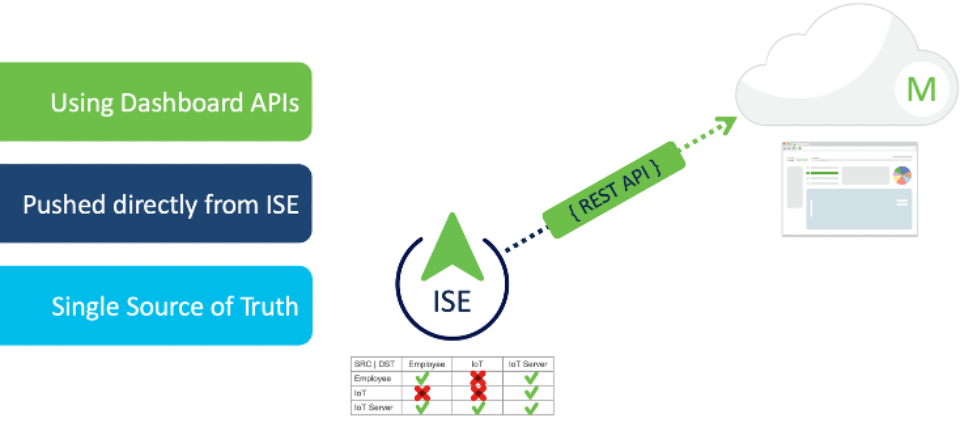
Meraki and ISE Adaptive Policy and SGT Synchronization
Platform and Licensing
|
|
MX |
MS |
MR |
|
Model |
MX64/67/68/75/85/95/ 100/105/250/450 & Z3 |
MS390/C9300-M |
Meraki 802.11ac Wave 2 & Wi-Fi 6/6E MR Access Points and CW Access Points |
|
Licensing |
Advanced+ |
Advanced |
Advanced |
|
Minimum Release |
MX18.1 |
MS14.33.1+ /all CS releases |
MR27 |
|
Recommended Release |
Latest MX Release |
Latest MS/CS Release |
Latest MR Release |
If an adaptive policy needs to be enabled in a specific network, it is required that all the Meraki devices in that network stay compliant with the above license requirement.
Scaling
|
Max Number of SGTs |
60 |
|
Max Number of Policies |
3600 |
|
Max Custom ACLs per policy |
7 |
|
Max number of ACE per ACL |
16 |
|
Max IP/CIDR to SGT mapping |
8000 |
Design Consideration
Meraki Devices do not support SXP; each hop must support the CMD encapsulation (Recommended).
Switches that do not support CMD encapsulation can still forward the data frames, but they cannot enforce the policy or carry over the SGT Tag to the next hop. Thus, this makes policy enforcement inconsistent.
MR does not support IP/CIDR to SGT static mapping on the Meraki Dashboard.
If you only have MR in the network, IP/CIDR to SGT static mapping will not be applicable. MR itself supports SSID to STG static mapping and RADIUS dynamic SGT assignments. MS is required if this feature is needed.
The Max IP to SGT mapping scale is only for static mappings on the Meraki dashboard; dynamic SGT assignment with RADIUS server entries will not consume the IP/CIDR to SGT mapping scale. The scale number of the RADIUS dynamic SGT assignment is the same as the client scale on the Meraki device.
For further details on Adaptive Policy in general, please go to Adaptive Policy Overview.
For further details on configuring Adaptive Policy on the Meraki Dashboard, please go to Adaptive Policy Configuration Guide.
For further details on configuring Adaptive Policy with ISE Integration, please go to Adaptive Policy and Cisco ISE.
For further details on syncing up SGT/SGACL with ISE and Meraki dashboard, please go to https://www.cisco.com/c/en/us/td/docs/security/ise/3-2/admin_guide/b_ise_admin_3_2/b_ISE_admin_32_segmentation.html#connect_meraki_dashboards_ise.
RADSec
Regular RADIUS traffic uses a pre-shared key and MD5 hash functions, which are weak in security and easy to compromise by man-in-the-middle attacks.
RADSec provides an encrypted TLS tunnel for your RADIUS traffic between your Meraki APs and the RADIUS server. It is highly recommended that RADSec be enabled to secure your RADIUS
Note: RADSec support was introduced in MR firmware 30.X. To proceed with the configuration, ensure you've upgraded to MR 30.X.
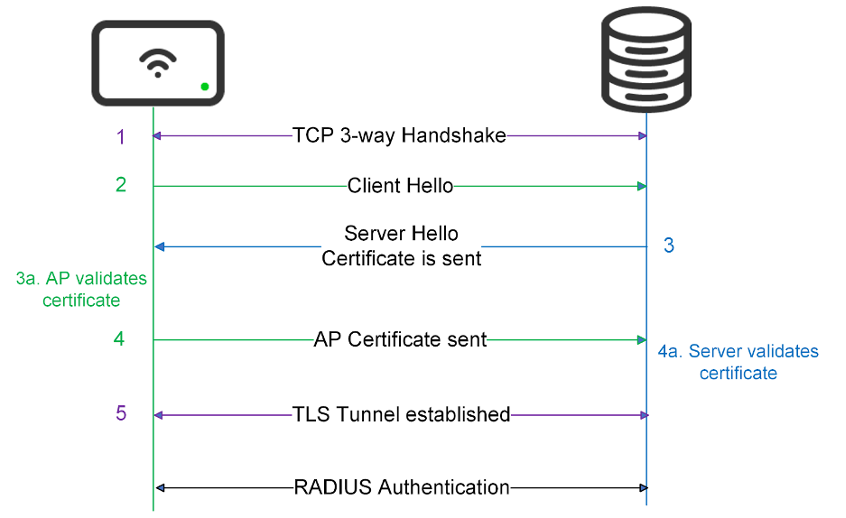
TLS Tunnel established before RADIUS Authentication
- Access Point establishes a TCP connection to the RADIUS server with a 3-way handshake (SYN, SYN-ACK, ACK).
- Access Point sends “Client Hello”.
- The server sends “Server Hello”.
- AP validates the certificate, and if it is valid, AP sends its certificate.
- The Server validates the certificate, and if it is valid, the TLS tunnel is established.
For further details, go to Configuring RADSec (MR).
Umbrella Integration
You can apply Umbrella policies directly in the Meraki dashboard for additional control and ease of management at the wireless layer. This makes it easier to manage your global wireless infrastructure and report on user traffic. Plus, you’ll simplify the onboarding and policy configuration process with the convenience of centralised cloud management.
Deploy Umbrella’s DNS-layer security across your Meraki MR network with just a few clicks. In minutes, your users will be protected against threats such as malware, ransomware, and C2 call-backs with no added latency.

Umbrella with Meraki Integration
for further details on how to integrate Cisco Umbrella with Meraki Manually, please follow Manually Integrating Cisco Umbrella with Meraki Networks
for more information about integrating Cisco Umbrella with Meraki Automatically, please follow Automatically Integrating Cisco Umbrella with Meraki Networks.
for more information about DNS Security with Meraki MR & Umbrella White Paper: https://meraki.cisco.com/lib/pdf/meraki_whitepaper_mr_umbrella.pdf
Alternate Management Interface (AMI) on MR Devices
By default, without an Alternate Management Interface enabled, Management traffic like RADIUS and SNMP will be sourced from the same LAN IP/VLAN as the MR communicates with the Meraki dashboard, where this management VLAN is required to have internet access. However, specific businesses/deployments may have a security policy which requires the management traffic to be completely isolated from the internet.
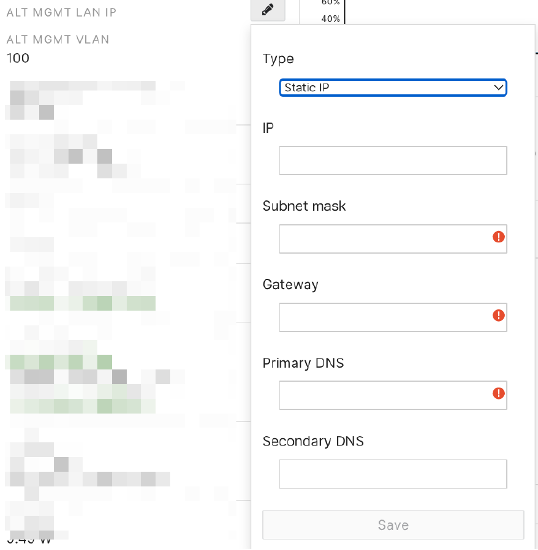
From MR 26. x onwards, MR supports an Alternate Management Interface, allowing the user to obtain a secondary IP address on a VLAN other than the primary uplink VLAN and choose which management services must be sourced from. RADIUS, SNMP, Syslog, and LDAP are the management services that can be selected for the AMI.
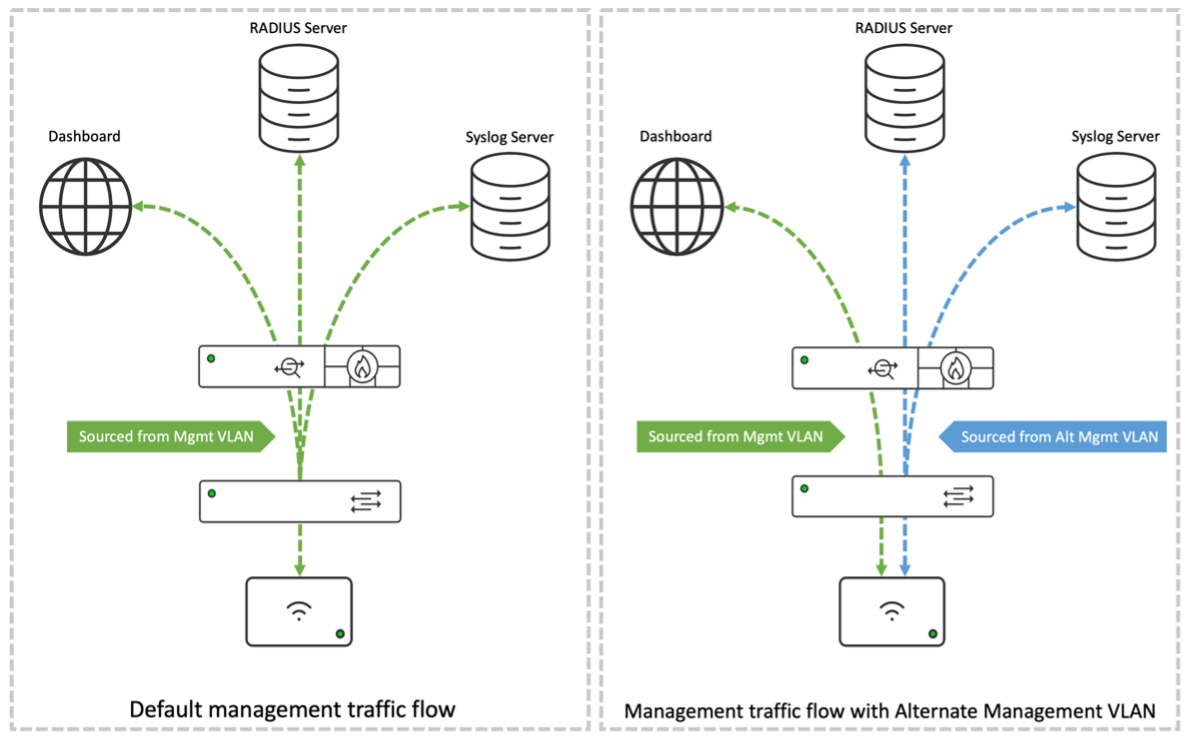
This feature can be easily enabled in Network-wide -> General-> Wireless Alternate Management Interface. Users can choose the alternate management VLAN and which of the four services to be sourced from the AMI.
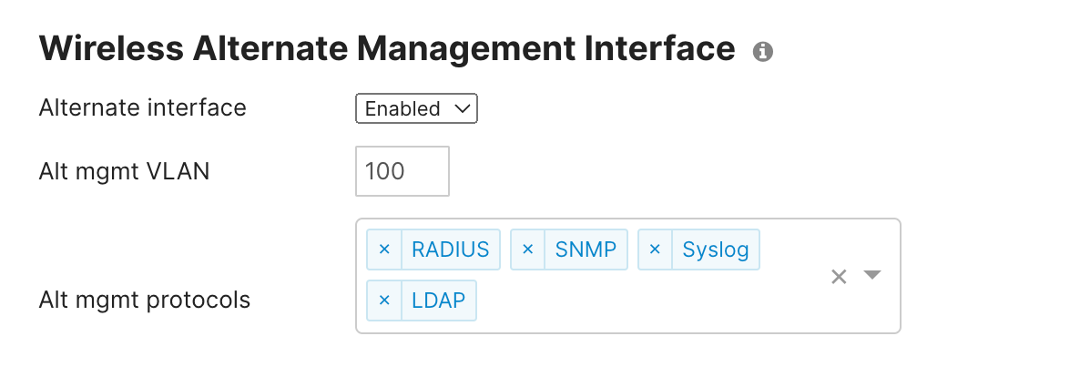
Users can either configure the static IP on the AMI or get it by DHCP on the Access Point page.
For further details, please go to Alternate Management Interface on MR Devices.
Meraki Secure Connect
For specific network deployments like financial institutions that require network devices to be authenticated before they join the network, Meraki Secure allows administrators to use Meraki Access Points (APs) when using 802.1X authentication on LAN infrastructure. This feature allows administrators to use standards-based EAP-TLS authentication with certificates. Administrators can provision the APs with their certificates via SCEP (Simple Certificate Enrollment Protocol), allowing them to keep total control over the security of the infrastructure.
The graph below describes how Meraki Secure Connect works. It assumed that NDES (Network Device Enrollment Service), RADIUS and wired 802.1X are set up along with guest VLAN. The flow of Meraki Secure Connect will be accomplished with three steps:
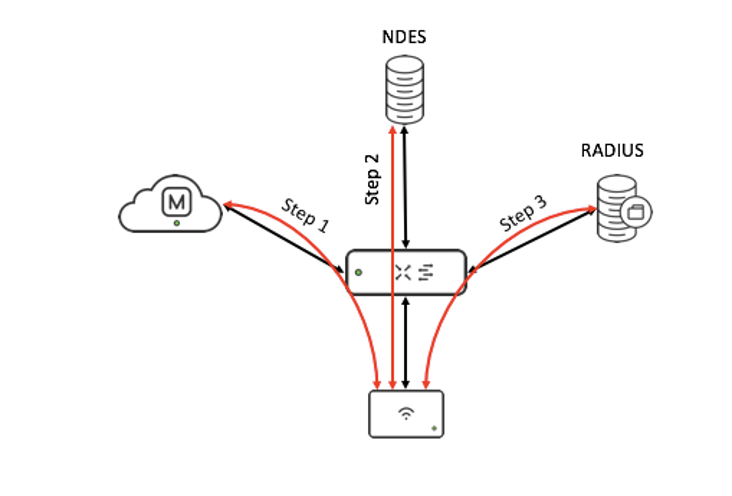
- AP will boot up and fail on 802.1X authentication initially because of the lack of the certificate. Failed AP will be placed on GUEST VLAN. The GUEST VLAN is necessary to have access to the Meraki Dashboard and the NDES server access. AP will connect to the Meraki Dashboard and download the initial configuration. In the configuration, AP will know the domain/address of the NDES server and the SCEP password.
- AP will reach out to the NDES server with the SCEP password and download the certificate from the NDES server.
- After AP get the certificate from the NDES server, AP will install and reboot, then go through the standard 802.1X EAP-TLS process to be authenticated with the RADIUS server.
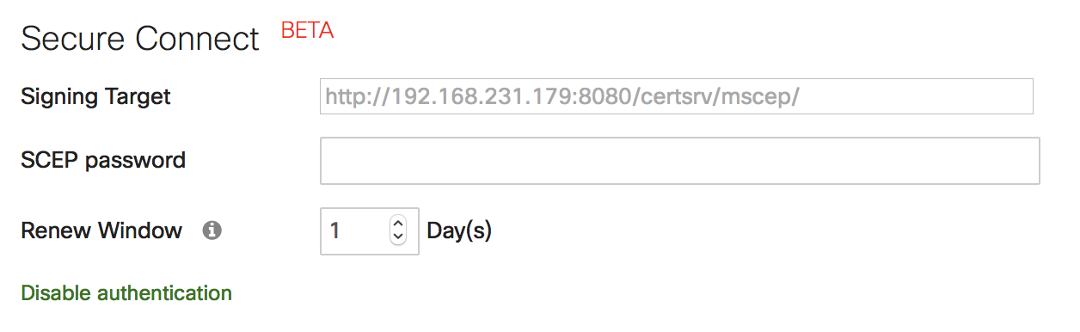
Meraki Secure Connect configuration on the Meraki Dashboard
Note: This feature is not enabled by default on the Meraki dashboard, and customers who need this feature need to contact Meraki to get it enabled on the Meraki dashboard. Contact Meraki for further details on this feature.
Secure the Client
Application Visibility
Applications in today's enterprise networks require different levels of service based on business requirements. These requirements can be translated into network policies. The resources provided here assist you in configuring your network to provide the appropriate level of service to these applications.
Network-Based Application Recognition (NBAR) is an advanced application recognition engine developed by Cisco that utilizes several classification techniques and can quickly update its classification rules. It supports 1,500+ applications and sub-classifications with less than 1% unknown and less than 1% unclassified encrypted traffic. Meraki platforms with the NBAR engine provide granular and enhanced capabilities regarding client tracking and application enforcement.
Administrators can observe the application details where client end devices are currently being used in the Network-wide Clients page on the Meraki Dashboard.
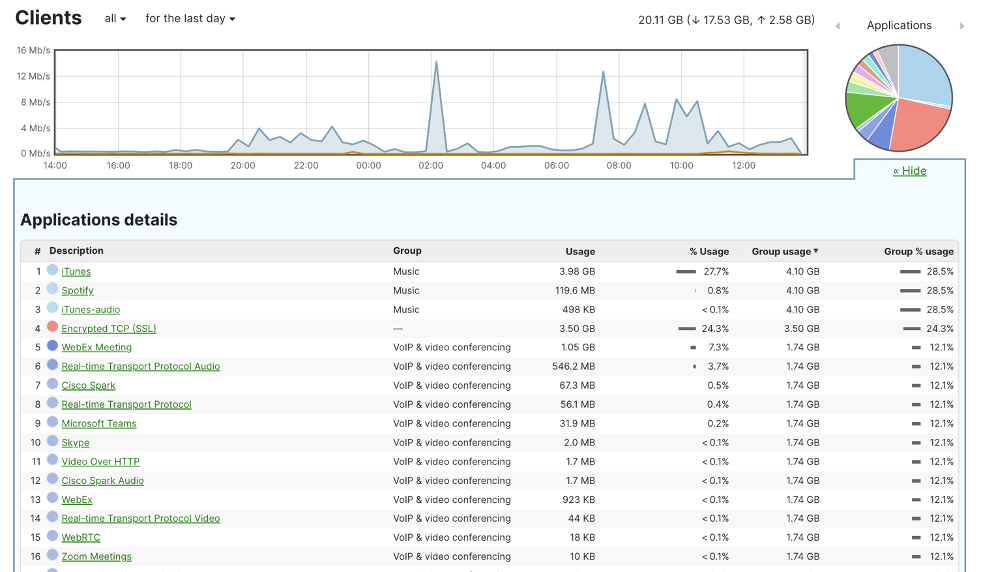
Application Visibility on Meraki Dashboard
On each recognised application, Administrators will be able to observe which clients are using the applications by simply clicking on the application name, for example, Webex Meeting:
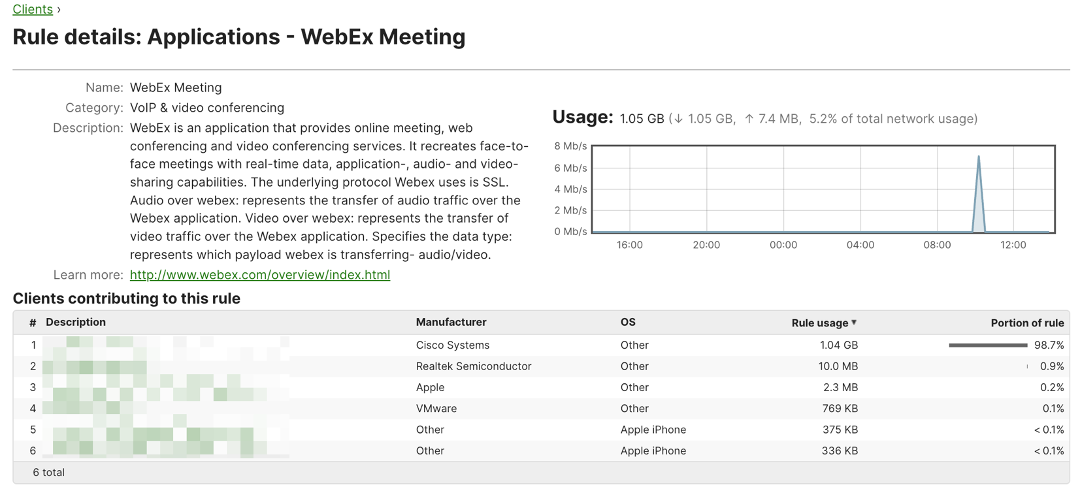
client usage detail on a specific application
If the user wants to enable per client base application details, go to Network-wide – Configuration – General. In the Traffic analysis section, select detailed: collect destination hostnames in the traffic analysis drop-down menu. After applying the above configuration, users can see the detailed chart of the application usage per client host.
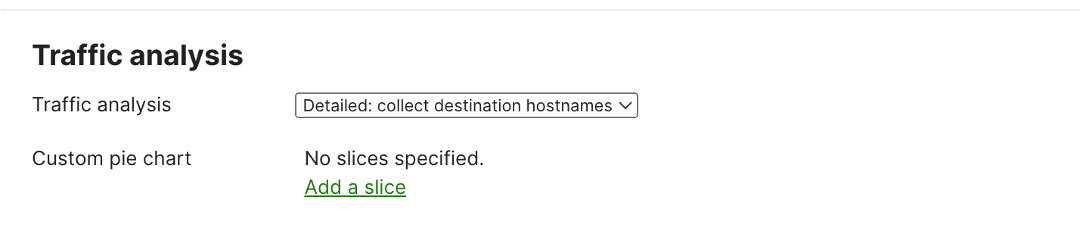
Enabling traffic analysis by collecting client destination hostname
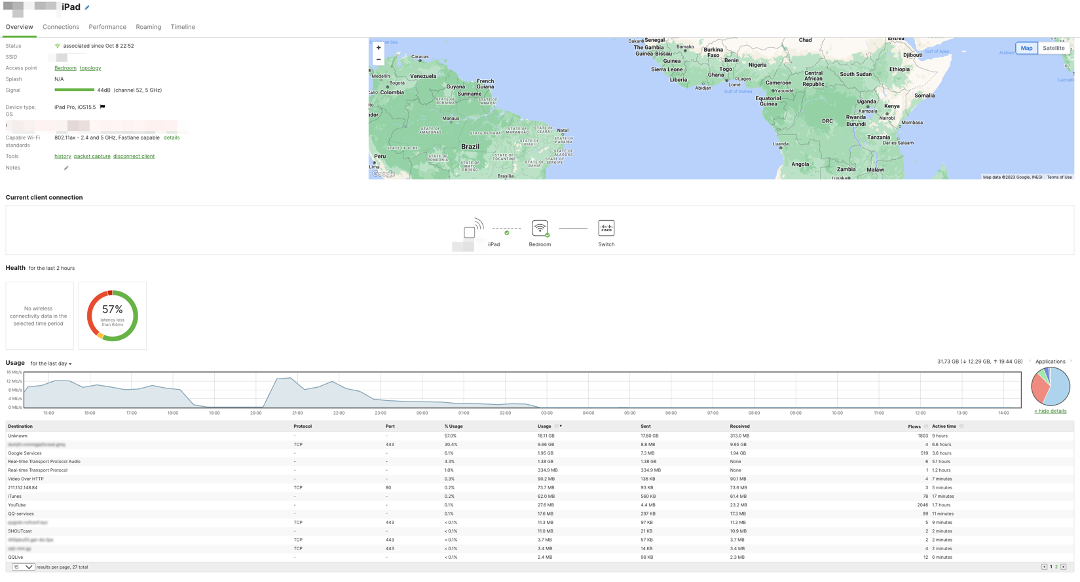
Per client application usage detail
NBAR also allow administrators to define custom firewall rules based on the application; for more information on Layer7 firewall rules, please go to the previous section, Firewall & traffic shaping – Layer3/Layer7 firewall rules.
For further details , please go to https://meraki.cisco.com/product-collateral/layer-7-visibility-and-control-whitepaper/?file
Secure the Air
WIPS(Wireless Intrusion Prevention System) - Meraki Air Marshal
As an extension to a wired network, a wireless network simplifies the network access for end users and enhances productivity significantly. However, at the same time, there is a potential for unauthorized wireless networks to hide in your secured wireless or wired network, which gives additional security concerns. Cisco Meraki’s Air Marshal allows network administrators to meet wireless security requirements and design an airtight network architecture that provides an industry-leading WIPS platform to protect the airspace from common wireless attacks.
Different types of threats
1. Compromised wired network.
This happens when the wired infrastructure is not configured securely, and a rogue AP has been plugged into the wired network. For example, an employee who brings their own Access Point (Cisco or Non-Cisco) into a well-secured wireless or wired infrastructure and allows unauthorized users access to this otherwise secured network can easily compromise a secure network.

Example of a Rogue SSID seen on LAN
2. Compromised wireless network.
This happens when attacks against your wireless network over the air. For example, Denial of Service (DoS) attacks and packet floods that prevent legitimate clients from associating with your access points.
3. Evil Twin attack.
This scenario, known as an Evil Twin attack or a spoofed SSID, happens when an attacker brings a customer-grade or enterprise-ready AP and impersonates your wireless network. The attacker may obtain user credentials, gather confidential information and snoop on client information transactions.
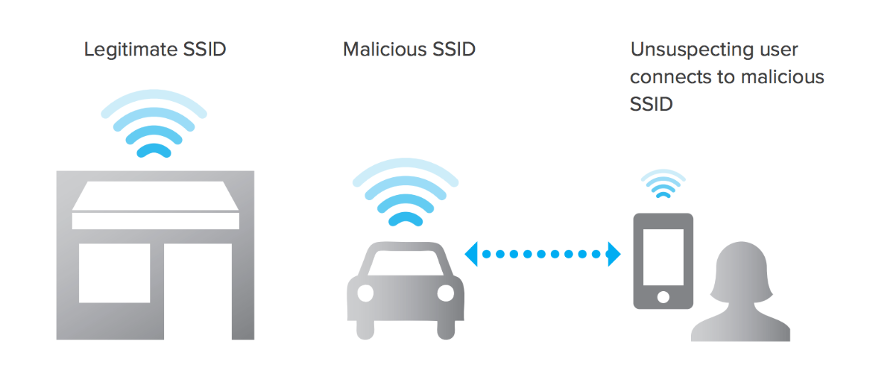
Example of an Evil Twin attack
The latest iteration of Meraki Access points has the dedicated 2.4GHz, 5GHz, and 6GHz tri-band Air Marshal scanning radio to help customers obtain a secure wireless network by continuous RF scanning and threat containment without impacting the standard AP data throughput. To quickly review your access point Air Marshal capability, please go to MR Overview and Specifications.
Air Marshal Classifications
Air Marshal can classify five kinds of SSID/actions shown on the Meraki dashboard. They are Rogue SSIDs, Other SSIDs, Spoofs, Malicious broadcasts, and Packet floods.
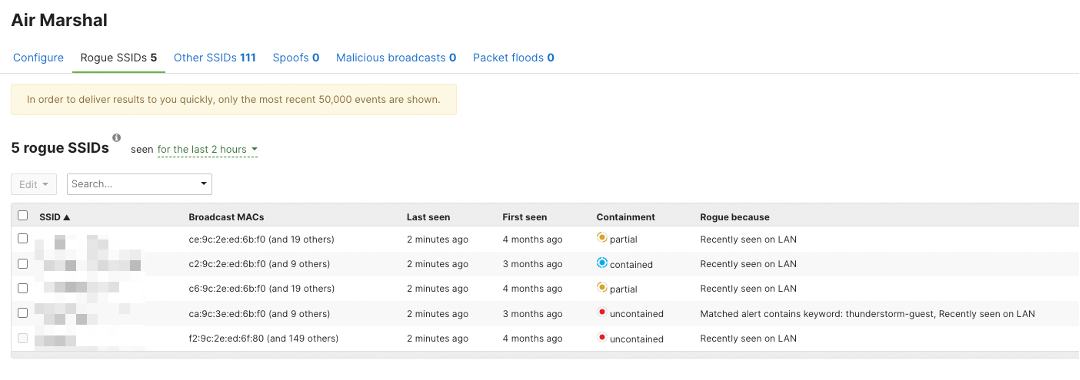
Threats Visibility on Meraki Dashboard
The chart below describes how the Air Marshal identifies those threats and what will be the appropriate solutions.
|
Threats |
Classification Method |
Appropriate Solution |
|
Rogue SSIDs |
Air Marshal compares the BSSIDs of nearby access points to the Ethernet MAC addresses seen on the LAN. If an Ethernet MAC address and the broadcasted BSSID match on the 3rd and 4th bytes, and the rest of the bytes differ by 5 bits or less, then the wireless networks associated with those BSSIDS are classified as Rogue SSIDs. |
You can configure Air Marshal to automatically contain all Rogue SSIDs by default, automatically contain specific Rogue SSIDs, or provide SSID alerts for manual containment later. |
|
Other SSIDs |
Air Marshal continually watches the RF environment, identifies nearby wireless networks not appearing on the local LAN, and classifies them as Other SSIDs. |
Other SSIDs are usually not considered as a threat. These SSIDs consist of hotspots and nearby wireless networks that may cause RF interference and accidental associations for your wireless clients. It is usually not necessary to contain those SSIDs |
|
Spoofs |
Air Marshal records the MAC addresses of all Meraki access points operating within your dashboard network. If it finds another access point operating in your RF airspace with the same MAC address and SSID as one of your Meraki access points, Air Marshal classifies it in the Spoofs category. |
Spoof should be treated as a severe risk as the SSID is trying to impersonate your legitimate wireless network. You should quickly locate and neutralize the attacking device using the Seen by access point signal values. |
|
Malicious broadcasts |
Air Marshal analyses the nearby RF airspace for denial of service (DoS) attacks attempting to prevent clients from associating with your Meraki access point(s).
Air Marshal keeps track of your access points’ BSSIDs and compares the source of 802.11 management broadcast traffic. If Air Marshal observes a spoofed 802.11 management frame, it identifies it as a Malicious broadcast.
|
Malicious broadcasts can vary. Based on the actions by the threat the severity is different. You can use the Seen by access point signal values to quickly locate and neutralize the source of any malicious broadcasts. |
|
Packet floods |
Air Marshal examines the rate of wireless management frames received per Meraki BSSID. If an excessive number of beacons, probe requests, probe responses, association requests, and more occur within a short time (about 10 ms), Air Marshal will classify it as Packet floods. |
You should quickly locate and physically remove the attacking device to ensure your access point's performance won’t be degraded due to processing excessive malicious management frames. |
Automatic Rogue SSID containment
Administrators can configure Air Marshal policy to perform automatic Rogue SSID detection, alerting and containment in Wireless -> Air Marshal -> Configuration. The Air Marshal policy has three main configurations: SSID Block List, SSID Allow list and SSID alerting. The policy can be matched to exact words, MAC address (BSSID), keywords, or wildcards.
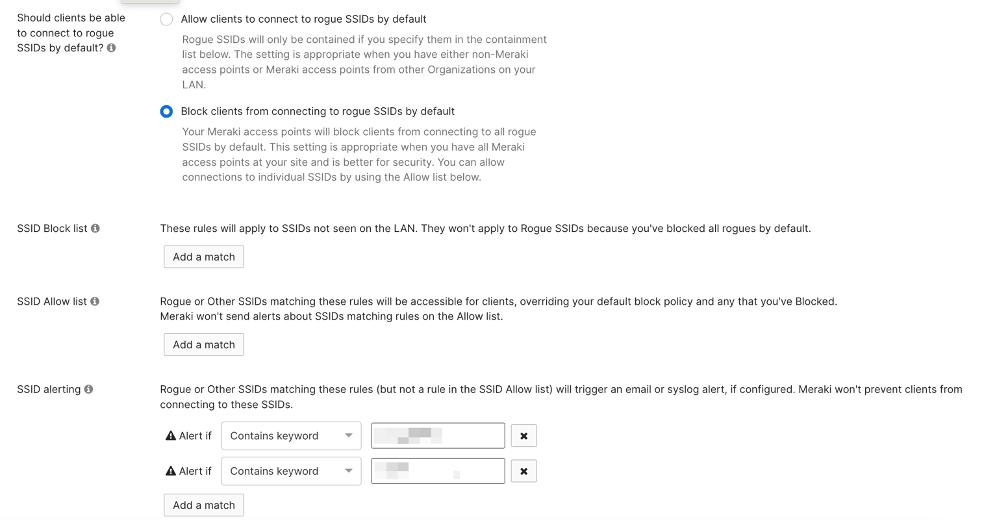
Air Marshal policy configuration
1. SSID block list
The SSID block list will automatically contain the matching SSIDs and BSSIDs in both Rogue SSIDs and Other SSIDs categories based on the user input in the configuration.
2. SSID Allow list
The SSID Allow list will make sure the matching SSIDs and BSSIDs bypass the containment configurations or alerts and are not being contained.
3. SSID alerting
The SSID alerting list will send notifications of the matching SSIDs and BSSIDs in real time if the Air Marshal detects them.
You can configure SSID alert emails to dashboard administrators within the Network-wide > Alerts page. For these to work, you must also enable the network-wide alert. A rogue AP is detected.
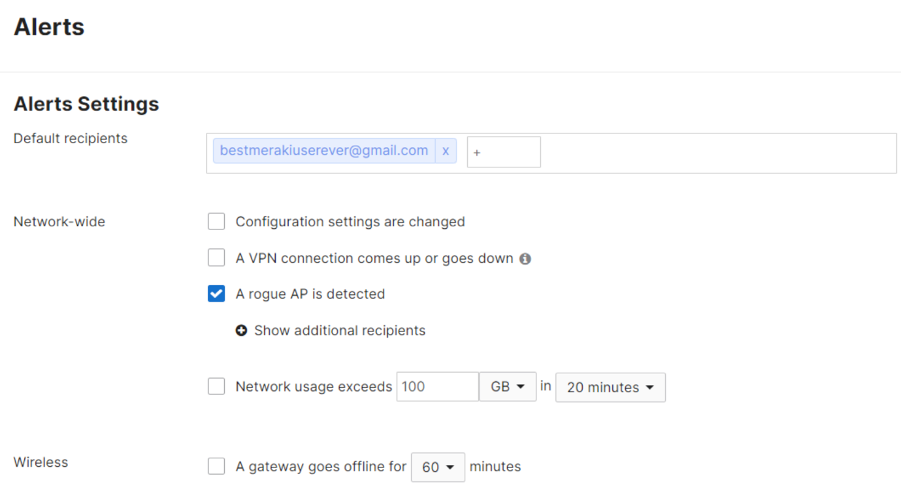
Example of Alert configuration
Design consideration
PMF containment
SSIDs which use WPA3 PMF encryption will not be able to be contained at this time.
DFS channel containment
Non-DFS Channel and client-serving channel Rogue/Blacklisted SSID will be automatically contained if enabled by the policy. Rogue SSID/Blacklisted SSID will be contained on DFS Channel only if it is the client-serving channel and policy enabled.
Use this feature with caution!
Enabling is easy, but by default, Air Marshal will not contain any SSIDs, and there is a reason for that. Containment can have legal implications when launched against neighbor's legitimate networks (DoS Attack). At the same time, it will increase channel utilization in your network and potentially disrupt clients connecting to your APs. Enable only if the containment is necessary.
For further details on how to configure Air Marshal, go to Air Marshal.
Conclusion
By understanding Meraki Wireless's security features, network administrators can make a security plan that is the most suitable for their network. With industry-leading Meraki Security feature suites, administrators can quickly deploy a robust wireless network to deliver enterprise-grade zero-trust security in a wireless environment.
Here are some interesting things about...