
Getting Started Checklist
Welcome to Cisco Meraki! This guide will walk you through how to get started in the Meraki dashboard. The dashboard is the centralized cloud management platform for all Meraki devices and services. It is intended for network administrators who will be monitoring and managing Meraki products.
Learn more with these free online training courses on the Meraki Learning Hub:
Getting Started Checklist
Traditional hardware requires physical access to make configurations. But, thanks to Meraki cloud, you can configure everything before you even have your devices. Meraki devices get their configuration settings from the Meraki cloud. This means the only prerequisite to set up a device is an uplink connection on the device itself. As long as your device can connect to the internet and has the appropriate firewall rules configured, it will be able to contact the Meraki cloud. For more information, refer to the article titled Upstream Firewall Rules for Cloud Connectivity. Once connected, your device can check for and download its latest configuration, plus report on its performance.
All of your configuration settings can be set up in the dashboard, either before you have the device or after. There is a tremendous amount of flexibility with the initial setup for a Meraki deployment. Here's a list of the things you'll need to set up for your first devices and networks:
- A Meraki dashboard account and organization: you'll create an organization at the same time you create your account
- An order claim key - 12-digit order claim key sent to email or the serial numbers of your devices
- An idea of what you want to do with your devices and how to group them
- An uplink to the internet for your devices with valid firewall rules configured so they can talk to the Meraki cloud
That's all you need to get started with Meraki!
Introduction to the Meraki Cloud and Dashboard
Before creating a dashboard account, let's address terminology:
- Meraki cloud: The backbone of the highly available, secure, and efficient Meraki solution. The cloud enables instant onboarding access to all features inside the Meraki dashboard. It is comprised of highly reliable servers at various data centers around the world.
- Meraki dashboard: A centralized, web-based tool used to monitor and configure Meraki devices and services.
- Dashboard account: What you use to log in to the dashboard. From your account, you can manage and configure your organizations, networks, and devices.
It is important to note that "organization" and "network" in this sense are from the perspective of the dashboard.
- Organization: A logical container for Meraki networks managed by one or more accounts.
- Network: A logical container for a set of centrally managed Meraki devices and services.
Devices go in a network, networks go in an organization, and organizations are managed by user accounts from the Meraki dashboard. This information, as well as device configuration settings, is stored in the Meraki cloud.
Refer to the Meraki Cloud Architecture article for more information on how devices communicate with the Meraki Cloud.
Creating a Dashboard Account
To begin, create an account in the Meraki dashboard. For more information, refer to our documentation on the Meraki Dashboard Organizational Structure.
- Navigate to https://dashboard.meraki.com. For Canada & India regions with in-country local data storage, see below
Region Dashboard URL Documentation Canada Region dashboard.meraki.ca See details and products support here India Region dashboard.meraki.in See details and products support here - Select Create an account.
- Select the region your Meraki dashboard account and organization will reside in. All data related to your dashboard organization will reside on servers in the selected region. Ensure that this is accurate, as it cannot be changed later.
- Provide the requested information.
- Email: The email address that will be used to log in to the dashboard, and for administrator communication.
- Full Name: The name that will be displayed for your account in logs, selection fields, and when contacting Meraki Support.
- Password: Passwords must be at least 8 characters long. We recommend using a mix of lower- and uppercase letters, numbers, and special characters.
- Company: The name of your company or organization; for example, Cisco Systems, Inc.
- Address: (optional) An address that can be used as the default for network locations and maps within the dashboard.
- Select Create account at the bottom of the page.
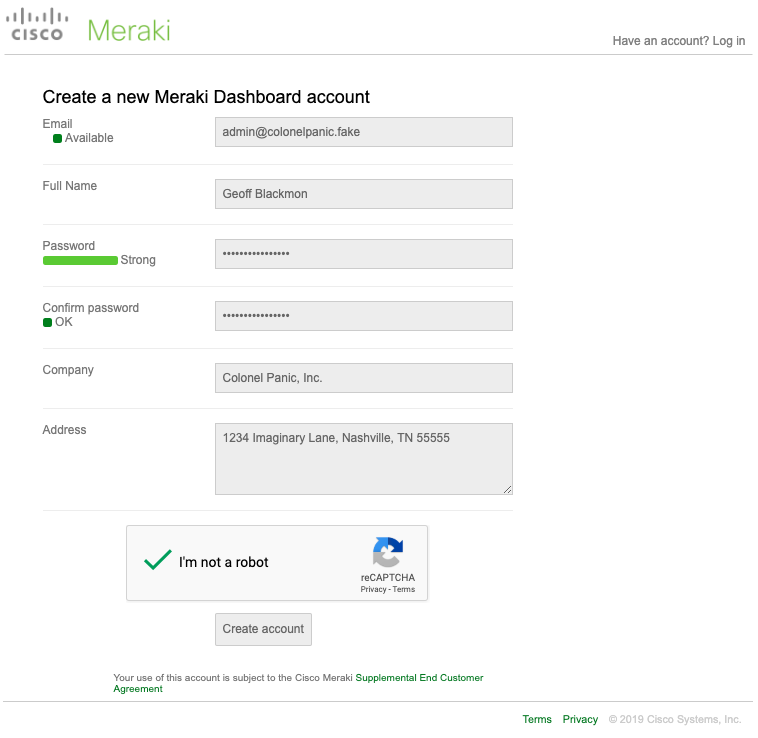
Congratulations! You've successfully created a Meraki dashboard account and organization. In the above example, we created the organization "Colonel Panic, Inc." under the dashboard account "admin@colonelpanic.fake". Note that in reality, a valid email address is required when making the account. Before continuing, check your email and click the confirmation link to verify your account. You will be unable to access the newly created dashboard organization or log in to your account until the email address is verified.
Creating a Network
Now that you have a Meraki dashboard account and organization, it's time to create a network. Networks are used to contain devices and their configurations. It's common practice to create a device network for each physical location. For example:
- NYC - wireless and security appliances
- SF - switches, cameras, wireless and security appliances
To create a hardware or device network:
- Log in to https://dashboard.meraki.com (or your chosen region's dashboard url) using the account created earlier.
- From the prompt window, choose Register Meraki devices and select Next.
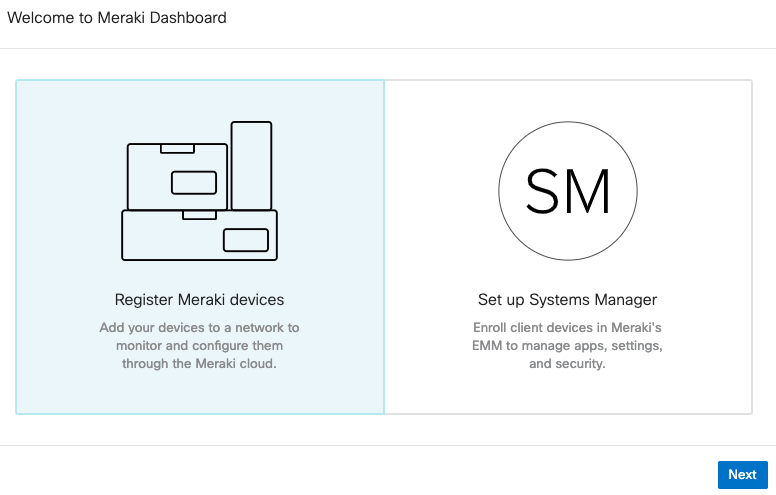
Note: If you do not see this prompt in your Meraki dashboard, navigate to Organization > Configure > Create network in the left-side pane instead.
- Provide the requested information to create the network and register the devices.
- Name: The name that will be used to identify this network in the Meraki dashboard, for example, "NYC - Wireless" or "SF Office"
- Network type: Choose which type of Meraki device(s) will be managed in this network. Note: This drop-down is not shown unless you are creating the network through the Organization > Configure > Create network page. If you used the prompt shown above, the created network will automatically be the correct type for the device(s) added. If two or more device types are added, the network will be created as a Combined network.
- Wireless: Wireless access points (MR series)
- Security appliance: Security appliance (MX series) or teleworker gateway (Z Series); please note only one of these devices can exist per network
- Gateway: Cellular Gateway (MG series)
- Switch: Access and aggregation switches (MS series)
- Camera: Security cameras (MV series)
- Combined hardware: These networks can contain a mix of any (or all) of the above devices; please note that the limit of one MX or Z-series device still applies
- Devices (optional): If you have an order claim key or device serial number on hand, it can be added here, otherwise, refer to the Adding Devices and Licenses section once this information is available. Adding a device at this stage will allow you to add it directly to the network.
- Enter an order claim key - 12-digit order claim key sent to email or device serial number(s) (for example, Qxxx-xxxx-xxxx) in the box next to the blue Claim button, one per line.
- Select Claim.
- Tick the checkbox next to any desired devices and they will be added to the network once created.
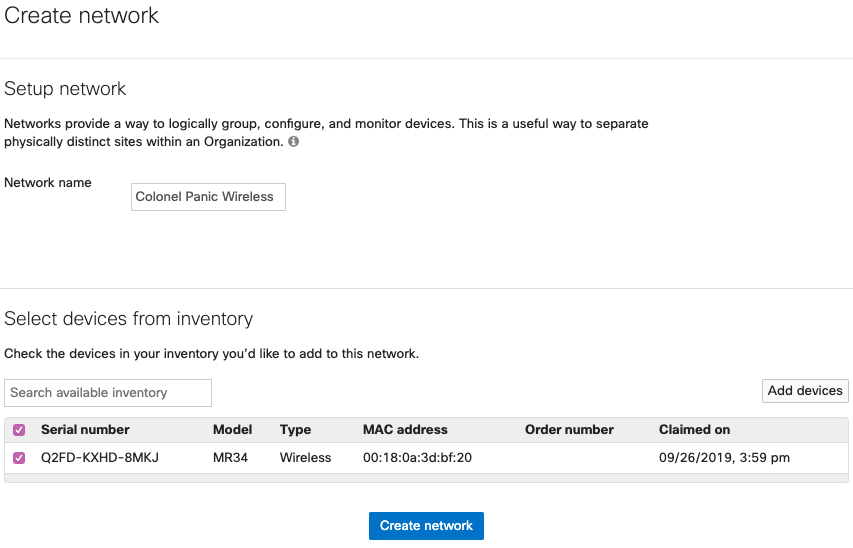
- Choose Create network.
Now you've successfully created a Meraki dashboard device or hardware network. Look in the left-side panel to access the network. This is where you'll be able to configure and manage your Cisco Meraki devices. To learn more about how to combine networks after creation, refer to the Combined Dashboard Networks article.
Creating a Systems Manager Network
To create a Systems Manager network for endpoint management, follow this process:
- Log in to https://dashboard.meraki.com (or your chosen region's dashboard url) using the account created earlier.
- From the prompt window, choose Set up Systems Manager and select Next.
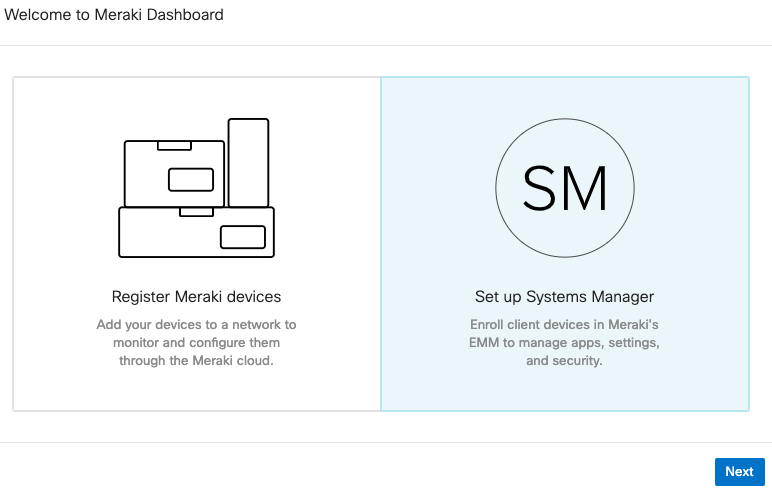
Note: If you do not see this prompt in your Meraki dashboard, navigate to Organization > Configure > Create network in the left-side pane instead.
- Give the network a name, for example, "Company Phones." If the page has a drop-down for Network type, select EMM (Systems Manager).
- Review the page, then select Create network at the bottom of the screen.
Once complete, you've successfully created a Meraki Systems Manager network. This is where you can configure profiles, payloads, applications, and many other features for endpoint management. This network type can be combined with hardware networks if desired, but is generally kept separate for ease of administration. Endpoint management is rarely tied to a single location, so having a standalone network for all managed endpoints is a common practice. For an overview of common questions and additional links to getting started, please consult our Systems Manager FAQ article.
Adding Devices and Licenses
Devices need to be added to a network to download their configuration. You'll also need to add the licenses for those devices. This can easily be done in one step using the order number associated with your devices and licenses.
- Within the Meraki dashboard, navigate to Organization > Configure > Inventory using the left-side navigation bar.
- Click the blue button "+ Claim devices" - In the box next to the blue Claim button, enter order numbers, one per line.
-
License-only orders must be claimed via Subscription & License Info
-
Enter order claim key - 12-digit order claim key sent to email
- If the order claim key is not available, click "Claim individual devices", then enter manually the Device Cloud IDs (Meraki serial numbers) or license key (one per line). We advise entering order claim key when possible. Doing so will claim all devices and licenses from the order. Otherwise, you will need to add devices and licenses manually.
-
- Choose (1) Claim Order or (2) Claim devices, depending on the selected method.
 OR
OR 
At this point, a list of devices should appear in the inventory. These devices can then be added to networks, like the one created earlier.
- Tick the checkbox next to any devices that should be added to the network.
- Select Add to above the inventory list.
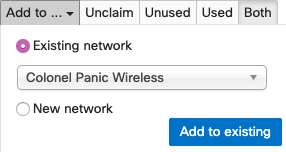
- Under Existing network, choose the network that was created earlier.
- Select Add to existing.
Note: Remember that only a single MX or Z-series device can be contained in a given network, unless a secondary MX is to be used as a warm spare. To configure two MX appliances for warm spare functionality, follow these instructions to add the first MX appliance, then refer to our documentation on the MX Warm Spare - High-Availability Pair feature for more info.
Once this step is complete, the device(s) selected will now be located in the network and are ready to be configured.
Quickly Scan and Claim Multiple Devices through the Meraki Mobile App
If you have to claim multiple devices, the quickest way is by scanning their barcode using the Meraki app.
- Log in to your Meraki iOS or Android app with your Meraki dashboard account.
- Navigate to the correct network through the left-side bar.
- Go to the Devices tab from the bottom navigation bar.
- Select the + icon on the top right of the screen and pick Scan new device barcode.
- Point your phone camera toward the hardware barcode to claim the device.
- Enter device information and then select Done. Press Add another to claim a new device.

Manually Adding Licenses
It may be necessary to add a license manually if:
- The order number associated with a license is not known
- The license was ordered separately from the devices
The license key should be sent to you from shipping@meraki.com or your authorized Meraki distributor.
- Within the Meraki dashboard, navigate to Organization > Configure > License info.
- Select the link to Add another license.
- For the Operation, choose "License more devices."
- Enter the License key in the box provided. Enter the key exactly as provided, including dashes. License keys are provided in the format Zxxx-xxxx-xxxx.
- Choose Add license.
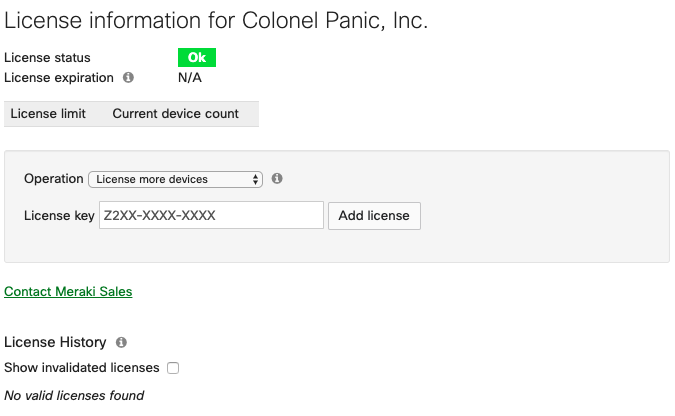
- On the following page, confirm the accuracy of the details shown; if everything looks correct, select Add license.
The license key will now be added to the organization. If you need to add more licenses, repeat the steps above. For more information, please consult our article Meraki Co-Termination Licensing Overview.
Device Setup
If you have Meraki devices in hand that are not installed, please refer to our quick-start guides for first-time setup. These will provide information about mounting and initial configuration.
- Wireless Access Points Quick Start
- MS Quick Start
- MX Quick Start
- MG Installation Guide
- Z3/4 Quick Start
- MV Quick Start
Once the device is installed and online, it is ready to communicate with the dashboard. From there, it can download available firmware updates and initial configuration.
For information about setting up Systems Manager—Meraki's endpoint management platform—please refer to our article, Systems Manager Quick-Start.
Next Steps
Congratulations! You've successfully completed these tasks:
- Created a dashboard account, organization, and network
- Added devices to the network
- Added licenses to the organization
At this point, you are ready to start configuring your devices.
As you move forward, use this section to help direct you to the right documentation. If you have additional questions, check out our documentation library.
At this point, you're ready to start configuring and setting up your devices. This section will help direct you toward the right documentation to keep moving forward - and if you have questions that aren't answered in the below articles, check out our documentation library.
Configuring a Network
To begin configuring your network, navigate to the desired configuration options in the Meraki dashboard and make your changes. Once your devices are online, they will automatically download their latest configuration within one to two minutes after saving the changes in the dashboard. For more information about the configuration options available for each type of Meraki device, refer to the respective product manuals below.
- Wireless Access Points Quick Start
- MS Quick Start
- MX Quick Start
- MG Installation Guide
- Z3/4 Quick Start
- MV Quick Start
- Systems Manager Quick Start - Meraki's endpoint management solution
- Meraki Insight Introduction - Performance monitoring of web applications and WAN links (requires an MX security appliance and additional licensing)
Using the Local Status Page
Meraki MX/MR/MS series devices have a local status page. Access this page to:
- perform limited local configuration changes
- monitor device status and utilization
- perform simple troubleshooting
This page is useful when initially deploying new devices. It allows for IP assignment on the device as well as basic status information during first-time setup. For more information, refer to the Using the Cisco Meraki Device Local Status Page article.
Adding and Managing Administrators
Now that you have an organization with a network and devices, we recommend that you add at least one other administrator. This provides redundancy in the event one administrator is locked out due to failed password attempts or is otherwise unable to access the Meraki dashboard. Details on adding additional administrators and the various permissions and roles they can have are covered in our Managing Dashboard Administrators and Permissions article.
Recommended Reading and Additional Resources
The following list of articles will help to further your knowledge regarding the Meraki dashboard and how things work. We recommend these articles so you can leverage the full functionality and features of the Meraki dashboard and your devices.
- Best Practices for Meraki Firmware: Meraki has always prided itself on delivering powerful networking and IT solutions in a simple, easy-to-manage fashion. This extends to firmware management on Meraki devices.
- Meraki Licensing FAQ: This article answers common questions regarding Meraki licensing and supplements the guidelines and limitations article linked earlier in this document.
- Cisco Meraki Dashboard API: The Meraki dashboard Application Programming Interface (API) allows software to interact directly with the Meraki cloud platform and Meraki-managed devices. The API contains a set of tools known as endpoints for building software and applications that communicate with the Meraki dashboard for use cases such as provisioning, bulk configuration changes, monitoring, and role-based access controls.
- Managing Multiple Networks with Configuration Templates: Configuration templates allow many Meraki devices to be deployed using a single base configuration. This makes it much easier to roll out new sites/users and maintain consistency across each site's configuration. It is most useful in cases where a large number of sites exist that share a common network design.